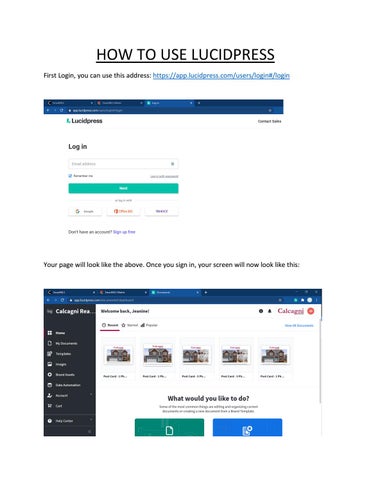
HOW TO USE LUCIDPRESS First Login, you can use this address: https://app.lucidpress.com/users/login#/login
Your page will look like the above. Once you sign in, your screen will now look like this:
If you are starting a new project, click “templates”. If you are picking up where you last left off, click “My Documents”
To start a new project, click templates. All template designs will now appear. You can either scroll until you see the one you want, or you can use the filters to locate the template you are looking for. You can narrow down your search to sold postcards, new listing postcards, business cards, specific type of social media posts, etc.
Once you find the template you’re interested in using, hover over that template. You will see two options. If you click preview, you will be able to view what the template looks like. If you click new, you will begin a new document.
Click new to begin on the new document. A popup will appear asking you to name your document, so you can save it with the agent’s name and the address for what property it’s for.
Once you click create document, your document will open in a new tab and you can begin to design it.
To begin customizing, you will most likely want to switch out the image with the house for the appropriate property. To do that you will want to select the property listing option on the lefthand navigation.
Once you click it, a popup will appear with all of our Calcagni listings. To make it easy, use the search bar to search for the street name of the listing.
Type in the address and it should automatically return in the search.
Next you will want to open the property listing and grab the image. To do this, there are two ways. You can either double click on the property or you can click once to highlight the property and then click “apply to shape�
This will now pull up the data for that property. You will want to click Images. This will then display all images entered into MLS for that property.
To replace the image on the template with the image you want to use, you will want to click on the image you want under the property photos, drag it over the image on the template, and let go of your left mouse button so it drops the image into place.
The new image will automatically replace the original image. You can switch out this image until you find the perfect one. If you change the image or any information and realize you messed up, you can remove the changes by using the undo button in the upper left-hand corner below file.
So you have uploaded the image you like! Next you will want to fill in the info below the image. You do not need to do this manually. This section is a smart field, and you can populate it in almost the same way as the image.
Click on any of the words and it will recognize that these are smart fields. As you already had a property listing up, it will most likely bring you back to your property listing search. You will want to make sure you still see the listing you are working on.
To populate the address, click on the listing once and then click “apply to shape�. This will cause all the information to automatically populate in the respective fields without you needing to type them out.
If there is anything missing, Lucidpress will give you an alert. This includes fonts.
So you will notice that there is an error in this where font is missing somewhere. ALWAYS click “find missing font�. If you do keep default, you will not locate what font is missing from your
template. In this case, I know it is missing “Sold” and stems from not having the correct font. By clicking “find font,” Lucidpress will walk you through correcting the issue, such as a missing font.
If it is missing a font, you can see if the font is located on google fonts or dafont, both are websites that offer free fonts. If you are unable to locate the font you need, click continue and then click on the space where the text should be. You will then see the right-side toolbox show all the font information. The font type will be blank.
Once you click the font type drop down, it will pull up a list of fonts. Because the missing font is from the Garamond family, selecting another font from the Garamond family would be best. If you have Adobe Garamond Pro, this would be a fine alterative to use. Once you select a font, it will appear on your document.
That will finish the front half of the postcard. Next you will want to customize the back half of the postcard. To do that, you will want to select it from the left hand option next to the navigation bar.
It will now shift your view over to the back half of the postcard. If you have a zoomed out view, you can zoom in using the zoom in and out option that should appear towards the lower right
hand corner of the screen. Between 150%-175% zoomed in is a good range to be depending on the size of your screen.
You will see that there are already several errors, so let’s look at those first. Clicking the error next to Stamp proved that font is missing. It is missing a bold font. Just in this case, it is fine to click “Keep default font”. After clicking it, click the plus sign under stamp, it will generate the missing font.
Next, we’ll look at the other error. First click the little plus button. This will insert the text in a default font.
Click the exclamation triangle. This may be telling you that you are missing the font. In this template, it’s Garamond Bold again, so I selected “Keep Default Font”. I double clicked the box, so it selected “Heading Here” and highlighted the words, clicked the drop down box and selected Adobe Garamond Pro as my font.
To select the text box you want to alter, you will need to double click that box so it brings up the typing curser. One you’re done typing, click anywhere else on the document for the box edit box to disappear and your changes to take effect.
Next, we’re going to begin to fill in the information for the office address and information for the appropriate agent. In the listed property, one of the agents is Julie Luchina from Cheshire. So, we will use her for this. First, let’s add her photo! Click on the shadow person, that will select that field. You will then want to select images on the left-hand navigation.
This will bring up images you have uploaded and a search bar with a drop down. Click the dropdown option right next to the folder. You will then want to select shared with me
You should now see a folder labeled “Agent Photos�. Double click this open it.
If will pull up a list of folders. There will be a folder for every person in the company, agents, managers, admin, and corporate. The easiest way to find the agent you are looking for is to search their name in the search option.
You will see that it will return a list of folders for that name along with photos. To open a folder, you will need to double click it. Once you see a picture you would like to use, click and drag the photo over the circle and let go of your left-hand button of your mouse to drop it into place. It’s worth noting that the image automatically resizes to fit the space.
See how the above is squished slightly? You can change how it displays by using the right-hand options. To correct the issue, it is best to select “scale to fit” for the image. In some this will fix any squish. You may need to look at the different images to find the best image to use.
Next, we will want to fill in the appropriate information for her. Let’s first correct the name of the agent. Click on the agent name, which will cause a box to appear. Next you will want to select Calcagni Users from the left-hand navigation.
It will pull up a list of everyone who works for Calcagni: agents, admin, managers, corporate. So to quickly find who you are looking for, type their name in the search bar.
To populate the information on the postcard, you can either double click on the name or click once and then click “Apply to shape�
You will then see that the name has now changed to the person you are making the postcard for.
You will be able to see all the information on the left hand. Their name, their email, phone number. The next line is their title. If an agent has any designations, you will need to add these. To add them you can populate them with a click. Since Julie is a Realtor, we will use her phone number to show how to change each of the other fields now. You will repeat these following steps for Title, Phone Number, Office Phone, Email, and for the Office Address. For the field you want to update, click on it. This will highlight the information you are editing and bring the user info on the left back to the search option.
You will then double click or click once and click “Apply to Shape”. It will then update that field to the correct information.
You will repeat that for each field you need to update. Click on the section to pull up the pop-up box, double click or single click and click “Apply to Shape” on the information on the left hand bar, and it will update the information. You do not need to type a thing. It is important to remember not to forget to change the office. That is located towards the top.
Congrats! You have now finished your postcard. To preview your postcard, click the play button in the upper right-hand corner.
Right next to it is the download button. Where you can download your postcard.
The final button is to order prints.