Teacher's Book (Colour Cover, Black & White inner) Nigeria Store
1.Teaching Notes for Primary 1
1.1 Teaching the Five Skills
1.2 Assessment Sheet for Pupil Book 1
2. Teaching Notes for Primary 2
2.1 Alternative Spellings
2.2 How to teach magic e
2.3 Letter Names
2.4 How to teach independent writing
2.5 Glossary of Terms
3. Phonics Planner 1: Daily Lesson Plans for Primary 1
3.1 42 letter sounds Daily Lessons
3.2 Teaching Timetable once Pupil Book 1 is Complete
3.3 Tricky Words Lessons
3.4 Songs
3.5 Games
3.6 Sound Songs 3.7 Consonant Blends
3.8 Decodable Phrases
4. Phonics Planner 2: Daily Lesson Plans for Primary 2
4.1 Daily Lessons
4.2 Primary 2 Teaching Timetables
4.3 List of the 72 tricky words
4.4 Vowel Song
4.5 Decodable Stories
4.6 Word Booklet with ‘Safe Words’
4.7 End of Pupil Books 1 and 2 Assessment Page 70 Page 71-88 Page 89 Page 91 Page 92 Page 93 Page 95 Page 102
Teaching Notes for Primary 1
Introduction:
The Jolly Phonics Teacher Guide has been designed to help learners break through to English Literacy, on the path to becoming skilled readers and independent writers. This resource will help you develop your learners’ phonemic awareness by teaching them to recognise, pronounce and form the letter sounds of English. Your learners will then use that knowledge to develop the skills of decoding (blending letter sounds together to read) and encoding (hearing individual letter sounds within words to write them). In addition to this, learners are taught strategies for learning how to read and write tricky words.
Jolly Phonics
Jolly Phonics was developed by Early Childhood Education teachers in the UK. It is a multisensory programme based on teaching 42 letter sounds of the English language in a systematic order. Learners apply this knowledge of letter sounds to reading and writing at a fast pace. Jolly Phonics has identified the following five key skills in learning to read and write in English.
5 Key Skills:
1 Learning the Letter Sounds
2. Learning Letter Formations
3. Blending 4. Identifying Sounds in Words 5. Tricky Words
Although five key skills have been identified, this programme focuses on simultaneously developing the first four skills from the beginning, with the fifth skill of learning tricky words, taught later in the year. These first four skills are developed in every lesson where a new letter sound is being introduced and they are taught using the following eight steps.
8 Steps:
1 Sound Revision 2. Story
3. Action 4. Song
Skill 1: Learning the Letter Sounds:
Letter Formation
Blending
Sounding
Dictation
Learners are taught how to pronounce the sounds of English through games, stories, songs and other activities in the first four steps of a lesson. Initially, only the most frequently used spelling choice for each sound is taught.
Sound Revision (Step1)
Each lesson should start with revising previously taught letter sounds with your learners. This should focus on the sounds that your learners need to practise the most, as identified through continuous assessment. It is good practice to use a variety of activities when revising previously taught sounds. Teachers should make use of flashcards, songs and additional games and activities to ensure learners respond automatically with the correct pronunciation of the sounds of English.
Story (Step2)
The main purpose of the story is to introduce the letter sound of the day and its accompanying action. Each lesson contains a suggested story that has been written for the Nigerian context. It is important that you engage your learners and make the story memorable. The sound stories are deliberately brief so that you can familiarise yourself with the story and ‘tell it to your class’ rather than ‘read it to you class.’ Key words that contain the sound of the day have been made bold to help you remember to emphasise the sound with your learners.
The sound story should;
• Highlight the sound of the day and its accompanying action
• Be told in English. You may utilise local languages to ensure learners’ comprehension
• Be animated when telling the story, making use of gesture and intonation
• Use real-life objects or pictures that relate to the sound story
• Involve your class as you tell the story. Learners could roleplay part of the story to help others visualise it
• Ask your learners engagement questions (whilst telling the story) that help them to engage with and relate to the story. E.g., Whatdoyouthinkismakingthatnoise? Haveyoueverbeencoveredinants?
Action (Step3)
In addition to each story leading learners to the sound of the day, learners should be taught the accompanying action for the sound. The action is a physical reminder of a key part of the story and helps learners recall the story and, therefore, the sound. This multisensory approach is especially helpful for those learners who learn best through physical movement.
Songs (Step4)
The Jolly Songs are another component of Jolly Phonics’ multisensory approach in teaching the sounds of the English language. These songs can be taught within the lesson and recounted throughout the school day as time allows. The Jolly Songs (referred to often as the 'sound songs’ or ‘songs’) are designed to help learners remember the story, whilst reinforcing the action and the sound that they relate to.
Skill 2: Learning Letter Formations
The second skill of Jolly Phonics focuses on developing your learners’ understanding of the relationship between written and spoken language by teaching learners how to write the most common spelling choice for sounds.
Pencil Grip:
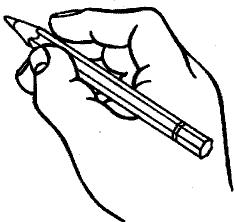
Learners should use the correct pencil hold as this helps them to write more fluently. The recommended pencil hold is the tripod grip, which uses the thumb and first two fingers. This is taught as the ‘froggy legs’ grip in Jolly Phonics.
Letter Formation (Step5)
Once your learners have been taught the sound and flashcard with the letter sound written on it, the next step is to learn how to write the sound.
Correct letter formation is important as it leads to good handwriting. For learners to progress to cursive handwriting, it is imperative that they have already learnt how to form letters correctly, including knowledge of where to start and finish each letter. This ensures a smooth transition from print to precursive and then onto cursive handwriting.
Talking through the letter formation:
Continuing the multisensory approach to learning, it is important to also talk through the letter formation for those learners that learn best through seeing and hearing.
When talking through the letter formation with learners, you should…
• Begin by modelling how the letter for the sound is formed by writing it on the board
• Use handwriting lines on the board to help show size and position of the letter
• Ask your learners to identify the size of the letter sound, referring to the three letter sizes (tall, small or fall) e.g., “Is it tall like a giraffe?” (ascenders)“Is it small like a tortoise? Or does it fall below the line, like a monkey’s tail?” (descenders)
• Emphasise the letter’s starting point to your learners (e.g., Near the top line or on the middle-dotted line)
• It can also be helpful to refer to formation families where relevant (see image below) These are letters grouped by similar handwriting patterns
Skill 3: Blending
Blending is the skill of running sounds together to decode words. Blending leads to reading: for example, the sounds /s/, /a/ and /t/ are put together to help the learner read the word ‘sat.’
Blending (Step6)
A good starting point is auditory blending or pre-reading. This builds a learners’ phonological awareness as they develop their understanding of how sounds work and improve their ability to hear and manipulate them. Auditory blending is a fundamental activity where you call out the sounds within a word, and your learners respond by blending the sounds together to form the word (e.g., You say: “s– u – n”, Learners respond: “sun”). This skill is vital to develop in your learners. If it is not explicitly taught, most learners will not be able to progress and break through into reading.
Learners should then progress onto identifying the sounds that they see written, which is also known as print blending. It is recommended that, initially, the teacher should identify the sounds with their learners by putting a ‘sound button’ underneath each sound. For digraphs one dot should be placed between the two letters. Even though there are two letters, they only make one sound.
You should encourage your learners to make each sound as they point to the sound dots. To help learners blend the sounds in the correct order, you can encourage your learners to say the initial sound ‘loud and proud,’ and the following sounds ‘quickly and quietly.’
The Blending Song
This is an effective way to help learners blend regular words that contain three sounds. The initial sounds are blended first, then the final sound is added to complete the word.
Safe words are regular phonetic words that only contain sounds that learners have already been taught. It is vital that learners are not set-up for failure by being expected to read or write words that contain sounds that they have not yet learnt. When introducing a new sound to learners, you should ensure that you only ask learners to practise reading and writing it alongside sounds that you have already taught your class. Safe words are a vital part of every lesson. Lists of safe words are found within each Lesson Overview and in the Pupil Book. Appendix 8 (‘SafeWords’WordBank)lists safe words for the 42 sounds in one reference point.
Consonant Blends
As learners gain more confidence in blending, and when they can consistently succeed at reading safe words, consonant blends can be introduced to increase reading fluency. A consonant blend is when two or more consonant sounds are found together in a word (with no intervening vowel).
Consonant blends are not digraphs. A digraph is the name for two letters that make one sound. The consonant blend, on the other hand, still represents two (or more) sounds, only they are snapped together for faster reading. Each individual sound in the blend can still be heard. Ensure that your learners understand this by calling out a consonant blend and asking your learners to hold up a finger for each sound they can hear. Once this is understood, they can then move on to identifying consonant blends in safe words
Consonant blends can occur at the beginning, middle and at the end of words, and it is possible for a word to have more than one consonant blend (e.g. the word stand has an initial consonant blend st- and a final consonant blend -nd). A consonant blend should only be taught once the individual sounds in the blend have been taught and mastered. Jolly Phonics focuses on teaching initial and final blends. Consonant blends can be found at the back of this guide.
Skill 4: Identifying Sounds in Words
Hearing the sounds in words (or phonemic awareness) is one of the main skills needed for writing. When children can hear each sound in a simple word and if they know how to write the letters for those sounds, they can write hundreds of safe words by themselves.
Sounding (Step7)
Sounding (also known as segmenting) is the skill of hearing the individual sounds in words. It is the reverse of blending, as leaners are dividing safe words up into their composite sounds. 'Sounding leads to spelling and writing: for example, hearing that the word ‘hen’ can be broken into the sounds /h/, /e/ and /n/ helps a learner spell the word. If coupled with the knowledge of how to form those letter sounds, learners can then write the word ‘hen’ independently.
A good starting point is auditory sounding or pre-writing. Auditory sounding is a valuable activity which can be split into the following stages:
1. Learners identify if a specific sound is found in the word. Canyouheartoday’ssoundintheword‘sun’?Thumbsupfor‘yes.’Thumbsdownfor ‘no.’
2. Learners hold up a finger for each sound they can hear within a word. Onyourfingers,countthesoundsintheword‘dig’?
3. Learners identify where, in the given word, a specific sound is heard. Wheredoesthesound/p/appearintheword‘up’?Isitatthebeginningorend?
4. Learners segment a given word into its composite sounds. Whatsoundscanyouhearintheword‘dog’?Yourlearnersshouldrespond:“d–o–g.”(Yourlearnersmay havedifficultyhearingandidentifyingthesoundsinthe middleofwords.)
From /n/ onwards, each lesson in the Pupil Book contains four suggested sounding pictures for your learners to practise sounding. If Pupil Books are not available, you can copy these simple pictures onto the board prior to the start of the lesson. After helping your learners identify the safe word from each picture you should ask your learners: “Can you hear today’s sound in the word?” Thumbs up if they can, thumbs down if they can’t. If it is there, ask your learners if they hear the sound at the beginning, middle or end of the word?” You should also encourage your learners to sound out the word (holding up a finger for each sound). The learners should then be encouraged to practise sounding out those safe words into their books.
Dictation (Step8)
Dictation is the best way to develop writing. During this valuable part of the programme you are also able to assess how your learners are progressing in their knowledge of the sounds taught, and the skill of sounding out words. Call out sounds and safe words for learners to write independently. You should put each sound into the context of a word and define each safe word by putting it into the context of a sentence. Donotsoundoutthewordsforyour learners,asdictationismeanttoassessyourlearners’abilitytosoundwordsoutontheirown.
Skill 5: Tricky Words
Tricky words are words that are either irregular in their spelling (such as to, your, and one) or they are frequently used words that can only be read with phonic knowledge that has not been taught yet (such as like, madeor my). Tricky words can be found at the back of this guide.
A good starting point to teaching tricky words is getting your learners to identify which part, or parts, of the tricky word is irregular and therefore trying to trick them. For example, if learners identify that the ‹a› in the word was makes an /o/ sound, they are more likely to remember the correct spelling.
These tricky words need plenty of practice, so that learners are able to remember the tricky parts. The main technique for helping learners to remember these spellings are listed below.
The Tricky Word Spelling Routine
This is the principal method for teaching the spelling of tricky words in Pupil Book 1. Look: learners look at the word
Say: learners can say the word
Copy: Encourage learners to trace the tricky word in the air and copy the tricky word in their Pupil Book or exercise book.
Cover, Write: After they have practised the formation, they cover up the word and write it again by themselves.
Check: Finally, they uncover the word and check if they got it correct.
Word wall
As you teach each tricky word, you should display it within your classroom. Posters are a great reference point for revising how to read and write the tricky words.
Say it as it sounds
Some learners may also find it helpful to say tricky words as they sound. This can help learners remember the awkward spelling e.g. pronouncing the silent ‹k› in the word know.
Assessment
Continuous Assessment (also known as Assessment for Learning) provides day-to-day feedback on how your learners are acquiring knowledge and skills. It is good to check whether your learners are able to read and write the letter sounds that you have taught them. Where possible, you should update your continuous assessment after teaching each group of letter sounds to help you identify learners who require early intervention. The assessment sheet is shown on the next page:
Teaching Notes for Primary 2
Alternative Spellings
Once children have learnt the 42 letter sounds they need to be aware of the alternative ways in which some of the vowels can be written. The list below details the alternative vowel spellings, most of which are taught in Pupil Book 2 as part of this programme.
List of Alternative Vowel Spellings
Long /a/: ai a-e
Long /e/: ee ea
Long /i/:
Long /o/: oa
rain, waist, drain date, plate, flame day, stay, play