
4 minute read
EPIC Care Link User Guide

Navigating in Care Link
When you log in to Care Link, several sets of navigation tools appear at the top of the page.
Advertisement
A) Navigation Tabs: Use these tabs to open different activities in Care Link. Each tab contains one or more related activities. For example, the Patient tab contains patient-specific activities. When you click a tab, the default activity for that tab opens.
B) Activity Menu: Use this menu to open the various activities that are contained in the selected navigation tab. For example, the Patient tab activity menu contains the Allergies and Chart Review activities.
• If there are more activities than can fit on the screen, hover over the ellipsis on the far right of the menu to see all the activities contained in the tab.
• You can also click to pin an activity so it appears first in the menu. If you pin multiple activities, they appear in the order that you pinned them. Click and drag pinned activities in the menu to change their order.
C) Action Options: Use these buttons, located on the top right of the screen, to see all of your available activities or to log out.
Select your patient's chart from a list of current patients
1. Click Patient and go to the My Patients tab.
• If you have access to many patients, your patients might appear on more than one page. Use the field at the top of the page to search for patients by their name.
2. Click a patient's name to open his chart.
3. To view a list of currently admitted patients, select the Patient List navigation tab and select the tab for admitted patients. For patients to appear on this list, you must have a provider relationship of PCP, attending, admitting, or treatment team on the admission.

4. Select a patient's name to view additional patient-specific information in the report pane.

5. If you view a report frequently, click to add a button for the report to the toolbar. From that page, you can also remove your report toolbar buttons, rearrange the order of buttons, and rename the reports.
6. Click to open a patient's chart.
Reviewing the Patient’s Chart
1. Open the patient’s chart and click Chart Review
To see only the patients for whom you are the PCP, select your name in the Filter by provider field.
2. Select a tab. For example, to view information about the patient’s radiology visits, select the Imaging tab.
3. To view more detail, such as a specific patient visit, click the date link that appears in the row. The Report Viewer page opens.
To view details on several rows at once, click the check boxes in those rows and then click Start Review.
Search for a patient's record based on name or MRN
If you know specific information about a patient, such as their name, you can use the Patient Search activity to enter that information and then select the appropriate patient from the list of possible matches.


1. Click Patient and enter the patient's name or MRN.
2. In the Search Results window, click the name of the patient whose chart you want to open.
Remove a patient from the Patient List:
1. Click on the x on the right hand side
What if I can't find a patient?
If you don't find a patient using the methods above, you might not have been granted access to her chart yet, or she might not have a record in the system. Use the Search All Patients section of the Patient Search activity when you need to gain immediate access to a patient's chart for the first time, such as in the case of an emergency. Note that you must enter the patient's first and last name when using this method.
1. If your initial search returns no results, click Search All Patients from the Search Results window.
2. Complete all of the required fields, Name, DOB, Sex and either last 4 SSN or Jefferson MRN then click Search.
3. Select the patient record you want to open and select the reason you need access to the patient's chart in the Reason for access field. Click Accept
Managing Your Clinic
The Manage My Clinic activity is a central location from which you can change users’ passwords and request new users to be created in the system.
Change a user’s password
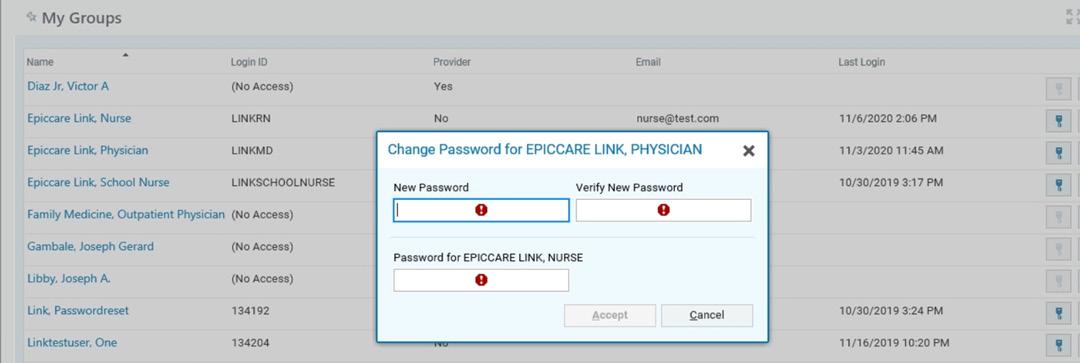
1. Select the Admin tab and select the My Groups tab.
2. On the My Groups tab, select the user whose password you need to change and click Change Password.
3. In the New password and Verify New Password fields, enter the new password for the user.
4. Enter your password.
5. Click Accept. The next time the user signs in using this password, she will be prompted to select a new password of her choice.
Deactivate a User
If a user should no longer have access to Care Link, you should deactivate her user record.
1. Select the Admin tab and select My Groups.
2. On the My Groups tab, select to deactivate the user.
3. Enter a comment indicating why you're deactivating the user and click Deactivate.

Verify User Records
You might receive a Site Verification message from Jefferson asking you to verify that all users working at your site are current and active. From the message, you can click Verify Now and you are brought to the Site Verification tab in Manage My Clinic. From the Site Verification tab, you can verify that all the users working at your site are current and you can deactivate user records to prevent unauthorized access by users whose accounts are outdated.

1. On the Site Verification tab, select No for all the users whose accounts you want to deactivate. You can enter a comment in the Comments field that appears.
2. Select the Acknowledgement check box to acknowledge that you have reviewed and confirmed the list of users.
3. Click Acknowledge & Verify to verify the list of users and close the screen.
Request a new user in EpicCare Link
1. Select the Admin tab and click My Groups.
2. Select the Account Requests tab and click Request New Account.
3. Choose the type of account you want to create. For example, to create an account for a new physician at your site, click Request access for a new provider.

4. Enter the user's demographic information.
5. In the User group field, select the user group to which the user should belong.

6. Enter a comment about your request, if necessary, and click Submit Request.
7. After your request has been processed, the new user will receive a login instructions letter.
You can check the status of user requests that have been submitted by viewing the Status column on the Requests tab.
Reset Users’ Two-Factor Authentication
Site administrators can reset users' two-factor authentication settings. For example, if a link user gets a new phone but lost their reset code, the site administrator can reset the provider's two-factor authentication.

