10 minute read
Tech Reviews


by Todd Sheridan Perry
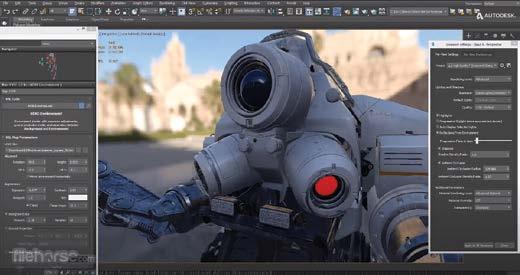
Maya 2023
Maya 2023 was released with a cavalcade of both major and minor features, but the biggest emphasis is in the modeling realm. I feel the most exciting feature is a change in the Boolean (data type with only two possible values, true or false) workflow. I’ve always been both a fan and enemy of Booleans. I love them for how quickly they can help you model complex objects, but I hate them for creating messy geometry, crashing the software — and, most egregiously, not being very procedural. Maya’s 2023 Boolean tool has expanded the toolset to overcome these issues. Now the Boolean is listed as a dynamic stack of operands. You can choose the base, and then begin adding operands —each one of which can have its own math: union, difference, intersection, Slice, hole punch, cut out and split edge (the expansion of math choices alone is substantial from earlier versions). If you want to add more objects to the Boolean you can just drag form the viewport into the stack in the attribute editor. Further, you can access those operands and modify the transforms, thus dynamically changing the results. What’s even cooler is that the materials from the different objects can be transferred to the Boolean surfaces.
Maya also gets some updated retopology math — inherited from its sibling, 3ds Max — which has been using these algorithms for a couple versions.
The new methods are faster and more accurate, benefitting from a preprocessing of the model to check for and fix problems before the retopologizing. The process becomes an attribute that can be adjusted to taste to get better results. It would benefit from a way to retain UVs and maybe some live curves to guide edge flow. But this is definitely a dramatic setup forward in Maya’s toolset and allows you to get good results without having to jump to another program to optimize a model.
Grease Pencil has been updated to the Blue Pencil Tool — and that’s not in name only. The base functionality is the same: the ability to draw directly onto the Maya viewport as notes and annotations for feedback to the animator. Blue Pencil increases the functionality dramatically, as indicated by the new toolbar of tools. Along with the pressure-sensitive pen features, you have onion skinning to see the annotations before and after. There’s also Photoshop-type layering. Once you make drawings you can select and modify the drawing — even over time. A type tool has also been added for clear text notes. The notations are embedded into the Maya file, so you don’t lose the context of the notes. There are plenty of more updates, but these are the standouts. I’d definitely push for moving into 2023 if a good deal of your workflow is modeling in Maya.
Website: autodesk.com/products/maya Price: $1,785 (per year); $225 (per month)
3ds Max 2023
Along with Maya 2023, Autodesk has released the 2023 version of 3ds Max with some features that have evolved alongside Maya, and others unique to Max that were introduced in the previous edition, but have been refined for this latest release. In earlier versions of Retopology Tools, a number of steps were involved before you actually got to the retopologizing part. In this version, those steps have been automated to not only speed up the process by removing manual steps, but also by handing a clean model to the retopology algorithm. Also, if there are problems with the mesh, the errors are much more thorough to point you to the process that failed. These optimizations, in turn, benefit Maya as they migrate from one piece of software to the other. The difference is that in Max, there is data propagation during the process, meaning that data like UVs and Normals will be transferred from the original mesh to the retopologized mesh. And there is a display mode that allows you to compare the before and after. In the modeling area of 3ds Max, there have been improvements in modifying your Working Pivot — you’ll notice that this is a focus over at Foundry in Nuke as well. Through Snap Working Pivot tools, you get a bunch of different tools to place, align and snap your pivot to your active object. One specific tool that excites me helps create a grid from a working pivot. In the olden days, creating a working grid was a pain. You frequently want to create new objects on a different axis than your world coordinates. Creating a new grid based on the face of an object that you can then make a new piece on that new axis is extremely helpful. The above pivot tools work great for the Smart Extrude tool, which originally showed up in 2022.2, but is now part of the Edit Poly modifier. The Smart Extrude will automagically merge vertices and edges, or subtract geometry when the extrude is inward. It even works if an extrude pushes through the opposite side of the object and creates a hole complete with inner faces.
In alignment with developing Max and Maya to work together, Max’s Physical Material can be set to Standard Surface Compliant, which means that the material will migrate to Maya’s shaders. In conjunction, FBX files will recognize both and convert appropriately. When active, parameters named Thin Film and Sheen will be active, and any renderer that supports the Physical Material won’t have a problem. These are all important features that definitely optimize workflows.
Website: autodesk.com/products/3ds-max Price: $1,785 (per year); $225 (per month)
continued on page 142
Nuke 13.2
Normally, I would wait until a full release for a product review. However, there are some really cool features in this point release since last year, that I felt I should mention them. The first feature that caught my eye was actually implemented in 13.1, and as of 13.2 it’s still in Beta.
This is the UnrealReader node. which provides a live connection between Unreal Engine, specifically its Movie Render. So, what does this do? Once an Unreal scene is set up, the Nuke compositor can access different output channels for compositing from UE to begin finessing the image with compositing tools. This includes Matte IDs that can be selected by eyedropper picks or by wildcard selections, in the same way that you use Cryptomattes. On top of this control of the image, the compositor can parse the camera from the UE file, which is invaluable for incorporating projection maps or for DMPs. Or, a new camera can be created to override the UE camera in case the comper needs another view of the scene, or needs to alter the camera qualities like depth of field or field of view. All of the compositing changes can then be rendered to a file sequence using the UE renderer as the foundation, but then going through the comp script for final output. The CopyCat node was a pretty significant feature in 13, and Foundry didn’t stop developing it. This node is a Machine Learning-based tool for doing repeatable and traditionally time-consuming tasks like roto and paint. Improvements under the hood result in up to 30% speed improvements along with support for multiple GPUs. The limitation on the number of training images has been removed (but, keep in mind that the more images you use, the longer the training may take) and the ML training can be launched without a Nuke interface. Foundry also dug into the 3D UX of Nuke, providing much more control to manipulate 3D objects in space. The most significant (even if it sounds mundane) is more intuitive controls (and more control) over the pivot points of 3D objects. Before, it was extremely aggravating to try and position 3D objects. Handles for snapping pivot points to vertices, and then aligning them makes things much more familiar — like you are used to in your 3D programs. Speed benefits are additionally gained by a new rendering methodology called “top-down rendering”, which means that Nuke goes down through the script and renders whole frames at each stage. Before, it would render the image a scanline at a time. The method optimizes caching and thread synchronization during renders. But, the results may vary depending on the script and what nodes may benefit from it, so Nuke still defaults to the scanline mode and you choose to use top-down. The features may not be as sexy this time around, but if you are inside of an Unreal Engine workflow or if you have begun to use the CopyCat node more, the benefits in the new build are definitely worth checking out.
Website: foundry.com/products/nuke-family Price: Various
Unreal Engine 5
Finally, after a two-year period since the Early Release, Epic has released the stable version of Unreal Engine 5 into the wild, with all the mind-boggling goodness of the Early Release, and to top it off releasing not only a ton of learning material, but a full game that people can dig into and deconstruct, as well as a City Sample with assets that were used in The Matrix Awakens — the real-time companion piece to the latest Matrix film.
If Unreal Engine was sold at a price, I would say go ahead and buy it, just for these assets alone. But A)
Unreal Engine is free and B) there is no B!
The list of features in Unreal Engine 5 is exhaustive and exhausting, the depth and breadth of which can’t fit into this review. So, let’s focus on the things I like!
Nanites are a big deal. Normally in real-time worlds, geometry has to be optimized and structured into LODs (Level of Detail) so that the engine can process everything quickly. Nanite Virtualized Geometry allows for highly detailed models to be placed into the environment. UE5 streams the pertinent geometry data and textures based on what the camera is looking at. That allows you to push the complexity and creativity of your assets without baking out maps or dramatically optimizing the models. That said, if I start to see really messy assets just because UE5 can handle it, I’m not going to be happy. Lumen is part of the new lighting and rendering system. It’s fully dynamic, so lighting no longer has to be static and no longer has to be baked. Global Illumination and reflections are fully hardware accelerated. Indirect lighting and specular reflection contribute more to the realism. The difference between UE5 and UE4 is night and day (no pun…) Animation control! In earlier versions of UE, the character animation tools were not nearly robust for production work, even though many productions still made it work. The general workflow was to animation in Maya or Houdini or something and then port the data over to UE either through FBX files or through a plugin like Maya Link, which would tether Maya and UE so you could animate in one and see the results in the other. Still, that was not ideal. In UE5 there are gobs of animation controls, posing tools, retargeting tools, space switchers (to dynamically parent controls to other things). Now, it is more intuitive to animate within UE. Then there are the modeling tools. Similar to the animation workflow, modeling is relegated to third party 3D tools, and that won’t change. But Epic has now put in a pretty comprehensive toolset for modeling within UE. For really complex stuff, I’ll go to my go-tos. But if I need to make some simpler geo or modify imported geo, I don’t have to be bothered going outside of my workspace to do it. Again, the feature set for Unreal Engine 5 is immense, but don’t take my word for it. Download it. Because. Free! (Unless you start developing games that people pay you for — then you just share the wealth, because that’s what you should do.
Website: Unreal.com Price: Free
Todd Sheridan Perry is an award-winning VFX supervisor and digital artist whose credits include Black Panther, Avengers: Age of Ultron, The Christmas Chronicles and Three Busy Debras. You can reach him at todd@teaspoonvfx.com.


