13 minute read
My Image Garden Guide(AirPrint

by ij canon

What Is My Image Garden?
My Image Garden Features
Advertisement
To Utilize Images Imported to the Computer
Selecting Images, PDF Files, and Videos
Starting My Image Garden
My Image Garden Features
My Image Garden is an application for utilizing photos taken with digital cameras and other images saved on your computer.
Features at Glance
Getting Layout Suggestions from My Image Garden Automatically Organize Photos Print Photos and Documents Print Personalized Items Print Disc Labels (CD/DVD/BD) Capture and Print Still Images from Videos Scan Photos and Documents Correct/Enhance Photos
Note
• File formats available in My Image Garden vary by function. For details, see File Formats. • If you are using OS X Mountain Lion v10.8.5, change Mac OS settings as needed beforehand to utilize images imported from a digital camera, picture CD, and other media quickly in My Image
Garden. For details, see To Utilize Images Imported to the Computer.
Getting Layout Suggestions from My Image Garden
My Image Garden employs a technology called "Image Assorting Technology" that provides the following functions.
• An image analysis function to group images by person by detecting faces in photos, and to register images and videos to a calendar automatically based on the shooting date and time. • An item recommendation function that automatically recommends layouts for analyzed images.
This technology makes it easy to create and print various items such as collages and cards. Utilizing the Item Recommendation Function
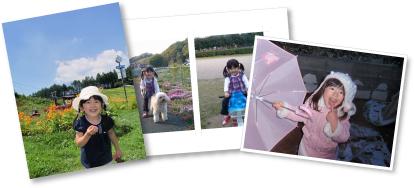
Automatically Organize Photos
Images analyzed in My Image Garden appear in the Unregistered People view or grouped by person in the People view. They also appear in the Calendar view based on the shooting date and time. Register
people's profiles or event information to organize a large number of images or to search quickly for the images you want.
Registering People Registering Events

Print Photos and Documents
Preview your favorite photos easily before you print. Documents saved as PDF files can also be printed.
Printing Photos and Documents

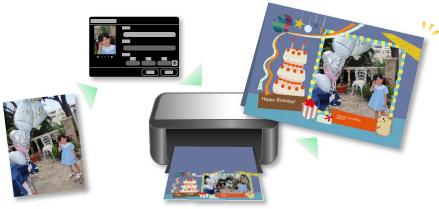
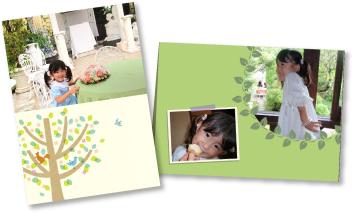
Print Personalized Items
Combine your favorite photos with preset templates to create and print personalized items such as collages and cards.
Creating and Printing Items

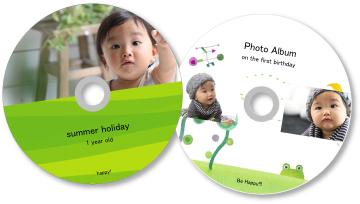
Print Disc Labels (CD/DVD/BD)
Create and print personalized disc labels (CD/DVD/BD) from your favorite photos.
Printing Disc Labels (CD/DVD/BD)
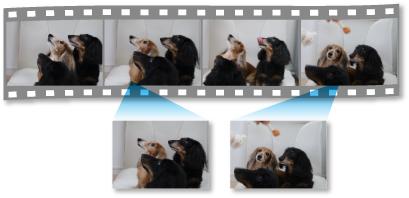
Capture and Print Still Images from Videos
Select your favorite scenes from videos and print them as still images.
Capturing and Printing Still Images from Videos
Scan Photos and Documents
Scan photos and documents easily.
Scanning Photos and Documents

Correct/Enhance Photos
Correct red eye or adjust the brightness and contrast of images.
Correcting/Enhancing Photos

Note
• In My Image Garden, there are many methods for selecting images, PDF files, and videos. For details, see Selecting Images, PDF Files, and Videos.
Printing
Printing Photos and Documents
Printing Disc Labels (CD/DVD/BD)
Creating and Printing Items
Printing Photos in a Variety of Layouts
Printing Photos and Documents
Print your favorite photos easily.
Documents (PDF files) created in My Image Garden can also be printed.
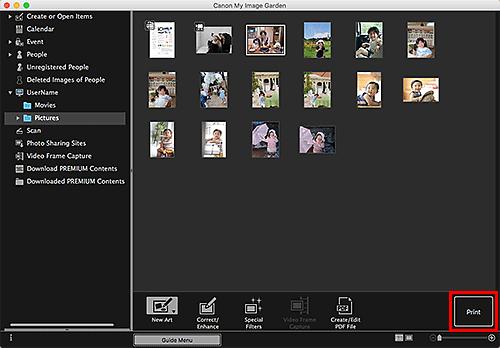
1. Make sure printer is turned on.
2. Start My Image Garden.
3. From Guide Menu screen, click Photo Print.

4. Select image(s) or PDF file(s) you want to print.
5. Click Print.
The print dialog appears.
Note
• An example of printing from the folder view.
6. Set number of copies to print as needed.

Note
• For details on the print dialog, see Print Dialog (Photos and Documents).
7. Load paper.
8. Click Print.
The Print dialog appears.
Note
• For details on the Print dialog, see Help of Mac OS.
10. Click Print.
Important
• If you print a large number of high resolution images at one time, printing may pause halfway through. • If you print in a bordered layout, the margins on the left and right or the top and bottom may become wider than the other.
Note
• Images can be corrected or enhanced before printing as needed. Correcting/Enhancing Photos Enhancing Photos Using Special Filters • Colors may fade with time if the printed paper is left for a long period of time.
After printing, dry the paper sufficiently, and then store or display indoors at room temperature and normal humidity, avoiding high temperatures, high humidity, and direct sunlight.
To avoid direct exposure to air, we recommend that you store the paper in an album, plastic folder, photo frame, or other container.
Printing Disc Labels (CD/DVD/BD)
Create and print personalized disc labels (CD/DVD/BD) from your favorite photos.
Note
• This function is available on supported models only. For details on the supported models, see Printers that Require Registration with AirPrint.
If your printer is not listed, see Printing Disc Labels (CD/DVD/BD).
Important
• Do not set the disc tray until a message prompting you to load a printable disc appears. Loading a printable disc while the printer is in operation may damage the printer. • To set or remove the disc tray, click Home to return to the top page of the Online Manual for your model and search for "Placing a Printable Disc."
1. Start My Image Garden.
2. From Guide Menu screen, click Disc Label.

The Set Design and Paper dialog appears.

The disc label (CD/DVD/BD) appears in the Item edit screen.
Note
• The layout may not be as expected depending on the photo information or analysis results of the selected images.
4. From Add Image, select image(s) you want to use for disc label (CD/DVD/BD).
The image(s) appear in the Materials area.
When you move an image to a layout frame, a cross icon appears on the image.

6. Edit item according to preference.

Note
• The print area can be set in the Advanced Settings dialog displayed by clicking Advanced... at
the bottom of the screen. If Advanced... is not displayed, click (Right Scroll).
• In cases such as when Identifying people appears at Unregistered People in Global Menu on the left side of the screen, the result may not be as expected since automatic placement does not apply to images for which analysis has not been completed. • To swap automatically placed images, see Inserting Images.
7. Click Print at bottom right of screen.
The Print dialog appears.
Important
• If the Print Settings dialog appears, select Print/scan using AirPrint checkbox in Preferences dialog.
8. Specify number of copies to print, printer to use, and other settings.
9. Click Show Details, and then make sure 120 x 120 mm is displayed in Paper Size.
If not displayed, proceed to Step 8 in Printing Disc Labels (CD/DVD/BD).
10. Select Media & Quality from print options pop-up menu, and then select Auto Select or
CD-DVD Tray in Feed from.
11. Click Print.
When a message appears, set the disc tray.
Note
• To print disc labels with the same settings from the next time, save the settings specified in the
Print dialog to Presets. For the save procedure, see Help of Mac OS. • If the print result's color tone is faint, select Media & Quality in the Print dialog, and then select
Best in Quality.
Related Topic
Item Edit Screen
Creating and Printing Items
You can easily create personalized items using your favorite photos and print them.
Select an image or images in the Calendar view, Event view, People view, Unregistered People view, or folder view, then click New Art at the bottom of the screen to select the item you want to create.
Note
• You can also insert images by selecting the type and design of your item from the Create or Open
Items view.
You can create and print items such as the following.
Printing Photos in a Variety of Layouts
You can print your favorite photos with dates or in a variety of layouts.
Printing Collages
You can create collages using your favorite photos and print them.
Printing Cards
You can create cards for anniversaries and annual events using your favorite photos and print them.
Printing Calendars
You can create personalized calendars using your memorable photos and print them.

Printing Stickers
You can create personalized stickers by printing your favorite photos on sticker sheets.

Printing in a Cinematic Layout
You can print your favorite photos in a layout that resembles a film or theater.

Printing Photos in a Variety of Layouts
You can print your favorite photos with dates or in a variety of layouts.
1. Start My Image Garden.
2. Click Photo Layout from the Guide Menu screen.

The Set Design and Paper dialog appears.

The selected design appears in the Item edit screen.
Note
• The layout may not be as expected depending on the photo information or analysis results of the selected images.
4. Select the image(s) you want to print from Add Image.
The image(s) appear in the Materials area.
5. Drag image in Materials area, and then drop it to layout frame of item.
When you move an image to a layout frame, a cross icon appears on the image.
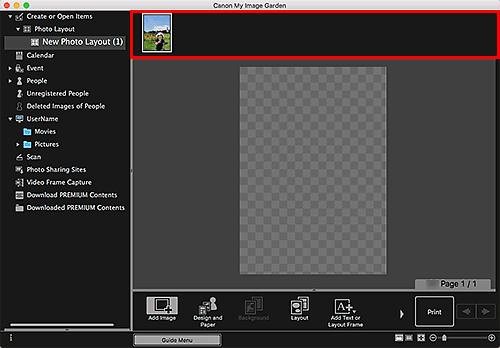
6. Edit item according to preference.

Note
• In cases such as when Identifying people appears at Unregistered People in Global Menu on the left side of the screen, the result may not be as expected since automatic placement does not apply to images for which analysis has not been completed. • To swap automatically placed images, see Inserting Images.
7. Add the date according to your preference.
Select the image to which you want to add the date to display the image editing tool. Click Add date to place a checkmark; the date is added to the image.
Note
• In the Advanced Settings dialog displayed by clicking Advanced... at the bottom of the screen, you can make advanced settings to the text of the date to be printed or set to print dates on all images. When using an ID photo design, you can also add the same image to all frames within the page or apply the angle and size set to an image to all copies of the same image within the
page. If Advanced... is not displayed, click (Right Scroll).
8. Click Print at bottom right of screen.
The Print dialog appears.
9. Specify printer and paper to use, number of copies to print, and other settings.
Note
• For details on the Print dialog, see Help of Mac OS.
10. Click Print.
Related Topic
Item Edit Screen
Using Various Functions
Scanning Photos and Documents
Scanning Photos
Scanning Documents
Editing Items
Setting the Design and Main People
Inserting Images
Correcting/Enhancing Photos
Cropping Photos
Creating/Editing PDF Files
Extracting Text from Images (OCR Function)
Scanning Photos and Documents
Use My Image Garden to scan photos, documents, and other items easily.
Scanning Photos Scanning Documents Scanning with Favorite Settings Cropping Scanned Images
Important
• To scan, you need to install IJ Scan Utility Lite.
Note
• Use the Stitch function from the Scan view to scan the left and right halves of an item larger than the platen and combine the scanned images back into one image. For more details, click Home to return to the top page of the Online Manual for your model and search for "Scanning Items Larger than the
Platen (Image Stitch)." • Click Driver in the Scan view to start the scanner driver and scan by specifying the output size, image corrections, and other settings.
Scanning Photos
You can scan with settings suitable for photos.
1. Place the item on the platen.
Note
• For how to place items, click Home to return to the top page of the Online Manual for your model and search for "Placing Items (When Scanning from a Computer)."
2. Start My Image Garden.
3. Click Scan from the Guide Menu screen.
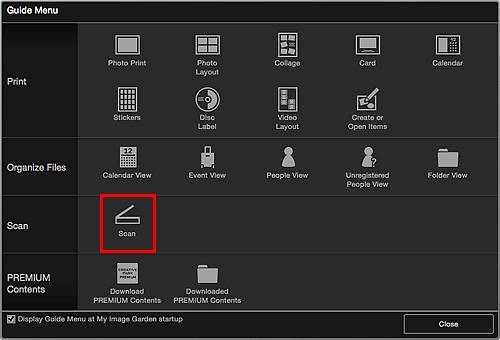
The view switches to Scan.
Note
• Clicking Scan from the Global Menu in the Main Screen also switches the view to Scan.
4. Click Photo.
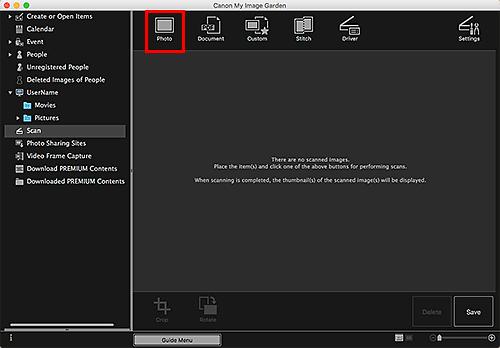
Scanning starts.
Note
• Click Cancel to cancel the scan.
When scanning is completed, the image appears as a thumbnail.

Note
• You can rotate the selected image 90 degrees clockwise each time you click Rotate. • You can crop images. Cropping Scanned Images
• Click Save to save rotated or cropped scanned images. Save Dialog (Scan View) • Set the save location for scanned images on the Advanced Settings tab of the Preferences dialog displayed by selecting Preferences... from the My Image Garden menu. Refer to "Advanced Settings Tab" for details on the setting procedure.
Note
• You can also print scanned images. Control-click a thumbnail and select Print... from the displayed menu to display the Print dialog. Select the printer and paper to use, and then click Print.
Related Topic
Scan View
Scanning Documents
You can scan with settings suitable for documents.
1. Place the item on the platen or ADF (Auto Document Feeder).
Note
• For how to place items, click Home to return to the top page of the Online Manual for your model and search for "Placing Items (When Scanning from a Computer)."
2. Start My Image Garden.
3. Click Scan from the Guide Menu screen.
The view switches to Scan.
Note
• Clicking Scan from the Global Menu in the Main Screen also switches the view to Scan.
4. Click Document.

Scanning starts.
Note
• Click Cancel to cancel the scan.
When scanning is completed, the image appears as a thumbnail.

Note
• Click Save to save scanned images. Save Dialog (Scan View)
• Set the save location for scanned images on the Advanced Settings tab of the Preferences dialog displayed by selecting Preferences... from the My Image Garden menu. Refer to "Advanced Settings Tab" for details on the setting procedure.
Note
• You can also print scanned images. Control-click a thumbnail and select Print... from the displayed menu to display the Print dialog. Select the printer and paper to use, and then click Print.
Related Topic
Scan View

