13 minute read
10 tips for laying perfect floors


1. Any flooring that has been purchased should be checked for defects before installation. This stops defective products being used. The guarantee may be invalidated if the floor covering is fitted anyway.
2. Only install on solid, non-floating base layers.
3. Do not fix objects (e. g. kitchen islands) onto the flooring - they should be secured directly onto the base layer.
4. Lay the floor around fixed objects (e.g. kitchen) and leave a gap of at least 8-10 mm for expansion.
5. Do not install the product immediately, but store it for at least 24 hours for SPC and 48 hours for vinyl flooring in the room where the installation is planned. This helps the floor covering to adapt to the temperature. 6. Always follow the manufacturer's installation instructions.
7. Buy the recommended footstep soundproofing for the floor. Carpet is NOT a permitted insulation.
8. Use spacers as you work so that the floor lies straight and does not slip during installation.
9. Keep the recommended offset of 30 cm to the joints in adjacent rows. This provides maximum stability for the connection.
10. Joints can be sealed using PE cord and silicone to prevent cracks from forming. To avoid complaints, it is recommended that if a joint has to be filled, it is important to ensure that a) silicone is used. b) the dimension of the joint is widened by 50%. and c) a joint cord is used to prevent the silicone from sticking to the base.
FIXED (ADHESIVE VINYL) 2.5 MM
Adhesive without footstep soundproofing
www.hwzi.ch
Fixed (adhesive vinyl) 2.5 mm
RECOMMENDED TOOLS
Universal knife and straight edge Tape measure 8-10 mm spacers Pencil
Tapping block Carpenter's angle Drawbar
Glue or FIXMAT
Hand-held roller
IMPORTANT BEFORE LAYING FLOORING
Check the goods before you start installation.
• You can no longer claim for visually detectable defects in cut and glued goods.
• We can only guarantee uniform batches in the case of delivery from a single production run.
• Allow the designer flooring to acclimatise in the rooms where it will be laid for at least 48 hours before applying the adhesive!
• Note these indoor climatic conditions:
Air temperature in the room > 18 °C, ground temperature at least 15 °C to no more than 25 °C, relative air humidity 35-60 %. • Make sure that constant room climatic conditions are maintained during the acclimatisation period as well as the setting phase for the adhesive.
This indoor climate must be maintained for at least 72 hours before, during and after bonding the covering.
• If you want to use office chairs on designer flooring, these should have soft rollers of TYPE
W that comply with DIN 68131. We also strongly recommend the use of suitable floor protection mats.
• Create an installation plan: Determine the best installation direction for the floor. The installation pattern will tell you how you begin. Start from a defined reference line.
• Check that you have all of the tools you need.
PREPARE THE BASE LAYER
Prepare the base layer in line with VOB part C floor covering work DIN 18365. The base layer must be level and free of cracks as well as being able to support a load and dry at all times. The maximum height tolerance of 3 mm per linear metre set out in DIN 18202 "tolerances in structural engineering - table 3-line 4" must not be exceeded. The installer of the designer floor covering must check the installation base layer and raise any concerns if necessary.
Concerns include (from the commentary on DIN 18365 floor covering work):
• larger irregularities and cracks in the base layer
• a base layer that is not sufficiently dry
• the surface of the substrate is not sufficiently firm, too porous or too rough
• the surface of the subsoil is contaminated, e. g. by oil, wax, varnish or paint residues
• incorrect elevation of the surface of the base layer in relation to the elevation
• adjacent structural features
• the base layer is not at a suitable temperature
• the indoor climate is unsuitable
• the lack of a heating log for heated floor constructions
• the edge insulation strip has no projecting edge
• measuring points in heated floor constructions have not been marked
• the lack of a joint plan
If the base layer is inadequate
Always compensate for any unevenness outside of tolerance. Make sure that there is an evenly absorbent base layer for wet bed adhesion. To do this, apply a suitable levelling compound in a sufficiently thick layer using the squeegee technique. Follow the instructions of the building material manufacturers.
For underfloor heating
In addition to VOB DIN 18365, EN 1264-2 is also relevant for the installation of vinyl flooring for adhesion with underfloor heating systems (underfloor heating systems and components). The surface temperature should not exceed 28 °C in the long term. Electric underfloor heating is generally unsuitable. The exception to this is if it behaves like a water-operated underfloor heating system.
LAYING THE FLOORING
Please note the general requirements for the base layers before installation. Measure the area being covered precisely. Determine the direction of installation and the pattern. Make sure that the abutting joints are offset by at least 30 cm so as to achieve an attractive installation pattern. Vinyl flooring should always be glued over the entire surface.
GENERAL TIPS ON USING ADHESIVE
• For inexperienced installers, it may be useful to test the adhesive bond in advance.
• Only use the recommended amount of adhesive.
• The vinyl backing must always be in full contact with the adhesive. This prevents a poor result when laying the flooring.
Therefore, use hand rollers and an articulated roller weighing at least 50 kg.
• The individual planks must be glued so that the joints are tight and not under any stress.
LAYING THE FLOORING
1. Flooring should only be laid if it is free of faults
After unpacking, check the panels immediately for damage and defects (e.g. differences in colour or gloss level). Defective panels should not be installed.
2
2. Checking and acclimatisation
Check that every packet has an identical batch number. Unpack the covering and place it flat in small stacks in an enclosed, ventilated and moistureresistant space for at least 48 hours before being laid (decoration upwards) on a clean and level surface. Mix the panels from several packs from the same batch to avoid colour variations and achieve a natural visual effect.
MINI 30 cm
MINI 5 cm
3. Laying the first row
The start axis of the first row initially runs perpendicular to the wall of the main window and secondly parallel to the length of the room in which the flooring is being laid.
4. Offset by at least 30 cm
The first and last row should be wider than 5 cm. Otherwise the start axis will be shifted. The length of one panel should not be less than 30 cm.
5. The correct adhesive
Use low emission and solvent-free dispersion adhesives, e. g. EC1 or RAL (Blauer Engel). The adhesive is applied to the trowelled base layer using a notched trowel and spread evenly. You should only apply as much adhesive that can be used to lay the planks within the available application time. Contiguous surfaces should be laid at the same time to achieve a good result.
7. Applying pressure to the flooring
Press the vinyl planks into the semi-wet adhesive bed using a suitable pressure roller, e.g. a hand pressure roller. After gluing, you should also roll the floor covering evenly using a heavy articulated roller (at least 50 kg). Do not start using the surface until the adhesive has set completely (follow the adhesive manufacturer's instructions). IMPORTANT! Follow the recommended working times and guidelines for the adhesive.
6. Applying adhesive to the planks
Just use light pressure to lay the individual planks against each other.
A
B
8. Connecting planks
Overlap one panel A with the last fully installed panel. Place another panel B in an abutment on the wall (partially overlapping the previous one and completely covering the remaining floor area). Be careful not to touch the fresh adhesive with the floor covering. As a rule, with panel B, draw a marking line that can be used as a guide for cutting.
A
A
9. Shortening planks
Draw a cutting line along the guide marking. Bend the panel several times until it breaks and remove any burrs if necessary.
11. Cut-outs for pipes
Diameter: 5 to 10 mm larger than the pipe. Mark, drill holes, saw out angled part (illustration) and attach.
10. Sawn-off end pieces
If the end piece shortened in the last row is 30 cm or longer, it can be used as the first panel in the next row.
12. Direct sunlight
The floor must be protected from direct sunlight. The warranty will become invalid if the temperature is not within the recommended range.
RECOMMENDED ADHESIVES FOR CONVENTIONAL USE
Ardex
Premium AF 2200 EC-1 RDEX AF 2510 (2K-PU) EC-1
Bostik
Power Elastic EC-1
Forbo Erfurt GmbH
643 Eurostar Fibre EC-1
Kiesel Bauchemie GmbH & Co. KG
Oktamos Star 110 EC-1
Mapei GmbH
Ultrabond Eco V4 SP fibre EC-1+; Blauer Engel
PCI Augsburg GmbH
PKL 326 EC-1 +
Uzin Utz GmbH
KE 66 EC-1 +; Blauer Engel
Wakol Chemie GmbH
D 3320 single-sided adhesive EC-1+ D 3318 MultiFlex, fibrous EC-1+
Wulff GmbH
Ultra Strong; EC-1+; Blauer Engel Supra Strong; EC-1+; Blauer Engel Multistrong; EC-1+; Blauer Engel
The manufacturer's specifications are applicable. Please follow their instructions.
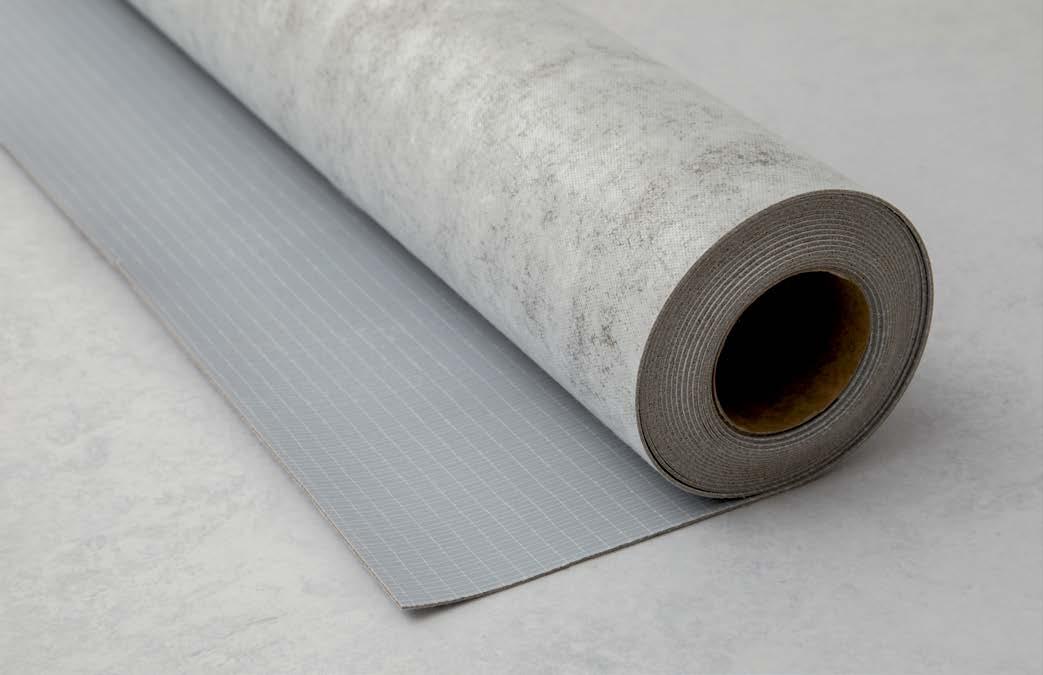
NOTES ON USING FIXMAT AS AN ADHESIVE
FIXMAT, the alternative to adhesive glue:
• FIXMAT is the innovative alternative to adhesive glue. The self-adhesive underlay mat makes it easy to lay floor coverings.
The insulating underlay already contains the dry adhesive and ensures quick and residue-free installation. As there are no waiting times, the floor can be used immediately once it has been laid.
• The underlay mat is rolled out with the foil side facing upwards. Lay out the rolls flush and without any overlap or offset.
• Allow the underlay mat to acclimatise for at least 24 hours when rolled out on the surface being laid.
FIXMAT
PROPERTIES
The planeo FIXMAT patented, permanently elastic acoustic system has been specifically designed for the floating installation (with fixing on one side) used by FIXED Vinyl flooring.
When working with FIXMAT the relevant standards, guidelines and references applicable in the respective countries for the installation of "elastic" floor coverings must be strictly observed.
Construction site conditions
As a general rule, base layers must be permanently dry, level, clean, load-bearing, free of cracks, and resistant to tension and compression. The maximum height tolerance of 3 mm per linear metre must not be exceeded. Base layers and filled surfaces must be dry at the time of installation:
• Cement screeds < 2.0 CM % (calcium carbide method) (heated < 1.8 CM %)
• Calcium sulphate screeds < 0.5 CM % (heated 0.3 CM %)
Indoor climatic conditions
• Air temperature in the room > 18 °C
• Ground temperature at least 15 °C up to no more than 25 °C (ideal ground temperature is 18 - 20 °C; higher temperatures may lead to subsequent changes in measurements)
• Relative air humidity 35-60 %
Preparations and important information before starting installation: Please make sure that the delivered goods are in perfect condition before you start working with them. Goods that have been cut to size or laid may not be returned.
Acclimatisation
FIXMAT should be acclimatised for at least 24 hours before installation in the rooms where it is being laid with the conditions listed above!
Installation on existing base layers
Textile floor coverings of any kind must be removed. FIXMAT can be laid over existing floor coverings such as linoleum, rubber, PVC, laminate, parquet and flat floorboards. Tile base layers must be levelled. The base must be prepared properly and professionally and appropriate auxiliary materials for this must be used.
• Individual solutions only available by arrangement
• Installation on existing and/or uneven base layers may have a negative effect on the performance (e.g. residual pressure behaviour of the
FIXMAT flooring system and top layer).
Packaging
Care must be taken to ensure that FIXMAT is not crushed or the edges damaged in the packaging.
Warranty
We guarantee our product, but due to the large number of factors that are beyond our control, such as application possibilities, storage and handling conditions on site, etc., we cannot guarantee the result of the installation in individual cases. We recommend that sufficient adhesive tests are carried out before the entire surface is laid.
Special considerations and exceptional circumstances
• Bondings do not meet the requirements of the adhesive standard with regard to shear and adhesive pull requirements specified in DIN EN 14259: This applies in particular to liquid or pasty fixatives and to fleeces, nets, fabrics and films coated with pressure-sensitive adhesives.
• In conservatories or similar rooms with floorto-ceiling and large-scale overhead glazing, the use of FIXMAT should be regarded as critical due to extreme fluctuations in the room climate and requires separate agreement and approval from the company HWZ International AG.
• With bonded flooring, it is not possible to prevent dimensional changes in floor coverings (e.g. shrinkage after exposure to heat or ageing). • To prevent material changes/damage, ensure sufficient shading when laying in areas with strong sunlight and maintain an edge distance of 10 mm (if necessary, use end profile PS400PEP).
• A "radiation barrier" of adequate size (e.g. glass or metal base plates) must be provided around fireplaces and tiled stoves. When using permanently elastic sealants, we recommend first applying a joint sealing tape to the joint areas and then filling these with silicone compound.
Permanently elastic sealed joints should be treated as joints that require maintenance and must be checked regularly for functionality and replaced if necessary.
• Please note that the specified residual impression behaviour of the top layer changes due to installation on FIXMAT.
• For furnishings with high static pressure load, sufficient load distribution (e.g. load distribution plates) must be provided as appropriate for the weight.
• FIXMAT must be kept away from all permanently installed furniture or fixtures such as kitchen units, ovens, etc.
• Visible unevenness in the highlights is not considered a defect as long as it is within the permissible deviations specified in DIN18202.
LAYING THE FLOORING
This innovative insulation already contains a dry adhesive. Floating installation is an ideal solution, especially for older base layers. This type of installation is particularly suitable when quick and residue-free removal is a required option. As there are no waiting times, the flooring can be used immediately once it has been installed. The selfadhesive underlay mat is rolled out floating on the base floor with the foil side facing upwards.
Lay the rolls out flush fully offset and without any overlap. Only pressure-resistant and flat base layers without any cracks are suitable. This also includes previous fixed (non-floating) coverings. Mark a line for the first row on the film. Ideally, lay the vinyl planks from the centre out to both sides. Remove the film only as much as is necessary for the installation. You can still adjust the vinyl planks for around 30 minutes before they cold weld to the adhesive.
IMPORTANT INSTALLATION TIPS
Before laying the floor covering, the floor fitter must check the base layer and raise any concerns. In particular if:
• there are larger irregularities or cracks in the base layer or the base layer is not dry enough
• the surface of the base layer is not sufficiently firm, too porous or too rough
• the surface of the base layer is contaminated, e.g. by oil, wax, varnish or paint residues
• the height of the surface of the base in relation to the height of adjoining parts of the building is not correct • the base layer is not at a suitable temperature or the indoor climate is not suitable
• there is no heating protocol for heated floor constructions
• the edge insulation strip has no projection
• there are no measuring points marked in heated floor constructions or there is no joint plan
To avoid damage caused by rot to wood-based base layer constructions (e.g. wooden beam ceilings), adequate rear ventilation of the construction must be provided or ensured.

