
5 minute read
FIRSTSERVICE TIPS


Advertisement

WORDS: DANNY WILSON


PHOTOS: BRIAN HEIDEN
EDITOR’S NOTE: For 25 years, Danny Wilson has been a master-certified Harley-Davidson technician, five of which he spent training overseas technicians how to be better technicians. Danny is a walking encyclopedia when it comes to Harley-Davidson functionality and has some great tips when servicing your motorcycle yourself, or at the very least, how to ensure the work your local dealer performed is up to snuff.
Welcome back to the first print issue of Hot Bike magazine. To celebrate that historic occasion, our first tech article is going to walk you through how to perform the first service on your Harley-Davidson big twin—more importantly, your Milwaukee-Eight Harley. Or M8 to most of you.
Before we get into the details of what to do, let’s talk about the importance of making sure the scheduled maintenance is performed on time and correctly. Oftentimes people will go to their local dealership or reputable shop and are shocked at the pricing. Then that shock is usually followed up with, “why is an oil change so expensive?” Here’s the thing, when done correctly it’s not just an oil and filter change.

The engineers that designed and tested your bike found that after countless hours and multiple miles of testing the points at which things needed to be changed out and checked. If all you do is change your oil and filter your engine might do just fine, but that leaves your transmission, primary, forks, and hydraulic fluids at risk, which could lead to the worst case scenario: a hard part failure. Not to mention things coming loose and shit falling off your motorcycle…Well, there’s always that too.
The first scheduled maintenance interval for your Harley-Davidson Milwaukee-Eight is recommended at 1,000 miles. After that, the services pick up at 5,000, 10,000, 15,000 and 20,000 (I think you get the idea). Some services are more involved than others, and not all three drivetrain fluids are changed at every service.
On my personal motorcycles, I change all three fluids every 5,000 miles. I also recommend this to my customers that come in to have me or anyone at my shop perform the work. From a mechanical standpoint, the primary fluid is lubricating the primary chain, the compensator assembly, and the clutch. It is an oil bath, so it does not circulate. The clutch is a series of friction and steel plates stacked in a specific order. As the clutch deteriorates from normal use, that friction material winds up in the primary fluid. It is essentially an abrasive that accelerates wear on the metal parts in the primary. You get a similar situation in the transmission too. The Harley-Davidson 6-speed transmission is a constant mesh gear stack, consisting of a main shaft and a counter shaft with all of the gears. These shafts are supported on either end with bearings. As the metal gears cycle at high-speeds on each other there is always an aspect of wear involved. This constant friction also creates heat. Heat and friction break down any lubricant over time. Just like the primary fluid, the transmission is an oil bath so it is not circulating or filtered in any way. Worn out transmission fluid with debris in it will accelerate the wear on all the gears and bearings. In layman’s terms, if you change all three of your powertrain fluids every 5,000 miles you don’t have to keep track of what you did or did not change last time you worked on the bike. And obviously it will extend the life of your motorcycle.
As with most things everyone has an opinion on what fluid is good and what fluid is junk. That isn’t the point of this article. You need to run a quality engine oil with the proper viscosity, as well as a quality gear oil for the transmission. Primary fluid is specific due to the fact that it is lubricating the clutch pack so make sure it is actually primary fluid, not gear or engine oil. The only other consideration on the primary fluid is if you have an aftermarket clutch, certain manufacturers call for the use of automotive style ATF. If you have an aftermarket clutch check to see what they call for on the fluid.


So let’s get into the service itself. The factory maintenance plan is available online, and is also in every printed service manual if you have one for your model. So we aren’t going to go through every single step, the whole plan is about 2.5 pages long. We are going to give you the major steps, and the crucial things to look for. Basically we’re going to set you up for success if you decide to do this yourself. If you decide to have a dealer or shop do it, you will know what is involved and what to look for to check the work.
The first thing you will want to do is fire up the bike and let it warm up. This will get the fluid temperature up and allow it to all drain out. Having said that, don’t do this right after you ride 60 miles, it will be hot and burn the shit out of your hands as you perform the work. After the bike is warm you need to get it securely upright on a motorcycle lift, flat jack, or center stand. I always pull all three drain plugs first. This allows me to do all the other checks and inspections while the fluid drains.


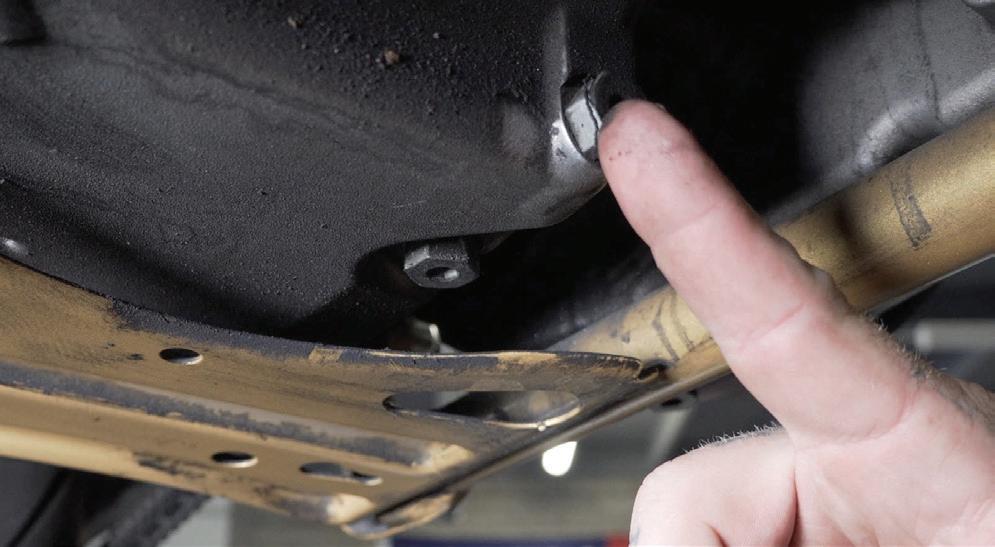
We have provided images for where the drain plugs are located on a Milwaukee-Eight Touring model as well as a Softail since they are not in the same location for both families. While the fluid is draining, check out the rest of the bike. If you are working with the service sheet from the manual it will outline every step. In this article we are going to hit the big ones.


1. You want to check your tire pressure, this gets overlooked by a lot of riders, and it has a huge impact on the way the bike handles as well as how the tires wear.
2. While you’re at the tires check the brake pads. Visually inspect that there is plenty of material on the pads, and that the pistons on the brake caliper are pushing at the same rate on either side.
3. Turn on the ignition and verify that all the lighting is working properly, and that all of the switches on the hand controls are working.
4. Remove your seat and verify that your battery terminals are secured properly, a loose battery terminal will cause all kinds of issues.
5. Leave the seat off for now because we will come back to the battery. Depending on the model you’re dealing with you might have had to remove some extra parts to access the battery, leave those off too.
6. Inspect your rear drive belt for damage and verify that the tension is set properly.
7. There are some items listed in the service manual that need to be lubricated, so look at what your model calls for and lubricate those items.
8. Clean and inspect your air cleaner, and while it is off wipe any oil from the throttle body that might be present.

These are the major critical fasteners you should inspect at every service (your Harley service manual provides a table of torque specs).


• Engine mounts
• Front and rear axle
• Front and rear brake caliper bolts
• Spark plugs
• Switch housing screws
• Clutch and brake perch screws
• Riser clamp bolts (if exposed)
• Fuel tank mounts (if you hear a weird buzzing noise, that’s why)
• Front triple tree pinch bolts
• Exhaust flange nuts and exhaust bracket hardware


