
1 minute read
3ds Max Gone with the wind

from May_e
by Hiba Dweib

Gone with the Wind
Step 1: Open your object in 3dsmax which you want to blow and drag a PF Source in the viewport.
Advertisement
Step 2: Press “6” for open a particle view window. And delete the following four operators from the event.
Or without creating a PFsource in the viewport you can press a shorcut key “6”. Right click in the window and select New > Particle System > Empty Flow. Its on you whichever method you choose.
Step 3: Drag a Position Object operator from below depot and add a object in the Emitter objects panel.
Step 4: Change the Birth “Emit Start” & “Emit Stop“ to 0 and amount value in thousands. Step 5: Add Sdeflector in the scene and animate from top to bottom of the object. Now add Collison operator in the particle view window and add deflector in the deflectors list.
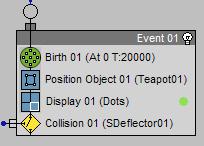
Step 6: Now if you play the scene then particles will go down after collision with the deflector because in particle view collisions settings - Collides speed set as Bounce. Change this to Continue, after this you will not see any motion in the scene.
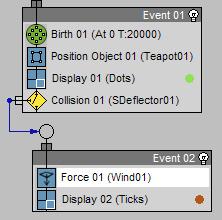
Step 7: Your effect is almost complete, just add a wind in the scene and set the settings according to the requirement and scene scale. Add a force operator in a new event and connect to the collision. Add the wind space warp in the force Space Warps list.
Add more wind and drag space warp for more realistic effect. Apply material and motion blur on the particles for better result.
Source: Allan Mckay Video
www.cgarena.com

CGArena brings you latest news and happenings 24 hours a day.

