8 minute read
see Maintenance on

8 Maintenance
8.1 Information on maintenance
8.1.1 Responsibilities and prerequisites
• Perform maintenance and inspection work only with suitable protective equipment. • Perform only the maintenance and inspection work described in this operator’s manual. • For questions concerning the maintenance and service work, please contact your service partner at any time.
8.1.2 Safety instructions
Information on the vehicle and the attachment
• Only perform maintenance and inspection work if the vehicle is secured. • A raised loader unit can fall suddenly and cause serious injury. • If working under the raised loader unit is unavoidable, then the loader unit must be secured by a suitable support. • Lower attachment on the ground ensuring that no movements can occur when releasing mechanical or hydraulic connections. • Remove dirt from steps and handholds to keep them safe and ready for use.
Information on handling flammable liquids
• Do not smoke and avoid open fire when handling flammable liquids. • Do not extinguish burning liquids with water. • Use suitable extinguishing agents, such as powder, carbon dioxide or foam fire extinguishers. • Always call the fire department in the event of a fire.
Information on handling fuels, oils and greases
• Burn hazard due to hot lubricating oil or hydraulic oil. • Avoid skin and eye contact with oil and grease. • Wear protective equipment. • Do not use fuel or solvents to clean your skin. • Rectify any oil or fuel leaks immediately. • Do not allow the oil and oily wastes to get into the ground or stretches of water. • Absorb the escaping oil or fuel immediately with a binding agent, and dispose of it in an environmentally friendly manner and separately from other waste. • Even biodegradable, “environmentally friendly” oil must be disposed of separately, just like every other type of oil.
Information on screw connections, pipes, hydraulic hoses
• Have any leaks in the line system rectified immediately. • A fine jet of hydraulic oil under high pressure can penetrate through the skin. Seek medical attention immediately if oil penetrates the skin or eyes. • Do not search for leaks with your hands. • Search for leaks using cardboard or paper on which the escaping oil can been seen. • Do not repair damaged pipe lines and hydraulic hoses, but replace them immediately by new ones.
Information on engine exhaust
• Engine exhaust is hazardous to your health. Do not breathe in engine exhaust. • If maintenance and inspection work has to be performed in enclosed spaces with a running engine, extract the exhaust gases with an extraction system and ensure that the space is well ventilated.
8.2 Maintenance accesses
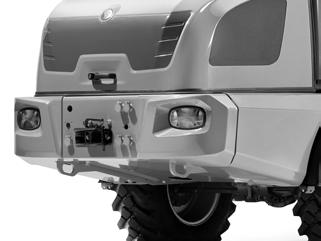
8.2.1 Engine cover
WARNING
Injury hazard due to hot and rotating parts!
When the engine is running and for a short time thereafter, parts in the engine compartment may still be hot or rotate. This may cause crushing which may result in serious injury or death. ► Do not open the engine cover if the engine is running. ► Let the engine cool down. ► Wear protective equipment.
NOTICE
Damage to the engine caused by loose objects in the engine compartment!
► Remove all tools and objects from the engine compartment before closing the engine cover.
1
Opening the engine cover
Open the engine cover with the handle. The handle is lockable. ü Switch off the ignition and remove the ignition key. 1. Unlock engine cover with the key. 2. Open the engine cover by pressing button 1. ð The engine cover is unlocked. 3. Raise the engine cover by pulling the handle. ð The engine cover is pushed up by gas springs.
2
Fig. 174: Opening the engine cover
Closing the engine cover
1. Hold the engine cover at bar 2 at the lower edge and pull it downward against the pressure of the gas springs. 2. Make the engine cover lock into place by pressing it downward. 3. Pull on the handle to check whether the engine cover is locked in place. 4. Lock engine cover with key.
8.2.2 Openings in the cab
WARNING
Risk of injury due to unintentional slipping of the seat!
If the fixing screws are not reattached correctly, the seat may slip on its own! ► Reassemble the fixing screws immediately after the maintenance work has been completed. ► Do not use the vehicle if the fastening screws are not installed.
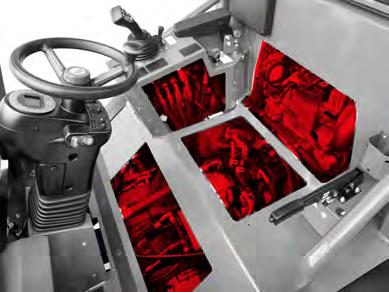
Fig. 175: Maintenance openings in the cab
Remove seat plate
ü Required tools: Wrench with wrench see 13. 1. Remove loose objects from the cab. 2. Push the seat completely forward. ð see Adjusting the seat on page 63 3. Remove the fixing screws from the seat plate. ð The seat plate can be removed together with the seat. ð Further maintenance openings are accessible.

Fig. 176: Maintenance flap in the right side door
Further maintenance openings in the cab
Required tools: Hexagon socket wrench size 5 mm. All maintenance openings are fastened with screws. For maintenance work, these plates can be removed by loosening the screws. As soon as the maintenance work is finished, reassemble the plates immediately.
Maintenance opening for Comfort cab version
The Comfort cab has a hinged service opening on the outside right of the cab. The maintenance opening is opened and closed with the cab door key. When operating the vehicle, all maintenance openings must be locked and closed.
8.2.3 Opening the battery holder for Perkins engines
NOTICE
Risk of damage to the vehicle!
► Lock the battery holder securely after maintenance work.
1 The battery holder is in position 1. The battery holder is accessible by opening the cover. Behind the battery is the left side of the engine. 1. Stop the engine and let it cool down. 2. Open the engine cover. 3. Turn lock lever 2 counterclockwise. ð Battery holder is unlocked. 4. Swivel the battery holder including the battery to the left. ð Left motor side is accessible. After maintenance, swivel the battery holder back and lock it.

2

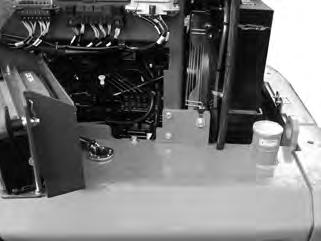
Fig. 177: Make the maintenance opening accessible behind the battery
8.3 Visual check
8.3.1 Checking components
Check the following components weekly: • Check all steel parts for damage and loose threaded fittings, in particular the protective ROPS/FOPS structure. • Check the condition and function of the seat belt. • Check the power coupler for the attachment. • Check whether all pivot pins are in their correct positions and secured with their locks. • Check the climbing aids and handholds for correct position. • Check cab windows for breaks, cracks and stone chips. • Check the condition of the lights and work lights. • Check the tires for damage and penetration of sharp-edged objects. • Check tires for wear. • Check the condition of all safety labels and warning labels.
8.3.2 Leakage check
WARNING
Risk of injury due to pressure!
A fine jet of hydraulic oil under high pressure can penetrate through the skin. This can cause serious injury. ► Wear protective gloves and safety glasses. ► Never search for leaks with your bare hands. ► Search for leaks using a piece of cardboard or paper on which the escaping oil can been seen. ► Seek medical attention immediately if hydraulic oil penetrates the skin or eyes. Check the following components to see if they are tight: • Check air intake line from air filter to engine. • Check the hose pipes of the cooling system. • Check engine oil filter. • Check fuel lines. • Check the hose pipes and hydraulic cylinders of the steering system. • Check the hydraulic system, control valve, lowering brake valves, hydraulic hoses and hydraulic cylinders. • Check hydraulic connections of all control circuits, auto-hitch trailer coupling, tipper connections. • Check the hose pipes of the braking system and the tank for the brake fluid. • Check front and rear axle. Have defects and leaks repaired by an authorized service center.
8.4 Maintenance plan
8.4.1 Daily and weekly maintenance
Maintenance cycle Personnel
Daily Operating personnel [} 176] Checking the engine oil level [} 178] Check the coolant level [} 190] Cleaning pedals and floor mat [} 192] Cleaning the radiator [} 194] Cleaning the air filter [} 197] Checking the service brake and parking brake for function [} 198] Checking steering system for function [} 199] Checking the lighting [} 203] Checking/tensioning the belt [} 212] Checking function of seat switch [} 213] Checking the tires
For further information
Maintenance cycle Personnel
Every week Operating personnel [} 168] Checking components [} 169] Leakage check [} 174] Water separator maintenance [} 178] Check the coolant level [} 180] Check the hydraulic oil level [} 182] Check fill level of brake fluid. [} 182] Window wiper water level [} 183] Lubricating the vehicle [} 189] Cleaning the vehicle from the outside [} 190] Cleaning the cab [} 190] Cleaning pedals and floor mat [} 191] Check/replace cab breather filter [} 191] Clean engine and engine compartment [} 192] Cleaning the radiator [} 193] Cleaning the condenser [} 194] Cleaning the air filter [} 197] Check air intake line [} 198] Checking steering system for function [} 199] Checking the steering column adjustment [} 200] Checking window wiper and washer system [} 200] Battery maintenance [} 202] Checking the locking function for the joystick [} 202] Checking the function of the lock [} 203] Checking the hydraulic control circuits for function [} 203] Checking/tensioning the belt [} 211] Checking the seat [} 211] Checking the seat belt for proper function [} 212] Checking doors and windows [} 212] Checking safety labels and information labels [} 212] Checking heating, ventilation and air conditioning system [} 213] Checking the tires