14 minute read
MAINTENANCE PROCEDURES


GENERAL
This section includes instructions for basic maintenance procedures. WARNING
Turn off the engine and follow these maintenance procedures when performing maintenance. If you do not follow proper maintenance procedures you can be injured by hot parts, moving parts, electricity, chemicals or other hazards.
WARNING
Should removal of a locking device be required (e.g. lock tabs, self-locking fasteners, etc.), always replace it with a new one.
CAUTION
Some components in the engine compartment may be very hot.
ENGINE OIL
Recommended Engine Oil for Rotax 4TEC 150 and Rotax 4-TEC 150 ECT Engines:
Use XPS™ 4- STROKE SYNTH. BLEND OIL (SUMMER) (P/N 460787) If the recommended XPSTM engine oil is not available, use a 5W40 or 10W40 engine oil meeting the requirements for API service classification SM, SL or SJ. Always check the API service label certification on the oil container, it must contain at least one of the above standards.
Use XPS™ 4- STROKE SYNTH. BLEND OIL (SUMMER) (P/N 460787)
NOTICE
These engines have been developed and validated using the BRP XPS Synthetic blend oil. BRP recommends the use of its XPS Synthetic blend oil at all times. If the recommended XPS engine oil is not available, use a 10W40 mineral engine oil compatible with wet clutches. Damages caused by oil which is not suitable for the engine may not be covered by the BRP limited warranty.
NOTICE
NEVER use fully synthetic oil. This would impair the proper operation of the supercharger clutch. Do not add any additives to the recommended oil. Mineral oils for API service classification SM contain additives (friction modifiers) that may cause inappropriate slippage of the supercharger and eventually lead to premature wear.
Inspections and Maintenance Engine Oil Level NOTICE
Check level frequently and refill if necessary. Operating the engines with improper oil levels may severely damage engines.
TYPICAL
1.Dipstick 2.Oil cap
B00064
IMPORTANT: Boat must be leveled. Oil level can be checked either with boat in water or out of water.
If Boat is Out of the Water
If the boat is out of the water and on a trailer, block the wheels and raise the bow slightly with the trailer jack (if so equipped) until the bumper rail is level. Install a garden hose to the flushing connector. Refer to EXHAUST SYSTEM FLUSHING in MAINTENANCE PROCEDURES and follow the procedure.
NOTICE
Never run engine without supplying water to the exhaust systems when boat is out of water. Failure to supply water to the exhaust systems may severely damage exhaust systems.
NOTICE
Never run engine longer than 2 minutes. Drive line seals have no cooling when boat is out of water.
Boat Out or In Water
It is of the utmost importance to follow this procedure in order to obtain an accurate reading of the engine oil level.
1)Ensure engine is at normal operating temperature. 2)Let engine idle for 30 seconds before stopping. 3)Stop engine. 4)Wait at least 30 seconds. 5)Pull dipstick out and wipe clean.
6)Reinstall dipstick, push in completely. 7)Remove dipstick and read oil level. It should be between marks.
CAUTION
Engine oil may be hot. Certain components in the engine compartment may be very hot. Direct contact may result in skin burn.
TYPICAL
1.Dipstick
B00065
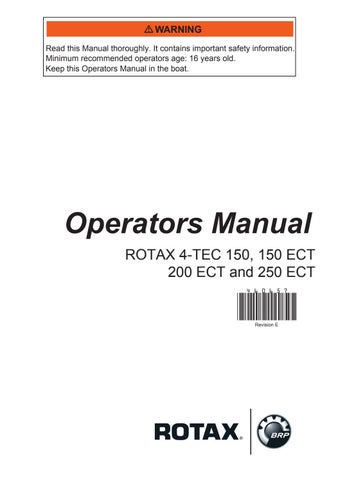
TYPICAL
1.Full 2.Add 3.Operating range
lmr2007-053-100_a
8)If needed, add oil up to have the level between marks as required. To add oil, unscrew oil cap. Place a funnel into the opening and add the recommended oil to the proper level. Do not overfill.
TYPICAL
B00066
1.Oil cap
9)Properly reinstall oil cap and dipstick. 10)If you have 2 inboards: Repeat the procedure on the other engine. 11)Wipe off any oil spillage.
ENGINE COOLANT
Recommended Engine Coolant
Always use ethylene-glycol antifreeze containing corrosion inhibitors specifically for internal combustion aluminum engines.
Cooling system must be filled with BRP Premixed Coolant, P/N 460777, or with a water and antifreeze solution (50% distilled water, 50% antifreeze). To prevent antifreeze deterioration, always use the same brand. Never mix different brands unless cooling system is completely flushed and refilled. Refer to an authorized Rotax Jet Propulsion dealer.
Engine Coolant Level
With boat on a level surface, coolant should be between MIN. and MAX. level marks for each coolant reservoir when each engine is cold.
IMPORTANT: The boat is considered level when it is in water. When boat is on a trailer, block the wheels and raise the bow slightly with the trailer jack (if so equipped) until the bumper rail is level. Add coolant to have the level between marks as required. Use a funnel to avoid spillage. Do not overfill. Properly reinstall and tighten filler cap. IMPORTANT: A cooling system that frequently requires coolant indicates leaks or engine problems. See an authorized Rotax Jet Propulsion dealer.
ENVIRONMENTAL NOTE
When available, it is recommended to use biodegradable antifreeze compatible with internal combustion aluminum engines. This will contribute to protecting the environment.
1.Level between marks when engine is cold
B00067
WARNING
Check coolant level with cold engine. Never add coolant in cooling system when engine is hot.
Engine Coolant Replacement
The coolant replacement should be performed by an authorized Rotax Jet Propulsion dealer.
Ignition Coil Removal NOTICE
Do not remove the ignition coil before disconnecting the input connector or the wires may be damaged. Do not pry up ignition coil with a screwdriver to avoid damage.
1)Disconnect ignition coil connector. IMPORTANT: Twist ignition coil in both directions as you pull it up to ease removal. 2)Remove ignition coil from spark plug.
Ignition Coil Lubrication
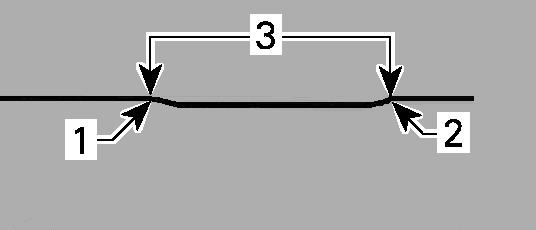
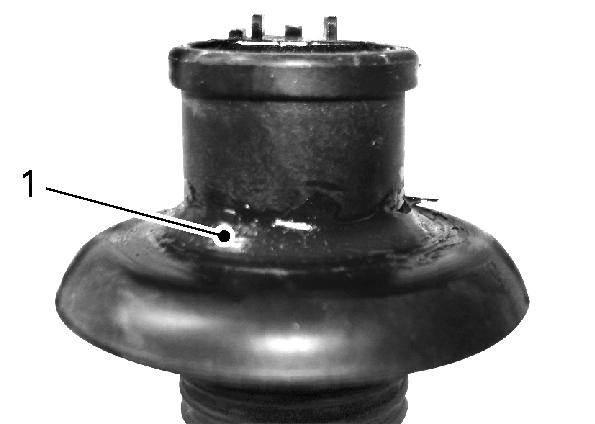
1)Pull rubber seal down.
1.Rubber seal pulled down sbs2009-011-002
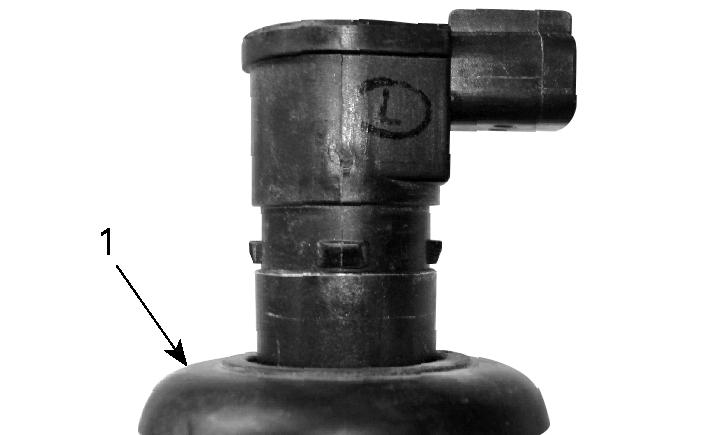
2)Apply Dow Corning 111, P/N 460796, or equivalent to rubber seal seat as shown. 3)Pull rubber seal back on its seat making sure the tabs on the ignition coil and the slots in the seal properly match together. 4)Leave a ring of grease on top of the seal as shown to act as a water barrier. Wipe off the excess.
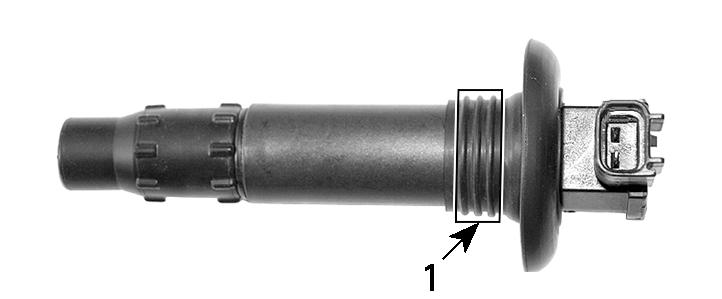
5)Apply DOW CORNING 111, P/N 460796, or equivalent on rubber seal contact area.
Ignition Coil Installation
IMPORTANT: Prior to inserting the ignition coil on its spark plug, apply sealant as described in IGNITION COIL LUBRICATION 1)Install coil in cylinder head hole. 2)Push the ignition coil down to securely install it on the spark plug tip.
1.Apply product here sbs2009-011-001 1.Correctly shaped excess of product
sbs2009-011-003
1.Apply product here smr05-015-002_d3

TYPICAL
smr2009-032-004
1.Seal properly seated
TYPICAL
1.Flushing connector
lmo2007-003-030_a4
EXHAUST SYSTEM
Exhaust System Flushing
Flushing the exhaust system and intercooler of each engines with fresh water is essential to neutralize corroding effects of salt or other chemical products present in water. It will help to remove sand, salt, shells or other particles in water jackets and/or hoses.
Proceed as follows: 1)Clean jet pump by spraying water in its inlet and outlet and then apply a coating of XPS
Lube, P/N 460786, or equivalent. 2)Connect a garden hose to the connector located at the rear of boat on jet pump support. Do not open water tap at this time.
IMPORTANT: Use optional Flushing Adapter, P/N 460711, with a quick connect adapter to ease garden hose installation. A hose pincher is NOT required to flush engine.
WARNING
Perform this operation in a well ventilated area.
WARNING
When operating the engine while the boat is out of the water, the heat exchanger in the ride plate may become very hot. Avoid any contact with ride plate as burns may occur.
TYPICAL
1.Quick connect adapter 2.Flushing connector adapter
B00068
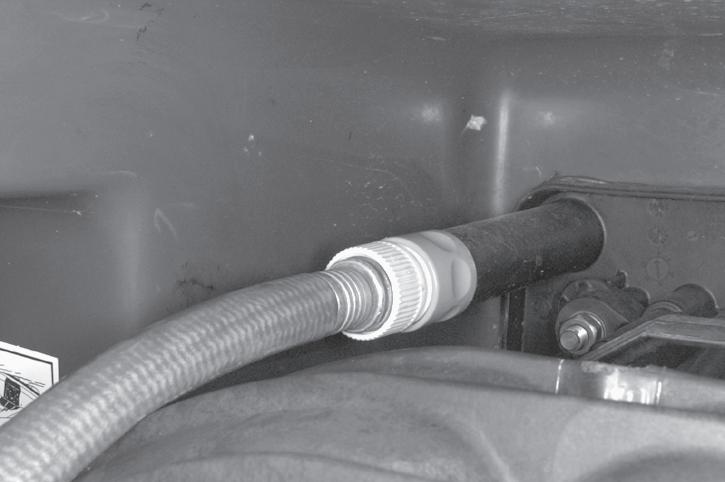
TYPICAL
1.Flushing connector 2.Quick connect adapter and flushing 3.Garden hose
B00069
Inspections and Maintenance
StepProcedure 3)To flush, start engine then immediately open the water tap. CAUTION
Certain components in the engine compartment may be very hot. Direct contact may result in skin burn. Do not touch any electrical parts or jet pump area when engine is running.
NOTICE
Never flush a hot engine. Always start the engine before opening the water tap. Open water tap immediately after engine is started to prevent overheating.
4)Run the engine about 20 seconds at a fast idle between 4000-5000 rpm.
5)Ensure water flows out of jet pump while flushing. Otherwise, refer to an authorized Rotax Jet Propulsion dealer for servicing.
6)Close the water tap, then stop the engine.
NOTICE
Never run engine without supplying water to the exhaust system when boat is out of water.
NOTICE
Never run engine longer than 2 minutes. Drive line seal has no cooling when boat is out of water.
NOTICE
Always close the water tap before stopping the engine.
NOTICE
Remove quick connect adapter after flushing operation (if used). Post-Operation Care
Remove the boat from the water every day to prevent growth of marine organisms.
NOTICE
Failure to perform proper care such as: boat rinsing, exhaust system flushing and anti-corrosion treatment, when used in salt water, will result in damage to the boat and its components.
WARNING
Allow engine to cool before performing any maintenance.
Exhaust System Flushing
The exhaust system should be flushed daily when boat is used in salt or foul water. Refer to MAINTENANCE PROCEDURES. On supercharged models, the intercooler is flushed at the same time. Anticorrosion Treatment To prevent corrosion, spray a corrosion inhibitor (salt water resistant) such as XPS Lube, P/N 460786, or equivalent over metallic components in engine compartment. Engine fogging should be done with XPS Lube, P/N 460786, or equivalent whenever the boat is to be stored for an extended period of time. Apply Dielectric Grease, P/N 460781, (salt water resistant) on battery posts and cable connectors.
NOTICE
Never leave rags or tools in the engine compartment or in the bilge.
Additional Care for Foul Water or Salt Water Use
When the boat is operated in foul water and particularly in salt water, additional care must be taken to protect the boat and its components. Rinse trailer and boat's hull/bilge area with fresh water. Never use a high pressure washer to clean the bilge. USE LOW PRESSURE ONLY
(such as a garden hose). High pressure can cause da ages to electrical or mechanical systems. In coastal areas, special care should also be taken on stainless steel or chrome parts like grab handles, mooring cleats, fuel cap and navigation lights. Refer to BOAT CLEANING for proper care.
STORAGE
It is recommended that the boat be taken to an authorized Rotax Jet Propulsion dealer, repair shop, or person of your choosing for proper storage but the following operations can be performed by you with a minimum of tools. IMPORTANT: Leave drain plug out during storage period.
Jet Pump Cleaning
Clean jet pump by spraying water in its inlet and outlet and then apply a coating of XPS Lube, P/N 460786, or equivalent.
Fuel System Protection
XPS Fuel Stabilizer, P/N 460795, (or equivalent), can be added in fuel tank to prevent fuel deterioration and fuel system gumming. Follow stabilizer manufacturer‘s instructions for proper use.
NOTICE
Do nut run the engines during storage period.
WARNING
Always remove tether cord cap from engine cut-off switch to prevent unexpected engine starting before cleaning the jet pump area. Engine must not be running for this operation.
NOTICE
It is highly recommended to add fuel stabilizer at storage in order to maintain fuel system in good condition.
Engine Oil And Filter Replacement
The oil change and filter replacement may be performed by an authorized Rotax Jet Propulsion dealer, repair shop, or person of your choosing.
Intercooler Draining
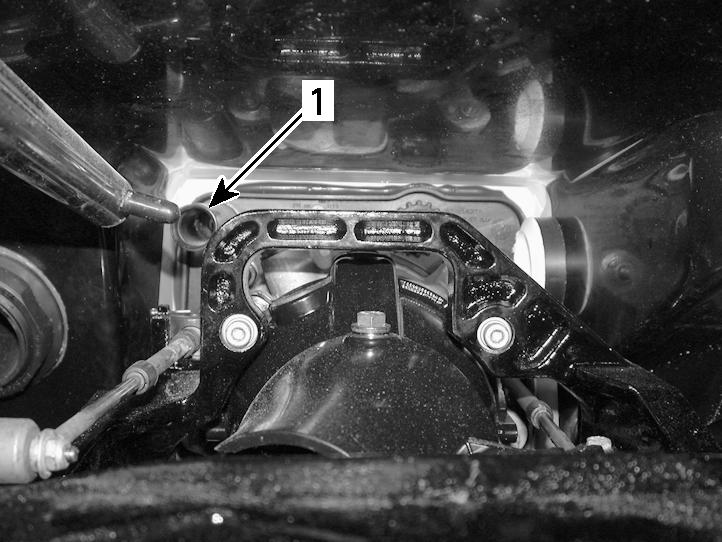
It is important to expel any trapped water that may have accumulated from condensation in the intercooler of each engine. Proceed as follows: 1)Open the engine cover. 2)Ensure there is an alignment line drawn on the intercooler outlet hose. This will ensure the hose is not twisted or kinked on reinstallation. 3)Loosen the clamp retaining the intercooler outlet hose. 4)Remove the intercooler outlet hose from the intercooler. IMPORTANT: This hose feeds the inlet of the supercharger.
5)Start and rev the engine up to 4000 rpm several times IMPORTANT: Prevent air intake system from aspirating foreign objects which may cause severe engine damage. 6)Stop engine. 7)Reinstall the intercooler air outlet hose, ensure it is properly aligned as prior to removal to ensure proper engine operation.
1.Intercooler outlet hose lmo2010-001-004_a
Exhaust System Flushing
Perform procedure as described in MAINTENANCE section.
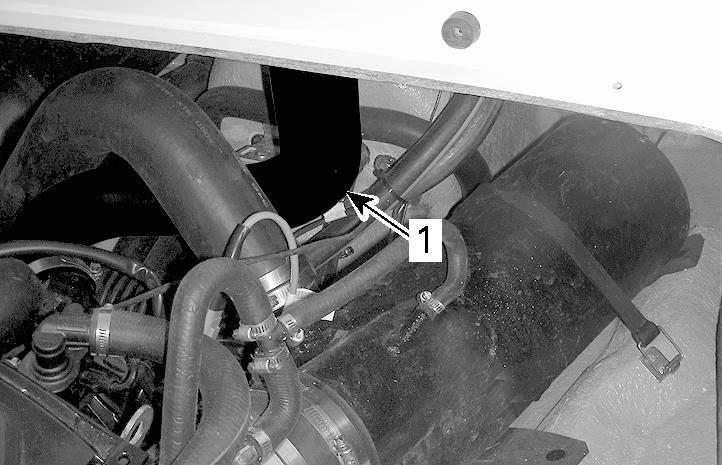
Inspections and Maintenance Exhaust System and Intercooler Protection Out of Water Flushing
Expel water from the exhaust system and intercooler as follows: Using the flushing connectors on the jet pump supports, inject pressurized air (around 689 kPa (100 psi)) into the system until there is no more water flowing from the jet pumps.
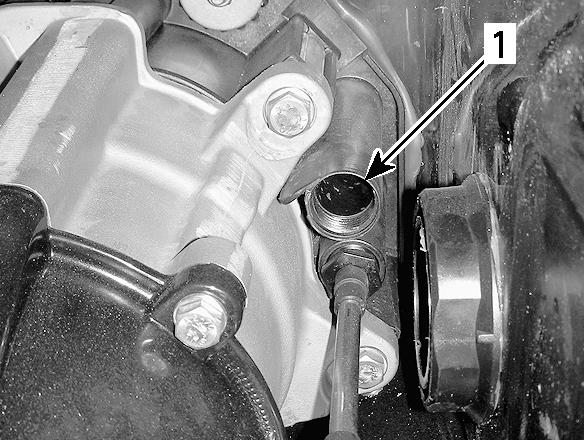
1.Flushing connector – location may differ
lmo2008-001-054_a
To ease the procedure, a custom hose can be assembled. See the following illustration.
In Water Flushing - Optional
This flushing kit is designed to work with the Rotax 1503 250, 200 and 150 HP CAT engines. Use the on-board flush kit to flush the exhaust system.
Engine Internal Lubrication
IMPORTANT: Both engines must be internally lubricated for the storage period. 1)Open the engine compartment lid. 2)Remove storage tray. 3)Remove dipstick. 4)Remove engine cover. 5)Reinstall dipstick. 6)Expel water from the exhaust system and intercooler as follows: 7)Remove ignition coils. Refer to MAINTE-
NANCE PROCEDURE. 8)Remove spark plugs.
IMPORTANT: After loosening the spark plugs, a coil may be used to remove the spark

TYPICAL
1.Flushing connector adapter (P/N 460711) 2.Hose 13 mm (1/2 in.) 3.Air hose male adapter
lmo2008-001-053_a
NOTICE
Failure to drain the exhaust system may cause severe damage to intercooler and exhaust manifold.
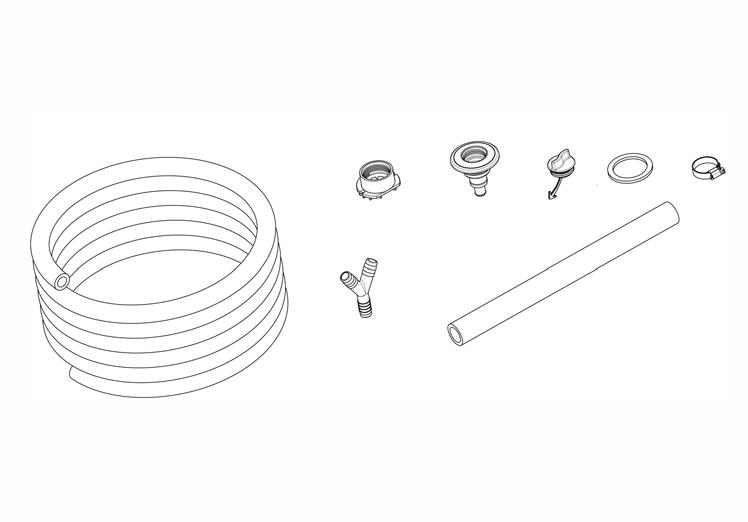
1.Remote flush kit P/N 461478
J0152
NOTICE
Ensure there is no dirt in coil holes before removing the spark plugs. Otherwise, dirt would fall into cylinder and will damage the internal components.
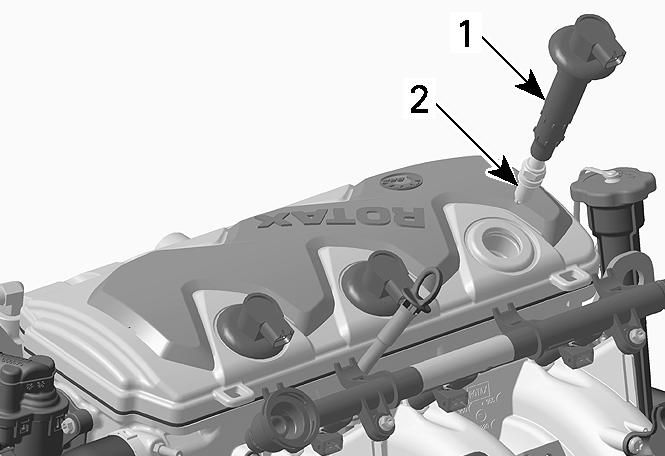
1.Ignition coil 2.Spark plug
lmr2006-016-030_a
NOTICE
Failure to drain the exhaust system may cause severe damage to intercooler and exhaust manifold.
9)Spray XPS Lube, P/N 460786, or equivalent, into spark plug holes. IMPORTANT: To allow engine lubrication for storage, the DROWNED MODE can be activated to prevent fuel injection and ignition while cranking in order to lubricate the cylinder walls. Proceed as follows to activate drowned mode. 10)Ensure both engines are OFF. WARNING
Both engines must be stopped when using drowned mode to lubricate the engines.
11)Install the tether cord on the engine cut-off switch. 12)Ensure the throttle/shifter lever is in the
NEUTRAL position. 13)Activate the drowned mode as follows. 14)Move the throttle accelerator sensor (TAS) to the wide open throttle position (WOT). 15)Turn ignition key to ON position. IMPORTANT: The ECM will allow engine cranking while inhibiting fuel injection and ignition. Do not crank engine for more than 10 seconds. 16)Ensure both engines are OFF. IMPORTANT: The ECM will allow engine cranking while inhibiting fuel injection and ignition. Do not crank engine for more than 10 seconds. 17)Crank each engine a few turns to distribute the oil on cylinder walls. IMPORTANT: Ask a person to assist you for this operation. 18)Release TAS. 19)Turn ignition key OFF. 20)Apply LOCTITE 767 Antiseize Lubricant,
P/N 460791, on spark plug threads then reinstall them. 21)Lubricate and reinstall ignition coils. Refer to MAINTENANCE PROCEDURES. 22)To reinstall engine cover downward until it snaps. 23)Reinstall dipstick. IMPORTANT: It is recommended to fog the engine valves with XPS Lube, P/N 460786 or equivalent. Contact your authorized Rotax Jet Propulsion dealer.
Engine Coolant Test
If antifreeze is not replaced, test its density. The antifreeze replacement and a density test should be performed by an authorized Rotax Jet Propulsion dealer. Antifreeze of each engines should be replaced every 200 hours or every 2 years to prevent antifreeze deterioration.
NOTICE
Improper antifreeze density may allow freezing of the liquid in the cooling system if the boat is stored in an area where the freezing point is attained. This would seriously damage the engine.
Battery Removal And Storage
For battery removal, cleaning and storage, contact your Rotax Jet Propulsion dealer.
PRESEASON PREPARATION
Maintenance preparation must be performed in conjunction with PERIODIC MAINTENANCE CHART.
Inspections and Maintenance
Ensure to perform all tasks included in the 100 hours or 1 Year column. Preseason maintenance preparation may be performed by an authorized Rotax Jet Propulsion dealer, repair shop, or person of your own choosing. Though not required, it is recommended that an authorized Rotax Jet Propulsion dealer perform preseason maintenance preparation at the same time that any safety-related factory campaigns are performed by the authorized Rotax Jet Propulsion dealer.