28 minute read
SAFETY TIPS DURING MAINTENANCE


1.At least on a daily basis check all oil levels. Water level in the radiator and electrolyte level in the battery and perform services according to the service schedule.
2.Ensure tire pressures are even and the correct pressure for the job being done is maintained.
3.Check to ensure that the all controls and preventative mechanisms of the Tractor and implement work correctly and effectively.
4.Ensure that an adequate set of the correct tools is available for maintenance and minor repairs.
5.Ensure that all service work and repairs are carried out on a flat area with a concrete or similar floor.
Do not carry out service work on a tractor until it is switched off, and the parking brake applied and wheels choked.
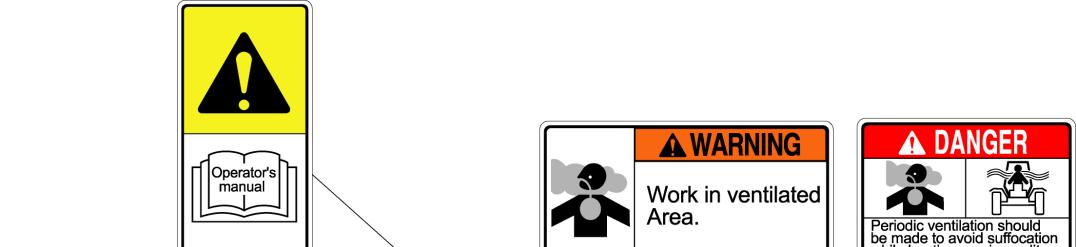
Where a tractor is started in a confined area, ensure that the area is well ventilated as exhaust gases are very harmful, and can cause death.
6.Do not work under raised implements.
7 Whhihltithtitblhltdilddthli When changing wheels or tires ensure that a suitable wheel stand is placed under the axle prior to removing the wheel and the wheels are chocked.
8.Where guards or shields need to be removed to perform a service or repair, ensure that the guard or shield is correctly reinstalled before starting the tractor.
9.Never refuel near an open flame or with an overheated engine. Ensure to turn off the engine before refueling.
10 Thecoolingsystemoperatesunderpressuretakecarewhenremovingtheradiatorcapona The cooling system operates under pressure, take care when removing the radiator cap on a hot engine to prevent being scalded by steam or hot water. Do not add water to the radiator when the engine is hot. Add water to the radiator only after the engine cools down completely.
11.To prevent fires keep the tractor including the engine clean and free from flammable material and well away from fuels and other flammable material.
► MOUNTING AND DEMOUNTING IMPLEMENTS
(1)Ensure that all mounting and removal of implements is done on safe flat ground. Ensure no one is between the tractor and implement and do not get under the implement to avoid accidental injuries.
(2)After mounting the implement, ensure that all sway chains are correctly adjusted and, where PTOshaftsareused,thattheshaftisfittedandsecuredcorrectly. PTO shafts are used, that the shaft is fitted and secured correctly.
(3)Where heavy implements are used, ensure that the combination is well balanced or use proper ballast to achieve balance.
(4)Before leaving the tractor at any time, lower the implement, stop the PTO shaft where applicable, set the parking brake and switch off the engine.
(5) While operating the implements with the PTO keep all bystanders away from any moving parts and do not attempt to make adjustments while the machine is running.
(6) Only the driver should ride on the tractor with the ROPS frame fitted and with the seat belt properly fastened.
(7) Whereyoungchildrenarepresentparticularcareshouldbetakenandthetractorshouldnot Where young children are present, particular care should be taken and the tractor should not be moved until the whereabouts of all children is known.
(8) Only trained operators should operate the tractor and so taking care to ensure that other workers are not injured. In particular they should take care during dusty operations, which will reduce visibility substantially.
(9) Never start the tractor unless the transmission is out of gear, the operator is in the seat and all round safety has been checked.
(10) Only operate the tractor seated in the driver’s seat and never turn or brake suddenly at high speed as this can cause a roll-over and serious injury or death.
(11) When traveling on a public road ensure that the tractor and driver both meet all laws relating to safety and licensing.
When traveling with wide implements use red flags on the extremities and observe all laws including escort requirements.
(12) When operating under adverse conditions, hilly terrain or on bad ground adjust the speed of the tractor to suit the conditions, safety comes first.
Never drive down hill at high speed or with the transmission in neutral. And use of the braking capacity of the engine as well as the service brakes. gpyg
Do not try to change gear going up or down a steep slope, select the correct gear before starting.
(13) Take care when traveling uphill with a heavy implement to ensure that it does not overbalance and tip up the front end.
(14) Never remove or modify the seat belt.
(15) Never remove, modify or repair the ROPS frame.
PLEASE REMEMBER THAT A LITTLE BIT OF EXTRA CARE CAN PREVENT SERIOUSINJURYORDEATHANDAVOIDDAMAGETOYOURTRACTOR SERIOUS INJURY OR DEATH AND AVOID DAMAGE TO YOUR TRACTOR
The following precautions are suggested to help prevent accidents.
A careful operator is the best operator. Most accidents can be avoided by observing certain precautions .
Read and take the following precautions before operating the tractor to prevent accidents. Tractors should be operated only by those who are responsible and properly trained to do so.
■ The Tractor
1. Read the operator’s manual carefully before using the tractor. A Lack of operating knowledge can lead to accidents.
2. Use an approved rollover bar and seat belt for safe operation. Overturning a tractor without a rollover bar can result in death or injury.
3. Do not remove ROPS (Roll Over Protective Structure). Althtblt Always use the seat belt.
4. A fiberglass canopy does not give any protection.
5. To prevent falls, keep steps and platform clear of mud and oil.
6. Do not permit anyone but the operator to ride on the tractor. There is no safe place for extra riders.
7. Replace all missing, illegible or damaged safety signs.
8. Keep safety signs clean of dirt and grease
■ Servicing the Tractor
1.Keep the tractor in good operating condition for your safety. An improperly maintained tractor can be hazardous.
2. Stop the engine before performing any service on the tractor.
3. The cooling system operates under pressure, which is controlled by the radiator cap. It is dangerous to remove the cap while the system is hot Firstturnthecapslowlytostopandallowthepressuretoescapebeforeremovingthecapentirely. First turn the cap slowly to stop and allow the pressure to escape before removing the cap entirely.
4. Do not smoke while refueling the tractor. Keep away any type of open flame
5. The fuel in the injection system is under high pressure and can penetrate the skin. Unqualified persons should not remove or attempt to adjust a pump, injector, nozzle or any part of the fuel injection system. Failure to follow these instructions can result in serious injury.
6Keepopenflameorcoldweatherstartingaidsawayfrombatterytopreventfireor
6. Keep open flame or cold weather starting aids away from battery to prevent fire or explosions.
7. Do not modify or alter or permit anyone else to modify or alter this tractor or any of its components or any tractor functions
■ Operating the tractor
1.Before starting the tractor apply the parking brake, place the position, the hydraulic control levers in the downward position, the remote control valve levers in the neutral position( if fitted) and the transmission in neutral.
2 Donotstarttheengineorcontrols whilestandingbesidesthetractor . Do not start the engine or controls while standing besides the tractor. Always sit in the tractor seat when the engine is running or operating controls.
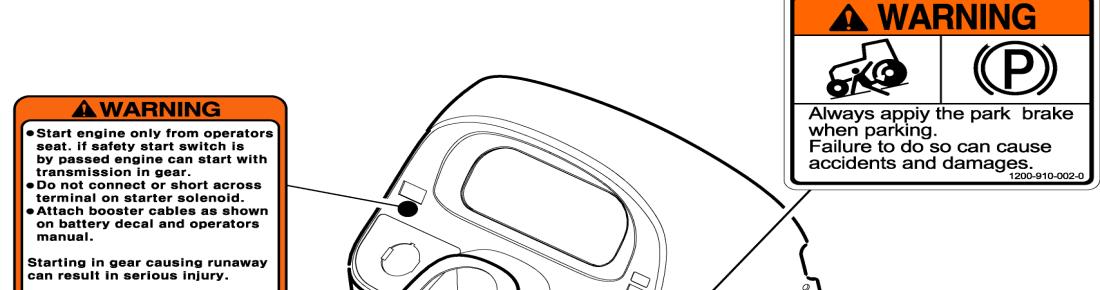
3.Safety Starter Switch.
In order to prevent the accidental starting of the tractor, a safety switch has been provided. The starting system of the tractor is connected through this switch, which becomes operative only when the clutch pedal is depressed.
On some models the shuttle shifter lever and PTO button should also be in the neutral position for completing the starting circuit.
Dtbthftttith Do not bypass the safety starter switch
Consult your Mahindra tractor dealer/distributor if the safety-starting switch malfunctions.
4.Avoid accidental contact with the gear shifter lever while the engine is running. Unexpected tractor movement can result from such contact.
5.Do not get off or climb around the tractor while it is in motion.
6.Shut off the engine, remove the key and apply the parking brake before getting off the tractor.
7.Do not operate the tractor in an enclosed building without adequate ventilation. Exhaust fumes can cause death.
8.Do not park the tractor on a steep slope.
9. If power steering or the engine ceases to operate, stop the tractor immediately
10. Pullonlyfromtheswingingdrawbarorthelowerlinkdrawbarinthedownposition. Pull only from the swinging draw bar or the lower link drawbar in the down position. Use only a drawbar pin that locks in place. Pulling from the tractor rear axle carriers or any point above the rear axle may cause the tractor’s front end to lift.
11.If the front end of the tractor tends to rise when heavy implements are attached to the threepoint linkage, install front end or front wheel weights. Do not operate the tractor with a light front end.
12. Always use the hydraulic position control lever when attaching equipments/implements and when transporting equipment. Be sure that the hydraulic couplers are properly mounted and will disconnect safely in case of the accidental detachment of an implement.
13.Do not leave equipment/implement in the raised position.
14.Use the flasher/ turn signal lights and Slow Moving Vehicle (SMV) signs when driving on public roads during both day and night time, unless prohibited by law.
15.Dim tractor lights when meeting an oncoming vehicle at night. Be sure the lights are adjusted to prevent the blinding the eyes of an oncoming vehicle operator.
16.Emergency stopping instruction; if the tractor fails to stop even after the application of brakes,
■ Drivingthetractor Driving the tractor
1.Watch where you are going especially at row ends, on roads, around trees and low hanging obstacles.
2.To avoid upsets, drive the tractor with care and at speeds compatible with safety, especially when operating over rough ground, crossing ditches or slopes, and when turning at corners.
3. Lock the tractor brake pedals together when transporting on roads to provide proper wheel braking.
4.Keep the tractor in the same gear when going downhill as used when going uphill. Dfhldhill Do not coast or free wheel down hills.
5.Any towed vehicle and/or trailer whose total weight exceeds that of the towing tractor, must be equipped with its own brakes for safe operation.
6.When the tractor is stuck or tires are frozen to the ground, back out to prevent upset.
7.Always check overhead clearance, especially when transporting the tractor.
■ Operating the PTO (Power Take Off) pg()
1.When operating PTO driven equipment, shut off the engine and wait until the PTO stops before getting off the tractor and disconnecting the equipment.
2.Do not wear loose clothing when operating the power take-off or near rotating equipment.
3.When operating stationery PTO driven equipment, always apply the tractor parking brake and block the rear wheels from front and rear side.
4.To avoid injury, always move down the flip part of the PTO. Do not clean, adjust or service the PTO driven equipment when the tractor engine is running.
5.Make sure the PTO master shield is installed at all times and always replace the PTO shield cap when the PTO is not in use.
■ Diesel fuel
1. Keep the equipment clean and properly maintained.
2.Under no circumstances should gasoline, alcohol or blended fuels be added to diesel fuel or explosive hazard. In a closed container such as a fuel tank such blends are more explosive than pure gasoline.. DO NOT USE THESE BLENDS.
3.Never remove the fuel cap or refuel the tractor with the engine running.
4Donotsmokewhilerefuelingorwhenstandingnearfuel
4 Do not smoke while refueling or when standing near fuel
5. Maintain control of the fuel filler pipe when filling the tank.
6. Do not fill the fuel tank to capacity. Allow room for expansion.
7. Wipe up spilled fuel immediately.
8. Always tighten the fuel cap securely.
9. If the original fuel tank cap is lost, replace it with a genuine cap. A non approved cap may not be safe.
10. Do not drive equipment near open fire.
11. Never use fuel for cleaning purposes.
12Aflhthtitdflithldddithi
12 Arrange fuel purchases so that winter grade fuel is not held over and used in the spring.
N.B: It is suggested that after repairs if any of the safety decal/signs are peeled/defaced, the same may be replaced immediately in interest of your safety.
DO’S-For Better performance
DO-Ensure that safety shields are in place and in good condition.
DO-Rdlltiittibfittthtt Read all operating instructions before commencing to operate the tractor.
DO-Carry out all maintenance tasks without fail.
DO-Keep the air cleaner clean.
DO -Ensure that the correct grade of lubricating oils is used and that they are replenished and changed at the recommended intervals.
DO-Fit new sealing rings when the filter elements are changed.
DO-Watch the oil pressure gauge or warning light and investigate any abnormality immediately.
DO-Keep the radiator filled with clean water and in cold weather use an anti-freeze mixture. Drain the system only in an emergency and fill before starting the engine.
DO-Ensure that the transmission is in neutral before starting the engine.
DO-Keep all fuel in clean storage and use a filter when filling the tank.
DO-Attend to minor adjustments and repairs as soon as necessity is apparent.
DO-Allow the engine to cool before removing the radiator filler cap and adding water, remove the radiator cap slowly.
DO-Shift into low gear when driving down steeps hills.
DO-Latch the brake pedals together when driving on a highway.
DO-Keep the draft control lever fully down when not in use.
Don’ts-For safe operation
DON’T-Run the engine with the air cleaner disconnected.
DON’T-Start the tractor in an enclosed building unless the doors and windows are open for proper ventilation.
DON’T-Operate the tractoror engine while lubricating or cleaning.
DON’T-Allow the tractor to run out of diesel fuel otherwise it will be necessary to vent the system.
DON’T-Tamper with the fuel injection pump, if the seal is broken the warranty becomes void.
DON’T-Allow the engine to run idle for a long period.
DON’T-Run the engine if it is not firing on all cylinders.
DON’T-Ride the brake or clutch pedal. This will result in the excessive wear of the brake lining, clutch driven member and clutch release bearing.
DON’T-Use the independent brakes for making turns on the highway or at high speeds.
DON’T-Refuel the tractor with the engine running.
DON’T-Mount or dismount from the right side of the tractor.
DON’T-Tamper the hydraulic control levers’ upper limit stops.
DON’T-Use the draft control lever for the lifting of implements.
DON’T-Start the engine with the PTO engaged.
DON’T-Use the governor control lever (hand throttle) while driving on roads.
Safety Signs
(Replace all missing, damaged or illegible signs)
GENERALSAFETYINFORMATION
IMPORTANT:This “GeneralsafetyInformation” shouldbekeptwiththemachineatalltimesas referencedata.
This symbol means ATTENTION! YOUR SAFETY IS INVOLVED
The message that follows the symbol contains important information about safety. Follow recommended precautions and safe operating practice. DECALS

Decals On The Cabin

PartNo:1200 910 012 0

Universal Symbols
Some of the universal symbols have been shown below with an indication of their meaning
Engine speed
Pd Ci gp rev/minX100)
Pressuredopen slowly
Hours, recorded Continuous variable
Corrosive substance
”Tortoise” Slow or minimum Setting
Engine coolant Warning ”Hare”fast or maximum temperature setting
Fuel level
Engine Stop control
Hazard warning
Transmission oil pressure
NeutralTurn signal
LightsFan
Horn
Engine oil pressure
Air filter
Power take off engaged
Transmission oil temperature
Parking brake
Power take off disengaged Work lamps
Lift arm/raise
Battery chargeLift arm/lower
Differential lock
See operator’s yg manual
Mainfunctionindicator lamp
Check engine indicator
Section -A Controls, Instruments and Operations
Thefollowingpagesinthissectiondetailthelocationandfunctionofvariousinstruments,switches andcontrolsonyourTractor.
Evenifyouoperateothertractors,youshouldreadthroughthissectionofthemanualandensurethat youarethoroughlyfamiliarwiththelocationandfunctionofallthefeaturesofyournewtractor.
Do not start the engine or attempt to drive or operate the tractor until you are fully accustomed with all thecontrols.
ItistoolatetolearnoncetheTractorismoving.
Ifindoubtaboutanyaspectoftheoperationofthetractorconsultyour Mahindra tractor dealer/distributor.
Particularattentionshouldbepaidtotherecommendationsforoperatingtoensurethatyourtractor willgivethelonglifeanddependableserviceforwhichitwasintended.
Description Of Tractor Controls
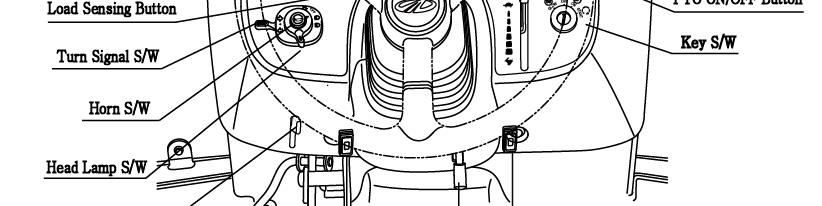
INSTRUMENT AND SWITCHES
► MAIN SWITCH (KEY SWITCH)
[OFF] -The key can be inserted or removed
[ON] -Theelectriccircuitison&preheatfunction
[START] -Thestartermotorisengaged.
WhenthekeyisreleaseditwillreturntotheONposition
[GLOW] -Glowplugspreheatthecombustionchamber
► HEADLAMP,TURNSIGNALSWITCHAND
HORN
■ HEADLAMPSWITCH
Highandlowbeamareoperatedonthemainswitch
Position ①.Lowbeam
Position ②.Highbeam
■ TURN SIGNAL SWITCH
Pulltheturnsignalleverdowntosignalaleftturn. Pushtheturnsignalleveruptosignalarightturn.
■ HORN
PushtheRedbutton.
► HOURMETER
The hour meter consists of digits with the last digit indicating 1/10th of an hour. It shows the hours the tractor has been used.
The lamp at bottom of the hour meter should twinkle diti during operation.
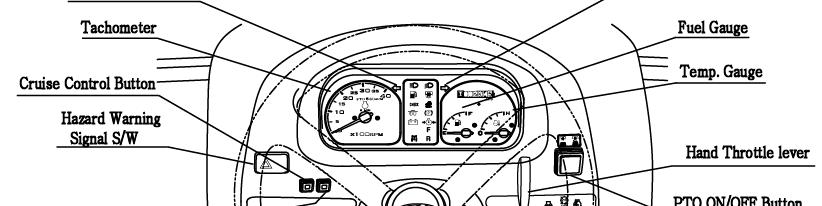
► TACHOMETER
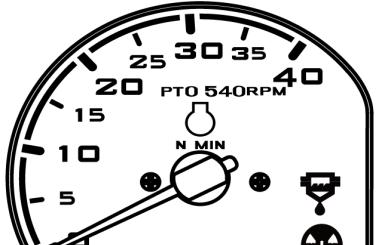
Thismetershowstherevolutionsoftheengineandthe PTOshaftsaswellasthetravelspeedintopgear.
►FUELGAUGE
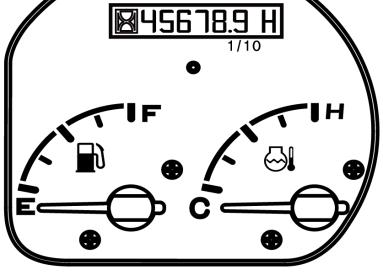
Shows the amount of fuel in the tank when the ignition switch is ON
►WATERTEMPERATUREGAUGE
ShowsthewatertemperaturewiththeignitionswitchON C is low to normal temperature.
H ishightemperature.
If the pointer is in the red H segment the engine is overheating. Refer to this book to rectify the problem.
► HAZARD WARNING SIGNAL SWITCH
Push the hazard warning signal once to operate the hazard warning light. (Left and right turn indicators flash). Push the hazard warning light switch again to switch off the hazard warning lights.
High beam lamp is operated on the combination switch.
Low beam lamp is operated on the combination switch
Parking brake is operated when the footbrake is engaged.
PTO monitor Lamp Shows the revolution of PTO. Refer to monitor lamp on Page 40
Fuel Level
If it comes on while the engine is running, fill the tank with fuel.
Oilpressurelamp
Will go out as soon as the engine starts if the oil pressure is correct. Ifitcomesonwhiletheengineisrunning,stoptheengineandgetexpertadvice
If it comes on while the engine is running, stop the engine and get expert advice
Charge lamp
This light will go off as soon as the engine starts to run to indicate that the alternator is charging. (Please note, asa broken fan belt can causethe light to come on, please stop the engine as overheating can occur if not rectified immediately)
Glow signal lamp indicates preheating.
Air cleaner filter contamination indicator
This comes on when the air cleaner is clogged by foreign materials. When this comes on, open the cover and clean the inside of the cleaner. Also, blow air through the filter in the direction of intake air to clean it or replace the filter with a new one.
Water in fuel warning lamp
When a certain amount of water is collected in the fuel filter, this lamp comes on. In this case, stop the engine immediately and drain water from the fuel filter.
Cruise Control Lamp
Will turn on when cruise control is engaged
Forward indicator lamp is operates when F/R Lever indicates forward ,Reverse indicator lamp is operated when F/R Lever indicates reverse
Check Lamp
Will turn on when the key switch is set to the ON position and safety start conditions are not satisfied. Safety start conditions : ① Brake pedal is depressed ② PTO ON/OFF switch is OFF If it comes on when safety start conditions are satisfied, some electric partisintrouble part is in trouble
Load Sensing Lamp
Will turn on when load sensing function is activated.
■ THE PTO MONITOR LAMP on the dash panel indicates the state of the PTO shaft.
1.If the monitor glows: The PTO is rotating
2.If the monitor is off: The PTO is off
3 Ifthemonitorblinks:ThePTOispresentlystationarybutwill If the monitor blinks: The PTO is presently stationary but will instantly start rotating of the clutch pedal is released or the implements lowered.
Two switches operate the independent PTO.
1. PTO ON/OFF SWITCH: PTO ON/OFF switch is located on the RHS, of the dash cover and can be identified easily with its built in red colored indicator. When the switch is pushed down to start the PTO indicator glows to indicate that the switch and the PTO are in the ON position, if the switch is pushed down again the indicator goes off signaling that the PTO is OFF.
Warning
If working on hard soils or, pavements with a rotary implement the PTO ON/OFF switch must be put to the OFF position to stop the PTO from rotating , If this is not done the rotating blades of the implement will push on the hard ground below and in turn push the tractor toward ,causing accidents which can lead to serious injuries or death death.
2 Extra precaution must be taken to clear the area of bystanders/onlookers when using PTO driven implements. The rotating blades of the implements can cause serious injuries on contact. The warning that is indicated by the blinking PTO monitor is to make the operator aware that the PTO is in the on position and will instantly start rotating if the clutch pedal is released or implement is lowered or both.
3.In no case should the specified rotating speeds indicated by the implement manufacturer be exceeded as the same can lead to serious damage to the tractor/equipment and can lead to serious injuries to persons around.
► CRUISE CONTROL BUTTON
■ Engaging Cruise Control
–Depress the forward speed control pedal until the required speed is achieved.
–Press the cruise control button to engage cruise control.
–Release the forward speed control pedal.
– The cruise control is only operational when the machine is traveling ypg forward.
■ Disengaging Cruise Control
To disengage the cruise control you can either press the cruise control button or depress the brake pedal.
► CRUISE SPEED CONTROL SWITCH
Cruise speed can be increased or decreased while cruise control is engaged.
Press and release the top of the cruise speed control switch(+) to increasecruisespeedbyincrementratio.Pressandreleaseagainto increase cruise speed by increment ratio. Press and release again to increase cruise speed more by increment ratio.
Press and release bottom of cruise speed control switch(-) to increase by increment ratio.
Press and release again to decrease cruise speed more by increment, Ratio.
Adjusted setting is erased when cruise control is disengaged.
Cruisespeed Controlswitch Cruise Speed Control Switch
►LOAD SENSING BUTTON
Load sensing function is used to prevent the engine from stalling during heavy load application. Press the load sensing button to activate the load sensing function.
Ifhiddhhh If the engine speed drops more than the set range, the controller should reduce HST speed to help the engine to recover. The heavier the load on the engine, the more the tractor speed is reduced.
Press the switch again to turn off the load sensing function LOAD
Sensing Button
► MODE(SENSITIVITY) SWITCH
The tractor allows the user to choose a response sensitivity among three different modes.
■ Mode 1
Fully depress the top of the mode switch to activate mode 1. This mode gives the higher response sensitivity to the drive pedal movement. illidikhiddiihillbjk It will provide quicker changes in speed or direction. The tractor will be more jerky.
■ Mode 2
Depress the top or the bottom of the mode switch to activate mode 2. This mode gives the medium response sensitivity to drive pedal movement which is typical to most normal operating conditions.
■ Mode 3
Fully depress the bottom of the mode switch to activate mode 3. This mode gives the slow response sensitivity to the drive pedal movement.
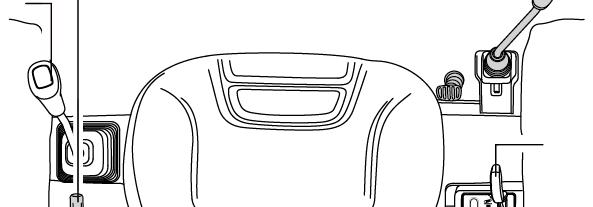
Tractor Controls
Steering Wheel

Throttle Lever
Tilt Lever
4WD Shift Lever
SubGearLever
Sub Gear Lever
Forard/Reerse
Forward / Reverse Speed Control Pedal Joystick Lever
Position Lever
Auxiliary Valve Lever
► THROTTLE LEVER ( HAND THROTTLE ) pushing it away from the driver decreases engine speed.
Pulling the hand throttle toward the driver increases engine speed.
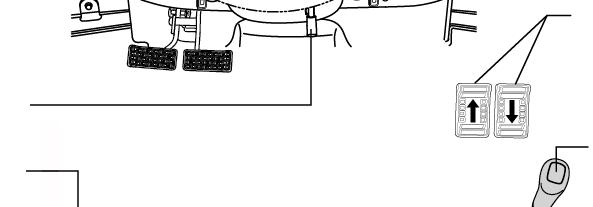
► SPEED CONTROL PEDAL
The Speed Control Pedal is located on the RHS of the Operator floor.
Depress the forward speed control pedal to move forward. Depress the reverse speed control pedal to move backward. The speed control pedal will return to neutral position and the tractor will stop when the speed control pedal is released.
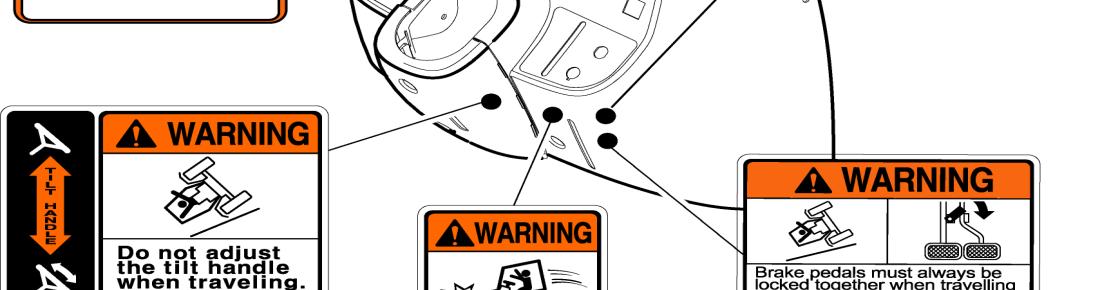
► BRAKE PEDAL
Right and left brakepedals are provided to assist in turning the tractor in the field. cancauserollovers.
A connecting latch is provided to connect the right and left brake pedals for high speed or road use.
Intheinterestofsafety alwaysuseitontheroad or athighspeed asusing onesideonly
When servicing the tractor ensure that the adjustment on both sides is the same. Caution
► PARKING BRAKE LEVER
Connect the brake pedals, push them down while pulling the parking brake lever up to engage. Push the Brake pedal to release.
Traveling with the parking brake on will damage the brakes. Important
► TO AVOID PERSONAL INJURY:
○ When you leave the tractor, be sure to apply the parking brake and stop the engine.
○ In applying the brakes:
The torque of the wheel axle is extremely high while creep speed is being used. Be sure to step down on the clutch pedal completely before applying the brakes, or they will not work.
When starting to operate the tractor, be sure to release the parking brakes. Misuse of the brakes may cause damage to the transmission and is therefore not acceptable to Mahindra for coverage under the warranty.
► SUB GEAR LEVER (RANGE SHIFT LEVER)
Operate the sub gear lever using the clutch to select the appropriate speed for different applications. It is located on the LHS of driver seat.
Avoid damage! To prevent transmission damage: mportant g(g) Subgeaeve pg,yppp motion before changing travel gears.
1.Depress the clutch pedal and stop machine motion completely before shifting the main shift & reverselever (changing direction forward and reverse ).
2.While operating the machine, always depress the clutch pedal and stop machine I
3.Never rest a foot on the clutch pedal while the machine is in motion.
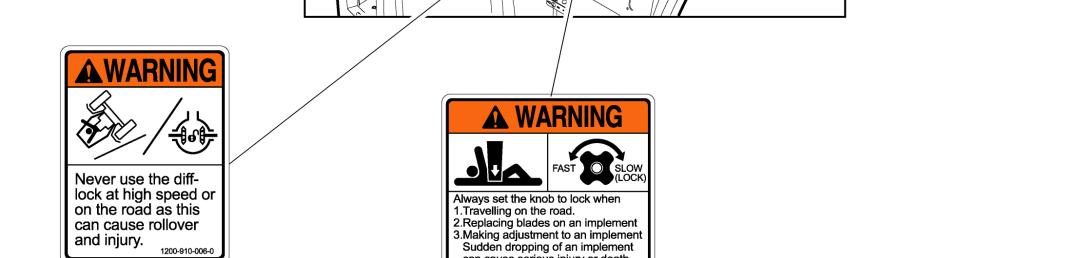
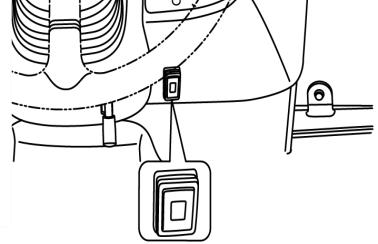
► DIFF-LOCK PEDAL
In the case of wheel slippage use the diff-lock by pushing down on thedifflockpedal.
Diff-Lock pedal the diff lock pedal. To release it remove the foot from the pedal.
Tractor will be difficult to turn if the Diff-lock is engaged, ensure the lock is disengaged before turning the steering wheel. Danger
Danger
Important
Tractor will be difficult to turn if the Diff-lock is engaged, ensure the lock is disengaged before turning the steering wheel.
Do not use high engine RPM when engaging Diff lock If the diff lock does not release after removing the foot from the diff lock pedal, alternatively brake with the left and right brake until it gets released.
Caution
Never use the diff lock at high speed or on the road as this can cause roll over and injury.
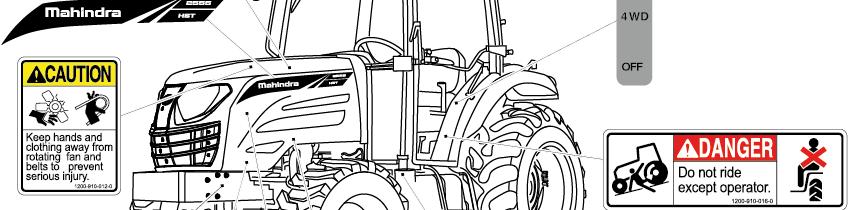
► FRONT WHEEL DRIVE LEVER (4WD)
In the ON position, the front wheels are engaged and in the OFF position they are disengaged.
Engage & disengage the front wheel drive with the front wheels in the straight position and at low Engine RPM.
Important
Dtfthldithihdthdtf Do not use front wheel drive at high speed or on the road as premature wear of components will result.
Always use the clutch when using the front wheel drive lever. Important the use of front wheel drive improves traction performance.
► DRIVER’S SEAT
To adjust the seat backwards and forwards, push the left side of the lever at the front of the seat and set it to the desired position
► TILT LEVER
Toadjusttheinclinationofthesteeringwheelin3stagesandsetittothedesired
To adjust the inclination of the steering wheel in 3 stages and set it to the desired
Ehhillhlkdbfih
Ensure that the tilt lever has locked before moving the tractor. Danger
PTO GEAR
Your tractor is equipped with a 1Speed rear PTO to suit range of applications and conditions. Use the PTO switch to engage or disengage rear PTO.
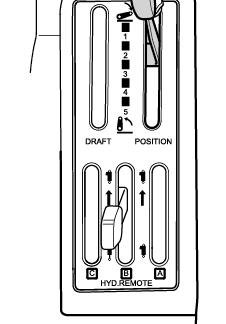
OPERATING THE HYDRAULICS.
The hydraulics are powered with an engine driven hydraulic pump and controlled with a position control lever mounted beside the driver.
Position Control
► Implementscanberaisedandloweredwiththehydraulicpositioncontrolleverandcanbestoppedat Implements can be raised and lowered with the hydraulic position control lever and can be stopped at any position by stopping the lever.
To ensure a consistent working depth, the adjustable stop can be set to ensure that the implement returns to the same depth every time.
To raise the implement: Pull the lever back.
To lower the implement: Push the lever forward.
After finishing the work, always lower the implement to the ground and switch off the engine, set the parking brake to avoid injuries and accidents .
► LOWERING SPEED CONTROL KNOB FOR THE 3 POINT HITCH
This knob controls the downward speed of the hydraulics three point linkage and is positioned at the front of the driver’s seat.
Toslowthedownwardspeed- Turntheknobclockwise.
To slow the downward speed Turn the knob clockwise. To increase the downward speed, turn the knob Counterclockwise.
To lock, turn the knob clockwise. Do not over tighten the knob.
Always set the knob to lock when
1.Traveling on the road
2.Replacing tires or blades on an implement.
3.Makingadjustmentstoanimplement.Thesuddendroppingofanimplementdue Caution
3.Making adjustments to an implement. The sudden dropping of an implement due to hydraulic cause serious injury or death.
REMOTE HYDRAULIC VALVE LEVER
Move the lever up or down and hold. This will raise or lower the implement (rotavator or hydraulic plow).
The remote control valve is detent type (dbl iihD)(double-acting with Detent).
Important:
Do not hold the lever in the “pull” or “Push” position once the remote cylinder has reached the end of the stroke. as this will cause oil to flow through the relief valve.
Forcing oil through the relief valve for extended periods will overheat the oil.
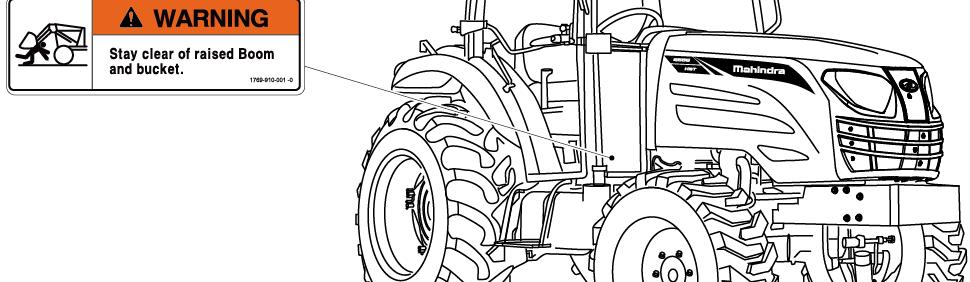
When Using the tractor hydraulic system to power front loader, do not operate the boom and bucket cylinders simultaneously.
► REMOTE HYDRAULIC CONTROL VALVE COUPLER CONNECTING AND DISCONNECTING.
■ Connecting
1.Clean both couplers.
2.Remove dust plugs.
3.Insert the implement coupler to the tractor hydraulic coupler.
4.Pull the implement coupler slightly to make sure couplers are firmly connected.
■ Disconnecting
1. Lower the implement first to the ground to release hydraulic pressure in the hoses.
2. Clean the couplers.
3Rlibihdlitllithihtff 3 Relieve pressure by moving hydraulic control levers with engine shut off Pull the hose straight from the hydraulic coupler to release it
4. Clean oil and dust from the coupler,then replace the dust plugs.
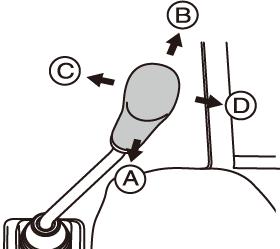
► JOYSTICKLEVER
This simple joystick lever can control the use of a front-end loader. and lift-retract, dump-rollback smoothly and act as one handle lever.
To raise the front end loader : pull the lever to lift position.
To lower the front end loader : push the lever to retract position.
To rollback the bucket : pull the stick to rollback position.
To dump the bucket : push the stick to dump position.
To raise the front end loader.
To lower the front end loader.
To rollback the boom
To dump the boom
NOTE : The Joystick control and valve can also be used for other applications if a front end loader is not fitted.
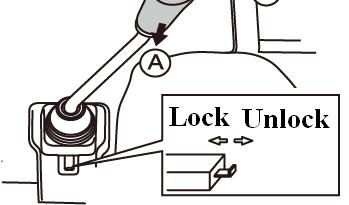
► SAFETYIMPLEMENTFORJOYSTICKLEVER
This simple Safety locking system can lock the joystick by pushing the button and unlock by pulling .
Hydraulic fluid escaping under pressure can have enough force to penetrate the skin. Hydraulic fluid may also infect a minor cut or opening in the skin.
If injured by escaping fluid. See a doctor at once.
Serious infection or reaction can result if medical treatment is not given immediately. Make sure all connections are tight and that hoses and lines are in good condition before applying pressure to the system.
Warning hydraulic system.
Release all pressure before disconnecting the lines or performing other work on the hydraulicsystem.
To find a leak under pressure use a small piece of cardboard or wood. Never use hands.
OPERATING THE 3 POINT LINKAGE (TPL)

► ADJUSTMENT OF THE CHECK CHAIN
There should be no clearance during implement transport and when working with grades, roller mowers, seeders, drills and similar implements. However, a slight play is necessary when working with ploughs, harrows, ditchers, or cultivators.
► ADJUSTMENT OF THE TOP LINK
Lengthening or shortening the top link will change the angle of the implement.
The locating hole of the top link varies with the type of implement used. eypeopeeused.
The most common locations are the 1st and 2nd hole from the top.
► ADJUSTMENTOFTHELIFTROD ADJUSTMENT OF THE LIFT ROD
The adjustment is done with the adjusting handle on the Right hand Lift rod.
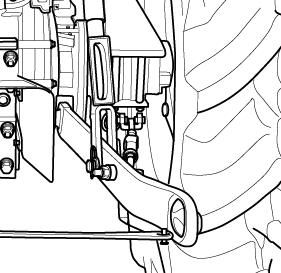
To shorten it wind the handle clockwise and to lengthen it wind it counter clockwise. When adjusted correctly, hold the turn buckle with the stopper provided.
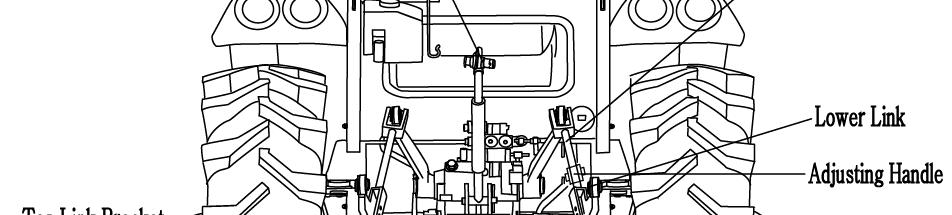
► ADJUSTMENT OF THE LIFT ROD ON THE LOWER LINK
For different applications change the position of the lift rod on the lower links as shown and insert the pin in the direction of the arrow
Lift Rod insert the Pin Check Chain insert the Pin
Only use drawbar to tow and keep the 3 point linkage in the raised position when towing with the drawbar. Position can create unbalance causing the tractor to roll-over & result in death or serious injury. Danger
► MOUNTING IMPLEMENT
If the PTO is used, remove the safety cover from the PTO shaft. Adjust the yoke rod on the lower links to suit the implement in use.
Attach the left lower link, then attach the right lower link using the adjusting handle on the leveling box if required. Attach the top link.
Attach the PTO shaft to the tractor if used, making sure that it is locked in place. Adjust the check chains to suit the implement and tighten the jpg locknuts.
To remove an implement reverse the procedure
Do not attach a PTO shaft while the engine is running and ensure all safety shields are in place. Caution
Starting The Engine
Before starting the engine carry out the pre-operational checks as set out on page 20.
(1) Sitinthedriverseat
Sit in the driver seat
(2)Apply the footbrake.
(3)Put the hydraulic lever in the down position.
(4) Push down the clutch to activate the safety-starting switch.

(5)Put the main gear lever in neutral
(6) Insert the ignition key and turn it on
(7)Ensure that the warning lights are working
(8) Operators need to turn the key to the “ON” position. The glow circuit automatically activates. Operators need to wait for the glow light to turn off . As the lamp goes off, turn the key to the start position to start the engine
(9) Ensure that all the warning lights are off with the engine is running.
Important
Never turn the key to the start position while the engine is running as this can cause serious damage to the starter and engine flywheel. Only engage the starter for a period of not more than 10 seconds.
If the engine does not start, rest the starter for about 20 seconds and try again for a maximum of 10 seconds.
If the engine does not start after repeated attempts, refer to the fault tracing guide.
Especially in cold weather, always allow the tractor to idle for a while to warm up & build up sufficient oil pressure to ensure normal operating temperature for longer engine life. Important
STOPPING THE ENGINE
-After light work let the engine idle for a while and turn the key off.
After long or heavy work allow the engine to idle for 5-10 minutes and turn the key off. Important
WARMING UP
When starting the engine allow it to warm up to operating temperature by allowing it to idle 5-10 minutestoensurefull minutes to ensure full lubrication and operating temperature. Failure to do so can shorten engine life substantially.
► WARMING UP IN COLD WEATHER
Cold weather will change the viscosity of the oil, resulting in a reduced oil pumping capacity, which can cause damage to the engine if it is not warmed up correctly.It also causes problems with the hydraulic system and the synchromesh in the transmission.
Correct times for warming up are:
TemperatureTime for warming up
Above 50°F 5~10 min.
50°F~32°F 10~20 min.
32°F~14°F 20~30 min.
14°F~-4°F 30~40 min.
Below –4°F Over 40 min.
Important
Ensure the handbrake (Foot brake) is on during the warming period. Failure to warm up correctly can result in problems.
When the engine is warm, push down the clutch and engage the main and auxiliary gear levers to the required position.
Push down on the brake pedals and release the handbrake. Increase the engine revolutions and let out the clutch smoothly. Onlychangegearswiththethemaingearleverwhilemovingandensurethatthisisdonewiththe Only change gears with the the main gear lever while moving and ensure that this is done with the full use of the clutch.
► STORING ENGINE IN OPERABLE CONDITION FOR 3 MONTHS OR MORE
When the engine is not operated during storage periods of three months or more, internal engine parts can rust and lose oil film.
As a result, the engine can seize when it is started after storage.
To prevent such rust, the engine must be operated periodically during storage.
Always connect the brake pedals when traveling on the road. Never tow anything except with the drawbar.
Do not tow loads which are too large for the tractor’s capacity to brake effectively especillihillti ially in hilly terrain.
Danger
Take special care when towing large or wide implements. Do not carry passengers.
At all times observe local legislation and road rules.
Tight Turns In The Field
Disconnect the latch connecting the left and right brake pedals to allow the use of individual pedals.
To make a tight turn use both the steering wheel and the brake pedal at the same time.
For a left turns use the left pedal and a right turn the right pedal. Perform tight turns only at a slow safe speed. Doing so at a high speed can cause rollovers and very serious injury or death. Caution
Normal Braking And Parking
Let the engine come back to idle and at the same time push in the clutch and brake simultaneously.
When the tractor has come to a halt, lower any implement to the ground, and put the main gear in neutral.
Applytheparkingbrakestoptheengineandremovethekey Apply the parking brake, stop the engine, and remove the key
Illustration
Always apply the parking brake when parking. Failure to do so can cause accidents and damage. Asanextraprecautionwhenparkingonaslopechocktherearwheels Caution As an extra precaution when parking on a slope, chock the rear wheels.
Uphill Starts On A Steep Slope
With the pedals connected together push down on the brake pedals and push down the clutch. Set all gear levers to low and the throttle to medium engine speed. Release the clutch and as it engages release the brake pedals. Adjustthethrottletotherequiredspeed Adjust the throttle to the required speed
► DRIVING DOWNHILL
Use the engine’s ability to brake when traveling downhill. Never rely on the brakes only and never travel downhill with the gears in neutral.
When operating in hilly terrain the risk of the rollover is increased substantially, please drive with extra care.
When towing trailers in hilly terrain ensure that they are equipped with brakes, use a lower gear to get maximum engine braking and do not change gears on a down hill run Caution
Operation Of The Diff Lock
While the diff lock is a very useful feature, care should be taken in its use as misuse can lead to dangerous situations.
The diff lock should only be used in situations where traction is lost on one of the rear wheels.
Use low engine revolutions when using the diff lock. Ifhdifflkdlfihffhdlhlfd If the diff lock does not release after removing the foot from the pedal use the left and right brake pedals in turn to release it.
Warning
Do not try to engage or use the diff lock on tight turns as serious damage can result.
Check During Driving
Constantly monitor the warning lights on the dash and if any come on stop the tractor to determine the cause.
If the oil pressure light comes on check the oil level first of all.
If the oil level is OK ask a qualified dealer to check the reason for the light coming on.
If the alternator warning light comes on check all connections and ensure that the fan belt is not broken.
If all connections and the fan belt are intact consult your dealer to determine the cause of the problem.
► FUEL GAUGE.
Toavoid excessive condensation in the fuel tank refill it at the end of each day’s work and ensure during the day that it does not drop to a low enough level where the fuel system would require bleeding to expel air in the system after refilling the tank.
► ENGINE COOLING WATER.
If the gauge indicates that the engine is running hot, stop the tractor and check the coolant in the radiator.
► TRAILER SOCKET (Seven Terminal Electrical Socket type) Tooperatetheelectricalsystemsofimplementstrailerlighting
To operate the electrical systems of implements, trailer lighting, warning lamp etc.
Allow the engine to cool down before opening the radiator as serious burns may
Also check to ensure that the fins in the radiator core are not clogged or that the tractor has a broken or stretched fan belt.
Caution result due to hot steam & boiling water. Danger gpp weight of any mounted implement to ensure that the unit is not unbalanced. Also allow for the width when passing other road users. Where fitted use the hazard lights provided.
Caution
When traveling on public or farm roads connect both brake pedals and allow for the
Strictly follow the local traffic regulations.
When operating near others with an implement attached take particular care to allow for the width of the implement and avoid accidents.
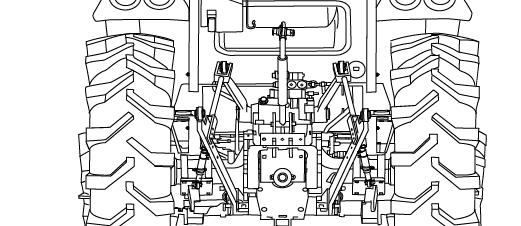
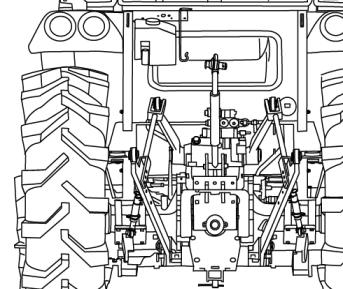
► TRACK ADJUSTMENT
As 2555HST/ HST Cab models of Mahindra are front wheel assist the front track can be set in The rear track can be set in as illustrated.
Tread
Tread
(*) Marking is STANDARD TYPEDIVISIONTYRETREAD