2 minute read
Loosen the capscrews for the timing belt tensioner and remove the spring. Remove the capscrews and the timing belt tensioner.


b.Put the tank in the tank bracket. Make sure that the tank is aligned with the alignment pin. c.Close the latch. d.Connect the quick disconnect fitting to the shut–off valve on the tank. Use your hand to tighten the fitting. Do not open the shut–off valve until the quick disconnect fitting is completely tightened.
Turn the shut–off valve counterclockwise to open the valve. e.Inspect the fuel system for leaks when the shut–off valve is open. Frost on the surface of the tank, valves, or fittings; or a strong odor indicates leakage.
3. If the lift truck has an overhead exhaust, install it as shown in FIGURE 8. and FIGURE 9.
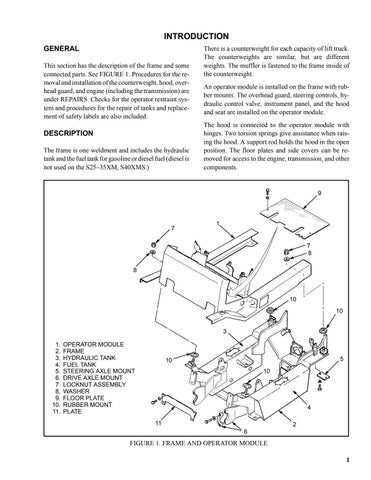
EXHAUST SYSTEM
The muffler is installed inside the cavity of the counterweight. A short exhaust pipe sends the exhaust gases out of the lift truck through the grille in the counterweight.
The lift truck can have an overhead exhaust system. The exhaust pipe is fastened to the top of the counterweight. See FIGURE 8. and FIGURE 9.
Muffler Replacement (See FIGURE 8. and FIGURE 9.)
The counterweight must be removed to replace the muffler. When replacing parts of the exhaust system, see FIGURE 8. and FIGURE 9. When connecting the exhaust pipe to the engine do the following: a.On units with the a gasoline or LPG engine, tighten the exhaust pipe nuts to 16 to 23 N.m (12 to 17 lbf ft). b.On units with a diesel engine, tighten the exhaust pipe nuts to 32 to 47 N.m (24 to 35 lbf ft). c.On units with an overhead exhaust, tighten the capscrews that hold the vertical pipe to the counterweight to 15 to 18 N.m (12 to 17 lbf ft). Install the cover.
RADIATOR AND COOLING SYSTEM
WARNING
DO NOT remove the radiator cap while it is hot. Hot coolant and steam can cause burns. Make sure the label is on the radiator cap. See FIGURE 7. Removal (See FIGURE 7.)
1. Use the drain valve and drain the coolant from the radiator. Remove the bottom radiator hose and drain the coolant from the engine.
2. Remove the capscrews that fasten the fan to the hub. Remove the capscrews that hold the fan shroud to the radiator. Remove both the fan and the fan shroud.
3. Disconnect the top coolant hose at the radiator. Disconnect the lines to the oil cooler in the side of the radiator. Put caps on the open lines and ports. Remove the capscrews that hold the radiator to the frame. Remove the radiator.
Installation (See FIGURE 7.)
1. Install the radiator. Install the fan and fan shroud in position on the radiator. Install the capscrews that hold the fan shroud. Install the capscrews that fasten the fan to the hub.
2. Connect the upper coolant hoses at the radiator. Connect the lines for transmission oil to the oil cooler in the radiator.
FIGURE 7. COOLING SYSTEM
4 3
2
1
5
1.RADIATOR 2.RADIATOR CAP 3.AUXILIARY COOLANT
RESERVOIR 4.SHROUD 5.DRAIN VALVE