7 minute read
DEALER CHECK LISTS


PRE-DELIVERY CHECK LIST (DEALER’S RESPONSIBILITY)
Inspect the equipment thoroughly after assembly to be certain it is set up properly before delivering it to the customer. The following check list is a reminder of points to inspect. Check off each item if it is found satisfactory or after proper adjustment is made.
___Check that all safety decals are installed and in good condition. Replace if damaged.
___Check all bolts to be sure they are properly torqued.
___Check that all cotter pins and safety pins are properly installed. Replace if damaged.
DELIVERY CHECK LIST (DEALER’S RESPONSIBILITY)
___Show customer the safe, proper procedures to be used when mounting, dismounting, and storing equipment.
___For mounted units, add wheel weights, ballast in front tires, and/or front tractor weight to enhance front end stability. A minimum 20% of tractor and equipment gross weight must be on front tractor wheels. When adding weight to attain 20% of tractor and equipment weight on front tractor wheels, you must not exceed the ROPS weight certification. Weigh the tractor and equipment. Do not estimate!
___Show customer how to make adjustments.
___Present Operator's Manual and request that customer and all operators read it before operating equipment. Point out the manual safety rules, explain their meanings and emphasize the increased safety hazards that exist when safety rules are not followed.
___Point out the safety decals. Explain their meaning and the need to keep them in place and in good condition. Emphasize the increased safety hazards when instructions are not followed.
___Explain to customer the potential crushing hazards of going underneath raised equipment. Instruct customer that service work does not require going underneath unit and never to do so.
The operator is responsible for the safe operation of this overseeder. The operator must be properly trained. Operators should be familiar with the equipment, the tractor, and all safety practices before starting operation. Read the safety rules and safety decals on pages 5 to 8.
Recommended tractor ground speed is from 2 to 5 mph (3 - 8 kph).
Power unit must be equipped with ROPS or ROPS cab and seat belt. Keep seat belt securely fastened. Falling off power unit can result in death from being run over or crushed. Keep foldable ROPS system in “locked up” position at all times.
Never allow children or untrained persons to operate equipment.
Keep bystanders away from equipment.
NEVER GO UNDERNEATH EQUIPMENT. Never place any part of the body underneath equipment or between moveable parts even when the engine has been turned off. Hydraulic system leak down, hydraulic system failures, mechanical failures, or movement of control levers can cause equipment to drop or rotate unexpectedly and cause severe injury or death.
•Service work does not require going underneath.
•Read Operator's Manual for service instructions or have service performed by a qualified dealer.
Keep hands, feet, hair, and clothing away from equipment while engine is running. Stay clear of all moving parts.
remove key, inspect, and repair any damage before resuming operation.
Stop power unit and equipment immediately upon striking an obstruction. Turn off engine,
Always wear relatively tight and belted clothing to avoid getting caught in moving parts. Wear sturdy, rough-soled work shoes and protective equipment for eyes, hair, hands, hearing, and head; and respirator or filter mask where appropriate.
Overseeder Roller Operation
The Overseeder is an excellent turf reconditioning tool. Its ground penetration promotes a healthy root system by allowing water, air, and sunlight to enter the roots.
For best results, adjust the overseeder level front to back so that the front and rear rollers work together. Control fore and aft pitch by adjusting the tractor's top link length.
Front Rollers
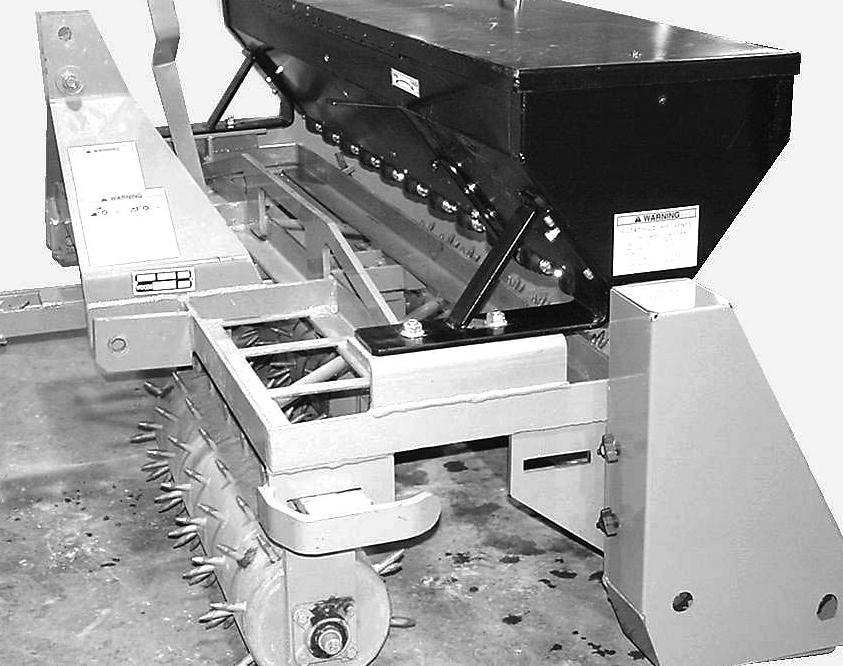
When the front rollers are straight (Figure 1) and the overseeder is pulled forward, the large front pins will penetrate the soil in a straight pushing action, and little disturbance is caused to the turf.
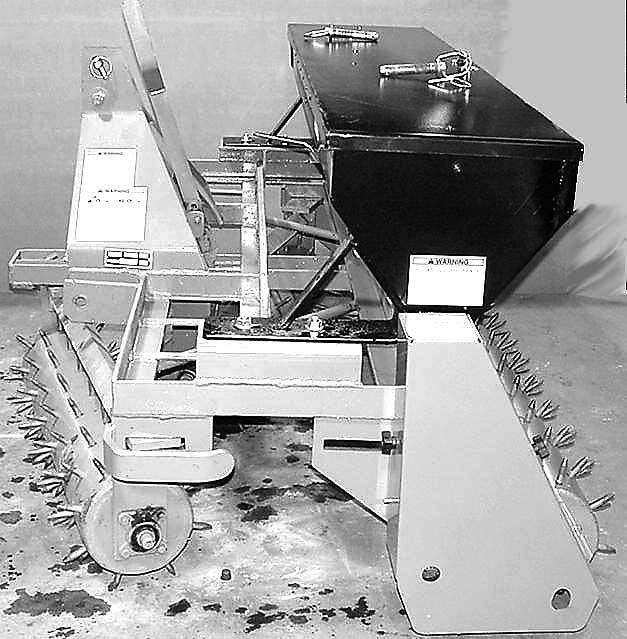
The front rollers can be angled to promote a more aggressive tearing action of the turf. The more the angle, the more tearing action is applied by the front roller pins. For severe turf conditions, the maximum angle position may be desired (Figure 2).
Survey the area to be worked and remove any obstructions that may affect the performance of the equipment.
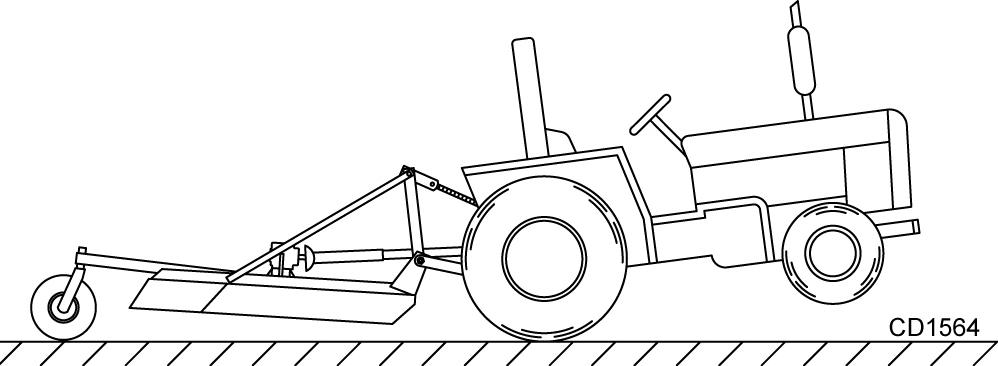
Tractor Stability
A minimum 20% of tractor and equipment weight must be on the tractor front wheels when attachments are in transport position. Without this weight, tractor could tip over, causing personal injury or death. The weight may be attained with a loader, front wheel weights, ballast in tires or front tractor weights. Weigh the tractor and equipment. Do not estimate.
Rear Rollers
The rear roller firms and presses soil kicked up by the front roller. This creates a uniform seedbed with the loose soil needed for proper seed germination. The spring tension on the rear roller can be adjusted to deliver the desired down pressure and roller action and achieve the desired seedbed appearance.
When the situation permits, making a second pass 90 degrees to the first is an effective way for the roller pins to penetrate areas where uneven soil conditions exist.
In extremely compacted soil conditions, add extra weight to the overseeder to help the roller pins penetrate the turf and soil sufficiently.
To Begin Operation
The power for operating the overseeder comes from contact between the overseeder rollers and the turf.
Know how to stop the tractor and overseeder quickly in an emergency.
Attaching Overseeder To Tractor
NOTE: This overseeder is designed for use on Category 1, 3-point tractors. See page 4 for specifications.
1. Attach the tractor’s lower lift arms to the overseeder and secure with mounting pins (11) and klik pins. See Figure 4.
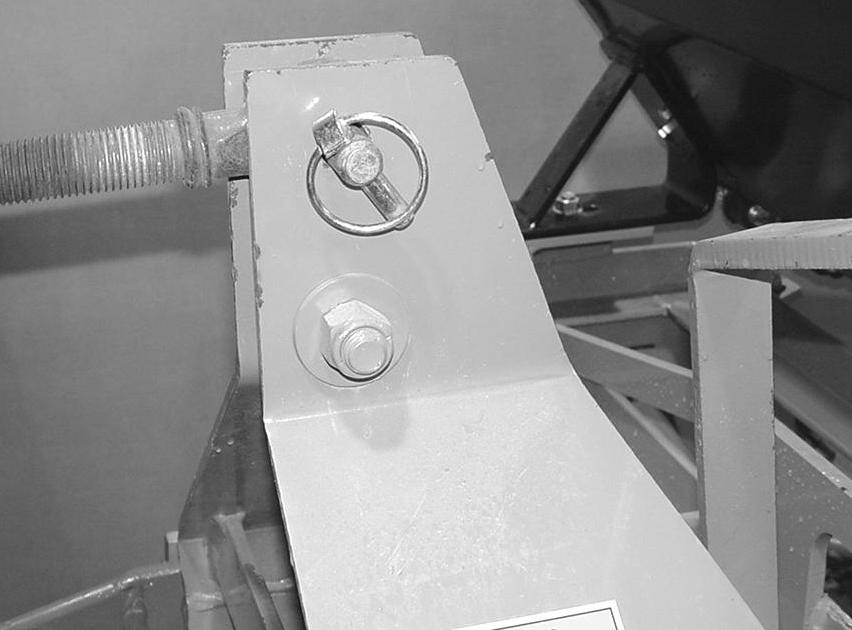
2. Attach the tractor’s top link to the upper mast of the overseeder. Secure with high-strength top link pin and retaining pin provided with the tractor. See Figure 5.
3. Adjust top link as needed to level the overseeder fore and aft.
4. Adjust the lower lift arm anti-sway device to prevent the overseeder from excessive side-to-side movement.
QUICK HITCH BUSHING KIT (OPTIONAL)
NOTE: An optional quick hitch bushing kit (5WP1002019) is available through your dealer.
1. Use bushing kit when using a quick hitch.
2. Place .94 x 1.44 x 2.44 bushings (5WP1001702) over mounting pins and secure into position.
Adjust Front Roller Angle
1. Position tractor and overseeder on a level surface.
2. Raise overseeder slightly off the ground.
3. Stop engine and set parking brake.
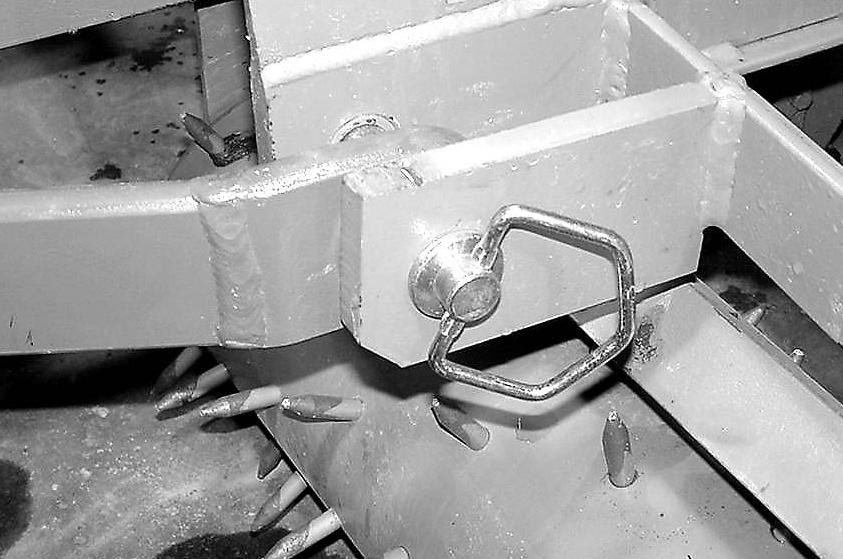
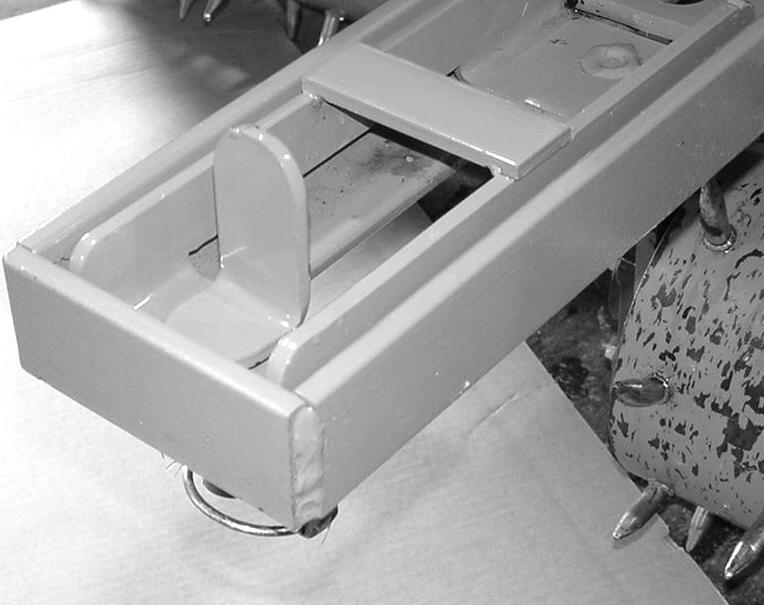
4. Remove klik pin (21), lock pin (15), and lock assembly (5), Figure 6, from front of overseeder.
5. Raise the adjustment handle (16), Figure 7, and pivot it to the next adjustment hole. Move handle rearward; front roller will start to angle. Continue this process until front roller has the desired angle.
6. Install lock assembly (5), lock pin (15), and klik pin (21) to secure front roller into position.

7. Reverse this procedure to move front roller back into normal position.
Seeding Operation
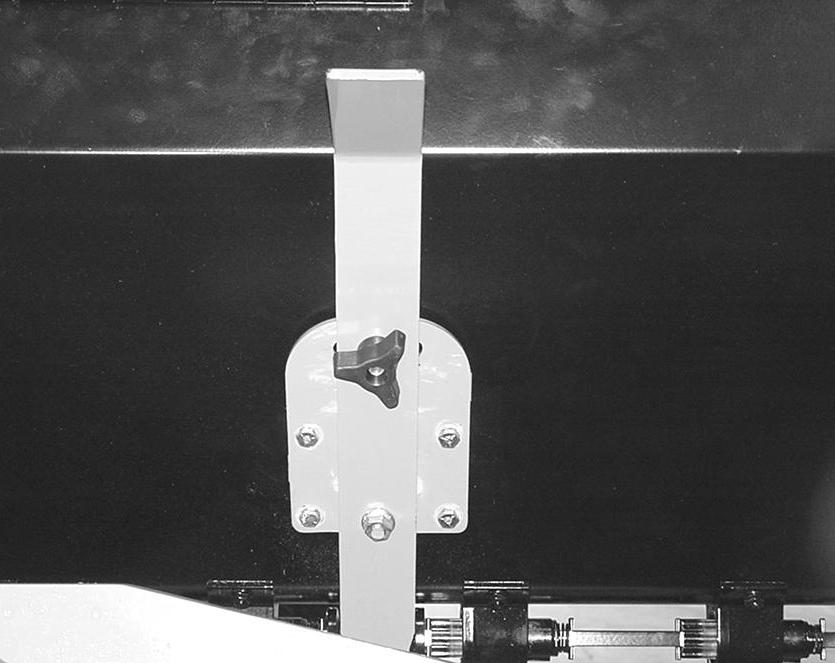
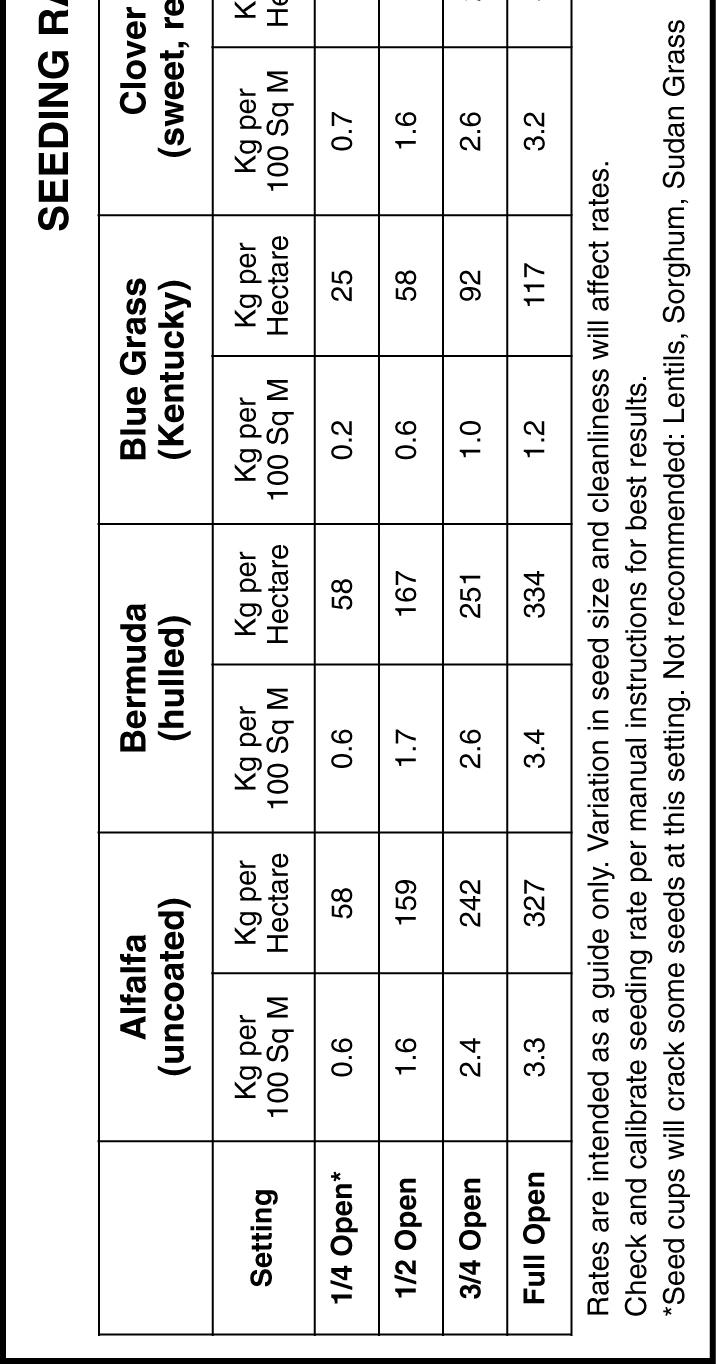
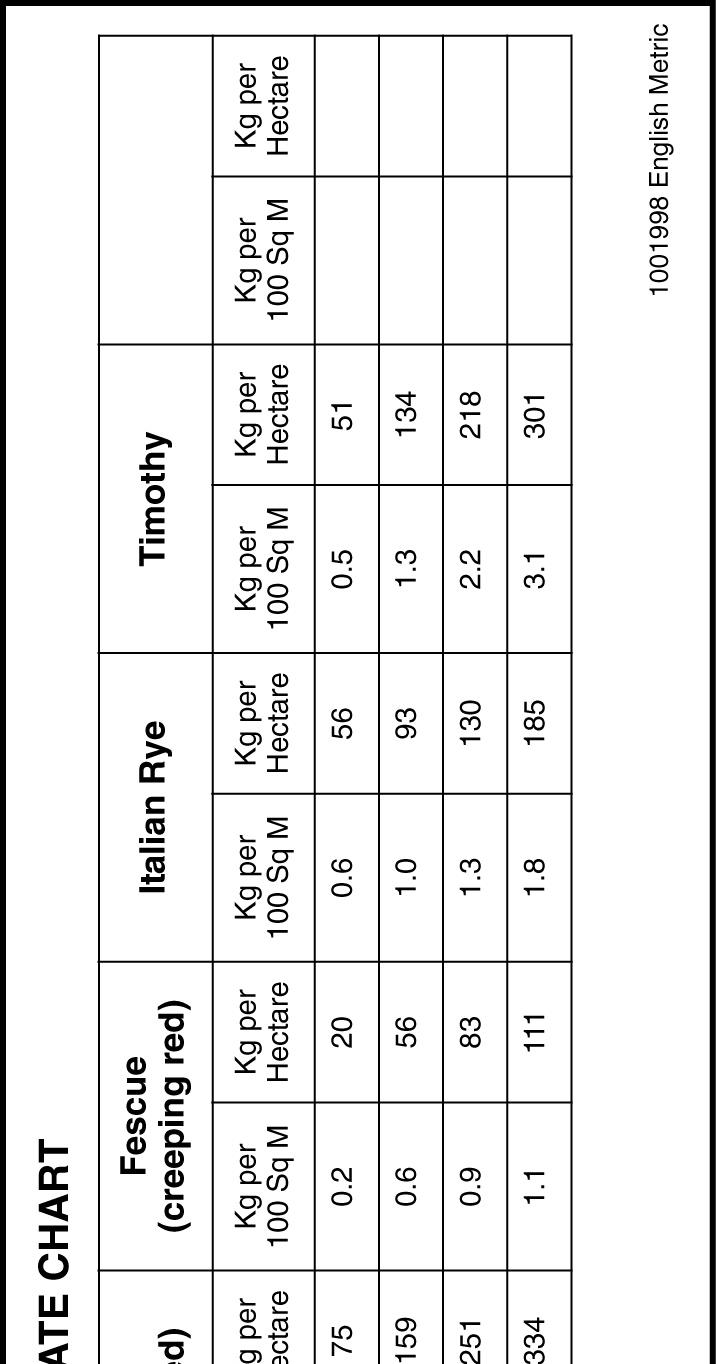
Tractor speed and seed flow settings are critical for proper seed population. Check the seed control chart , located on the inside of the seedbox lid (see page 14). Adjust the flow control handle (Figure 8) as needed for the seed being used and the population desired.
Tractor speed, normally 2-5 mph (3-8 kph), should be established so that uniform seed incorporation occurs with the action of the rollers.
The seed chart is based on a standard sprocket configuration. Any adjustments to this ratio will result in a change to the flow rate, as described in the chart.
NOTE: The seed control chart should be used as a general guide only.
Before seeding an area, check the attitude of the seeder and adjust the top link so that the front and rear rollers are level. Adjust the 3-point lower lift stop so that the roller spikes penetrate the ground at 3/4" (19 mm) or enough to remove the tracks left by the tractor tires.
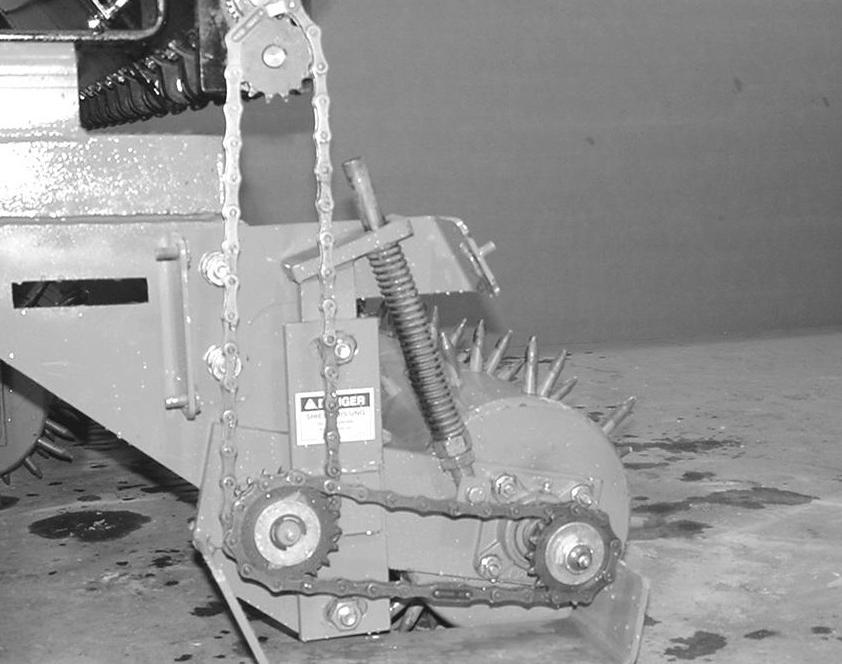
Always run the drive chain with some slack in the chain. An extremely tight chain can damage the roller shaft, the roller bearings, and the idler shaft and bearing.
When properly torqued, the hex lock nut (1), Figure 9, drives the seedbox roller chain. Disengage the seedbox chain when not in use by backing off a 1/4 turn on the lock nut.
Notice
■ Before closing the seed cup flow, make sure cups are not full of seed (especially small, round, hard seed). To reduce the amount of seed remaining in cups, cover the holes above the seed cups with a strip of cardboard and run the seeder a short distance. Failure to do so could result in seed cup damage.
PRE-OPERATION CHECK LIST (OWNER'S RESPONSIBILITY)
Operating Tips
Do not allow dirt to build up on the roller sprockets. Clean sprockets and chain as needed. Excessive buildup of material can cause damage to the roller and idler shafts.
___Review and follow all safety rules and safety decal instructions on pages 5 through 8.
___Check that equipment is properly and securely attached to tractor.
___Check that all safety decals are installed and in good condition. Replace if damaged.
___Do not allow riders.
___Check that all hardware is properly installed and secured.
___Check that shields and guards are properly installed and in good condition. Replace if damaged.
___Check all lubrication points and grease as instructed in “Lubrication Information” on page15.
___Make sure tractor ROPS or ROPS cab and seat belt are in good condition. Keep seat belt securely fastened during operation.
Calibrating the Overseeder for Unlisted Seed or Seed Blends
7. If seed rate is not correct, repeat steps 1 through 6, after adjusting the seed cup opening.
Formula (Metric formula in italic)
Revolutions per 1000 sq. ft. (100 2m ):
TR107258 (62.4)
TR106069 (74.3)
TR104887 (93.6)
(___ g ÷ 1000 = ___ kg)
Weight of collected seed ___ oz. x .0625 = ___ lbs.
Seed per acre (hectare) ___ lbs. x 43.56 =___ lbs. per acre (___ kg x 48.9 =___ kg per hectare)
Example (Metric formula in italic)
TR1048 rear roller was rotated 87 complete revolutions in the direction of travel as specified above. Collected seed weighed 10 ounces or .63 pounds (10 oz. x .0625 = .63 lbs). Seed rate was calibrated at .63 lbs. x 43.56 = 27.4 lbs. of seed per acre.
Equipment You will need the following equipment to calibrate your seeder.
1. Two jack stands.
2. One to two pound (0.51 kg) sample of seed.
3. One tarp or canvas approximately 48" x 84" (1.2 m x 2.1 m).
4. One scale capable of measuring ounces or tenths of a pound (grams or tenths of a kilogram).
Procedure
1. Evenly distribute seed in the bottom of seed box.
2. Raise overseeder just enough to lift rear roller spikes off the ground and securely block the rear corners of the frame with jack stands. Blocking up prevents hydraulic leak down or mechanical component failure.
3. Place a canvas or tarp under overseeder to collect seed.
4. Open seed cups half way and lock into position.
5. Turn rear roller in the direction of travel the number of revolutions as indicated in the Formula section.
6. Weigh the collected seed and calibrate.
TR1048 rear roller was rotated 93.6 revolutions in the direction of travel as specified above. Collected seed weighed 4000 g or 4 kg (4000g ÷ 1000 = 4 kg). Seed rate was calibrated at 4 kg x 48.9 = 195.6kg of seed per hectare. (Rev. 6/20/2008)
(Rev. 5/2/2008)