2 minute read
Disassembling the Lower Case


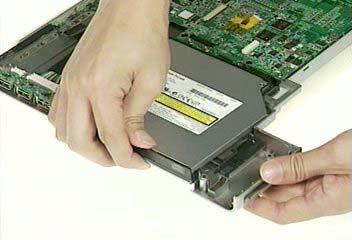
1. Remove the ODD from the lower case.
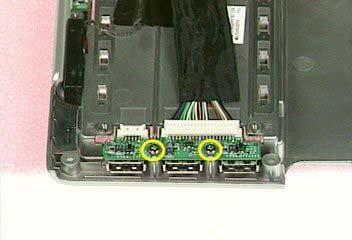
2. Disconnect the right speaker cable from USB cable and disconnect the USB cable from the mainboard.
3. Remove the two screws that secure the USB module.
4. Remove the USB module from the lower case. 5. Disconnect the USB module from the USB module.
6. Disconnect the left speaker cable from the mainboard. 7. Disconnect the Audio cable from the mainboard and remove the audio cable from the audio board.
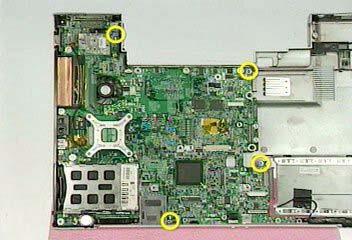
8. Remove the four screws that secure the mainboard.
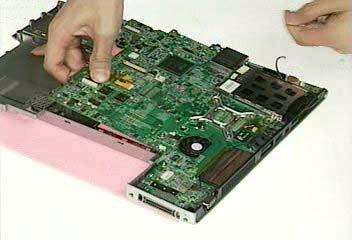
9. Detach the mainboard from the lower case assembly.

10. Tear off the mylar on the MDC cable. 11. Disconnect the MDC cable from the mainboard.
12. Remove the two screws that secure the MDC module.
13. Remove the MDC module from the mainboard. 14. Disconnect the cable from MDC board.

15. Disconnect the fan cable from the mainboard.

16. Remove the seven screws that secure the thermal module. 17. Remove the serew that securew the CPU 18. Turn the screw that secures the CPU. 19. Remove the CPU from the mainboard.
20. Tear off the mylar on the right speaker cable. 21. Remove the right speaker from the lower case. 22. Remove the screw that secure the left speaker. 23. Remove the left speaker from the lower case.
24. Remove the two screws thatsecure the audio board.
25. Remove the audio board from the lower case.


Disassembling the LCD Module and Upper Case
1. Disconnect the LCD cable from the power board. 2. Remove the two screws that secure the power board. 3. Remove another four screws that secure the power board. 4. Remove the power board from the upper case.
5. Tear off the mylar on the touchpad FFC. 6. Disconnect the touchpad FFC from the touchpad board. 7. Remove the three screws that secure the touchpad bracket.