42 minute read
Maintenance - Maintenance schedule

from Dynapac Vibratory rollers CC1200 VI Operating & Maintenance Instruction Manual 4812313735 - PDF
General
Periodic maintenance should be carried out after the number of hours specified. Use the daily, weekly etc. periods where number of hours cannot be used.
Remove all dirt before filling, when checking oils and fuel and when lubricating using oil or grease.
The manufacturer’s instructions found in the engine manual also apply. Specific maintenance and checks on diesel engines must be carried out by the engine supplier’s certified personnel.
Every 10 hours of operation (Daily)
Refer to the contents to find the page number of the sections referred to ! Pos.
Before starting up for the first time on that day
3Clean the outside of the cooler package In dusty conditions when necessary
3Check coolant level
6Check the engine oil level Refer to the engine manual
14Check the hydraulic reservoir level
3Check for free circulation of cooling air
2Fill the fuel tank
7Fill the water tank
8Check the sprinkler system/Drum
9Check the scraper setting/Drum
9Check the spring loaded scrapers Optional
Test the brakes
2018-12-28
After the FIRST 50 hours of operation
See Contents to find the page number of the sections referred to!
Pos. in fig Action
6Change the engine oil and oil filter
13Change the hydraulic fluid filter
10Check bolted joints
Pos. in fig Action
Refer to the engine manual
Every 50 hours of operation (Weekly)
See Contents to find the page number of the sections referred to!
4Check indicator for air cleaner Check that the air hoses are in good condition and that the connections are tight
15, 16Grease the steering joint and the steering cylinder brackets
Check the fuel pipe and hose clamps
Drain the fuel prefilter/water separator
Only T4
Every 250 / 750 / 1250 / 1750 hours of operation
See Contents to find the page number of the sections referred to!
Pos. in fig Action
5Check the battery condition
6Change the engine oil and oil filter
6Cleaning the air filter
6Checking belts/belt tension
3Checking cooler hoses and hose clamps
Checking air intake hoses and hose clamps
Refer to the engine manual
Pos. in fig Action
5Check the condition of the battery
6Change engine oil and oil filter
Every 500 hours of operation
See Contents to find the page number of the sections referred to!
Comment
Refer to the engine manual
17Check the oil level in the drum/drums
10Check rubber elements and bolted joints
11Check the hydraulic reservoir cover/breather
15, 16Lubricate the articulated joint and the steering cylinder’s bearings
3Check coolant freezing point
4Replace the air filter (main filter)
6Change the engine's fuel filter
6Replacing the diesel engine’s fuel prefilter/water separator
3Checking cooler hoses and hose clamps
Checking air intake hoses and hose clamps
1Clean the fuel tank
3Clean the cooler package
6Replacing the diesel engine’s V-belt
Change the coolant every other year
Refer to the engine manual
Refer to the engine manual
Every 1000 hours of operation
See Contents to find the page number of the sections referred to!
Pos. in fig Action Comment
5Check the condition of the battery
6Change engine oil and oil filter Refer to the engine manual
17Check the oil level in the drum/drums
10Check the rubber elements and bolted joints
11Check the hydraulic reservoir cover/breather
15, 16Lubricate the articulated joint and the steering cylinder’s bearings
3Check the freezing point of the coolant
Change every other year
4Replace the air filters (main and backup filter)or annually
6Change the engine's fuel filter
Refer to the engine manual
6Replace diesel engine’s fuel prefilter / water separatorRefer to the engine manual
3Check the cooler hoses and hose clamps
1Clean the fuel tank
3Clean the cooler package
6Check engine's valve clearances Contact your local Kubota representative
Checking air intake hoses and hose clamps
Change hydraulic fluid filter
6Replacing the diesel engine’s V-belt
Refer to the engine manual
Every 2000 hours of operation
See Contents to find the page numbers of the sections referred to!
Pos. in fig Action
5Check the battery condition
6Change the engine oil and oil filter
17Check the oil level in the drum/drums
10Check rubber elements and bolted joints
11Check the hydraulic reservoir cover/breather
15, 16Lubricate the articulated joint and the steering cylinder’s bearings
3Check coolant freezing point
4Replace the air filters (main and backup filter)
13Change hydraulic fluid filter
6Change the engine's fuel filter
6Replacing the diesel engine’s fuel prefilter/water separator
1Drain and clean the fuel tank
3Clean the cooler package
7Drain and clean the water tank
6Check the engine valve clearances
12Change the hydraulic fluid
17,18Change/Check the oil in the drum/drums
15Check the condition of the articulation
Lubricate the edge cutter
6Replace the V-belt on the engine
Comment
Refer to the engine manual
Change the coolant every other year
Refer to the engine manual
Refer to the engine manual
Contact your local Kubota representative
Every 3000 hours of operation
See Contents to find the page numbers of the sections referred to!
Pos. in fig Action Comment
5Check the battery condition
6Change the engine oil and oil filter
Refer to the engine manual oil
17Check the oil level in the drum/drums
10Check rubber elements and bolted joints
11Check the hydraulic reservoir cover/breather
15, 16Lubricate the articulated joint and the steering cylinder’s bearings
3Check coolant freezing point
4Replace the air filters (main and backup filter)
13Change the hydraulic fluid filter
6Change the engine's fuel filter
6Replace diesel engine’s fuel prefilter / water separator
3Checking cooler hoses and hose clamps
1Clean the fuel tank
3Clean the cooler package
6Check the engine valve clearances
7Drain and clean the water tank
12Change the hydraulic fluid
Clean the air and fuel filters
Checking air intake hoses and hose clamps
Check injection pump (only D1703)
15Check the condition of the articulation
6Replace the V-belt on the engine
2018-12-28
Change the coolant every other year coolant
Refer to the engine manual
Refer to the engine manual
Contact your local Kubota representative
Contact your local Kubota representative
Every 12th month (Annually)
Refer to the contents to find the page number of the sections referred to !
4Replacing the air filters (main and backup filter)
Every 24th month (Every other year)
Refer to the contents to find the page number of the sections referred to !
Pos. in fig
3Replacing the coolant
3Checking cooler hoses and hose clamps
Checking air intake hoses and hose clamps
Replace when necessary
Replace when necessary
Maintenance, 10h
Every 10 hours of operation (Daily)
Park the roller on a level surface. The engine must be switched off and the parking brake activated when checking or adjusting the roller, unless otherwise specified.
Ensure that there is good ventilation (air extraction) if the engine is run indoors. Risk of carbon monoxide poisoning.
Check - Coolant system
Check that all hoses/hose connectors are intact and tight. Fill with coolant as specified in the lubricants specification.
Take great care when opening the radiator cap while the engine is hot. Wear protective gloves and goggles.
Also check the freezing point. Change the coolant every other year.
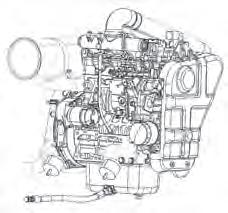
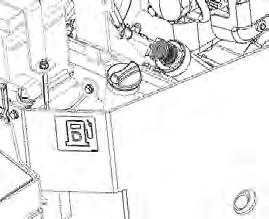
Diesel engine Check oil level
Ensure that the engine cover is fully open when work is carried out under the cover.
Open the engine cover lock and lower the engine cover forwards.
Check the oil level using the dipstick (1). The level should be between the marks. If the level is near the lower mark, top off with fresh engine oil via the filler cap (2). See under the heading lubricants for the correct oil grade.
Never overfill with oil, as this can damage the engine.
2018-12-28
2018-12-28
Check that the oil level is visible in the sight glass.
Open the engine hood and unscrew the filler cap (2), top up with hydraulic fluid (as per lubricant specification) if the level is too low.
Screw on the cap again after filling.
Air circulation - Check
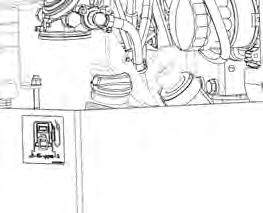
Check that the engine has free circulation of cooling air through the grille (1) in the engine compartment.
Refuel the tank every day before starting work.
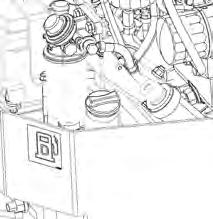
Open the engine hood, unscrew the tank cap (1) fill with diesel up to the lower edge of the filler pipe.
Stop the diesel engine. Short-circuit (press) the filler gun against a non-insulated part of the roller before refuelling, and against the filler pipe while refuelling.
Never refuel while the engine is running. Do not smoke and avoid spilling fuel.
The fuel tank holds 50 liters.
Water tank - Filling
Unscrew the tank cap (1) and fill with clean water. Do not remove the strainer. See technical specifications for the tank volume.
Only additive: A small amount of environment-friendly antifreeze.
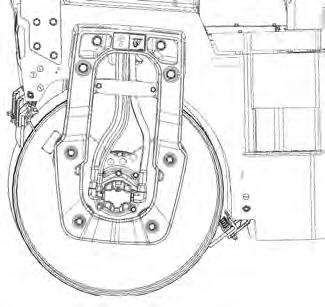
Sprinkler system/Drum Checking - Cleaning
Start the sprinkler system and make sure that no nozzles (2) are clogged. If necessary, clean clogged nozzles and the coarse filter located by the water pump; see figures below.
Make sure that the watering system is empty/drained of water (sprinkler, hoses, tank/s) or that anti-freeze has been added, to prevent the system freezing. Close the ball valves (1) and draw up the anti-freeze liquid through the filter.
When cleaning the coarse filter (1), open the cock (2) and loosen the filter housing. Clean the filter and filter housing. Check that the rubber gasket in the filter housing is intact.
After inspecting and carrying out any necessary cleaning, start the system and check that it works.
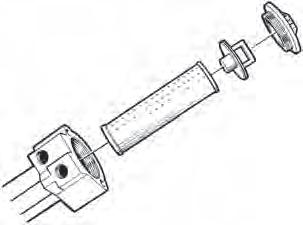
Sprinkler system/Drum Cleaning of sprinkler nozzle

Dismantle the blocked nozzle by hand.
Blow the nozzle (2) and fine filter (4) clean using compressed air. Alternatively, fit replacement parts and clean the blocked parts later on.
After inspecting and carrying out any necessary cleaning, start the system and check that it works.
Wear protective goggles when working with compressed air.
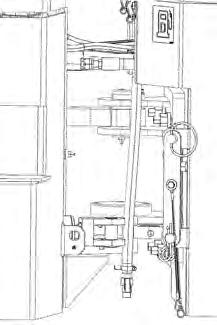
Scrapers, fixed Checking - Setting
Make sure that the scrapers are undamaged. Adjust the scrapers so that they are 1-2 mm from the drum. For special asphalt compounds, it may be better if the scraper blades (1) lie lightly against the drums.
Asphalt remnants can accumulate on the scraper and affect the contact force. Clean as required.
Loosen the screws (2) to adjust the contact pressure of the scraper blade against the drum.
Lock this setting by tightening the lock nut (2) against the mounting plate (3).
Adjust the contact surface on both scraper attachments.
Remember to tighten all the screws after any adjustment.
Scrapers, spring-action (Optional) Checking - Adjustment
The scrapers must be lifted from the drum during transport.
2018-12-28
Brakes - Check
Check operation of the brakes as follows:
Check operation of the brakes as follows:
Run the roller very slowly forward. Hold the steering wheel firmly and brace yourself for a sudden stop.
Make sure the parking brake is deactivated and press in the emergency stop (3). The roller will stop abruptly and the engine is switched off.
After testing the brakes, set the forward/reverse lever in neutral.
Pull out the emergency stop (3), activate the parking brake and start the engine.
The roller is now ready for operation.
Refer also to the section in the manual on operation.
2018-12-28
Maintenance measures, First 50 hours
Maintenance measures, First 50 hours
Park the roller on a level surface. The engine must be switched off and the parking brake activated when checking or adjusting the roller, unless otherwise specified.
Ensure that there is good ventilation (air extraction) if the engine is run indoors. Risk of carbon monoxide poisoning.
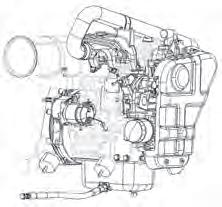
Engine oil and oil filter - Change
Run the engine until it is warm before draining the oil .
Switch off the engine and push in the emergency stop.
Take great care when draining fluids and oils. Wear protective gloves and goggles.
4812313735.pdf
Set a container which can hold at least 8 liters (2 gal) under the drain plug (2).
Undo the oil filler cap (3), and undo the drain plug (2) in the end of the drain hose (1). Let all the engine oil flow out. Refer to the engine manual for detailed instructions when changing oil and filters.
Deliver the drained oil to special waste handling.
Remove the oil filter (4). Collect any spillage. Install the new filter.
Fit the drain plug (2) to the end of the hose.
Fill with fresh engine oil. See under the heading lubricants, for the correct oil grade. Fit the filler cap (3) and check that the oil level is correct using the dipstick.
Start the engine and allow it to idle for a few minutes. During this time, check around the oil filter and drain plug for leaks.
Switch off the engine, wait for a minute or so and then check the oil level. Top up with more oil if necessary.
Replacing the hydraulic oil filter
Open the engine hood.
Loosen the red cap (1) and pull up the filter insert (4).
Refit the red cap temporarily to prevent dust and dirt getting into the tank.
Release the filter insert (4) from the handle (5).
Remove the filter (4) and hand in to a waste disposal site. This is a disposable filter and cannot be cleaned.
Mount the new insert on the handle, refit the unit into the filter holder (6), and refit the red cover. Start the engine and allow it to run at full revs for 30 seconds. Check that the filter cap (3) is tight.
Bolted joints
Check
Check that all bolted joints (1) are tightened correctly.
2018-12-28
Maintenance - 50h
Every 50 hours of operation (Weekly)
Park the roller on a level surface. The engine must be switched off and the parking brake activated when checking or adjusting the roller, unless otherwise specified.
Ensure that there is good ventilation (air extraction) if the engine is run indoors. Risk of carbon monoxide poisoning.
Check main filter
Check the air cleaner's main filter when the indicator shows red. The indicator is mounted on the air cleaner's connecting pipe.
4812313735.pdf steering joint when the engine is running. Danger Activate the parking brake before lubricating.
Do not allow anyone to remain in the vicinity of the steering joint when the engine is running. Danger of crush injury when the steering is operated. Activate the parking brake before lubricating.
The machine must be in neutral (straight) when lubricated. All five grease nipples (1) can now be accessed.
Wipe the grease nipples (1). Grease each nipple with five strokes of the hand-operated grease gun. Make sure that grease penetrates into the bearing. If grease does not penetrate the bearings, it may be necessary to relieve the articulation joint with a jack while repeating the greasing process.
Checking the fuel hoses and hose clamps
Stop the engine before checking or replacing the fuel pipes. Defective fuel pipes can cause a fire.
If the fuel pipes are not connected, plug them at both ends with a clean cloth or paper to prevent dirt from entering. Dirt in the pipes can cause fuel injection pump failure.
Check the fuel lines in case:
- Hose clamps are loose. Lubricate the screw in the clamp with oil and tighten the clamp properly.
- Fuel hoses are worn out. Replace them and the hose clamps every other year.
After replacing the pipes and strap, bleed the fuel system.
Water separator - Draining (on machines equipped with this)
If water or contaminates accumulate in the water separator, an indication will be shown on the display.
If this should happen during operation, drain from the draining plug. (1).
2018-12-28
Maintenance measures - 250 h
Maintenance measures - 250 h
Every 250/750/1250/1750..... hours of operation (every 3 months)
Park the roller on a level surface. The engine must be switched off and the parking brake activated when checking or adjusting the roller, unless otherwise specified.
Ensure that there is good ventilation (air extraction) if the engine is run indoors. Risk of carbon monoxide poisoning.
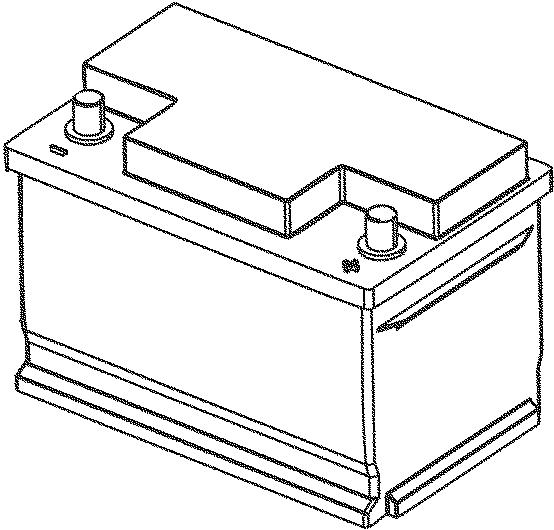
Battery - Check condition
The battery is sealed and maintenance-free.
Make sure there is no open flame in the vicinity when checking the electrolyte level. Explosive gas is formed when the alternator charges the battery.
When disconnecting the battery, always disconnect the negative cable first. When connecting the battery, always connect the positive cable first.
The cable shoes should be clean and well-tightened. Corroded cable shoes should be cleaned and greased with acid-free Vaseline.
Wipe the top of the battery.
4812313735.pdf
Engine oil and oil filter - Change
Run the engine until it is warm before draining the oil . Switch off the engine and push in the emergency stop.
Take great care when draining fluids and oils. Wear protective gloves and goggles.
Set a container which can hold at least 8 liters (2 gal) under the drain plug (2).
Undo the oil filler cap (3), and undo the drain plug (2) in the end of the drain hose (1). Let all the engine oil flow out.
Deliver the drained oil to special waste handling.
Refer to the engine manual for detailed instructions when changing oil and filters.
2018-12-28
2018-12-28
Remove the oil filter (4). Collect any spillage. Install the new filter.
Fit the drain plug (2) to the end of the hose.
Fill with fresh engine oil. See under the heading lubricants, for the correct oil grade. Fit the filler cap (3) and check that the oil level is correct using the dipstick. Start the engine and allow it to idle for a few minutes. During this time, check around the oil filter and drain plug for leaks.
Switch off the engine, wait for a minute or so and then check the oil level. Top up with more oil if necessary.
Wipe also both surfaces for the outlet pipe; see adjacent figure.
Check that the hose clamps between the filter housing and the suction hose are tight and that the hoses are intact. Inspect the entire hose system, all the way to the engine.
4812313735.pdf
Replacing belts/Checking the belt tension
Exercise care to stop the engine and remove the key before checking the belt tension.
Exercise care to install the standalone safety shield after maintenance or inspection. Stop the engine and remove the key.
If necessary, remove the belt guard.
Apply a moderate pressure with your thumb on the belt, between the belt pulleys on the alternator and crankshaft, to check the belt tension. The deflection should be between 7 and 9 mm
If the belt tension is not sufficient: - Loosen the bolts that hold the alternator in place. - Use a prybar/lever and place it between the alternator and engine block, push the alternator outwards to achieve the required belt tension.
To obtain the correct belt tension, loosen the alternator's mounting bolts, and use a lever located between the alternator and the engine block.
Use a prybar/lever and place it between the alternator and engine block, push the alternator outwards to achieve the required belt tension.
Tighten the bolts holding the alternator with the correct torque.
If the belt is loose or damaged, it may result in insufficient charging. Adjust or replace the belt.
2018-12-28
Check - Coolant system
Check that all hoses/hose connectors are intact and tight. Fill with coolant as specified in the lubricants specification.
Take great care when opening the radiator cap while the engine is hot. Wear protective gloves and goggles.
Also check the freezing point. Change the coolant every other year.
4812313735.pdf
Check - Air intake hoses
Check that all hoses/hose connections are intact and tight.
4812313735.pdf 2018-12-28
2018-12-28
Maintenance - 500h
Park the roller on a level surface. The engine must be switched off and the parking brake activated when checking or adjusting the roller, unless otherwise specified.
Ensure that there is good ventilation (air extraction) if the engine is run indoors. Risk of carbon monoxide poisoning.
Battery - Check condition
The battery is sealed and maintenance-free.
Make sure there is no open flame in the vicinity when checking the electrolyte level. Explosive gas is formed when the alternator charges the battery. disconnect the negative cable first. When
When disconnecting the battery, always disconnect the negative cable first. When connecting the battery, always connect the positive cable first.
The cable shoes should be clean and well-tightened. Corroded cable shoes should be cleaned and greased with acid-free Vaseline.
Wipe the top of the battery.
4812313735.pdf
Engine oil and oil filter - Change
Run the engine until it is warm before draining the oil . Switch off the engine and push in the emergency stop.
Take great care when draining fluids and oils. Wear protective gloves and goggles.
Set a container which can hold at least 8 liters (2 gal) under the drain plug (2).
Undo the oil filler cap (3), and undo the drain plug (2) in the end of the drain hose (1). Let all the engine oil flow out.
Deliver the drained oil to special waste handling.
Refer to the engine manual for detailed instructions when changing oil and filters.
Maintenance - 500h 4812313735.pdf
2018-12-28
2018-12-28
Remove the oil filter (4). Collect any spillage.
Install the new filter.
Fit the drain plug (2) to the end of the hose.
Fill with fresh engine oil. See under the heading lubricants, for the correct oil grade. Fit the filler cap (3) and check that the oil level is correct using the dipstick. Start the engine and allow it to idle for a few minutes. During this time, check around the oil filter and drain plug for leaks.
Switch off the engine, wait for a minute or so and then check the oil level. Top up with more oil if necessary.
Drum - oil level
Inspection - filling
Run the roller slowly until the oil plug (1) is positioned as illustrated.
Unscrew the plug and check that the oil level reaches up to the bottom of the hole. Top up with new oil if necessary. Use oil as per the lubricant specification.
Clean the magnetic oil plug (1) from any metallic residue, and refit the plug.
Maintenance - 500h
Rubber elements and bolted joints
Check all rubber elements (1). Replace all elements where more than 25% of the elements on one side of the drum have cracks deeper than 10-15 mm (0.4-0.6 in).
Check using a knife blade or pointed object.
Check also that the attachment screws (2) are tightened.
Hydraulic reservoir cap - Check
Screw off the tank cap and check that it is not clogged. Air must have unobstructed passage through the cap in both directions.
If clogged in either direction, clean with a little diesel oil and blow with compressed air until free passage is assured or replace the cap with a new one.
Check Wear protective goggles when working with compressed air.
4812313735.pdf
2018-12-28
2018-12-28
-
Do not allow anyone to remain in the vicinity of the steering joint when the engine is running. Danger of crush injury when the steering is operated. Activate the parking brake before lubricating.
The machine must be in neutral (straight) when lubricated. All five grease nipples (1) can now be accessed.
Wipe the grease nipples (1). Grease each nipple with five strokes of the hand-operated grease gun. Make sure that grease penetrates into the bearing. If grease does not penetrate the bearings, it may be necessary to relieve the articulation joint with a jack while repeating the greasing process.
Check - Coolant system
Check that all hoses/hose connectors are intact and tight. Fill with coolant as specified in the lubricants specification.
Take great care when opening the radiator cap while the engine is hot. Wear protective gloves and goggles.
Also check the freezing point. Change the coolant every other year.
Air cleaner Check - Replacement of main filter
Replace the air cleaner's main filter when the indicator shows red. The indicator is located on the filter, or in its immediate vicinity.
Release the clips (1), pull off the cover (2), and pull out the main filter (3).
Do not remove the backup filter (4).
Clean the air cleaner if necessary, see section Air cleaner - Cleaning.
When replacing the main filter (3), insert a new filter and refit the air cleaner in the reverse order.
Check the condition of the dust valve (6); replace if necessary.
When refitting the cover, make sure that the dust valve is positioned downwards.
Air filter indicator - Resetting
The air filter indicator is located on the filter, or in its immediate vicinity.
The air filter indicator must be reset after replacing the air filter.
Press the "button" (1) on the top of the indicator to reset.
2018-12-28
Replacing the fuel filter
Place a container underneath to collect fuel that runs out when the filter is released.
Screw off the fuel filter (1). The filter is of the disposable type and cannot be cleaned. Hand in to a waste disposal site.
Install the new filter.
Start the engine and check that the fuel filter is tight.
Refer to the engine manual for detailed instructions when replacing the fuel filter.
Ensure good ventilation (air extraction) if the diesel engine is run indoors. Risk of carbon monoxide poisoning.
Replacing the pre-filter
Activate the parking brake. Switch off the engine and open the engine hood.
Place a container underneath to collect fuel that runs out when the filter is released.
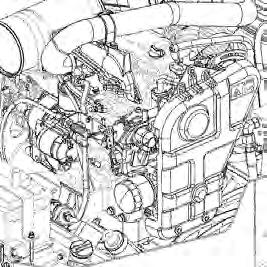
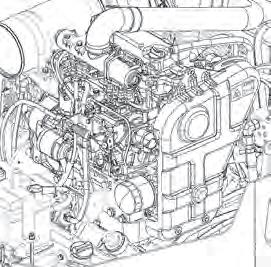
D1703
The prefilter is located to the left of the fuel pump in the engine compartment.
Loosen the hose clamps (2) using a screwdriver. Remove the pre-filter (1) and hand in to a waste disposal site. This is a disposable filter and cannot be cleaned.
Fit a new pre-filter and tighten the hose clamps. Start the engine and check that the pre-filter is tight.
Ensure good ventilation (air extraction) if the diesel engine is run indoors. Risk of carbon monoxide poisoning.
2018-12-28
Check - Air intake hoses
Check that all hoses/hose connections are intact and tight.
4812313735.pdf
It is easiest to clean the tank when it is almost empty.
Pump out any bottom sediment using a suitable pump, such as an oil drain pump. Save the oil in a container and dispose of it in an approved manner.
Keep in mind fire risk when handling fuel.
The fuel tank is made of plastic (polyethylene) and is recyclable.
Fuel filter’s water separator - Draining (on machines equipped with this)
If water or contaminates accumulate in the fuel filter’s water separator, an indication will be shown on the display.
If this should happen during operation, drain from the draining plug. (1).
Coolers Checking - Cleaning
Make sure that the air flow through the coolers (1) and (2) is unobstructed. Dirty coolers are blown clean with compressed air or washed clean using a high-pressure water cleaner.
Blow air or direct water through the cooler in the opposite direction to that of the cooling air.
Take care when using a high-pressure water jet. Do not hold the nozzle too near the cooler.
Wear protective goggles when working with compressed air or high-pressure water jets.
Replacing belts/Checking the belt tension
Exercise care to stop the engine and remove the key before checking the belt tension.
Exercise care to install the standalone safety shield after maintenance or inspection.
Stop the engine and remove the key.
If necessary, remove the belt guard.
Apply a moderate pressure with your thumb on the belt, between the belt pulleys on the alternator and crankshaft, to check the belt tension. The deflection should be between 7 and 9 mm
If the belt tension is not sufficient: - Loosen the fastening bolts that hold the alternator in place. - Use a prybar/lever and place it between the alternator and engine block, push the alternator outwards to achieve the required belt tension.
Tighten the bolts holding the alternator with the correct torque.
If the belt is loose or damaged, it may result in insufficient charging. Adjust or replace the belt.
2018-12-28
Maintenance - 1000h
Performed after 1000 operating hours (each year)
Park the roller on a level surface. The engine must be switched off and the parking brake activated when checking or adjusting the roller, unless otherwise specified.
Ensure that there is good ventilation (air extraction) if the engine is run indoors. Risk of carbon monoxide poisoning.
Battery - Check condition
The battery is sealed and maintenance-free.
Make sure there is no open flame in the vicinity when checking the electrolyte level. Explosive gas is formed when the alternator charges the battery. disconnect the negative cable first. When
When disconnecting the battery, always disconnect the negative cable first. When connecting the battery, always connect the positive cable first.
The cable shoes should be clean and well-tightened. Corroded cable shoes should be cleaned and greased with acid-free Vaseline.
Wipe the top of the battery.
4812313735.pdf
Engine oil and oil filter - Change
Run the engine until it is warm before draining the oil . Switch off the engine and push in the emergency stop.
Take great care when draining fluids and oils. Wear protective gloves and goggles.
Set a container which can hold at least 8 liters (2 gal) under the drain plug (2).
Undo the oil filler cap (3), and undo the drain plug (2) in the end of the drain hose (1). Let all the engine oil flow out.
Deliver the drained oil to special waste handling.
Refer to the engine manual for detailed instructions when changing oil and filters.
2018-12-28
Remove the oil filter (4).
Collect any spillage. Install the new filter.
Fit the drain plug (2) to the end of the hose.
Fill with fresh engine oil. See under the heading lubricants, for the correct oil grade. Fit the filler cap (3) and check that the oil level is correct using the dipstick.
Start the engine and allow it to idle for a few minutes. During this time, check around the oil filter and drain plug for leaks.
Switch off the engine, wait for a minute or so and then check the oil level. Top up with more oil if necessary.
Inspection - filling
Run the roller slowly until the oil plug (1) is positioned as illustrated.
Unscrew the plug and check that the oil level reaches up to the bottom of the hole. Top up with new oil if necessary. Use oil as per the lubricant specification.
Clean the magnetic oil plug (1) from any metallic residue, and refit the plug.
Rubber elements and bolted joints
Check all rubber elements (1). Replace all elements where more than 25% of the elements on one side of the drum have cracks deeper than 10-15 mm (0.4-0.6 in).
Check using a knife blade or pointed object.
Check also that the attachment screws (2) are tightened.
Hydraulic reservoir cap - Check
Screw off the tank cap and check that it is not clogged. Air must have unobstructed passage through the cap in both directions.
If clogged in either direction, clean with a little diesel oil and blow with compressed air until free passage is assured or replace the cap with a new one.
Check Wear protective goggles when working with compressed air.
4812313735.pdf
2018-12-28
Do not allow anyone to remain in the vicinity of the steering joint when the engine is running. Danger of crush injury when the steering is operated. Activate the parking brake before lubricating.
The machine must be in neutral (straight) when lubricated. All five grease nipples (1) can now be accessed.
Wipe the grease nipples (1). Grease each nipple with five strokes of the hand-operated grease gun. Make sure that grease penetrates into the bearing. If grease does not penetrate the bearings, it may be necessary to relieve the articulation joint with a jack while repeating the greasing process.
Check - Coolant system
Check that all hoses/hose connectors are intact and tight. Fill with coolant as specified in the lubricants specification.
Take great care when opening the radiator cap while the engine is hot. Wear protective gloves and goggles.
Also check the freezing point. Change the coolant every other year.
Air cleaner Check - Replacement of main filter
Replace the air cleaner's main filter when the indicator shows red. The indicator is mounted on the air cleaner's connecting pipe.
Release the clips (1), pull off the cover (2), and pull out the main filter (3).
Do not remove the backup filter (4).
Clean the air cleaner if necessary, see section Air cleaner - Cleaning.
When replacing the main filter (3), insert a new filter and refit the air cleaner in the reverse order.
Check the condition of the dust valve (6); replace if necessary.
When refitting the cover, make sure that the dust valve is positioned downwards.
Air filter indicator - Resetting
The air filter indicator is located on the filter, or in its immediate vicinity.
The air filter indicator must be reset after replacing the air filter.
Press the "button" (1) on the top of the indicator to reset.
1
Backup filter - Change
Change the backup filter with a new filter after every third replacement of the main filter.
To change the backup filter (1), pull the old filter out of its holder, insert a new filter and reassemble the air cleaner in the reverse order.
Clean the air cleaner if necessary, see section Air cleaner - Cleaning.
Replacing the fuel filter
Place a container underneath to collect fuel that runs out when the filter is released.
Screw off the fuel filter (1). The filter is of the disposable type and cannot be cleaned. Hand in to a waste disposal site.
Install the new filter.
Start the engine and check that the fuel filter is tight.
Refer to the engine manual for detailed instructions when replacing the fuel filter.
Ensure good ventilation (air extraction) if the diesel engine is run indoors. Risk of carbon monoxide poisoning.
monoxide poisoning.
Replacing the pre-filter
Activate the parking brake. Switch off the engine and open the engine hood.
Place a container underneath to collect fuel that runs out when the filter is released.
D1703
The prefilter is located to the left of the fuel pump in the engine compartment.
Loosen the hose clamps (2) using a screwdriver. Remove the pre-filter (1) and hand in to a waste disposal site. This is a disposable filter and cannot be cleaned.
Fit a new pre-filter and tighten the hose clamps. Start the engine and check that the pre-filter is tight.
Ensure good ventilation (air extraction) if the diesel engine is run indoors. Risk of carbon monoxide poisoning.
2018-12-28
2018-12-28
Fuel tank - Cleaning
It is easiest to clean the tank when it is almost empty.
Pump out any bottom sediment using a suitable pump, such as an oil drain pump. Save the oil in a container and dispose of it in an approved manner.
Keep in mind fire risk when handling fuel.
The fuel tank is made of plastic (polyethylene) and is recyclable.
Coolers
Checking - Cleaning
Make sure that the air flow through the coolers (1) and (2) is unobstructed. Dirty coolers are blown clean with compressed air or washed clean using a high-pressure water cleaner.
Blow air or direct water through the cooler in the opposite direction to that of the cooling air.
Take care when using a high-pressure water jet. Do not hold the nozzle too near the cooler.
Wear protective goggles when working with compressed air or high-pressure water jets.
Checking of EGR cooler
Contact your local Kubota representative for this service
4812313735.pdf
Maintenance - 1000h
Check - Air intake hoses
Check that all hoses/hose connections are intact and tight.
4812313735.pdf
2018-12-28
2018-12-28
Replacing the hydraulic oil filter
Open the engine hood.
Loosen the red cap (1) and pull up the filter insert (4).
Refit the red cap temporarily to prevent dust and dirt getting into the tank.
Release the filter insert (4) from the handle (5).
Remove the filter (4) and hand in to a waste disposal site. This is a disposable filter and cannot be cleaned.
Mount the new insert on the handle, refit the unit into the filter holder (6), and refit the red cover. Start the engine and allow it to run at full revs for 30 seconds. Check that the filter cap (3) is tight.
Replacing belts/Checking the belt tension
Exercise care to stop the engine and remove the key before checking the belt tension.
Exercise care to install the standalone safety shield after maintenance or inspection.
Stop the engine and remove the key.
If necessary, remove the belt guard.
Apply a moderate pressure with your thumb on the belt, between the belt pulleys on the alternator and crankshaft, to check the belt tension. The deflection should be between 7 and 9 mm
If the belt tension is not sufficient: - Loosen the fastening bolts that hold the alternator in place. - Use a prybar/lever and place it between the alternator and engine block, push the alternator outwards to achieve the required belt tension.
Tighten the bolts holding the alternator with the correct torque.
If the belt is loose or damaged, it may result in insufficient charging. Adjust or replace the belt.
2018-12-28
Maintenance - 2000h
Performed after 2000 operating hours (every two years)
Park the roller on a level surface. The engine must be switched off and the parking brake activated when checking or adjusting the roller, unless otherwise specified.
Ensure that there is good ventilation (air extraction) if the engine is run indoors. Risk of carbon monoxide poisoning.
Battery - Check condition
The battery is sealed and maintenance-free.
Make sure there is no open flame in the vicinity when checking the electrolyte level. Explosive gas is formed when the alternator charges the battery.
When disconnecting the battery, always disconnect the negative cable first. When connecting the battery, always connect the positive cable first.
The cable shoes should be clean and well-tightened. Corroded cable shoes should be cleaned and greased with acid-free Vaseline.
Wipe the top of the battery.
Engine oil and oil filter - Change
Run the engine until it is warm before draining the oil . Switch off the engine and push in the emergency stop.
Take great care when draining fluids and oils. Wear protective gloves and goggles.
Set a container which can hold at least 8 liters (2 gal) under the drain plug (2).
Undo the oil filler cap (3), and undo the drain plug (2) in the end of the drain hose (1). Let all the engine oil flow out.
Deliver the drained oil to special waste handling.
Refer to the engine manual for detailed instructions when changing oil and filters.
Remove the oil filter (4). Collect any spillage. Install the new filter.
Fit the drain plug (2) to the end of the hose. Fill with fresh engine oil. See under the heading lubricants, for the correct oil grade. Fit the filler cap (3) and check that the oil level is correct using the dipstick. Start the engine and allow it to idle for a few minutes. During this time, check around the oil filter and drain plug for leaks.
Switch off the engine, wait for a minute or so and then check the oil level. Top up with more oil if necessary.
Drum - oil level Inspection - filling
Run the roller slowly until the oil plug (1) is positioned as illustrated.
Unscrew the plug and check that the oil level reaches up to the bottom of the hole. Top up with new oil if necessary. Use oil as per the lubricant specification.
Clean the magnetic oil plug (1) from any metallic residue, and refit the plug.
Rubber elements and bolted joints
Check
Check all rubber elements (1). Replace all elements where more than 25% of the elements on one side of the drum have cracks deeper than 10-15 mm (0.4-0.6 in).
Check using a knife blade or pointed object.
Check also that the attachment screws (2) are tightened.
Hydraulic reservoir cap - Check
Screw off the tank cap and check that it is not clogged. Air must have unobstructed passage through the cap in both directions.
If clogged in either direction, clean with a little diesel oil and blow with compressed air until free passage is assured or replace the cap with a new one.
Wear protective goggles when working with compressed air.
2018-12-28
Steering cylinder and steering jointLubrication
Do not allow anyone to remain in the vicinity of the steering joint when the engine is running. Danger of crush injury when the steering is operated. Activate the parking brake before lubricating.
The machine must be in neutral (straight) when lubricated. All five grease nipples (1) can now be accessed.
Wipe the grease nipples (1). Grease each nipple with five strokes of the hand-operated grease gun. Make sure that grease penetrates into the bearing. If grease does not penetrate the bearings, it may be necessary to relieve the articulation joint with a jack while repeating the greasing process.
Check - Coolant system
Check that all hoses/hose connectors are intact and tight. Fill with coolant as specified in the lubricants specification.
Take great care when opening the radiator cap while the engine is hot. Wear protective gloves and goggles. the
Also check the freezing point. Change the coolant every other year.
Air cleaner Check - Replacement of main filter
Replace the air cleaner's main filter when the indicator shows red. The indicator is mounted on the air cleaner's connecting pipe.
Release the clips (1), pull off the cover (2), and pull out the main filter (3).
Do not remove the backup filter (4).
Clean the air cleaner if necessary, see section Air cleaner - Cleaning.
When replacing the main filter (3), insert a new filter and refit the air cleaner in the reverse order.
Check the condition of the dust valve (6); replace if necessary.
When refitting the cover, make sure that the dust valve is positioned downwards.
Air filter indicator - Resetting
The air filter indicator is located on the filter, or in its immediate vicinity.
The air filter indicator must be reset after replacing the air filter.
Press the "button" (1) on the top of the indicator to reset.
1
Backup filter - Change
Change the backup filter with a new filter after every third replacement of the main filter.
To change the backup filter (1), pull the old filter out of its holder, insert a new filter and reassemble the air cleaner in the reverse order.
Clean the air cleaner if necessary, see section Air cleaner - Cleaning.
2018-12-28
Replacing the hydraulic oil filter
Open the engine hood.
Loosen the red cap (1) and pull up the filter insert (4).
Refit the red cap temporarily to prevent dust and dirt getting into the tank.
Release the filter insert (4) from the handle (5).
Remove the filter (4) and hand in to a waste disposal site. This is a disposable filter and cannot be cleaned.
Mount the new insert on the handle, refit the unit into the filter holder (6), and refit the red cover. Start the engine and allow it to run at full revs for 30 seconds. Check that the filter cap (3) is tight.
Replacing the fuel filter
Place a container underneath to collect fuel that runs out when the filter is released.
Screw off the fuel filter (1). The filter is of the disposable type and cannot be cleaned. Hand in to a waste disposal site.
Install the new filter.
Start the engine and check that the fuel filter is tight.
Refer to the engine manual for detailed instructions when replacing the fuel filter.
Ensure good ventilation (air extraction) if the diesel engine is run indoors. Risk of carbon monoxide poisoning.
Replacing the pre-filter
Activate the parking brake. Switch off the engine and open the engine hood. fuel
Place a container underneath to collect fuel that runs out when the filter is released.
2018-12-28
D1703
The prefilter is located to the left of the fuel pump in the engine compartment.

Loosen the hose clamps (2) using a screwdriver. Remove the pre-filter (1) and hand in to a waste disposal site. This is a disposable filter and cannot be cleaned.
Fit a new pre-filter and tighten the hose clamps. Start the engine and check that the pre-filter is tight.
Ensure good ventilation (air extraction) if the diesel engine is run indoors. Risk of carbon monoxide poisoning.
Fuel tank - Cleaning
It is easiest to clean the tank when it is almost empty.
Pump out any bottom sediment using a suitable pump, such as an oil drain pump. Save the oil in a container and dispose of it in an approved manner.
Keep in mind fire risk when handling fuel.
The fuel tank is made of plastic (polyethylene) and is recyclable.
Coolers
Make sure that the air flow through the coolers (1) and (2) is unobstructed. Dirty coolers are blown clean with compressed air or washed clean using a high-pressure water cleaner.
Blow air or direct water through the cooler in the opposite direction to that of the cooling air.
Take care when using a high-pressure water jet. Do not hold the nozzle too near the cooler.
Wear protective goggles when working with compressed air or high-pressure water jets.
2018-12-28
Water tank - Draining
Remember that there is a risk of freezing during the winter. Empty the tank, pump and lines.
Remove the drain plug (1) and allow all the water to run out. Wipe clean the drain plug and screw back in.
Water tank - Cleaning
Clean the tank with water and a suitable detergent for plastic surfaces.
Refit the filter housing or the drain plug (1). Fill with water and check for leaks.
The water tank is made of plastic (polyethylene) and are recyclable.
Checking of EGR cooler
Contact your local Kubota representative for this service
4812313735.pdf
Hydraulic reservoir - fluid change
Use an external drainage pump when draining/emptying the hydraulic reservoir. Risk of burn injuries when draining hot oil. Wear protective gloves and goggles.
Unscrew the tank cap. Place the pump's suction hose in the filler/drain outlet in the hydraulic tank. Place the other hose in a container. Use a receptacle that holds at least 15 liters (4 gal).
Start the pumpen so that it sucks out the fluid from the tank.
Check that the hose to the pump reaches the bottom of the hydraulic reservoir to ensure that as much of the fluid as possible is drained.
Collect the oil and deliver to special waste handling.
Fill up with the recommended hydraulic fluid to the correct level. Replace the cap on the tank and wipe clean.
Change the hydraulic fluid filter, see under heading 'Every 1000 hours of operation'.
Start the engine and operate the various hydraulic functions. Check the level in the reservoir and top off as required.
2018-12-28
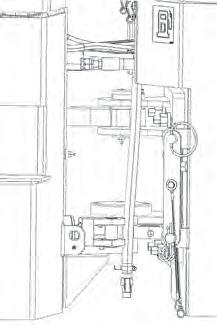
Drum - Oil change
Take great care when draining the fluid. Wear protective gloves and goggles.
Place the roller on a level surface and drive it slowly until the drain plug (1) is straight down.
- Remove the oil plug (1) and allow all the oil to run out.
- Clean and refit the oil plugs (1).
- Start the machine and run until the oil plug (1) is positioned straight up.
- Remove the oil plug (1) and fill the drum with the right quantity and the type of oil according to the lubricant table.
- Refit the oil plug (1).
Switch off the engine and activate the parking brake. (7.4 quarts) under the plug. Collect the oil and

Place a receptacle that will hold at least 7 liters (7.4 quarts) under the plug. Collect the oil and dispose of it properly.
4812313735.pdf
Steering joint - Check
Check the steering joint for any damage or cracks. Check and tighten any loose bolts.
Check also for any stiffness and play.
Refer to the operation section for information on how to operate the edge cutter.
Grease the two points as shown in the figure.
Grease should always be used for lubrication, see the lubricant specifications.
Grease all bearing points with five strokes of a hand-operated grease gun.
2018-12-28
Replacing belts/Checking the belt tension
Exercise care to stop the engine and remove the key before checking the belt tension.
Exercise care to install the standalone safety shield after maintenance or inspection. Stop the engine and remove the key.
If necessary, remove the belt guard.
Apply a moderate pressure with your thumb on the belt, between the belt pulleys on the alternator and crankshaft, to check the belt tension. The deflection should be between 7 and 9 mm
If the belt tension is not sufficient: - Loosen the fastening bolts that hold the alternator in place. - Use a prybar/lever and place it between the alternator and engine block, push the alternator outwards to achieve the required belt tension.
Tighten the bolts holding the alternator with the correct torque.
If the belt is loose or damaged, it may result in insufficient charging. Adjust or replace the belt.
4812313735.pdf
2018-12-28
Maintenance, 3000h
Park the roller on a level surface. The engine must be switched off and the parking brake activated when checking or adjusting the roller, unless otherwise specified.
Ensure that there is good ventilation (air extraction) if the engine is run indoors. Risk of carbon monoxide poisoning.
Battery - Check condition
The battery is sealed and maintenance-free.
Make sure there is no open flame in the vicinity when checking the electrolyte level. Explosive gas is formed when the alternator charges the battery. disconnect the negative cable first. When
When disconnecting the battery, always disconnect the negative cable first. When connecting the battery, always connect the positive cable first.
The cable shoes should be clean and well-tightened. Corroded cable shoes should be cleaned and greased with acid-free Vaseline.
Wipe the top of the battery.
4812313735.pdf
Engine oil and oil filter - Change
Run the engine until it is warm before draining the oil . Switch off the engine and push in the emergency stop.
Take great care when draining fluids and oils. Wear protective gloves and goggles.
Set a container which can hold at least 8 liters (2 gal) under the drain plug (2).
Undo the oil filler cap (3), and undo the drain plug (2) in the end of the drain hose (1). Let all the engine oil flow out.
Deliver the drained oil to special waste handling.
Refer to the engine manual for detailed instructions when changing oil and filters.
Remove the oil filter (4).
Collect any spillage. Install the new filter.
Fit the drain plug (2) to the end of the hose.
Fill with fresh engine oil. See under the heading lubricants, for the correct oil grade. Fit the filler cap (3) and check that the oil level is correct using the dipstick. Start the engine and allow it to idle for a few minutes. During this time, check around the oil filter and drain plug for leaks.
Switch off the engine, wait for a minute or so and then check the oil level. Top up with more oil if necessary.
Drum - oil level
Inspection - filling
Run the roller slowly until the oil plug (1) is positioned as illustrated.
Unscrew the plug and check that the oil level reaches up to the bottom of the hole. Top up with new oil if necessary. Use oil as per the lubricant specification.
Clean the magnetic oil plug (1) from any metallic residue, and refit the plug.
Rubber elements and bolted joints
Check all rubber elements (1). Replace all elements where more than 25% of the elements on one side of the drum have cracks deeper than 10-15 mm (0.4-0.6 in).
Check using a knife blade or pointed object.
Check also that the attachment screws (2) are tightened.
Hydraulic reservoir cap - Check
Screw off the tank cap and check that it is not clogged. Air must have unobstructed passage through the cap in both directions.
If clogged in either direction, clean with a little diesel oil and blow with compressed air until free passage is assured or replace the cap with a new one.
Check Wear protective goggles when working with compressed air.
2018-12-28
Do not allow anyone to remain in the vicinity of the steering joint when the engine is running. Danger of crush injury when the steering is operated. Activate the parking brake before lubricating.
The machine must be in neutral (straight) when lubricated. All five grease nipples (1) can now be accessed.
Wipe the grease nipples (1). Grease each nipple with five strokes of the hand-operated grease gun. Make sure that grease penetrates into the bearing. If grease does not penetrate the bearings, it may be necessary to relieve the articulation joint with a jack while repeating the greasing process.
Check - Coolant system
Check that all hoses/hose connectors are intact and tight. Fill with coolant as specified in the lubricants specification.
Take great care when opening the radiator cap while the engine is hot. Wear protective gloves and goggles.
Also check the freezing point. Change the coolant every other year.
4812313735.pdf
Air cleaner Check - Replacement of main filter
Replace the air cleaner's main filter when the indicator shows red. The indicator is mounted on the air cleaner's connecting pipe.
Release the clips (1), pull off the cover (2), and pull out the main filter (3).
Do not remove the backup filter (4).
Clean the air cleaner if necessary, see section Air cleaner - Cleaning.
When replacing the main filter (3), insert a new filter and refit the air cleaner in the reverse order.
Check the condition of the dust valve (6); replace if necessary.
When refitting the cover, make sure that the dust valve is positioned downwards.
Air filter indicator - Resetting
The air filter indicator is located on the filter, or in its immediate vicinity.
The air filter indicator must be reset after replacing the air filter.
Press the "button" (1) on the top of the indicator to reset.
1
Backup filter - Change
Change the backup filter with a new filter after every third replacement of the main filter.
To change the backup filter (1), pull the old filter out of its holder, insert a new filter and reassemble the air cleaner in the reverse order.
Clean the air cleaner if necessary, see section Air cleaner - Cleaning.
Water tank - Cleaning
Clean the tank with water and a suitable detergent for plastic surfaces.
Refit the filter housing or the drain plug (1). Fill with water and check for leaks.
The water tank is made of plastic (polyethylene) and are recyclable.
Replacing the hydraulic oil filter
Open the engine hood.
Loosen the red cap (1) and pull up the filter insert (4).
Refit the red cap temporarily to prevent dust and dirt getting into the tank.
Release the filter insert (4) from the handle (5).
Remove the filter (4) and hand in to a waste disposal site. This is a disposable filter and cannot be cleaned.
Mount the new insert on the handle, refit the unit into the filter holder (6), and refit the red cover. Start the engine and allow it to run at full revs for 30 seconds. Check that the filter cap (3) is tight.
Water tank - Draining
Remember that there is a risk of freezing during the winter. Empty the tank, pump and lines.
Remove the drain plug (1) and allow all the water to run out. Wipe clean the drain plug and screw back in.
Replacing the pre-filter
Activate the parking brake. Switch off the engine and open the engine hood.
Place a container underneath to collect fuel that runs out when the filter is released.
D1703
The prefilter is located to the left of the fuel pump in the engine compartment.
Loosen the hose clamps (2) using a screwdriver. Remove the pre-filter (1) and hand in to a waste disposal site. This is a disposable filter and cannot be cleaned.
Fit a new pre-filter and tighten the hose clamps. Start the engine and check that the pre-filter is tight.
Ensure good ventilation (air extraction) if the diesel engine is run indoors. Risk of carbon monoxide poisoning.
Fuel tank - Cleaning
It is easiest to clean the tank when it is almost empty.
Pump out any bottom sediment using a suitable pump, such as an oil drain pump. Save the oil in a container and dispose of it in an approved manner.
Keep in mind fire risk when handling fuel.
The fuel tank is made of plastic (polyethylene) and is recyclable.
2018-12-28
Coolers
Checking - Cleaning
Make sure that the air flow through the coolers (1) and (2) is unobstructed. Dirty coolers are blown clean with compressed air or washed clean using a high-pressure water cleaner.
Blow air or direct water through the cooler in the opposite direction to that of the cooling air.
Take care when using a high-pressure water jet. Do not hold the nozzle too near the cooler.
Wear protective goggles when working with compressed air or high-pressure water jets.
Checking of EGR cooler
Contact your local Kubota representative for this service
4812313735.pdf
Replacing the fuel filter
Place a container underneath to collect fuel that runs out when the filter is released.
Screw off the fuel filter (1). The filter is of the disposable type and cannot be cleaned. Hand in to a waste disposal site.
Install the new filter.
Start the engine and check that the fuel filter is tight.
Refer to the engine manual for detailed instructions when replacing the fuel filter.
Ensure good ventilation (air extraction) if the diesel engine is run indoors. Risk of carbon monoxide poisoning.
2018-12-28
Use an external drainage pump when draining/emptying the hydraulic reservoir.
Risk of burn injuries when draining hot oil. Wear protective gloves and goggles.
Unscrew the tank cap. Place the pump's suction hose in the filler/drain outlet in the hydraulic tank. Place the other hose in a container.
Use a receptacle that holds at least 15 liters (4 gal).
Start the pumpen so that it sucks out the fluid from the tank.
Check that the hose to the pump reaches the bottom of the hydraulic reservoir to ensure that as much of the fluid as possible is drained.
Collect the oil and deliver to special waste handling.
Fill up with the recommended hydraulic fluid to the correct level. Replace the cap on the tank and wipe clean.
Change the hydraulic fluid filter, see under heading 'Every 1000 hours of operation'.
Start the engine and operate the various hydraulic functions. Check the level in the reservoir and top off as required.
4812313735.pdf
Draining of water separator
Close the fuel filter knob (1).
Remove the top cap and rinse the inside with diesel fuel.
Remove filter element (2) and rinse the inside with diesel fuel.
After cleaning, install the fuel filter, to keep out of dust and dirt.
Air-bleed the injection pump.
Dust and dirt may cause a injection pump and nozzle failure. Wash the fuel filter cup periodically.
2018-12-28
2018-12-28
Check - Air intake hoses
Check that all hoses/hose connections are intact and tight.
4812313735.pdf
Checking the injection pump (only D1703)
Contact your local Kubota representative for this service
Steering joint - Check
Check the steering joint for any damage or cracks. Check and tighten any loose bolts. Check also for any stiffness and play.
2018-12-28
Replacing belts/Checking the belt tension
Exercise care to stop the engine and remove the key before checking the belt tension.
Exercise care to install the standalone safety shield after maintenance or inspection.
Stop the engine and remove the key.
If necessary, remove the belt guard.
Apply a moderate pressure with your thumb on the belt, between the belt pulleys on the alternator and crankshaft, to check the belt tension. The deflection should be between 7 and 9 mm
If the belt tension is not sufficient: - Loosen the fastening bolts that hold the alternator in place. - Use a prybar/lever and place it between the alternator and engine block, push the alternator outwards to achieve the required belt tension.
Tighten the bolts holding the alternator with the correct torque.
If the belt is loose or damaged, it may result in insufficient charging. Adjust or replace the belt.
1
2018-12-28
Maintenance, every 12th month (Annually)
Air cleaner
Check - Replacement of main filter
Replace the air cleaner's main filter when the indicator shows red. The indicator is mounted on the air cleaner's connecting pipe.
Air filter indicator - Resetting
The air filter indicator is located on the filter, or in its immediate vicinity.
The air filter indicator must be reset after replacing the air filter.
Press the "button" (1) on the top of the indicator to reset.
Backup filter - Change
Change the backup filter with a new filter after every third replacement of the main filter.
To change the backup filter (1), pull the old filter out of its holder, insert a new filter and reassemble the air cleaner in the reverse order.
Clean the air cleaner if necessary, see section Air cleaner - Cleaning.
4812313735.pdf
2018-12-28
Maintenance, every 24th month (Every other year)
Maintenance, every 24th month (Every other year)
Check - Coolant system
Check that all hoses/hose connectors are intact and tight. Fill with coolant as specified in the lubricants specification.
Take great care when opening the radiator cap while the engine is hot. Wear protective gloves and goggles.
Also check the freezing point. Change the coolant every other year.
4812313735.pdf
Check - Air intake hoses
Check that all hoses/hose connections are intact and tight.
Disposal
Correctly sorted disposal must be carried out after replacing wear and spare parts and after the machine has been withdraw from service (scrapped). The materials must be sorted correctly according to metal, plastic, electronic scrap, various operatng substances etc.
Any oily or greasy parts (hydraulic hoses, lube pipes etc.) must be retreated separately.
Electric devices, accessories and packaging should be recycled in an environment-friend manner.
Always observe the local regulations.