31 minute read
FOREWORD

from Dynapac Compactor DRA30 Engine DYNAPAC-275 DI TU Engine Operating & Maintenance Manual 4812333214_A
We are happy to provide you with latest revision of Dynapac Engine 275 DI-TU O & M manual. The Dynapac 275 DI-TU series Engine liquid cooled are developed and supplied for wide range of application meeting your requirements.
We assure you that all necessary safety precautions and regulations have been adhered to in the design, material and manufacturing of Dynapac 275 DI-TU Series Engine. All the engines under go stipulated performance test before being delivered to customers.
This manual provides specifications and operations guidelines for services maintenance procedure. The performance of engine largely depends on its proper maintenance and up keep. Hence, please maintain your Dynapac 275 DI-TU Engine properly as per the guidelines and schedules given in this manual.
We recommend that only trained manpower should perform the operation and maintenance tasks on the engine. Always use the genuine spare parts whenever required for periodic maintenance as well as for engine repairs.
We maintain the facility for operators training for maintenance of diesel engines. Please contact our authorized service dealer / distributors nearest to you to avail this facility.
Continuous improvements in the product design are incorporated from time to time which may not be included in this manual.
The manual is updated periodically to include such changes in the latest editions.
Should you have any queries, fully equipped and trained team from Dynapac Customer Support will be happy to provide the help.
Dynapac Road construction equipment India Pvt Ltd
Customer Support
Dynapac road construction Equipment (India) Pvt ltd.
Plot no 01, Gat no. 163-168, Alandi Markal road, Village: Fulgaon, Taluka: Haveli, Dist: Pune- 412216, India
Important note:
The information contained within this publication is given with our best intensions and are believed to be correct at the time of going to the press.
Our policy is one of continued development and we reserve the right to amend any technical information with or without prior notice.
Whilst every effort is made to ensure the accuracy of the particulars contained within this publication the Manufacturer, Sales Dealer or Service dealer shall in any circumstances not be held liable for any inaccuracy or the consequences thereof.
Warranty Policy
This warranty applies to the Dynapac 275 DI-TU Series Engine for off Highway application.
Duration of Warranty Off Highway Engines -
Within 18 Calendar Months from Date of Dispatch from Dynapac India 12Months of hours date of installation or 1500 Hrs of operation whichever occurs first if customer source the filters, Engine oil, coolant and avail the services from Dynapac Authorised Service dealer for off Highway application.
Scope of Warranty –
After the Engine has been taken delivery by you, we expressly guarantee, in lieu of any warranty implied by law, to make good any defective parts in machinery of our own manufacture, which defect develops under proper use and necessary maintenance practices as written in this manual and arises solely from faulty material or workmanship, provide always that such defective parts are promptly returned carriage paid to our works and provided that Fuel and lubricants approved by us, have been continuously used. The repaired or (at its option) new parts will be delivered
At the termination of such period of 12 calendar months (or six calendar months as the case may be) all liability on our part ceases.
In the case of goods not of our manufacture (e.g., Fuel Injection Equipment’s, Electrical Components like Starter, Alternator, Turbocharger), you are entitled to the benefits of respective manufacturers warranty given to us. In respect thereof and our liability in respect of such goods is limited to the warranty given by the respective manufacturer. In no case shall we be liable for the fitting charges of replacement parts of thereof
The defective parts replaced by us shall become our property. All goods are supplied on the Condition that we shall not be liable for any loss incurred through stoppages or any consequential damages. Warranty for rubber parts like AVM’s, Belts, Hoses, O rings etc. will be six months from date of installation.
Limitations and Exclusions
This warranty does not apply to
1.To fair wear and tear or to damage due to negligence or improper handling or in correct application or incorrect installation by the purchaser, or his employees or agents or in the case of repairs or alterations carried out by the purchaser without our knowledge and written approval.
2.To reconditioned or second-hand combination sets or Engines. The Engines will be deemed to have been taken over by the customer upon dispatch from our works, in the case of direct deliveries EX-Factory and from the go downs of our authorized Dealers in the case of supplies from their stock and this warranty will come into effect from that time.
3.Incorrect operational & maintenance practices, lapse in scheduled maintenance or maintenance done by other than Dynapac – Authorised dealership.
4.The cost of maintenance or regular service of the engine.
5.Any damage due to idle storage of engine beyond period of 6 months without treatment of long storage.
6.Any damage due to use of lubrication oil, coolant, fuel quality and grade not recommended by Dynapac.
7.Any damage resulting from improper shutdown.
8.Any failure to meet its obligations here under which are due to circumstances beyond its reasonable control including but not limited to industrial disputes, fire, severe weather conditions, government decisions, material shortage, power or machinery breakdown or failure or war.
9.Gradual reduction in operating performance commensurate with the age, kilometres covered or operating hours, including but not limited to, gradual loss of engine compression or gradual increase in oil consumption due to normal operating functions.
10. We will not be responsible for loss or damage to goods beyond the delivery stated in our tender and we will repair or replace free of charge goods damaged in transit up to the point of delivery by us, as specified above.
11. Any modification in engine without Dynapac consent, use of engine other than designed application or changes in engine performance related settings without Dynapac consent.
This warranty is the only document given by us warranting the Dynapac 4R1040T/NA series Engine. No other document giving any warranty terms conflicting these contents shall be considered and entertained.
*Dynapac recommends use of Engine oil, Coolant & Dynapac genuine filters to be used in engine.
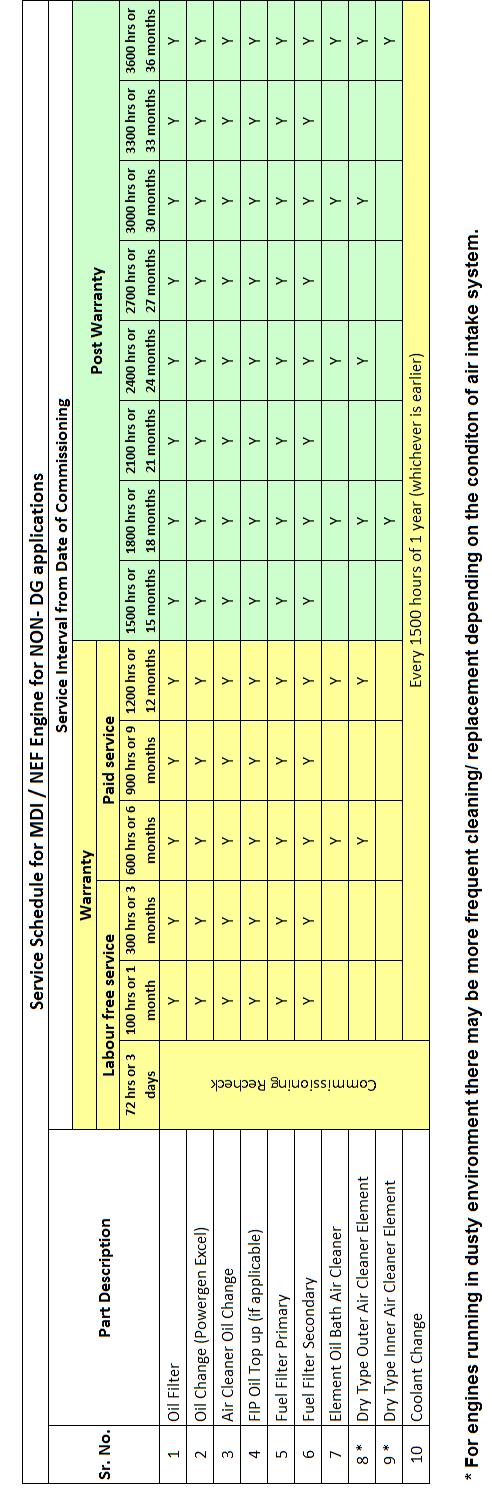
*Dynapac will provide for 5 free service checks (Namely C1, M1, M2, M3 & M4) for off highway application. For availing free service checks contact nearest Dynapac authorised service dealer
*Consumables & spares required for free service checks will be on chargeable basis.
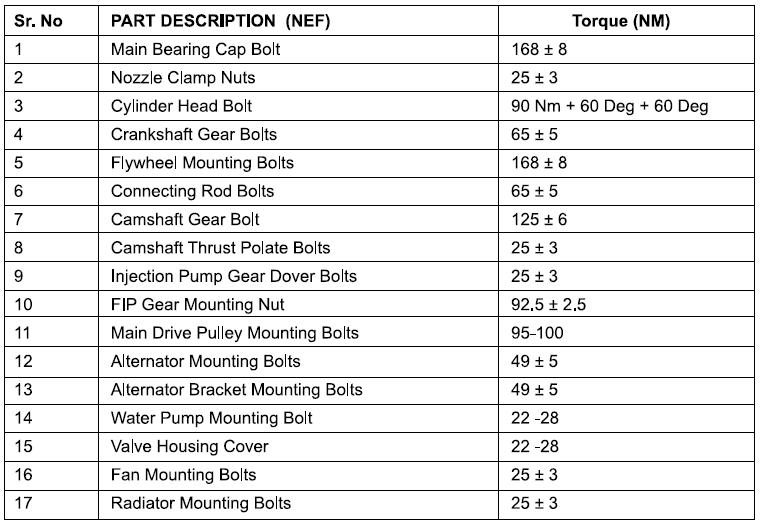
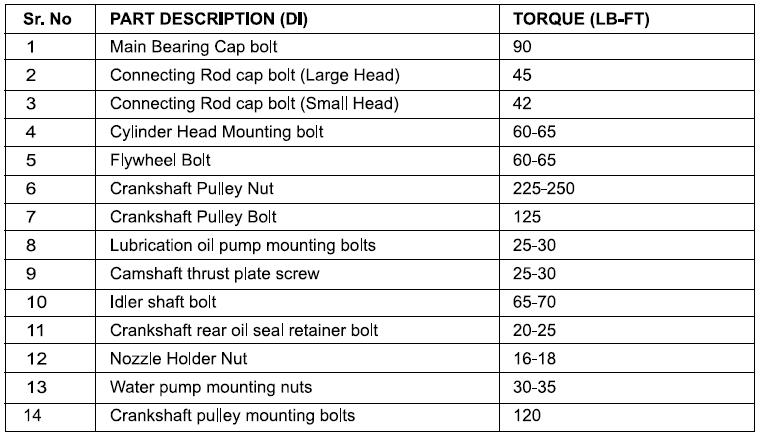
Technical Specifications
Torque Chart Component
Preparing Engine For Work
(New or Overhauled Engine - Check for installation as per guideline provided)
Inspection before Starting Engine
General
▪ Check Engine accessory mounting for damage/looseness. Correct as required.
▪ Check Engine &coupling alignment.
▪ Check crankshaft end play &record.
▪ Check belts tension &adjust if necessary.
Cooling System
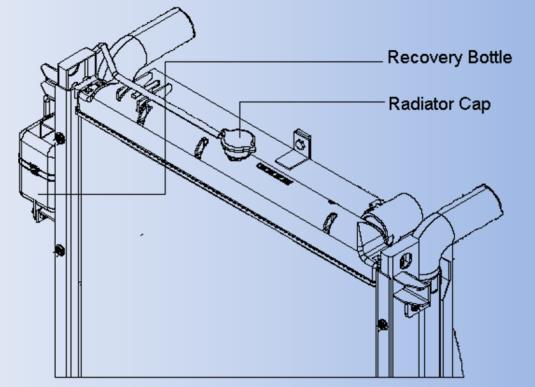
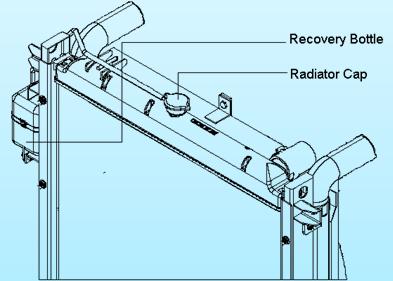
▪ Check coolant level in radiator as well as recovery bottle.
▪ Ensure ‘Dynapac recomended Coolant' is filled.
▪ Recovery bottle to be topped up only up-to max mark.
▪ Cap of recovery bottle should be securely fixed.
▪ Check all hose pipes for proper connections.
▪ Ensure radiator cap is fixed &securely tight at all the time.
▪ Check radiator mounting bolts for tightness.
▪ Check gap between cowl &fan &correct if necessary.
Air System
▪ Check oil in air cleaner
▪ Check air cleaner for dents/damages
▪ Check air piping for Sealing, proper support &tightening of hose clamps.
▪ Check air cleaner mounting bolts for tightness
▪ Check engine breather vent. Extend vent outlet away from air cleaner, radiator.
▪ Ensure that the breather pipe is not bend or twisted.
Exhaust
▪ Check for exhaust bellow - proper fitment.
▪ Exhaust pipe properly supported
▪ Silencer location, bends, diameter of exhaust pipe. Rainwater protection is proper.
Battery / Electrical System
▪ Check all electrical instruments, gauges, meters are connected properly.
▪ Check for batter cable size & tightness.
Fuel System
▪ Drain sediments from fuel tank. If required flush the fuel tank.
▪ Check all pipe / hose connections are securely tight.
▪ Clean fuel and a clean supply of air are essential for efficient and prolonged engine life. Ensure no sediments can enter at the time of pouring the fuel in the tank
Bleeding the Fuel System
▪ Do not use your hand to check for leaks. Use piece of cardboard or paper to search for leaks.
▪ Stop engine and relieve pressure before connecting or disconnecting lines.
▪ Tighten all connections before pressurizing lines.
▪ If any fluid is injected into the skin, obtain medical attention immediately or else, gangrene may result.
The air must be completely bled from the fuel system so that the engine operates satisfactorily. Vent the water trap, fuel filter and injection nozzles in the following sequence. Vent the water trap, fuel filter and injection nozzles in the following sequence.
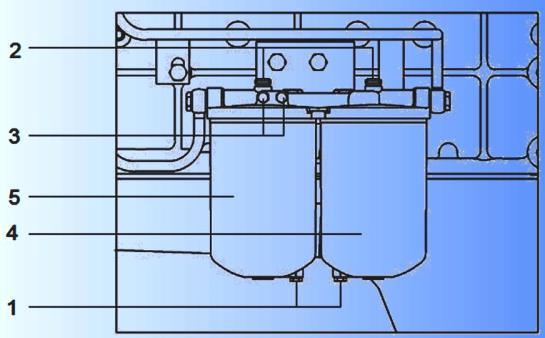
On Fuel Filter (see fig.)
1. Drain Plug, 2. Central Bolt, 3. Bleeding Screw, 4. Primary Filter, 5. Secondary Filter
▪ Loosen air bleeding screw '3' on primary filter and operate hand primer on fuel feed pump to free fuel of air. Retighten bleeding screw.
▪ Loosen air bleeding screw '3' on secondary filter and operate hand primer on fuel feed pump to free fuel of air. Re-tighten bleeding screw.
Lubrication System
Before you start a new or an overhauled engine, attend to the points given below: a) Self lubricating FIP (Internal lubricating type) b) External lubricating type FIP
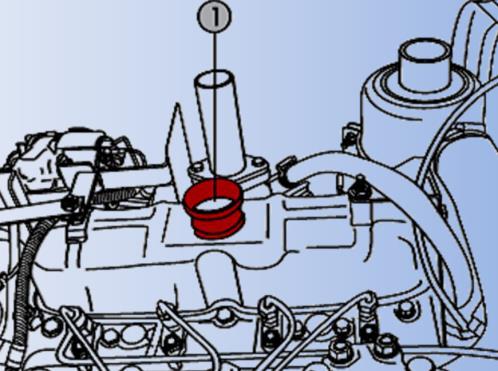
Fill engine oil through oil filling neck (1). Check Engine oil level in sum up to maximum mark on dipstick.
There are two different kind of lubricating system for the FIP.
For self lubricating type, FIP will get lubrication from the oil gallery. But for the manual lubrication type, The FIP needs additional lubricating oil to be filled manually.
Priming the Lubrication System
Fill the Dynapac recommended oil in the oil sump. Crank the engine at least for 15 second s with fuel shut off conditions. Check that oil has reached up to all points in tappets. (Remove tappet cover).
Operating Instructions
The Engine operator must assume responsibility of engine care while engine is being operated. There are comparatively few rules which operator must observe to get best service from Dynapac Diesel Engine.
New Engine
Dynapac engines are tested on dynamometers before being shipped from the factory and are ready to be put to work. But the operator has an opportunity to establish conditions for optimum service life during initial 100 hours of operation by:
1.Operating as much as possible at three-quarter throttle or load range.
2.Avoiding operation for long periods at engine idle speeds, or at maximum horsepower levels in excess of five minutes.
3.Developing the habit of watching engine instruments closely during operation and shut down the engine if coolant temperature exceeds 105°C (Red Zone)
4.Operating with a power requirement that allows acceleration to governed speed when conditions require more power.
5.Checking oil level every 10 hours during the break-in period.
6.For continuous rating rated load can be applied after the engine is commissioned.
7.Power generator units are pre-set to operate at specific governed RPM.
Pre-starting Instruction
▪ Any adjustments have been disturbed during any maintenance work. Check to be sure they have been properly adjusted before starting the engine.
▪ Check &fill fuel tank with clean high speed Diesel.
▪ Ensure diesel lines are connected &tightened properly
General
Your engine needs:
▪ Clean High speed Diesel.
▪ Lubricating Oil of specified quality and viscosity grade.
▪ Fresh air for combustion of fuel and for cooling and proper ventilation of engine compartment to avoid recirculation of hot air.
▪ Genuine spare parts for its maintenance, sourced from authorized Dynapac service network
Service and Maintenance
Sound service and maintenance practices will ensure that the engine continues to meet your requirements. Recommended service intervals must be observed. The service and maintenance work should be taken under abnormally demanding operating conditions.
Maintenance and Repairs
Shut the engine down before carrying out maintenance or repair work. When the work is completed, be sure to reinstall all safety devices that were removed. If you have to work on a running engine, ensure that all clothing is tight fitting and cannot catch the moving parts. Never fill the fuel tank while the engine is running. Please contact our Dynapac Dealer in the event of breakdowns or for Spare Parts Enquires. Our trained specialists will carry out repairs quickly and professionally, using only genuine parts
Safety
All Safety instructions (for both engine and operator) in this manual are designated by the accompanying symbol. Please follow them carefully. The attention of operating personnel should be drawn to these instructions. General safety and accident prevention regulations laid down by law must also be observed. Observe all industrial safety regulations when the engines are operating in closed spaces or underground.
Normal Starting Procedure
WARNING: Before starting check to make sure everyone is clear of engine and equipment to prevent accidents.
Press starter button or turn switch key to “start” position and crank the engine till it fires.
CAUTION: To prevent permanent cranking motor damage, do not crank engine for more than 5 seconds continuously. If the engine does not start after about three repeated attempts with an interval of two minutes between successive starts, then the starter should not be operated, and fuel system has to be checked for any faults.
At the initial start or after oil or filter changes and after engine has run for few minutes, shut it down & wait for 15 min. for oil to drain back into oil pan. Check engine oil level again, add oil as necessary to bring oil level to “Max” level on dipstick. The drop in oil level is due to absorption by oil filter. Never operate the engine with oil level below the low-level mark or above the high-level mark.
Warm up
When the engine is started, it takes a while to get the lubricating oil film re-established between shafts and bearings & between pistons & liners. The most favourable clearances between moving parts are obtained only after all engine parts reach normal operating temperature.
Engine Speed
All engines are equipped with in-built governors to prevent speeds in excess of maximum or predetermined lower speed rating. Power generator units are pre-set to operate at a specific governed RPM.
Oil Pressure
Normal engine oil pressure should be between 2.0 to 4.0 kg/cm at rated speed.
NOTE:
1)Please note that oil pressure will vary with temperature.
2)Individual Engines may vary from above normal pressure. Observe and record pressure when engine is new to serve as a guide for indication of progressive engine condition for record purpose these readings are more accurate &reliable when taken immediately after an oil change
•In normal working (engine warm) 2.5 to 3.5 kg/cm2
•At 1500 rpm &under loaded condition: Min. 2 kg/cm2
CAUTION: If the pressure at any time, drops below 2 kg/cm at minimum operating speed of 1500 rpm, under loaded condition, then replace the lube oil filter element / cartridge and check the pressure. If the pressure is still low, then contact our Dynapac Dealer for the services of their technicians.
Water Temperature
A water temperature of 82°Cto 95°Cis the best assurance that working parts of engine have expanded to most favourable oil clearances. Max. coolant temp. should not exceed 105°C (Red Zone). Keep thermostats always in engine, avoid long periods of idling & take necessary steps to keep water temp up to 85° C. If necessary, in cold weather use radiator shutters or cover a part of the radiator to prevent over cooling.
Engine Exhaust
The engine exhaust is good indicator of engine operation and performance. A smoky exhaust may be due to poor grade of fuel, dirty air cleaner, over fuelling or poor mechanical conditions. If engine exhaust is smoky, corrective action should be taken
Engine Shut Down
▪ Run the engine in idle condition for a few minutes before shut down. It is important to idle an engine 3 to 5 minutes before shutting it down to allow lubricating oil & water to carry heat away from the combustion chamber, bearings, shaft etc.
▪ Do not idle engine for excessively long periods. Long period of idling is not good for an engine because combustion chamber temperatures drop so low the fuel may not burn completely. This will cause carbon to clog the injector spray holes, piston rings & may result in stuck valves. If engine temp becomes too low, raw fuel will wash lubricating oil of cylinder walls and dilute crankcase oil so all moving parts to the engine will suffer from proper lubrication. If the engine is not being used shut it down.
▪ Turn switch key to 'off' position to shut down the engine. The engine can be shut down completely by turning off the switch key on installations equipped with an electric solenoid valve or by pulling the stop lever.
▪ Do not release the stop lever till the engine is completely stopped.
▪ If the stop solenoid is used on engine press the stop push button till the engine is completely stopped.
▪ Stop engine immediately if any parts fail. Practically all failures give some warning to the operator before the parts fail & run the engine. Many engines are saved because alert operators who attained to warning signs (sudden drop in oil pressure, unusual noises etc.) and immediately shut down the engine.
Trial Run
a) Upon completing the preparations run the engine for short trial period at about 10 minutes without load. Steps to be taken during &after trial run:
Check engine leakages in
▪ Air System
▪ Lub Oil System
▪ Cooling System
▪ Fuel System
▪ Meter / Gauges Working b) With engine stationary (after 10 min. from switch off) c) Start the Engine and put it on load. d) Record all parameter in logbook
▪ Correct all leakages if any.
▪ Check oil level &top up if necessary.
▪ Check coolant level &top up if necessary.
▪ Check belt tension &adjust if necessary.
CAUTION: Do not open radiator cap while the engine is running or hot. The cooling system is under pressure, danger of burning of body skin. Top up coolant in cold condition in the recovery bottled attached to the radiator. For Aluminium Radiator use of coolant in prescribed quantity is mandatory for better performance and long life.
Preventive Maintenance
Maintenance is the key to lower operating costs. A diesel engine requires regularly scheduled maintenance to keep it running efficiently.
Maintenance Schedule
Preventive maintenance is the easiest and least expensive type of maintenance. It permits the Maintenance Department to do the work at a convenient time.
A Good Maintenance Schedule depends on Engine Application
Actual operating environment of the engine governs the maintenance schedule. Some checks have to be performed more often under heavy dust or other special conditions. The maintenance schedule check-sheet is designed as a guide until adequate experience is obtained to establish a schedule to meet a specific operation.
A maintenance schedule should be established using the check-sheet as a guide; the result will be a maintenance program to fit a specific operation.
Storage of Engine out of Service
If an engine remains out of service & its use is not immediately forthcoming, special precautions should be taken to prevent rust.
The engine must be maintained in top mechanical condition if the operator is to get optimum satisfaction from its use. Comparison & intelligent interpretation of the daily report along with follow up action will eliminate practically all routine failures & emergency repairs.
Report to Maintenance Department any of the following conditions:
1.Low oil pressure.
2. Low Power. 3. High Water Temperature.
6. High consumption of fuel, coolant, oil
Air Intake System
Air Cleaner (dry type)
4. Unusual Noise.
7. Leakage’s fuel, coolant, lubricating oil
The engine draws a large volume of air into the combustion chambers and the important function of the air cleaner is to purify this air so that no dust or chaff etc. enters the engine. To remove these impurities, it is most important that the air cleaner should have regular maintenance. It can then continually and efficiently protect the engine from dust and other harmful substances which would otherwise enter the engine and cause abrasion and excessive wear.
The air cleaner comprises of the following parts:

Body Air-Cleaner
5. Excessive Smoke.
These serves as the main frame for housing all parts associated with the air cleaner system.
Cyclopic or built-in Pre-Cleaner
The coarse dust particles are separated by the curved blades of the cyclopic and get collected in the dust collector.
Paper element filter
This screens the fine impurities. This has to be cleaned by compressed air during every service or earlier if required. The filter should be replaced after every 1000 hours or earlier if required.
Safety Cartridge
Safety Cartridge fits inside the paper element filter. It is a safeguard against uncontrolled dust entry into engine due to paper filter element rupture and also when the paper element is removed for cleaning.
Cleaning of safety cartridge is not recommended. It is to be replaced. Change Safety Cartridge once for every third change of paper element.
Dust Collection Bowl
It collects the dust and releases it automatically.
Service Indicator
Mechanical service indicator is mounted on intake pipe. Visibility of red band in transparent window shows choking of air cleaner element. In this condition or at every 300 hrs, clean the paper element. If the red band persists after cleaning change the element.
Cleaning of Air Cleaner – SERVICE INSTRUCTIONS
▪ Open the steel clamps given on air cleaner body. Remove the bowl by opening four wire clamp given on its body.
▪ Take out paper element along with safety cartridge. Take care that dust is not spilled inside air intact.
▪ Separate the paper element from safety cartridge.
▪ If safety cartridge is very dirty then replace it by new one. Never clean safety cartridge.

▪ Clean the paper element by blowing compressed air from inside to outside. Ensure no damage to the paper element.
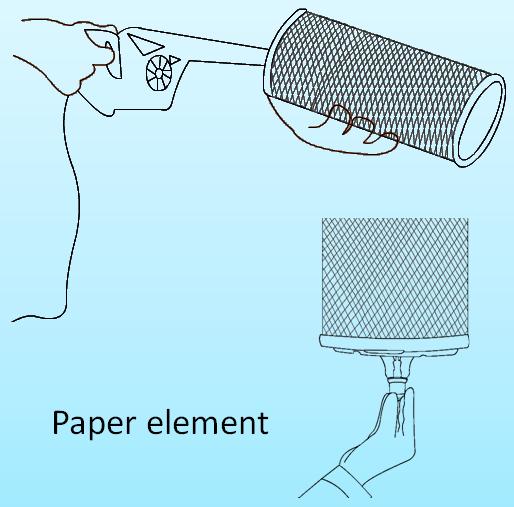
▪ After cleaning the paper element, check paper element for any crack or hole by putting an electric bulb inside the element and check from outside. If found damaged change it by new one.
▪ Remove the rubber dust unloader from air cleaner and clean and refit it.
▪ Assemble the safety cartridge and then paper element on air cleaner body.
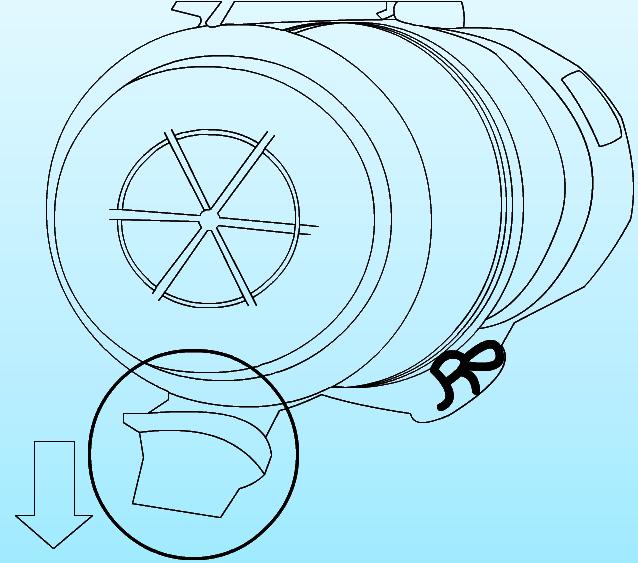
▪ Assemble the bowl on body and ensure dust unloader is towards down.
▪ Put the clamps back. Ensure all clamps are properly fitted, if any clamp is found loose, replace it by new one.
▪ Put the steel clamp on filter body.
▪ Ensure that all the joints of air cleaner are air tight.
▪ Press reset button on service indicator.
Cooling System
WARNING: The cooling system is under pressure; it is dangerous to remove the radiator cap while the system is hot. Always turn the cap slowly at the first step and allow pressure to escape before removing the cap completely.
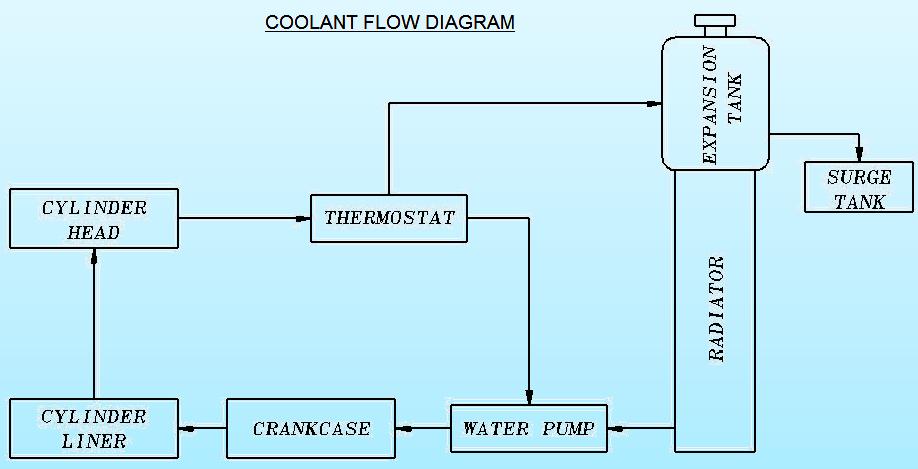
To ensure an even temperature, the cylinder head and cylinder walls of the Engine are cooled by coolant. This coolant is in turn cooled in the radiator. Coolant is circulated from the radiator to the Engine and back through the radiator by means of a water pump. The flow of the coolant is regulated by a thermostat. Below layout shows the coolant path.
Rust Prevention
To prevent rust formation in sleeve cylinder, water pump, cylinder block, Radiator tube & other parts of cooling system, “Dynapac coolant” is recommended. Continuous usage of the solution will ensure increased efficiency & increase life of the cooling system. During repair if for any reason coolant is to be removed, collect the solution in clean vessel & refill it after repair. Please replace coolant after every 1000 hrs. or 1 year whichever occurs earlier. Use clean water for mixing the coolant.
Service Instructions
▪ Check the coolant level in recovery bottle & top up if necessary.
▪ Coolant (Dynapac) should be added to water to maintain the concentration. This should be done more frequently in the areas where water contains more salt.
▪ Check &adjust fan belt tension.
▪ Do not use muddy water for radiator as it may chokes/corrodes the cooling system
Checking Radiator Fan
▪ Check &adjust fan belt tension.
▪ Blow compressed air through the radiator fins to remove foreign material.
▪ In case the Fan blade is bent, replace the fan.
NOTE: To avoid personal injury be sure to stop the engine before working on radiator.
Hose Connections
• Inspect the hoses for cracks &damages. Replace if necessary.
• Check clips are tight &no leakage.
• Replace Coolant. Flush the cooling system at 1000 hrs. or one year, whichever is earlier.
Flushing of Cooling System
Draining the System
There are two drain taps which must be opened, one is to the left hand said of the crankcase and one on the bottom tank of the radiator.
To speed up the draining, the radiator filler cap should be removed. Ensure that the drains are not clogged. When the water has drained completely, close the taps.
IMPORTANT: Do not run the Engine when the cooling system is empty, and do not add cold water or cold antifreeze solution if the engine is hot.
Cleaning out Dirt and Sludge
Fill the cooling system with a solution of 1.36 kgs. of ordinary washing soda to 10.19 liters of water. Operate the Engine until the water is hot. Drain, flush with clean water and refill. The system should be kept filled with clean water with a rust inhibitor or anti-freeze solution till the time of use. Fill with coolant with engine operation.
Hose Connections
Check periodically to ensure all the connections are in good order and the clips are tight. A leaking hose connection results in loss of coolant and thus Engine efficiency.
Radiator Core
Overheating may be caused by bent or clogged radiator fins. If the spaces between the radiator fins become clogged, clean them with forced air or water. When straightening bent fins be careful not to damage the tubes or to break the bond between the fins and tubes.
Fresh Water Pump
The water pump is provided with bearing which will last the normal life of the pump, no adjusting or greasing is required for bearing.
Thermostat
This device prevents water circulating through the Radiator until the engine reaches its operating temperature. With the thermostat closed, the water circulates only through the engine block. It is important that the thermostat is in good working order. If it is defective, do not attempt to repair it, replace with new When installing a new thermostat, ensure the valve is facing upward, towards the radiator connection.
IMPORTANT: Do not run the Engine without Thermostat Value.
Lubrication System
To prevent excessive friction and heat generation between any two surfaces in relative motion with respect to each other, an oil or lubricant film is required in between the two.
Lubricant oils mainly have the following additives:
▪ Anti-oxidation additive: for avoiding the risk of burning of oil due to sparks.
▪ Anti-corrosion of Rust: for preventing corrosion, scaling &rust formation. Preventive additive
▪ Detergent additive: for removing &cleaning carbon deposits &other impurities.
▪ Anti-foaming additive: for preventing foaming or bubble formation on oil surface.
Oil change Intervals
Oil change interval is very important factor in preserving integrity of an engine. Lubricating oil contamination is the direct result of engine operation & load factor involved. The amount of contamination generated depends on the amount of the fuel, the engine consumes. At each oil change the filters must be replaced. (For details of oil change intervals, check the PREVENTIVE MAINTENANCE SCHEDULE)
NOTE: If the lubricating oil is drained from the oil pan to make an engine repair, new oil must be used. Do not use oil after it has been drained from the oil pan.
Daily Checking
▪ Check engine oil level before starting the engine by means of dipstick gauge.
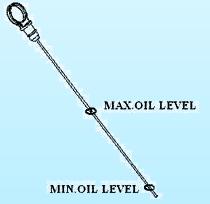
▪ Top up if found below low level.
NOTE: Do not check oil level when engine is running. Shut down the engine and wait for 10 minutes, then check the oil level.
Oil and Oil Filter Change
▪ Remove the drain plug provided at bottom of oil sump and allow the oil to drain completely
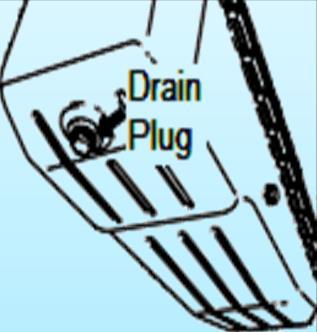

▪ Collect the Oil in flat tray, if metal particles are observed on Drain Plug or in the oil then check the engine thoroughly.
▪ Reinstall the drain plug.
▪ Remove the oil filter with the help of filter removing tool.
▪ Install a new filter by simply rotating it to the filter head. The filter must be hand tightened. Do not over tighten otherwise the filter O Ring may get damaged.
▪ Refill the oil sump by recommended grade of oil.
▪ Refit the oil filling cap.
IMPORTANT: It is a precision assembly. Consult authorized persons. Carry out servicing preferably when engine oil is still warm. Change rubber rings if damage is observed. For Centrifugal cover nut tightening, use 1.2 kg-m Torque.
Fuel System
Providing clean and adequate supply of fuel to the engine is the prime function of the fuel system.
Service Instructions:
▪ Drain the sediment from fuel filter from the drain plugs.
▪ Do not permit dirt to get into fuel tank.
▪ Do not forget to securely tighten the fuel filling cap after refuelling.
▪ Do not let the fuel tank become empty. It the tank becomes fully empty air can enter into the fuel system necessitating air bleeding before starting the engine.
▪ Be careful not to spill fuel during refuelling. If it spills, wipe if off immediately or it may cause fire.
▪ Do not use pesticide/chemical cans for storing fuel. Store fuel in a clean container. Dirty fuel will cause severe damage to the FIP.
CAUTION: Be sure to stop the engine before refuelling.
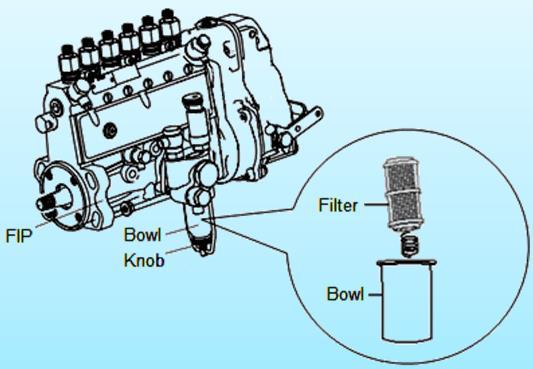
Cleaning the Feed Pump Filter
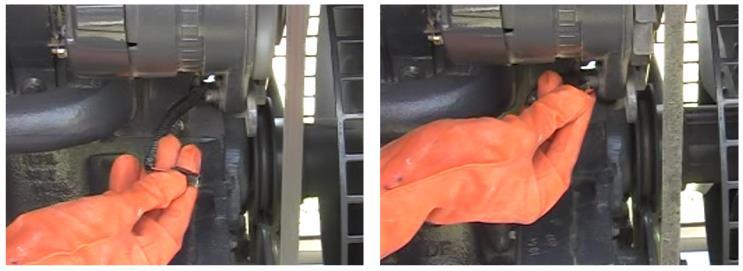
▪ Remove the feed pump bowl by rotating the knob anticlockwise.
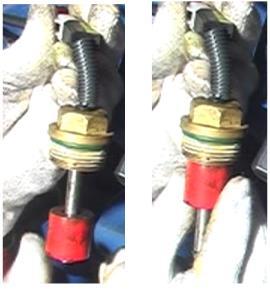
▪ Remove the filter and clean the bowl as well as the filter in diesel.
▪ While fitting the filter make sure that the spring is pointing downwards.
▪ Ensure the O ring sits properly.

Exhaust System
The Exhaust System is designed to remove the exhaust gases from the Engine into the atmosphere.
CAUTION: Do not run the engine with disconnecting the silencer.
Service Instruction
Silencer is required to be cleaned if the back pressure exceeds to 70 mm of Hg.
Electrical System
Maintaining the electrical system in good working order will enable the alternator to provide the battery with the flow of current needed to keep it fully charged thus ensuring maximum efficiency of the electrical devices.
Battery Maintenance
Check the battery at every 50 hours of operation for fluid level and specific gravity. If the battery shows need of charging it must be given immediate attention. Keeping the battery fully charged not only adds to its life but makes it available for instant use when needed.
CAUTION:
1. When the alternator is charging, an explosive gas is produced inside the battery. Therefore, always check the electrolyte level when the engine is not running.
2. Do not run the engine without battery.
3. Do not keep any exposed flame and do not smoke while checking the battery.
4. Before working on any part of the electrical system, disconnect the battery. Do not re connect the cable until all electrical work is complete. This will prevent short circuits and damage to electrical unit.
5. Do not allow acid to come into contact with the skin or clothing. Wear protective goggles.
When replacing the Battery, the earth cable must be connected to the negative terminal and the battery cover secured in its correct position.
▪ Keep the battery clean and dry. After cleaning ensure vent holes are open.
▪ Clean the terminals (+ -) with emery cloth if it is corroded.
▪ Wash the battery top with warm water & soda.
▪ Ensure cleaning solution does not enter the cell through the vent holes.
▪ After cleaning ensure that all vent holes are open.
▪ When reconnecting ensure good contact of the terminals. Tighten clamping bolts firmly.
▪ Apply petroleum jelly on terminals.
Check Electrolyte Level:
▪ The electrolyte (acid and distilled water) should be 3/8” (0.95 cms) above the separators in each of the cell add distilled water if necessary.
▪ Use of syringe to add distilled water to the cells to ensure no dirt or corrosive salts enter the cells.
Checking Specific Gravity of Electrolyte: Check the specific gravity of Electrolyte with a hydrometer five min. after adding distilled water.
1.280 1.230 Fully charged.
1.200 1.112 Half charged / recharging.
1.120 1.080 Discharge / Charge up immediately.
Battery care in Winter
▪ Cold Starting requires a good state of charge of battery.
▪ Lowering the starting limit temperatures by 4-5° is possible by raising the battery
▪ Temp at about + 20°C. This is achieved by removing the battery & storing it is warm room.
STARTER MOTOR
▪ Inspect the commutator & brush gear at every 500 hrs.
▪ Check that brushes moves freely in their holders by holding back the brush springs & pulling gently on the flexible connectors.
▪ They must be renewed if worn to approx. 0.8 mm. Brushes must always be replaced in sets & with correct grade.
▪ Check the commutator surface. It should be clean & entirely free from oil, any trace of which should be removed by pressing a dry fluff less cloth against the commutator while the armature is hand rotated.
▪ Check the drive assembly for free movement over the shaft splines. If necessary spread grease over the shaft splines to enable the drive assembly to move freely (frequency once in a 3 months).
Checking Of Sensors
Checking of HWT
▪ Remove the wiring connector of the HWT
▪ Connect with Body to check if the wiring connection of HWT is OK.
To separately check the HWT sensor, its resistance value should be checked by a multimeter.

With temperature increase then the resistance decreases. In the normal condition the sensor should show very high resistance (Around 750 Ohm’s). If the sensor shows low resistance or continuity at normal temperature, then the sensor is faulty. (66 ohm’s @ 100 deg cen)
Checking of RWL
▪ Remove the RWL from radiator.
▪ Check the float for free movement. Clean dirt if found.
▪ Dip the float in pot of water and check the movement of the float.
▪ Check continuity when the float is at the bottom, OK if continuity is found.
▪ Check continuity when the float is at the top, OK if no continuity is found.
Checking of LLOP
▪ Remove the wiring connector of the LLOP
▪ Check the Continuity of LLOP with the Help of the Continuity Tester as follows
Checking in Idle condition (Engine Off Condition)
▪ Bulb of the continuity tester should glow at point NC and C.
▪ Bulb of the continuity tester should not glow at point NO and C.
Checking by engine starting (Engine Running )
▪ Bulb of the continuity tester should not glow at point NC and – C.
▪ Bulb of the continuity tester should glow at point NO and – C.
Specifications
Lubricating Oil
Lubricating oil has a limited working life after which the effects of time, condensation, engine heat and by products of combustion will combine to reduce its lubricating properties rapidly.
It is incorrect to use Lubricating Oil for more than the specified period The intervals between lubricant changes detailed in this manual have been determined after prolonged tests and have been proved the most suitable for normal operation. In extremely arduous conditions, however, it may be necessary to reduce these periods and this point should be discussed with Dynapac or with authorised service dealers
Recommended Lubricating Oil
Dynapac recommends the use of Dynapac Engine Oil or equivalent grade of – API CH4/SJ SAE 15W40.
IMPORTANT: Do not inter mix different brands / grades of oil as two different brand of oil may not be compatible with each other. It is therefore recommended that the brand which is used for initial fill should only be used for top up.
Fuel Specifications
The performance of the engine depends upon supply of clean & correct grade of fuel. The fuel injection equipment manufactured to very close tolerance & slightest amount of dirt in fuel can cause wear on the injection equipment. Always use clean High Speed Diesel having a sulphur content of below 1%.
The following specifications are approved:
IS - 1460
BS - 2869 – A1 & A2 (In case ofA2, note sulphur content)
Din - 51601
ASTMP - 975 – 8P: ID 2D
Winter Grade Fuel
At low temperature waxing may occur and clog the fuel system thus causing operational troubles. In the case of ambient temperature below 100C, use Winter Grade diesel fuel.
Coolant
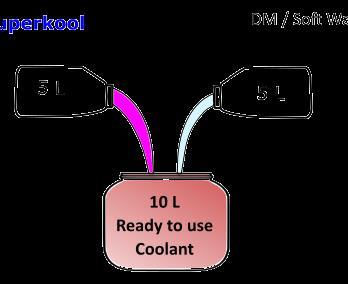
Dynapac recommends use of Dynapac coolant. Always use *DM (Demineralized) water to prepare the coolant. Coolant and Water mixing ration should be 1:1. This can be used for Can be used in very low temperatures (up to -35o C) also.
Powergen Superkool DM water
DM (Demineralized) water is not Distilled water. Demineralised water is specially purified water that has had most or all of its mineral and salt ions removed, such as Calcium, Magnesium, Sodium, Chloride, Sulphate, Nitrate and Bicarbonate. It is also known as Deionised water.
SAFETY PRECAUTIONS AND DO’S / DONT’S
The following precautions are suggested to help prevent accidents. A careful operator is the best operator. Most accidents can be avoided by observing certain precautions. Read and take the following precautions before operating the Engine to prevent accidents. Engine should be operated only by those who are responsible and instructed to do so.
The Engine
1. Read the Owner’s Manual carefully before using the Engine. Lack of operating knowledge can lead to accident.
2. Replace of missing, illegible or damaged safety decals.
3. Keep safety decals clean of dirty and grease.
Servicing the Engine
1. Keep the Engine in good operating condition for your safety. An improperly maintained Engine can be hazardous.
2. The cooling system operates under pressure which is controlled by the Radiator cap. It is dangerous to remove the cap while the system is hot. First turn the cap slowly to stop and allow the pressure to escape before removing the cap entirely.
3. Do not smoke while refuelling the Tank. Keep away any type of open flame.
4. The fuel in the injection system is under high pressure can penetrate the skin. Unqualified persons should not remove or attempt to adjust a pump, injector, nozzle or any part of the fuel injection system. Failure to follow these instructions can result in serious injury.
5. Keep open flame away from battery to prevent fire or explosions.
Diesel Fuel
1. Keep the fuel injection equipment clean and properly maintained.
2. Under no circumstances should gasoline, alcohol or blending fuels be added to diesel fuel. These combinations can create an increased fire or explosive hazard. Such blends are more explosive than pure gasoline in a closed container, such as a fuel tank. DO NOT USE THESE BLENDS.
3. Never remove the fuel cap or refuel while the Engine is running.
4. Do not smoke while refuelling or when standing near fuel tank.
5. Maintain control of the fuel filter pipe when filling the tank.
6. Do not fill the fuel tank to capacity. Allow some room for expansion.
7. Wipe up spilled fuel immediately.
8. Always tighten the fuel cap securely.
9. Do not keep equipment near open fire.
10. Never use fuel for cleaning purposes.
DO’S - for Better Performance
▪ Ensure that all safety shields are in place and in good condition.
▪ Read all operating instructions before commencing to operate Engine.
▪ Carry out all maintenance tasks without fail.
▪ Keep the air cleaner clean (oil at the correct level – for wet type Air Cleaners).
▪ If fitted with EGR system, regularly check for deterioration of the EGR hoses
▪ Regularly check the tightness of the EGR Hose Clips.
▪ Clean the EGR Valve, Cooler and the Pipes every 1500 hours.
▪ Ensure that the correct grade of lubricating oils is used and that they are replenished and changed at the recommended intervals.
▪ Fit new sealing rings when the filter elements are changed.
▪ Watch the oil pressure gauge or warning light and investigate any abnormality immediately.
▪ Keep the radiator filled with recommended coolant mixture. In cold weather use anti-freeze mixture. Drain the system only in an emergency and fill before starting the Engine.
▪ Ensure that electrical system, instrument & battery are in good working condition. Ensure to charge battery regularly.
▪ Keep all fuel in clean storage and use a filter when filling the tank.
▪ Attend to minor adjustments and repairs as soon as necessity is apparent. When in doubt, consult Dynapac service dealer
▪ Allow the Engine to cool before removing the radiator filler cap and adding water. Remove the radiator cap slowly.
DON'T'S – for Safe Operation
▪ Operate the Engine with the air cleaner or pre-cleaner disconnected.
▪ Tamper with the fuel injection pump. If the seal is broken the warranty becomes void.
▪ Allow the Engine to run idle for a long period
▪ Run the Engine if it is not firing on all cylinders.
▪ Refuel while the Engine is running.
▪ Use cloth for filtering Diesel, as minute cloth threads might mix up in fuel & effect the performance of F.I.P / Engine.
▪ Allow to fill water, Diesel or oil over starter motor.
▪ Wash an Engine attached with alternator without first covering the alternator with polythene bag.
Fault Tracing
If any trouble is experienced, make sure of the cause before attempting to make any adjustments. When making adjustments keep in mind the previous setting, in case, the adjustment brings no remedy.
PROBABLECAUSE POSSIBLE REMEDY
ENGINE FAILS TO START
Faulty Starter Switch Replace
Battery too low to run engine
Engine oil too heavy
Internal seizure
Starter motor inoperative
Charge or Install new battery
Drain oil and refill with correct grade
Hand crank the engine, with the Injector nozzles removed, and engine clutch disengaged If engine does not turn easily seizure due 10 Internal damage is indicated. *
Inspect cables and terminals. Check for tightness of mounting screw. Inspect brush gear for wear or damage and commentator for dirt or drainage.
ENGINE TURNS BUT WILL NOT START
Stopper knob pulled out
Water in fuel
Fuel system clogged
Batteries discharged
Push the knob in.
Drain system clean and refill with proper fuel
Check through and remove blockage
Charge or replace
Lack of compression *
Lubricating oil of wrong viscosity
Fuel feed pump inoperative
Drain and refill with proper lubricant (refer to LUBRICANT SPECIFICATION)
Check pump for restriction In system and clean out. Also check valves and spring· *
FIP has lost its efficiency *
ENGINE OVERHEATS
Faulty heat indicator Replace
Insufficient water in the cooling system
Cooling system clogged
Fan and water pump belt slipping
Insufficient oil
Check water level in radiator and add water if necessary. Check radiator cap. Replace if necessary.
Clean out radiator and engine
Check tension and make proper adjustment.
Maintain proper oil level.
PROBABLECAUSE POSSIBLE REMEDY
LUBRICATING OIL PRESSURE TOO HIGH OR TOO LOW
Defective oil pressure indicator Replace
Wrong viscosity, diluted or insufficient oil
Broken, loose or plugged oil lines
Low oil level in the crankcase
Refer to LUBRICANT SPECIFICATIONS. Select correct grade of oil.
Replace, clean and tighten. *
Add all an check for oil leakage
Defective or dirty oil pressure regulating valve *
Oil pump strainer clogged or pump not
Working *
Worn bearings *
Clogged oil filter
EXCESSIVE SMOKE
Air cleaner pipe clogged
Improper grade of fuel / oil
Air-cleaner clogged/Paper element
Choked
Incorrect valve adjustment
Change filter element.
Remove, check and clean
Drain off and replace with correct grade of fuel! oil.
Remove and clean. If defective, replace paper element.
Set valve clearance as specified
FIP lost its efficiency *
EXCESSIVE FUEL CONSUMPTION
Valve clearance incorrect
Fuel leaks
Engine not operating at proper temperature
Air cleaner clogged
Incorrect viscosity or quantity of lubricating oil
Fuel injection nozzles not operating
Properly
High idle rpm too high
Adjust correctly
Tighten or replace fuel lines
Check cooling system and thermostat.
Service the air cleaner
Refer to lubricant specifications. Keep oil up to the correct level.
Clean nozzles or replace. *
Check and correct.
FIP has lost its efficiency *
ELECTRICAL
Loose wiring or Improper connections causing malfunctioning
Battery defective, low charge or loose connections
Starter motor inoperative
Alternator inoperative
Check wiring to see that all connections are clean and tight.
Re-charge, clean and tighten cable lugs or replace with new, check earth cable.
Check commutator and brush gear.
Check regulator.