9 minute read
Operating devices


Always check the bearing capacity and the fastening of the bridge before loading or unloading. If you need to drive the truck onto another vehicle, ensure that the vehicle cannot move during this procedure. Do not drive to the edges of a loading bridge because there is always the risk of overturning.
4. Operating devices
Identification plates on the truck
Type plate. The truck's type plate is marked with:
• Manufacturer • Truck type • Year of manufacture • Serial number • Truck weight in operating condition without battery or accessories • Battery minimum weight • Battery terminal voltage • Truck's nominal lifting capacity • CE mark.
Check that the plates are legible and securely attached. Capacity plate. The capacity plate states the maximum lifting capacity at the maximum lifting height, and the lifting height with the nominal lifting capacity. In addition, the plate states the load centre distance for the relevant lifting capacity.
WARNING!
Do not overload! Capacity plate for accessories. Detachable accessories affect the truck’s lifting capacity. If the truck is used with detachable accessories, corresponding capacity plates must be attached to the truck.

• Arm rest (1) • Display panel (2) • Pedals (3) • Steering wheel (4) • Seat (5)
Arm rest

Valve levers . Reach trucks usually have 4 valve levers for:
• Lifting and lowering the forks (1) • Moving the mast forwards and backwards (2) • Tilting the mast or load (3) • Side-shifting the load or forks (4)
Familiarise yourself with the operation of the levers. Fork adjustment switches (5). Fork adjustment devices are accessories. The available accessories include centering functions for side-shifting and tilting, telescopic forks and a fork positioner.
Horn (6).
Driving direction selection switch (7). Use the switch to choose the direction of travel. You may also drive the truck at crawling speed by holding down the driving direction selection switch. The slow drive mode symbol (turtle) will be shown on the display. Arm rest adjustment button (8). Release the arm rest lock by pressing the button. The arm rest will be locked in its current position when you release the button.

Emergency stop button (1). Disconnect the truck's power supply by pressing the emergency stop button. Release the button by turning it clockwise. Use the emergency stop button in the following cases:
• There is a short circuit or other electrical malfunction, e.g. the pump motor will not stop running • An accident happens
Start button / Key switch (2). The Start button switches on the truck's electrical system. The PIN code menu appears on the display. A key switch is an optional accessory. The key switch switches on the truck's electrical system.
• 0 = Power off (power may be still connected to certain electronic devices) • 1 = Power on
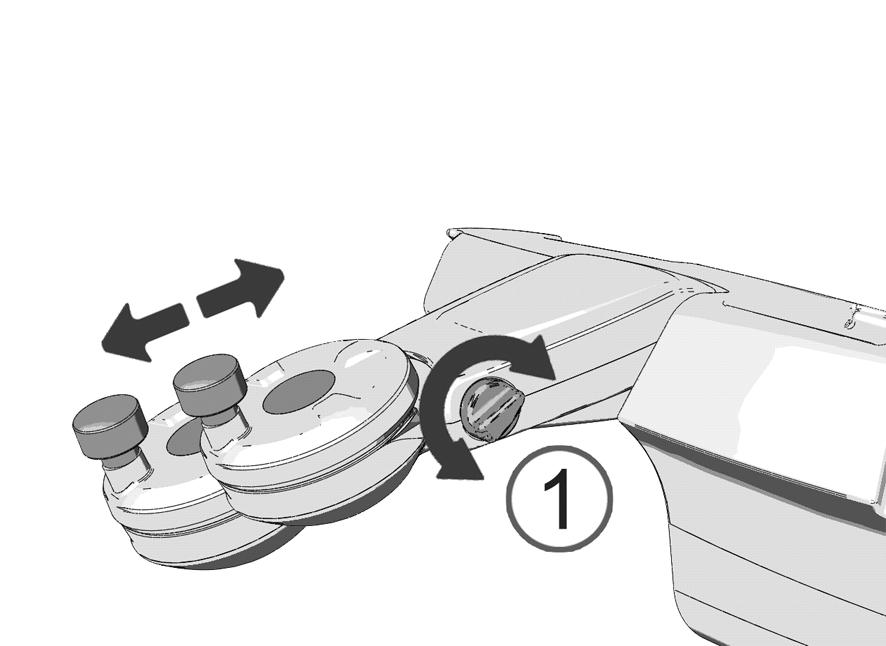
Display control keys (3). Enter the PIN code.
Display (4). Accessory switches (5-6).
• 5 – Optional • 6 – Light switches (working lights and the warning light)

Accelerator (1). Use the accelerator with your right foot. The more you press the pedal, the higher the speed. Handle the accelerator gently. Brake (2). Press the brake pedal to slow the driving speed. The truck is equipped with a regenerative motor braking system, which recharges the battery and decelerates the truck in the following cases:
• When you press the brake pedal • When you change the driving direction • When you completely release the accelerator
NOTE
Practice using the brake with and without a load. Safety pedal (3). To operate the truck, first press the safety pedal down to the drive position. Note that the truck cannot be driven unless the safety pedal is pressed down. The foot-operated driving direction change is integrated in the safety pedal. The truck changes its direction of travel when the pedal is released and then pressed back down. When starting off, you must select the initial driving direction with the driving direction switch on the arm rest. You can activate/deactivate foot-operated driving direction change via the truck display.

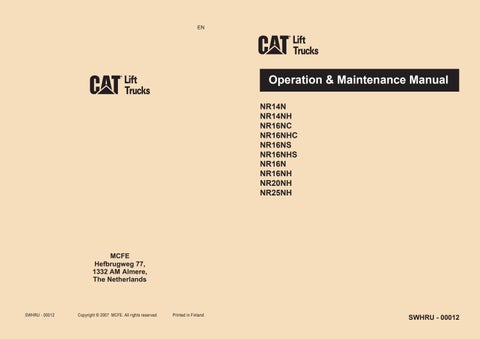
Steering wheel. The truck is equipped with an electronic steering system; see section "Electronic Steering System" in Chapter 5. Length adjustment (1). Turn the adjustment knob anticlockwise to release the locking. Release the adjustment knob or turn it clockwise to lock the length adjustment. The adjustment is five-step. Height adjustment (2). Raise the steering wheel higher by turning the adjustment knob to the left. Lower it by turning the knob to the right. 489459
Seat

Seat (mechanical suspension). You may adjust
• Seat suspension according to your weight (1). • Backrest tilt (2). • Distance to the pedals (3).
Seat (air suspension) (optional for reach truck). You may adjust
• Seat suspension according to your weight, and the seat height (1). • Backrest tilt (2).
Safety belt Using the safety belt.

• Pull the safety belt steadily across your pelvis. • Adjust the safety belt. • Push the tongue into the buckle so that it snaps shut. • Release the belt by pressing the red button on the buckle.
NOTE
Always fasten the safety belt before starting to drive.
Using the inertia reel safety belt.

• Pull the safety belt steadily across your pelvis. • Push the tongue into the buckle so that it snaps shut. • Release the belt by pressing the red button on the buckle. The belt will be automatically reeled in.
NOTE
489460 Always fasten the safety belt before starting to drive.
Cold storage cabin
All window panes (excluding the lower door pane) are heated. Their temperature is controlled by a thermostat installed behind the driver's seat. There is also a separate blower heater installed in front of the driver's knees with adjustable air volume and direction. The heating can also be completely turned off if the cabin is not used in a cold environment.

There is an on/off switch for the heating below the driver's display panel. When the switch is turned ON, heating is on (1). Blower heater. The blower heater has an on/off switch for the heating and a speed control for the blower. You must not close all air nozzles if the blower is operating. Speed control (2), Air nozzles (3).
Thermostat.
The thermostat controls only the heated window panes. If the temperature inside the cabin exceeds the limit set by the thermostat, window heating is turned off. Thermostat adjustment (4). Door switch. The door switch turns off all heating when the door is opened. Once the door is closed, heating will be automatically turned back on.
Heated windows.
If a window breaks or cracks, it must be immediately replaced. You can clean the windows using a moist towel. In case of emergency, break the window behind the driver's seat using the hammer (5) provided in the cabin for the purpose. 489461


Keypad.
• Exit/Esc (1) • Enter (2) • Browse up / PIN code 1 (3) • Browse right / PIN code 2 (4) • Browse down / PIN code 3 (5) • Browse left / PIN code 4 (6) • Warning light (7) • red indicates alarm • yellow indicates warning
Starting the truck. Turn the truck's power on with the Start switch. A PIN code query appears on the truck display. A key switch is available as an optional accessory, removing the need for a PIN code query.
Safety mode.
In case of emergency, a truck equipped with a PIN code device can be driven at a slow speed. The truck will always accept the safety code 1111.
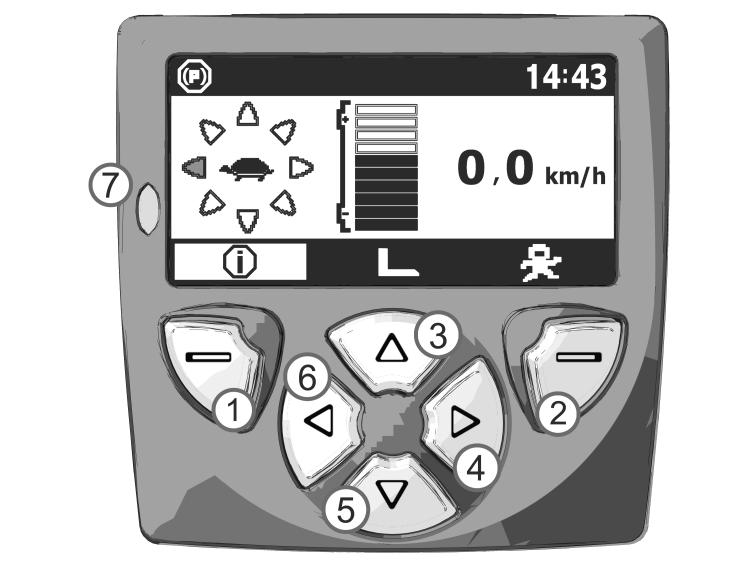
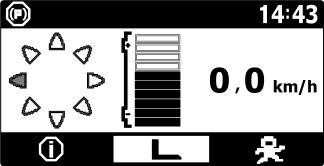
Main display.

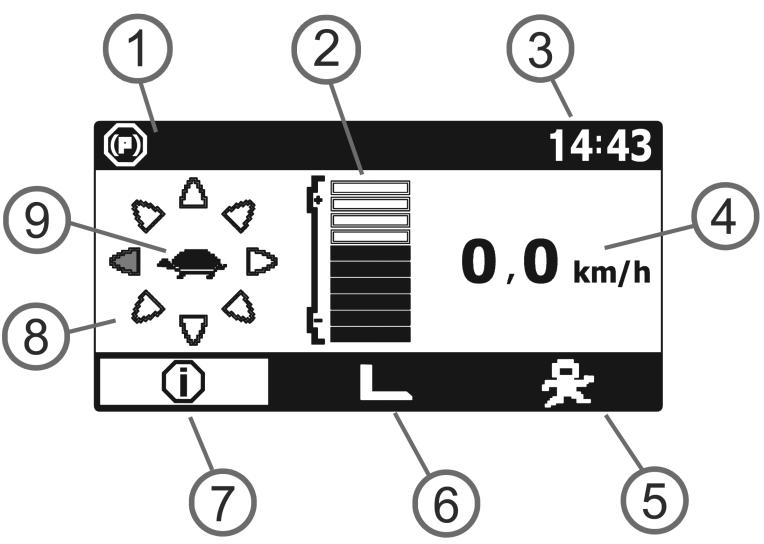
• Alert symbols (1) • Battery charge display (2) • Clock (3) • Speed, fork height and weight display (4). Weight display is an optional accessory. • Performance mode selection (5) • Lifting height preselection (6) • Information menu (7) • Travel direction display (8) • Crawling mode symbol (9)
Menu
/MESSAGECENTER
Setting Description
Basic information about the truck's status:
• Working hour clock (hourglass) • Time left until next service (wrench) • Active warning and code (Warning) • Active error message and code (Error)
MAIN MENU
Menu
/MAINMENU /Information
Setting
Key-On Hours
Operating Hours
Traction Hours
Description
Time the truck has been running
Time the truck has been in active use
Time the truck has been driven
/MAINMENU / Alarm log Pump Hours
Truck Serial Time the hydraulics have been running
Serial number of the truck
Truck Application
Hours
Alarm Item number of the application
Truck's operational hours
Alarm message


Code
Cnt Authentic alarm code xx(yyy)
Counter for alarm occurrances
/MAINMENU /Usage History Operating Hours
Operation
Traction Time the truck has been in active use
Truck's utilisation factor (%)
Drive function's utilisation factor (%)
Pump Hydraulic functions' utilisation factor (%)
/MAINMENU /Parameters RTC Clock Setting the real-time clock


HEIGHT PRESELECT
You can enter the height preselection by moving over the lifting device icon in the bottom centre of the main selection window. Press the Enter key to modify the settings.
The height preselection has two load handling alternatives. The first is UNLOADED and the second LOADED. You can enter the LOADED menu by pressing the Esc key. You can return to the main menu by pressing the Esc key twice. All memory slots are displayed at once in the height preselection menu. Use the arrow keys to navigate in the menu and modify the height. When you browse through other menus, the selection remains in memory and you can continue working with the same height preselection when you return to this mode.
If you want to set a new height preselection, press the Enter key in the LOADED or UNLOADED mode to enter the SETUP menu. Lift the empty forks to the desired height ("current height") and press the Enter key again to store the height in the memory slot you chose beforehand. Exit the menu by pressing the Esc key.