4 minute read
TYPICAL OPERATION


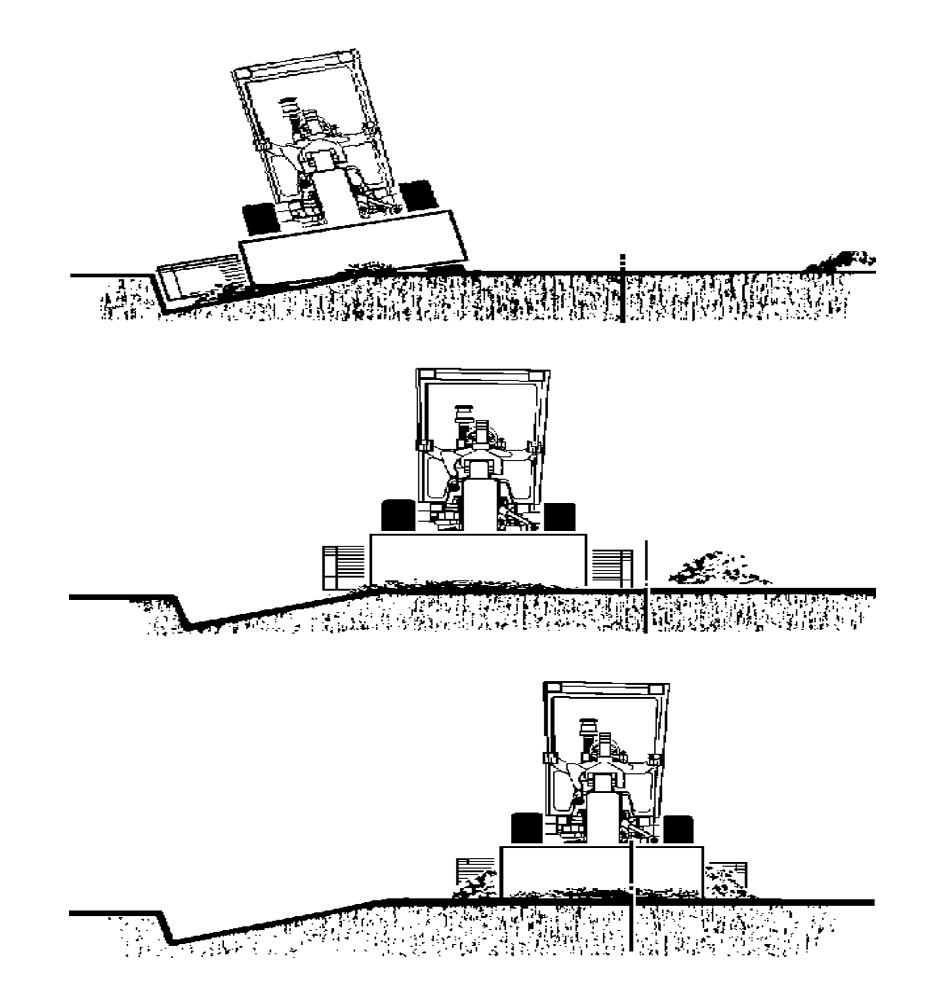
Cutting a “V” Ditch
Keep the frame straight if the ditch is being cut in solid material. If the dirt is loose, articulate the machine so that the rear frame and tandems are maintained on the most firm ground. With the circle directly under the frame, position the blade end bit slightly outside the front wheel. Incline the blade forward so that the top edge of it is in line with the center of the front tire. Position the blade in such a way that the discharge of the material is in the center of the machine, between the tandems, lean the front wheels in the direction of discharge.
From the first pass, in 1st or 2nd gear, cut only the material necessary to maintain the ditch line. For the second pass, position the wheels inside the ditch and with a speed slightly higher than first pass maintain 3:1 ratio between the ditch walls and depth. The material discharge should be maintained between the tandems. A cleaning pass is necessary. Move the circle and the blade in the direction of the ditch with the blade extended well behind the column of material, in such a way that the dirt cannot fall into the ditch. The blade end bits should be positioned between the rear wheels with the blade tilted slightly forward, to make material rolling easier. All the ditches should be cut with the differential locked, in 2nd or 3rd gear. To cut ditches with walls with a 1,5:1 and 2:1 slope, shift the circle and blade against the bank. Align the top of the moldboard with the center of the rear tire. Position the end of the blade outside of the front tire and pitch the blade slightly toward the front. Turn the wheels toward the “U” ditch in such a way that material from the bank is deposited inside the ditch. Make a cleaning pass to remove material from the ditch, pushing it on the road and spreading it out when necessary.
Terracing - Level Curves
One of the most important applications for motor graders in agriculture is terracing level curves that provide for the retention and distribution of water in the fields, permitting an increase in productivity and preventing soil erosion on hill sides. This work consists of “V” ditches following the level curves of the ground with a distance between them of 10 to 100 meters (34 - 338 ft), with the greater distance for small slopes and the smaller distance for steeper slopes.
Ditch Cutting on flat Plain
The opening of a ditch on a flat plain is a continuation of “V” ditching. With the circle centered on the frame in a straight position, position the blade end bit behind the outside edge of the front tire. Angle the blade in such a way that the other end reaches the width and depth of the ditch desired (with front scarifiers it is possible to position the blade at 90° if necessary). Tilt the blade slightly toward the front, so that material is spread along the sides of ditch. This pass should be done in 1st or 2nd gear (with the differential locked if available on the machine). On the following pass, push the material outside the ditch and on the road side. For this, move the circle and blade outside the pile and angle the blade in such a way that the material does not return into the ditch. Maintain the edge of the blade near the front tire, to keep small mounds of material from returning into the ditch. For the next pass, spread the material lightly from the road shoulder toward the center of the road.
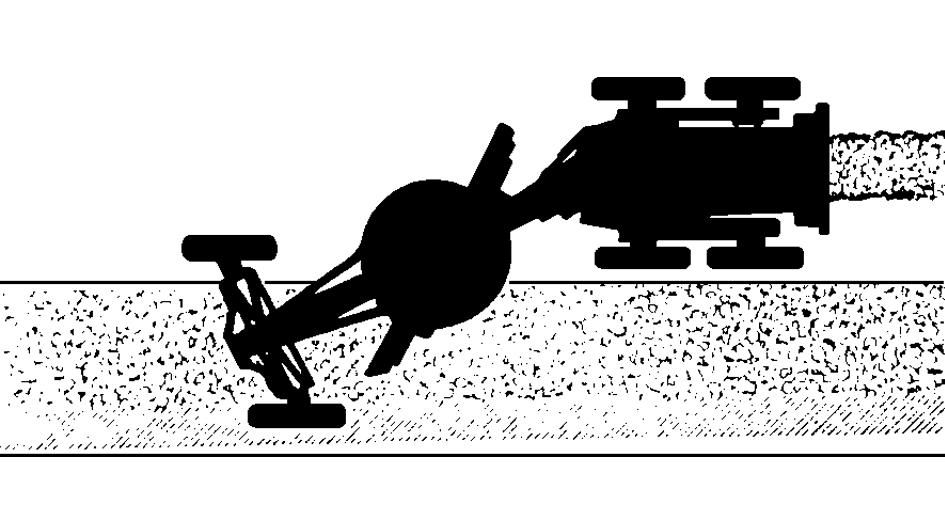
Cleaning a Moist bed Channel
The articulated grader makes the cleaning of wet ditches a relatively simple operation. Articulate the frame in the OFFSET position, in such a way that the rear wheels are on firm ground, while the front wheels are on the side of the bank.
Move the circle and blade toward the ditch, with the blade angled in such a way to bring the material toward the road bed. If tilt of channel is excessive, to the point that contact of the wheel with the ground is impossible, try to drive more inwards or outwards the channel in order to keep both wheels touching the ground. If the rear wheels should not touch the channel slope, position the wheels partially towards the channel, so that the machine is beveled sufficiently to keep the front wheels in contact with the ground.

After preparing the drainage, the next step is to prepare and level the road bed. Maintain the frame straight, circle centered and blade almost perpendicular to the machine, in such a way that the material leaves from both sides and cuts the crest of the road rather high to permit drainage on both sides. In subsequent passes, angle the blade between 10° and 25° tilting it a little toward the front to permit the material to roll toward the road shoulders. Make these passes at relatively high speeds, so that the loose material passes under the blade before touching the ends. On the final pass, for each road shoulder position the blade end bit in line with tandem, so that the rear tires can compact the material that may slide off the sides of the blade.