7 minute read
JP2 Mainboard to Button Board Connector


9 Status indicators Light-Emitting Diodes (LEDs) that light up to show the status of the computer’s functions and components.
10 Click buttons (left and right)
The left and right buttons function like the left and right mouse buttons. 11 Microphone Internal microphone for sound recording. 12 Display screen Also called Liquid-Crystal Display (LCD), displays computer output. 13 Empowering button Launches the Empowering Technology toolbar. 14 Speaker Left and right speakers deliver stereo audio output. 15 Palmrest Comfortable support area for your hands when you use the computer.
Closed Front View
# Icon Item Description
1 Power indicator Indicates the computer’s power status. 2 Battery indicator Indicates the computer’s battery status. 3 Line-in jack Accepts audio line-in devices (e.g., audio CD player, stereo walkman). 4 Microphone-in jack Accepts input from external microphones. 5 Headphones/speaker/ line-out jack with S/PDIF support Connects to audio line-out devices (e.g., speakers, headphones). 6 LCD display latch Secures the LCD display in place when closed. 7 Infrared port Interfaces with infrared devices (e.g. infrared printer and IR-aware computer).

# Icon Item Description
1 Kensington lock slot Connects to a Kensington-compatible computer security lock. 2 External display (VGA) port Connects to a display device (e.g., external monitor, LCD projector). 3 DVI DVI-D port Supports digital video connections. 4 Ethernet (RJ-45) Connects to an Ethernet 10/100/1000based network (for selected models). 5 2 USB 2.0 port Connect to USB 2.0 devices (e.g., USB mouse, USB camera). 6 S-video/TV-out (NTSC/ PAL) port Connects to a television or display device with S-video input. 7 4-pin IEEE 1394 port Connects to IEEE 1394 devices. 8 Volume control Increases and decreases the volume. 9 5-in-1 card reader Accepts Secure Digital (SD), MultiMediaCard (MMC), Memory Stick (MS), Memory Stick PRO (MS PRO), xDPicture Card (xD). 10 PCI Express Card slot Accepts an Express Card/54 module. Note: Express Cards are third generation of PC cards, hot-swapable and maller than previous PC Cards. Designed for both desktop and mobile use, Express Cards use either USB 2.0 or a single lane PCI Express technology that provides 500 Mbytes/sec total throughput. Formerly code named “NEWCARD,” Express Cards are 5mm thick like Type II PC Cards, but do not use the same 86x54mm footprint. Express Cards come in 75x54mm and 75x34mm sizes. Express Card/54 slot means this notebook accepts 75x54mm Express Cards.

# Icon Item Description
1 2 USB 2.0 ports Connect to USB 2.0 devices (e.g., USB mouse, USB camera).
2 AV-in port Accepts input signals from audio/video (AV) devices.
3 Optical drive Internal optical drive; accepts CDs or DVDs (slot-load or tray-load depending on model).
4 Optical disk access indicator Lights up when the optical drive is active.
5 Optical drive eject button Ejects the optical disk from the drive.
6 Emergency eject hole Ejects the optical drive tray when the computer is turned off. 7 Modem (RJ-11) port Connects to a phone line.
8 RF-in port Accepts input signals from analog/digital TV-tuner devices (for selected models).
Rear view

# Icon Item Description 1 DC-in jack Connects to an AC adapter.
2 Ventilation slots Enable the computer to stay cool, even after prolonged use.
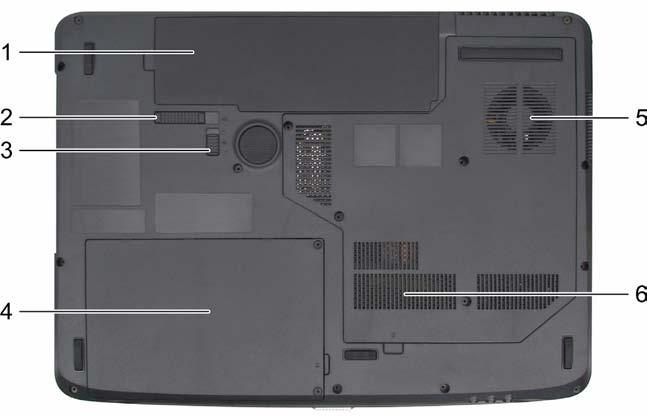
Item# Description
1 Battery bay Houses the computer’s battery pack. 2 Battery release latch Releases the battery for removal. 3 Battery lock Locks the battery in position. 4 Hard disk bay Houses the computer’s hard disk (secured with screws) 5 & 6 Ventilation slots and cooling fan Enable the computer to stay cool, even after prolonged use. Note: Do not cover or obstruct the opening of the fan.
Indicators
The computer has several easy-to-read status indicators.
The front panel indicators are visible even when the computer cover is closed up.

Icon
Function Description
Power Lights up when the computer is on.
Battery Lights up when the battery is being charged.
Wireless LAN Indicates the status of wireless LAN communication.
Bluetooth Indicates the status of Bluetooth communication.
HDD Indicates when the hard disc or optical drive is active.
Num lock Lights when Num Lock is activated.
Cap lock Lights when Cap Lock is activated
NOTE: 1. Charging: The light shows amber when the battery is charging. 2. Fully charged: The light shows green when in AC mode.
Easy-Launch Buttons
To the top of the keyboard there are four easy-launch buttons: Web browser, mail, arcade buttons and an
Empowering Key “ .
Press “ “ to run the Acer Empowering Technology. The mail and Web browser buttons are pre-set to email and Internet programs, but can be reset by users. To set the Web browser and mail buttons, run the Launch Manager.

Launch Button Default application
Acer Empowering Technology (user-programmable)
Web browser Internet browser (user-programmable) Mail Email application (user-programmable) Arcade Windows Media Center
Touchpad Basics
The following teaches you how to use the touchpad:
Move your finger across the touchpad (2) to move the cursor. Press the left (1) and right (4) buttons located beneath the touchpad to perform selection and execution functions. These two buttons are similar to the left and right buttons on a mouse.
Tapping on the touchpad is the same as clicking the left button. The center (3) button to mimics your cursor pressing on the right scroll bar of Windows applications.
NOTE: When using the touchpad, keep it - and your fingers - dry and clean. The touchpad is sensitive to finger movements; hence, the lighter the touch, the better the response. Tapping too hard will not increase the touchpad’s responsiveness.

Function Left Button (1) Right Button (4) Main touchpad (2) Center button (3)
Execute Click twice quickly Tap twice (at the same speed as double-clicking the mouse button) Select Click once Tap once Drag Click and hold, then use finger on the touchpad to drag the cursor. Tap twice (at the same speed as double-clicking a mouse button); rest your finger on the touchpad on the second tap and drag the cursor.
Access context menu Click once
Scroll Click and hold to move up/down/left/ right.
The keyboard has full-sized keys and an embedded keypad, separate cursor keys, one Windows key and twelve function keys.
Lock Keys and embedded numeric keypad
The keyboard has three lock keys which you can toggle on and off.
The embedded numeric keypad functions like a desktop numeric keypad. It is indicated by small characters located on the upper right corner of the keycaps. To simplify the keyboard legend, cursor-control key symbols are not printed on the keys.
Lock Key Description
Caps Lock When Caps Lock is on, all alphabetic characters typed are in uppercase.
Num lock <Fn>+<F11>
Scroll lock <Fn>+<F12> When Num Lock is on, the embedded keypad is in numeric mode. The keys function as a calculator (complete with the arithmetic operators +, -, *, and /). Use this mode when you need to do a lot of numeric data entry. A better solution would be to connect an external keypad. When Scroll Lock is on, the screen moves one line up or down when you press the up or down arrow keys respectively. Scroll Lock does not work with some applications.
Desired Access Num Lock On
Number keys on embedded keypad Cursor-control keys on embedded keypad
Type numbers in a normal manner. Hold <Shift> while using cursor-control keys. Main keyboard keys Hold <Fn> while typing letters on embedded keypad.
Num Lock Off
Hold <Fn> while using cursor-control keys. Type the letters in a normal manner.
The keyboard has one key that performs Windows-specific functions.
Key Icon Description
Windows key Pressed alone, this key has the same effect as clicking on the Windows Start button; it launches the Start menu. It can also be used with other keys to provide a variety of function:
+ <Tab> Activates next taskbar button.
+ <E> Opens the My Computer window
+ <F1> Opens Help and Support.
+ <F> Opens the Search: All Files dialog box.
+ <R> Opens the Run dialog box.
+ <M> Minimizes all windows.
Application key <Shift>+ + <M> Undoes the minimize all windows action. This key has the same effect as clicking the right mouse button; it opens the application’s context menu.
Hot Keys
The computer employs hotkeys or key combinations to access most of the computer’s controls like screen brightness, volume output, and the BIOS utility. To activate hot keys, press and hold the <Fn> key before pressing the other key in the hotkey combination.
Hot Key Icon Function Description
<Fn>+<F1> Hot key help Displays help on hot keys. <Fn>+<F2> Acer eSettings Launches the Acer eSettings in Acer eManager. <Fn>+<F3> Acer ePower Management Launches the Acer ePower Management in Acer Empowering Technology. See “Acer Empowering Technology” on page 18.
<Fn>+<F4> Sleep Puts the computer in Sleep mode.