12 minute read
Chapter 2 System Utilities


System Utilities
Phoenix SecureCore Setup Utility
Phoenix SecureCore Setup Utility is a hardware configuration program built into your system's Basic Input/ Output System (BIOS). Since most systems are already properly configured and optimized, there is normally no need to run this utility. You will need to run this utility under the following conditions: • When changing the system configuration including: • Setting the system time and date • Configuring the hard drives • Specifying the boot device sequence • Configuring the power management modes • Setting up system passwords or making other changes to the security setup • When a configuration error is detected by the system and you are prompted ("Run Setup" message) to make changes to the BIOS settings. IMPORTANT: If you repeatedly receive “Run Setup” messages, the RTC battery located on the mainboard (RTC1) may be defective. In this case, the system cannot retain configuration values in CMOS. Replace the RTC battery with a new one.
NOTE: For ease of reading, Phoenix SecureCore Setup Utility will be simply referred to as “Setup” or “Setup Utility” in this Service Guide. In the descriptive tables following each of the menu screen illustrations, settings in boldface are the default and suggested parameter settings. The Setup Utility loads the configuration values in a battery-backed nonvolatile memory called CMOS RAM. This memory area is not part of the system RAM, which allows configuration data to be retained when power is turned off. The values take effect when the system is booted. POST uses these values to configure the hardware. If the values and the actual hardware do not agree, POST generates an error message. You must run this utility to change the BIOS settings from the default or current configuration.
1. Turn on the computer.
If the computer is already turned on, save your data and close all open applications, then restart the computer. 2. During POST, press F2.
If you fail to press F2 before POST is completed, you will need to restart the computer. Use the left ( ) and right ( ) arrow keys to move between selections on the menu bar.
Information Main Phoenix SecureCore(tm) Setup Utility Security Boot Exit
CPU Type: CPU Speed: IDE0 Model Name: IDE0 Serial Number: ATAPI Model Name: System BIOS Version: VGA BIOS Version: KBC Version: Serial Number: Asset Tag Number: Product Name: Manufacturer Name: UUID: Intel (R) Core (TM)2 Duo CPU T6400 @ 2.00 GHz 2.00GHz XXXXXXXXXXX-(XX) XXXXXXXX XXXXXXXXXXX-XXX XX-XXXX-(XX) VX.XX XX-XXX XXXXXX.XXX.XXX.XXX.XXXXXX XX.XX XXXXXXXXXXXXXXXXXXXXXXX None Aspire 5738 Acer XXXxXxXX-xXxX-XXxx-xXXx-xXXxXXxXxxXX Menu bar
F1 Esc Help Exit Select Item Select Menu -/+ Enter Change Values Select Sub-Menu F9 F10 Setup Defaults Save and Exit Legend bar
Use the keys listed in the legend bar on the bottom of the Setup screen to work your way through the various menu and submenu screens of the Setup Utility. The table below lists these legend keys and their respective functions.
Key Function and To move between selections on the menu bar. To move the cursor to the field you want.The currently selected field will be highlighted. The and right side of each menu screen displays a field help panel—Item Specific Help panel. This panel displays the help text for the currently selected field. It updates as you move the cursor to each field. F5 and F6 To select a value for the currently selected field (only if it is user-configurable). Press these keys repeatedly to display all possible entries. A parameter that is enclosed in square brackets [ ] is user-configurable. Grayed-out parameters are not user-configurable for one of the following reasons: q The field value is auto-configured or auto-detected.· q The field value is informational only. q The field is password-protected. Enter To select a field value (a pop-up menu displays) or submenu screen.
Indicates a submenu field. To view a submenu screen, use the and keys to move the cursor to the submenu you want, then press Enter. Esc If you press this key: q On one of the primary menu screens, the Exit menu displays. q On a submenu screen, the previous screen displays. q When you are making selections from a pop-up menu, closes the pop-up without making a selection. F1 or Alt-H To bring up the General Help window. The General Help window describes other Setup navigation keys that are not displayed on the legend bar. F9 Press to load default system values. F10 Press to save changes and close the Setup Utility.
Setup Utility Menus
The Setup Utility has five menus for configuring the various system functions. These include: • Information • Main • Security • Boot • Exit
NOTE: The screenshots used in this section are for illustration only. The values displayed may not be the same as those in your computer.
The Information menu screen displays a summary of your computer hardware information. These information are necessary for troubleshooting and may be required when asking for technical support.
Information Main Phoenix SecureCore(tm) Setup Utility Security Boot Exit
CPU Type: CPU Speed: IDE0 Model Name: IDE0 Serial Number: ATAPI Model Name: System BIOS Version: VGA BIOS Version: KBC Version: Serial Number: Asset Tag Number: Product Name: Manufacturer Name: UUID: Intel (R) Core (TM)2 Duo CPU T6400 @ 2.00 GHz 2.00GHz XXXXXXXXXXX-(XX) XXXXXXXX XXXXXXXXXXX-XXX XX-XXXX-(XX) VX.XX XX-XXX XXXXXX.XXX.XXX.XXX.XXXXXX XX.XX XXXXXXXXXXXXXXXXXXXXXXX None Aspire 5738 Acer XXXxXxXX-xXxX-XXxx-xXXx-xXXxXXxXxxXX
F1 Esc Help Exit Select Item Select Menu -/+ Enter Change Values Select Sub-Menu F9 F10 Setup Defaults Save and Exit
The following table describes the information displayed in the Information menu screen.
Field Description
CPU Type
Displays the processor model. CPU Speed Displays the processor speed. IDE0 Model Name Displays the model name of the hard drive installed on the primary IDE master. IDE0 Serial Number Displays the serial number of the hard drive installed on the primary IDE master. ATAPI Model Name Displays the model name of the optical disc drive installed in the system. System BIOS Version Displays the current system BIOS version. VGA BIOS Version Displays the current VGA BIOS version. KBC Version Displays the keyboard controller version. Serial Number Displays the system serial number. Asset Tag Number Displays the system asset tag number Product Name Displays the official model name of the computer. Manufacturer Name Displays the manufacturer of the computer. UUID Displays your computer’s UUID (universally unique identifier). UUID is an identifier standard used in software construction, standardized by the Open Software Foundation (OSF) as part of the Distributed Computing Environment (DCE).
The Main menu screen allows you to configure the basic system settings.
Phoenix SecureCore(tm) Setup Utility Main Information Security Boot Exit
System Time: System Date:
System Memory: Extended Memory: Video Memory: [ ] :10:1010 [ ] 03/05/2009
632 KB 4093 MB 512 MB Item Specific Help
<Tab>, <Shift-Tab>, or <Enter> selects field.
Quiet Boot: Network Boot: F12 Boot Menu: D2D Recovery: SATAMode [Enabled] [Enabled] [Disabled] [Enabled] [AHCI]
F1 Esc Help Exit Select Item Select Menu -/+ Enter Change Values Select Sub-Menu F9 F10 Setup Defaults Save and Exit
The following table describes the parameters in this screen.
Field Description Value
System Time Sets the system time. HH:MM:SS (hour:minute:second)
System Date Sets the system date. MM/DD/YYYY (month/day/year)
System Memory Displays the size of system memory detected during boot-up. Extended Memory Displays the size of extended memory detected during boot-up. Extended memory = Total memory –1MB Video Memory Displays the size of video memory detected during boot-up. Quiet Boot Enables or disables the Quiet Boot function. When enabled, BIOS setup is in graphical mode and displays only an identification logo during POST and while booting. After booting, the screen displays the operating system prompt (such as DOS) or logo (such as Windows 95). If any error occurs while booting, the system automatically switches to text mode. When disabled, BIOS setup is in the conventional text mode where you see the system initialization details on the screen. Disabled Enabled Network Boot When enabled, a remote host with appropriate boot image can boot this computer. (only works with an Ethernet device.) Disabled Enabled F12 Boot Menu Enables or disables the Boot menu during POST. Disabled Enabled
D2D Recovery Enables or disables D2D Recovery function. This function allows the user to create a hidden partition on the hard drive to store the operation system. User can then use this partition to restore the system to factory defaults. Disabled Enabled
SATA Mode Select the SATA controller operating mode. When set to AHCI (Advanced Host Controller Interface), the SATA controller enables its AHCI and RAID features when the computer boots up. When set to IDE, the SATA controller disables its AHCI and RAID functions when the computer boots up. NOTE: The Acer eMachine D525/D725 computer does not support AHCI or RAID functions so set this parameter to IDE to speed up the boot-up time. AHCI IDE
Security
The Security menu screen contains parameters that help safeguard and protect your computer from unauthorized use.
Phoenix SecureCore(tm) Setup Utility Main Information Security Boot Exit
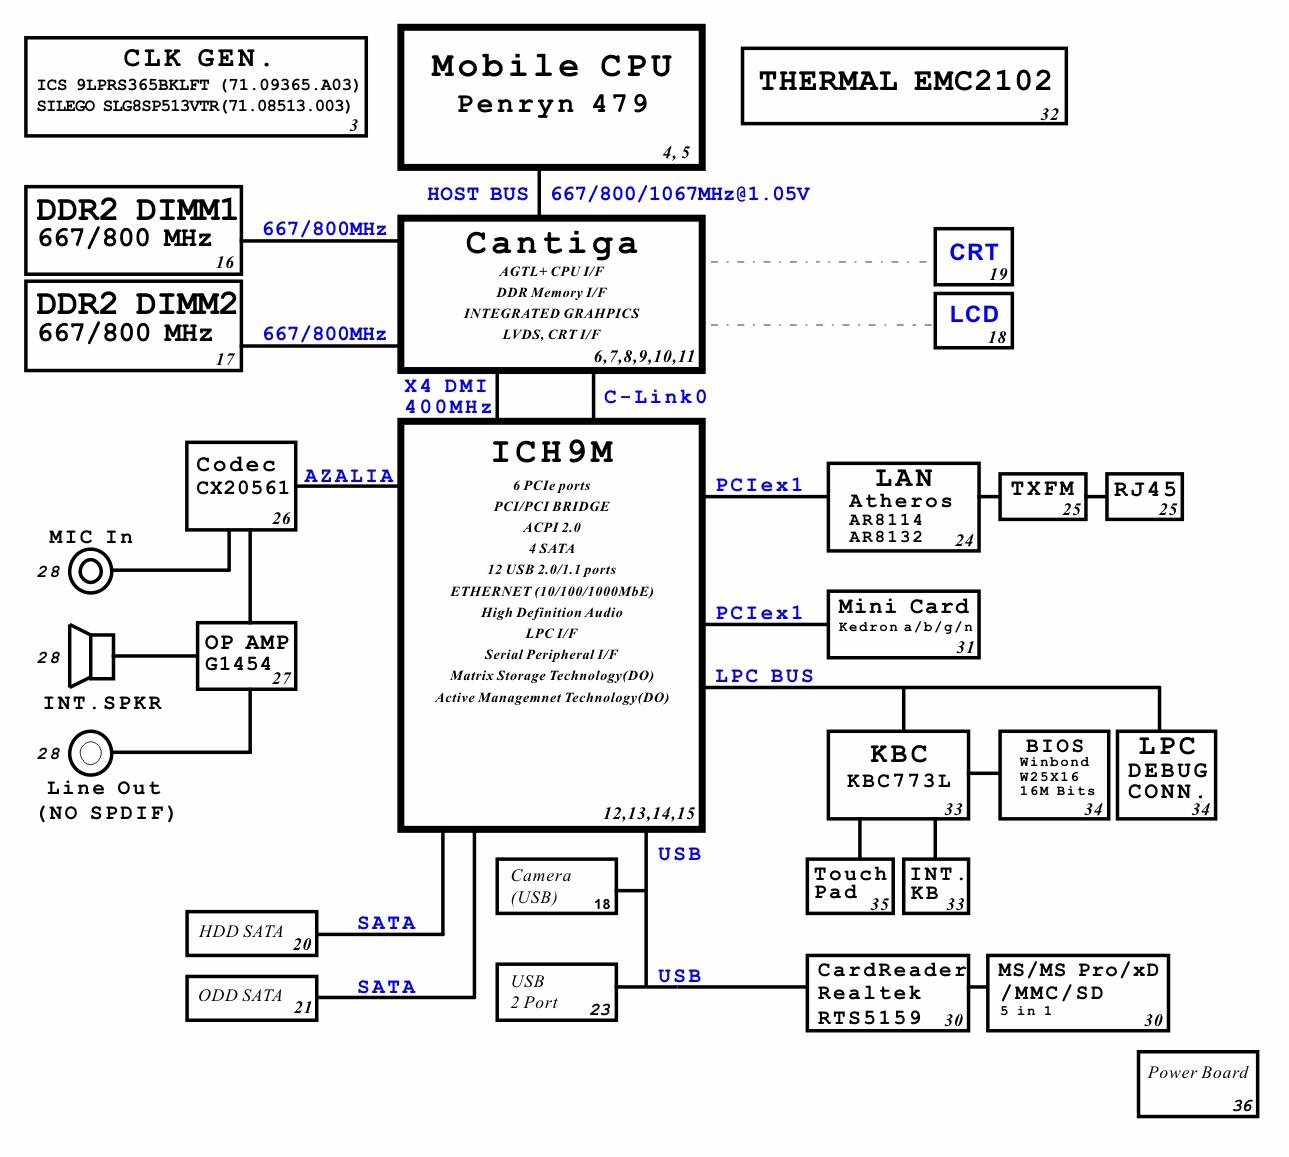
i Supervisor Password s: User Password s: i HDD Password is :
Set Supervisor Password Set User Password Set Password HDD
Password on Boot: Clear Clear Clear
[ ] Enter [Enter] [Enter]
[Disabled] Item Specific Help
Supervisor Password controls access of the whole setup utility. It can be used to boot up when Password on boot is enabled.
F1 Esc Help Exit Select Item Select Menu -/+ Enter Change Values Select Sub-Menu F9 F10 Setup Defaults Save and Exit
The following table describes the parameters in the Security menu screen.
Field Description Value
Supervisor Password is Displays the supervisor password status.
Clear User Password is Displays the user password status. Set HDD Password is Displays the HDD password status. Set Supervisor Password Press Enter to configure the supervisor password. When set, this password will allow the user to access and change all settings in the Setup Utility. Set User Password Press Enter to configure the user password. When set, this password will restrict a user’s access to the Setup menus. Only the following menus will be accessible: • System Time and System Date • All Exit menu options excluding Load Setup Defaults A supervisor password must first be set before creating this user password. Set HDD Password Press Enter to configure the HDD password. When set, this password will restrict a user’s access to the hard disk drive. It will be required during boot-up or when waking from hibernation mode. Password on Boot Referred to as power-on password. When set, the user or supervisor password will be required to boot up the system. A supervisor password must first be set before creating this password. Disabled Enabled
Note the following before you define a system password: • The maximum length of password contains 8 alphanumeric characters—A - Z, 0 - 9, and ‘;’ (for French keyboard). • System passwords are case-insensitive. • When you are prompted to enter a password, you have three tries before the system halts. Do not forget your password. If you forget your password, you may have to return your computer to your dealer to reset it.
To set a system password:
1. Select a password parameter, then press Enter.
The password box appears.
2. Type a password then press Enter. IMPORTANT: Be very careful when typing your password because the characters do not appear on the screen. Only shaded blocks representing each typed character are visible. 3. Retype the password to verify the first entry, then press Enter.
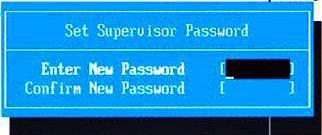
You will be prompted to save the new password.
4. Press Enter. 5. Press F10 to save the password and close the Setup Utility.
To change a system password:
1. Select a password parameter, then press Enter.
The password box appears.
2. Type the original password, then press Enter. 3. Type a new password, then press Enter.

4. Retype the new password to verify the first entry, then press Enter.
You will be prompted to save the new password.
5. Press Enter. 6. Press F10 to save the password and close the Setup Utility.
To remove a system password:
1. Select a password parameter, then press Enter.
The password box appears. 2. Type the original password, then press Enter. 3. Press Enter twice without entering anything in the new and confirm password fields.
You will be prompted to confirm the password removal.
4. Press Enter. 5. Press F10 to save the changes you made and close the Setup Utility.
Resetting a system password:
If you have forgotten the user password, the computer will continue to function normally but you will have limited access to the Setup Utility. If you have enabled the Password on Boot field and you forget the supervisor password, you will not be able to boot up the computer. The same thing applies if you forget the HDD password. To clear a lost BIOS password (user or supervisor password) you need to short the G61 hardware gap located near the processor socket (U33). Go to page 70 for instructions. To regain access to your computer if you lose the HDD password, you need to generate a master password and unlock your hard drive. Go to page 71 for instructions.
The Boot menu screen allows users to set the preferred drive sequence in which the Setup Utility attempts to boot the operating system.
Phoenix SecureCore(tm) Setup Utility Main Information Security Boot Exit
Boot priority order: 1: IDE0: XXXXXXXXXXX-(XX) 2: CD/DVD: XXXXXXXXXXX-XXXXX-(X 3: 4: 5: 6: Network Boot: XXXXXXXXXXXXXXXX USB HDD: USB FDD: USB Key: 7: USB CD/DVD ROM: Item Specific Help
Use < > or < > to select a device, then press <F6> to move it up the list, or <F5> to move it down the list. Press <Esc> to escape the menu.
F1 Esc Help Exit Select Item Select Menu -/+ Enter Change Values Select Sub-Menu F9 F10 Setup Defaults Save and Exit
Setting the boot drive sequence
By default, the computer searches for boot devices in the following order: 1. Hard disk drive 2. Optical disc drive 3. Network boot 4. External USB HDD 5. External USB floppy drive 6. External USB keyboard 7. External USB optical drive
To set the boot drive sequence:
1. Press or to highlight a bootable device. 2. Press F5 or F6 to move the selected device up or down the boot sequence. 3. Press F10 to save the changes you made and close the Setup Utility.
The Exit menu screen lists the exit options to quit from the Setup Utility.
Phoenix SecureCore(tm) Setup Utility Main Information Security Boot Exit
Exit Saving Changes Exit Discarding Changes Load Setup Defaults Discard Changes Save Changes Item Specific Help
Exit System Setup and save your changes to CMOS.
F1 Esc Help Exit Select Item Select Menu -/+ Enter Change Values Select Sub-Menu F9 F10 Setup Defaults Save and Exit
The following table describes the parameters in this screen.
Field Description Exit Saving Changes Saves changes made and closes the Setup Utility. Keyboard shortcut: F10· Exit Discarding Changes Discards changes made and closes the Setup Utility. Load Setup Defaults Loads the factory-default settings for all Setup parameters. Keyboard shortcut: F9 Discard Changes Discards all changes made to the Setup Utility and loads previous configuration settings. Save Changes Saves all changes made to the Setup Utility.