18 minute read
FR-1X210 Troubleshooting


The symptoms listed below are covered on the following pages. Before beginning any of those troubleshooting procedures, place the transmission in neutral and move the range selection lever from low to high. Listen for any constant air leak from the shift knob, air module base (exhaust), or transmission breather. If a constant leak is heard, go to that particular leak troubleshooting procedure first. If you do not see the symptom you need to correct, refer to the General Troubleshooting chart at the beginning of this section.
Symptom
• Air leak from Air Module Base (Exhaust leak) • No or Slow Range Shift into High (Shift into low range is good) • No or Slow Range Shift into Low (Shift into high range is good) • Constant Air Leak from Shift Knob • Range Shifts While Transmission is in Gear • Air Leak from Transmission Breather or Transmission Case is Pressurized
Note: Use the air system troubleshooting procedures for part replacement only if the symptom can be duplicated. If the problem is intermittent, parts that are not defective could be replaced. Note: During all testing, the vehicle air pressure must be greater than 90 PSI (620 kPa). If during testing the pressure falls below 90 PSI (620 kPa), make sure the transmission is in neutral, start the engine and let the pressure build to governor cutoff. After the pressure reaches the governor cutoff, continue testing. The pressure is critical if the vehicle is equipped with a Pressure Protection Valve that would shut off the air supply to certain air circuits if the system pressure dropped below a preset level.
Note: A 0-150 PSI (0-1034 kPa) air gauge with a 1/16" male pipe thread fitting attachment is required for some of the test procedures.
Note: Regulated air pressure is 75 to 85 PSI (517-586 kPa).
WARNING: Prior to removing the air module, exhaust the air from it. Failure to exhaust the air module may result in personal injury or damage to parts from the sudden release of air.
WARNING: Use care when removing the test port pipe plugs. If air pressure is present on the plug, it can become a projectile during removal. When removing the “L” plug or “H” plug, pressure can be shut off by selecting the opposite range mode. If removing the “F” plug, exhaust the air to the module inlet.
Air System Nomenclature
Figures 4-1 through 4-3 below show the air module, shift knob, and range alignment lock cover (earlier models) with their components labeled. These are the primary components used during troubleshooting. If necessary, refer to these figures while troubleshooting the air system.
Figure 4-4 below shows how to isolate the air module. If necessary, refer to this figure when isolating the air module.
The table below shows which air lines connect to which ports on the shift knob and air module. If necessary, refer to this table when connecting the air lines.

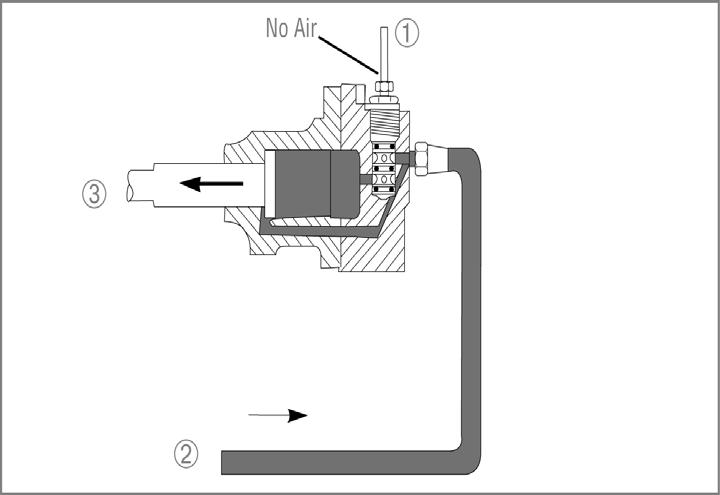
Figure 4-4 Air Module Isolation
Port on Knob Port on Air Module Air Line Color (Typical) S S Red P P Black
Short bursts of air leakage from the module base (exhaust) are normal as the range system is shifted. The module base is defined as both the interface of the module cover and module base and the extreme underside of the module. Leakage is a problem when it is audible and constant. Air leakage from the module base may result from either a defective air module or a defective range piston. The following procedure will identify the defective component.
Test Procedure:
1. Check for air leakage from the module base (exhaust) in each of the four following conditions. (Make sure the range is shifted when the shift lever is in neutral.) a. Range selection lever in Low and shift lever in neutral. b. Range selection lever in Low and shift lever in gear. c. Range selection lever in High and shift lever in neutral. d. Range selection lever in High and shift lever in gear.
Record the findings (constant leak or no leak) in the following table.
Lever in Neutral Lever in Gear Range Selector in LOW Range Selector in HIGH
2. If the information you recorded at step 1 matches one of the following tables, replace the air module. If your table does not match either of the tables, it will be necessary to isolate and test the air module separately, continue to step 3. Range Selector in LOW Range Selector in HIGH Lever in Neutral No Leak Constant Leak Lever in Gear No Leak Constant Leak
Range Selector in LOW Range Selector in HIGH Lever in Neutral Constant Leak Constant Leak Lever in Gear Constant Leak Constant Leak
WARNING: Failure to exhaust the air pressure may cause personal injury or damage to parts.
3. Exhaust the air pressure from the air module. To do so, the vehicle’s air tanks may need to be exhausted.
4. Leaving all air lines connected to the module, remove the four capscrews attaching the air module to the shift bar housing. Lift the air module and tilt it to gain access to the two air holes at the underside on the rear capscrew location. Do not damage or lose the two o-rings used to seal the holes.
5. Block off the air ports on the underside of the module. Use a piece of gasket material or rubber material to seal the bottom of the module as shown in Figure 4-1 under “Air System Nomenclature”.
6. Repressurize the air module with an inlet supply pressure of over 90 PSI (620 kPa). To repressurize the air module, the vehicle may need to be started and air pressure allowed to build up.
7. Check for air leakage in both high and low range. If air continues to leak constantly from the exhaust, the air module is defective. If air does not leak, a range cylinder piston or piston seal failure has occurred. Remove the shift bar housing to gain access to the range shift cylinder.
This transmission contains a SynchroSaver feature to protect the high range synchronizer. When high range is selected and a front section gear is engaged, air pressure is supplied to both sides of the range piston, which reduces synchronizer force. Therefore, if the driver engages a front section gear before the high range synchronizer engages, the high range synchronizer will remain in neutral. When a front section gear engages before the synchronizer shift completes, the driver must shift the lever back to neutral to allow the high range synchronizer to complete its shift. Once the range shift is complete, the driver can complete the front section shift.
If the high range synchronizer hangs up or is slow to synchronize, the front section may engage first. The driver complaint will be that the transmission “neutralizes” on a shift to high range. If this condition occurs, perform the following test of the air system to eliminate the air system as the source of the problem. If the air system performs properly, then the problem is internal to the transmission range synchronizer system. Note: The driver must preselect all range shifts. Note: If a capscrew or stud is installed too far into the right side (air module side) rear support hole, the fastener can extend too far into the transmission. The fastener may contact the range yoke and bind the range synchronizer assembly during the range shift.
Test Procedure
1. Check the shift knob operation.
On the shift knob, remove the screws holding the plastic skirt. Slide the skirt down and out of the way. Move the range selection lever up into high range. Disconnect the black line connected to the “P” port on the knob. Question Result What to do next Does air come out of the “P” port on the Yes Repair or replace the knob. knob?
No Reconnect the air line to the knob, and continue to the next step.
2. Test the regulator pressure. (Regulator pressure should be between 75 and 85 PSI (517-586 kPa).)
Reconnect the “P” line at the shift knob. Locate the two small pipe plugs on the rear of the air module. One is labeled “H" and the other “L”. (See Figure 4-1 “Air System Nomenclature”). Install a 0-150 PSI (0-1034 kPa) air gauge in the port marked “H.” Note: Prior to removing the pipe plug, turn off the air flow by flipping the range selector down into the low range position. The transmission must be in neutral.
Move the range selector up to the high range position and record the pressure on the gauge. Match the pressure to one of those on the chart on the next page, and follow the corresponding instructions. Question Result What to do Next What is the air pressure at 75-85 PSI (517-586 kPa) Continue to the next step. the “H” port? (to specification)
Question Result What to do Next Less than 75 PSI (517 kPa)
Greater than 85 PSI (586 kPA) On the top of the air module, remove the test port pipe plug for filtered vehicle air. (Marked “F” as shown in Figure 4-1.) Install the test gauge in the “F” port, and check the pressure. If the pressure is less than 90 PSI (620 kPa), repair the vehicle air system to achieve full vehicle air pressure at the air module inlet, and repeat the test. If the pressures greater than 90 PSI (620 kPa) and no external air leaks were detected from the air module, shift knob, or transmission, replace the air module. Replace the air module.
3. Check the spool valve function.
With the shift lever in neutral, move the range selector from low to high several times. Answer the question on the chart below, and follow the instructions corresponding to the result. Question Result What to do Next Does the gauge rapidly go from 75- Yes Air system performs properly. Go to 85 PSI (517-586 kPa) in High to 0 step 5. PSI in Low?
No Continue to the next step.
4. Isolate and test the air module. Refer to Figure 4-1 “Air System Nomenclature” to see an example of an isolated air module.
WARNING: Failure to exhaust the air module may cause personal injury or damage to parts due to the rapid release of air.
Exhaust the air pressure from the air module. To do so, the vehicle air tanks may need to be exhausted. Remove the four capscrews attaching the air module to the shift bar housing. Lift the air module and tilt it to gain access to the two air holes at the underside at the rear capscrew location. Do not damage or lose the two O-rings used to seal the holes. Block off the air ports on the underside of the module. Repressurize the air module with an inlet supply pressure of over 90 PSI (620 kPa). To repressurize the air module, the vehicle may need to be started and the air pressure allowed to build. With the shift lever in neutral and the gauge still in the “H” test port, move the range selection lever from high to low (down) position.
Answer the question on the chart below, and follow the instructions corresponding to the result. Question Result What to do Next Does the gauge rapidly go from 75-85 Yes Continue to the next step. PSI (517-586 kPa) in High to) PSI in Low?
No Replace the air module.
5. Install the air module, and remove the range alignment lock cover (Figure 4-3). Then move the range selection lever from the low to high (up) position. If range now shifts properly, inspect and correct the source of binding between lock cover and range yoke bar. Note: To prevent binding, range alignment lock cover capscrews must be tightened when transmission is in Low Range. If the transmission does not shift properly, continue to Step 6.
6. Remove the auxiliary section and inspect the range synchronizer, range yoke, range yoke bar, range yoke snap ring, range sliding clutch, and mating gears for excessive wear, binding, or damage. Repair as necessary. If these components do not need repair, continue to Step 7.
7. Remove the shift bar housing and inspect the range piston, piston bar, and cylinder for excessive wear, binding, or damage. Repair as necessary.
Test Procedure:
1. Check the shift knob operation.
On the shift knob, remove the two screws holding the plastic skirt. Slide the skirt down and out of the way. Move the range selector up into high range. Disconnect the black line connected to the “P” port on the knob. Move the range selector down into low. Answer the question on the chart below and follow the instructions corresponding to the result. Question Result What to do Next Does air come out of the “P” port on the Yes Go to Step 3. knob?
No Reconnect the air line to the knob, and continue to the next step.
2. Check the air supply to the shift knob.
Disconnect the red line from the “S” port on the shift knob. Answer the question on the chart below and follow the instructions corresponding to the result. Question Result What to do Next Is air coming out of the red line? Yes Repair or replace the shift knob. No Loosen the air fitting for the line that supplies vehicle air to the module inlet. If no air is available here, repair the vehicle air to the air module. If air is available at the inlet, check the red line going from the air module to the shift knob for obstructions or damage. If the line is clear, replace the air module.
3. Check the black line for obstruction.
Reconnect the black line at the shift knob. At the air module, disconnect the black air line from the “P” port. Answer the question on the chart below and follow the instructions corresponding to the result. Question Result What to do Next Is air available on the line when the Yes Continue to next step. range selector is in the Low position?
No Repair the black line for damage or obstruction.
4. Check the regulator pressure.
Reconnect the “P” line at the air module. Locate the two small pipe plugs on the rear of the air module. One is labeled “H,” and the other is labeled “L”. (See Figure 4-1 “Air System Nomenclature”). Install a 0-150 PSI (0-1034 kPa) air gauge in the port marked “L”.
Note: Prior to removing the pipe plug, turn off the air flow by placing the range selector up into the high range position. The transmission must be in neutral.
Move the range selector down to the low position and record the pressure on the gauge. Match the air pressure to one of those described on the chart on the next page, and follow the corresponding instructions. Question Result What to do Next What is the air pressure at the “L” port? 75-85 PSI (517-586 kPa) (To specifica- Continue to the next step. tion.) Less than 75 PSI (517 kPa) On the top or the air module, remove the test port pipe plug for filtered vehicle air. (Marked “F” as shown in Figure 4-1 “Air System Nomenclature”) Install the test gauge in the “F” port, and check the pressure. If the pressure is less than 90 PSI (620 kPa), repair the vehicle air system to achieve full vehicle air pressure at the module inlet, and repeat the test. If the pressure is greater than 90 PSI (620spa) and no external air leaks were detected form the air module, shift knob, or transmission, replace the air module. Greater than 85 PSI (586 kPa) Replace the air module.
5. Check the spool valve function.
With the shift lever in neutral, move the range selector from low to high several times. Answer the question on the chart below and follow the instructions corresponding to the result. Question Result What to do Next Does the gauge rapidly go from 75- Yes Air system performs properly. Go to step 7. 85PSI (517-586 kPa) in Low to 0 PSI in High?
No Continue to the next step.
6. Isolate the air module from the transmission. Refer to Figure 4-4 “Air System Nomenclature” to see an example of an isolated air module.
WARNING: Failure to exhaust the air module may cause personal injury or damage to parts due to the rapid release of air.
Exhaust the air pressure from the air module. To do so, you may have to exhaust the vehicle air. Remove the four capscrews attaching the air module to the shift bar housing. Lift the air module and tilt it to gain access to the two air holes on the underside at the rear capscrew location. Do not lose or damage the two small O-rings that seal the holes. Block off the air ports at the underside of the module. Repressurize the air module with an inlet supply pressure of over 90 PSI (620 kPa). To repressurize the air module, the vehicle may have to be started and the air pressure allowed to build. With the shift lever in neutral and the gauge still in the “L” test port, move the range selector from low to high (up) position.
Answer the question on the chart below, and follow the corresponding instructions. Question Result What to do Next Does the gauge rapidly go from 75- Yes Continue to next step. 85PSI (517-586 kPa) in Low to 0 PSI in High?
Question Result What to do Next No Replace the air module.
7. Install the air module, and remove range alignment lock cover (Figure 4-3 “Air System Nomenclature”). Then move the range selector from low to high (up) position. If range now shifts properly, inspect and correct the source of binding between lock cover and range yoke bar. Note: To prevent binding, range alignment lock cover capscrew must be tightened when transmission is in Low Range. If transmission does not shift properly, continue to Step 8
8. Remove the auxiliary section, and inspect range synchronizer, range yoke, range yoke bar, range yoke snap rings, range sliding clutch, and mating gears for excessive wear, binding, or damage. Repair as necessary. If these components do not need repair, continue to step 9.
9. Remove shift bar housing and inspect range piston, piston bar, and cylinder for excessive wear, binding, or damage. Repair as necessary.
In normal operation, a burst of air will be exhausted from the shift knob when moving the range selector from low to high range.
If a constant air leak is detected, first check for a leaking fitting. If the leak occurs when both high and low range are selected and the leak is from the exhaust “E” port on the shift knob. Repair or replace the shift knob.
If the leak only occurs in high range, check for reversed hook up of “P” and “S” air lines. If the air lines are connected properly, repair or replace the shift knob.
Air System Symptom - Range Shift While Transmission is in Gear
The interlock mechanism allows the driver to move the range selection lever while still in gear (preselect). The range will then shift when the shift lever moves into neutral. If the driver preselects a range shift and the shift occurs while the shift lever is in gear, a problem is present.
Test Procedure:
WARNING: Failure to exhaust the air module may cause personal injury or damage to parts due to the rapid release of air.
1. Exhaust air pressure from the air module. To do so, the vehicle air may need to be exhausted.
2. Remove the four capscrews attaching the air module to the shift bar housing. Lift the air module and tilt it to gain access to the module interlock finger. Do not lose or damage the two O-rings at the rear mounting capscrew.
3. Inspect the module interlock finger for excessive wear. Replace, if necessary.
4. Shine a bright light into the hole the interlock finger engages. Inspect the chamfer on the shift shaft for excessive wear. To inspect the chamfer, the transmission may need to be shifted into gear so both the forward and rearward chamfers are visible. If the chamfer is excessively worn, remove the shift bar housing, disassemble, and replace the worn parts.
5. If the shift shaft is not excessively worn, replace the air module.
Air System Symptom - Air Leak From Breather or Case is Pressurized
If the air leak occurs when the transmission is in high range, the problem is with the range cylinder in the transmission. Remove the shift bar housing, and disassemble and inspect the range cylinder for worn or missing o-rings. Also, inspect the shift bar housing for cracks or porosity.
If the leak only occurs when the transmission is shifted to low range, the air module may be leaking into the transmission at the interlock finger location. Prior to removing the shift bar housing, perform the following test to determine the problem.
Test Procedure:
WARNING: Failure to exhaust the air module may cause personal injury or damage to parts due to the rapid release of air.
Exhaust the air pressure from the air module. To do so, the vehicle air may need to be exhausted. Remove the four capscrews attaching the air module to the shift bar housing. Lift the air module and tilt it to gain access to the two air holes at the underside at the rear capscrew location. Do not lose or damage the two small o-rings near the rear capscrew location. Block off the air ports on the underside of the module (Figure 4-4 “Air System Nomenclature”). Repressurize the air module with an inlet supply pressure of over 90 PSI (620 kPa). Repressurizing the air module may require starting the vehicle and allowing the air pressure to build. Shift the transmission into low range. Answer the question on the chart below, and follow the instructions corresponding to the result.
Question Result What to do Next Can any air leakage be detected at the Yes Replace the air module. module interlock finger?
No Air leak is at the range cylinder. Remove the shift bar housing, and disassemble and inspect the range cylinder for worn or missing o-rings. Also inspect the shift bar housing for cracks or porosity.