
8 minute read
B&L


TIPS FOR WARM VERTICAL CONDENSATION
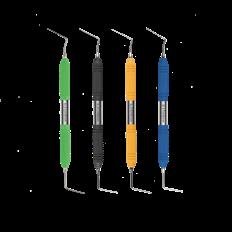
1. You need two devices – one heated plugger and one back fill unit. (e.g. B&L
SuperEndo Alpha and Beta) and to take your treatment to the next level we suggest endodontic pluggers such as B&L’s NiTi/SS
Kondensors.
2. Ensure the canals are prepared adequately, disinfected and dried. True warm vertical obturation works consistently with small apical size and larger taper preparation techniques eg. #25 .06. 3. Select your master GP point based on the minimum size of the apical constriction and ensure there is adequate tug back. 4. Select a plugger tip that goes within 4-5mm of your working length. Mark the depth at which it binds to the canal with a rubber stopper. 5. Insert your sealer coated master GP point into the canal and trim off the excess at orifice level using the B&L Alpha heated plugger. 6. Condense your GP at the orifice level using the large SS end of your B&L
Kondensor.
Alpha unit

Beta unit
B&L Kondensors 7. Activate the heated plugger and Insert into the canal, applying firm pressure.
Stop 1mm from the marked stopper. 8. De-activate the heat, whilst still maintaining apical pressure for approximately 8-10 seconds.
9. Activate the plugger again and push 1mm apically and swiftly pull the plugger out along the curvature of the canal. Do this step quickly in 1-2 seconds. This will leave an apical plug. 10. Condense the apical GP with the fine NiTi end of the
B&L Kondensor.
11. Place the pre-heated needle of the backfill unit (B&L
Beta) into the canal, resting on the apical portion of the
GP. Extrude the warmed
GP and let the pressure of the extruded GP push the tip out of the canal. Do not pull back as this can create voids! 12. Condense the expressed
GP into the canal carefully with an endodontic plugger.
It is recommended that you practice on extracted teeth first to gain confidence.
HYFLEX EDM CASE REPORTS
SHAPING OF AN ABRUPT CANAL CURVATURE IN A DISTAL MOLAR
Diagnosis • Patient presented with necrotic pulp and symptomatic apical periodontitis of tooth #18 (Universal Numbering System).
Challenge • Limited opening and limited space for instrumentation due to very distal position of the tooth. • Root canals highly curved with sudden sharp dilacerations.
Treatment • Preparation with pre-bent HyFlex EDM file sequence. • After hand filing to a size 15, the 10/.05 glide path file was used, followed by EDM OneFile 25. • Further preparation of the distal canals with a
HyFlex EDM 40/.04 finishing file and finishing of the abruptly curved mesial canals with a HyFlex
CM 35/.04. User Benefits • Fast, safe and efficient shaping of root canals despite abrupt curvature. Due to the innovative manufacturing process Hyflex EDM files are extremely flexible and fracture resistant. • Comfortable treatment of hard to reach distal teeth. HyFlex EDM files can be pre-bent similar to stainless steel hand files.
Conclusion The HyFlex EDM file sequence is ideally suitable for safe and efficient preparation of hard to reach distal molars with abrupt canal curvatures. Due to the EDM manufacturing process, HyFlex files are extremely flexible and fracture resistant. ‘Thanks to these flexible, fracture resistant files we were able to shape the canals very efficiently. Without pre-bendable NiTi files, we would probably have been unable to perform root canal treatment on this tooth’ Dr. Sam Alborz
HyFlex EDM Glide Path File 10/.05 Pre-op Post-op
Scan here to view the Hyflex EDM range on our website
DR. SAM ALBORZ
DDS, Tennessee, USA
HYFLEX REMOVER CASE REPORT
THE JOURNEY IS THE REWARD
During a revision, the optimal canal shape is not always that obvious at the start. Fortunately, modern assistance systems guide the dentist step by step through the individual root canal anatomy. In the following case, I will present how I used a new digital endodontic co-pilot to support me in navigating to the apex. When travelling by car, people have long since become accustomed to employing a navigation system or application. The digital co-pilot knows the traffic rules, reports and avoids obstacles and, in case of doubt, even reacts faster than the human driver. The long-cherished dream of reliable autonomous driving is now apparently finally coming true in endodontics too.
Thanks to a new drive concept, modern endodontic motors provide the dentist with quasi active support in both mechanical and chemical preparation. At millisecond intervals, a complex algorithm controls the variable file movements— current intensity and torque and possible fatigue always firmly in view. At the same time, the electronic co-driver signals acoustically when and how often rinsing is required. Such assistance systems are a great help, especially during revisions where the course of the canal ahead is not quite obvious at the beginning. This was also the case in a retreatment in the left mandible reported here.
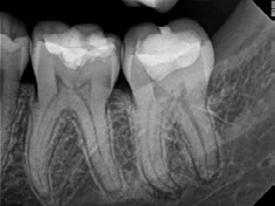
Periapical periodontitis of tooth #36 The 30-year-old patient was first diagnosed with acute pulpitis in a mandibular molar in 2015. Tooth #36 received root canal therapy and was then obturated using the vertical condensation technique with gutta-percha and a two-component sealer (Fig. 1). Unfortunately, the success of the treatment was not long-lasting. In 2020, the patient again presented himself in our practice with acute pain symptoms. Radiographic diagnostics confirmed the suspicion of periapical periodontitis around both root canals of the treated tooth #36 (Fig. 2). The patient finally agreed to the necessary revision treatment.
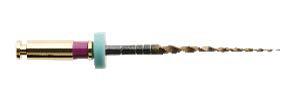
Preparation with remover file The first and decisive step in retreatment is the complete removal of the inadequate or aged guttapercha filling. For this purpose, we use special remover files in our practice (Fig. 3). The 30/.07 MicroMega REMOVER file (COLTENE) adapts flexibly to the individual canal shape. In this case,
Fig 1 Fig 2 Fig 3 Fig 4
we loosened the existing obturation material in this way without using additional solvents. At a speed of 1,000 rpm with continuous rotation, the filigree file was inserted into two-thirds of the canal. Thanks to the non-cutting instrument tip, the surrounding dentine was spared as much as possible. This additional safety component has proved to be very valuable in daily work.
Subsequently, the use of suitable nickel–titanium (NiTi) files is recommended for further shaping of the channel. The remaining distal root was treated with the HyFlex EDM OneFile in the contra-angle handpiece at 500 rpm. The 20/.05 HyFlex EDM file was used in the mesial canals. The speed was also 500 rpm. With the remover files, the existing guttapercha could be eliminated surprisingly quickly and easily. Within seconds, a clean access to the apical third was achieved.
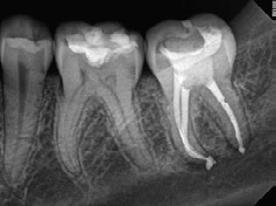
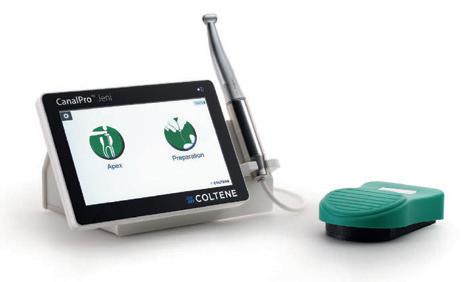
To the root in autopilot Even more exciting for us was the test drive with a new type of digital endodontic assistance system. The CanalPro Jeni endodontic motor (COLTENE) was used for the first time to perform the mechanical and chemical preparation in the case described (Fig. 4). The motor is named after its developer, Dr Eugenio Pedullà. For a long time, the Italian endodontist was occupied with the question of how the concept of autonomous driving could be employed in endodontics for safe and less error-prone root canal therapy. The result is a fully automatic endodontic motor that independently finds its way through the root canal. The application was comparatively simple: just work steadily with light pressure from the coronal to the apical aspect. Meanwhile, the motor decides independently on the appropriate motion sequence. For this purpose, the software of the assistance system uses complex algorithms that make the whole thing possible in the first place. Every millisecond, the device controls the variable file movements and continuously adjusts the rotational movement, speed and torque. Unnecessary file stress is also continuously corrected by Jeni. The selection of the appropriate NiTi sequence on the touch screen was quick and easy. However, it took a bit of getting used to the consequent preliminary work in the canal from coronal to apical, since I was used to advancing carefully in a small pecking motion downwards relying on tactile feedback. With Jeni, the dentist just holds the contra- angle handpiece; the motor does the rest and adjusts the rotation to the root canal anatomy. This “teamwork” also makes root canal therapy much more efficient and less prone to errors. After my initial reluctance, I grew more confident and trusted Jeni to indicate in good time when things could get tricky in the canal. The digital co-pilot also indicates when it is time to change files and when to rinse. In turbulent weeks with many treatments and emergencies, you will be quite grateful to have an additional safeguard in addition to the assistance at the chair to subtly remind you of the next step in the treatment process. For the final shaping of the canal, the 25/~ HyFlex EDM OneFile was used in the mesial canals. A 40/.04 EDM file was used in the distal canal. The result on the radiograph after obturation was extremely pleasing. Hopefully, it will be more durable than the first treatment approach five years ago (Figs. 5 & 6).
Conclusion
During revisions, flexible remover files can be used to efficiently loosen and remove insufficient gutta-percha fillings. Digital endodontic assistance systems navigate the dentist step by step through the mechanical and chemical preparation by adjusting the variable file movement. Thanks to the continuous preprocessing from coronal to apical, canal shaping is much more efficient and less prone to errors than before.
Fig 5 Fig 6
Note: The Jeni is currently not sold in our region
Scan here to purchase the Hyflex Remover on our website
DR SILVIU BONDARI
France


