


IT18 INTEGRATED TOOLCARRIER


Product: INTEGRATED TOOLCARRIER
Model: IT18 INTEGRATED TOOLCARRIER 7ZB
Configuration: 1T18 INTEGRATED TOOLCARRIER 7ZB00001-UP (MACHINE) POWERED BY 3204 ENGINE
Disassembly and Assembly
26SI Series Alternator
Media Number -RENR1252-01
Alternator - Assemble
SMCS - 1405-016
Assembly Procedure
Publication Date -01/10/1999
Date Updated -09/10/2001
i01167078
Note: Cleanliness is an important factor. Before assembly, all parts should be thoroughly cleaned in cleaning fluid. Allow the parts to air dry. Wiping cloths or rags should not be used to dry parts. Lint may be deposited on the parts which may cause later trouble. Inspect all parts. If any parts are worn or damaged, use new parts for replacement.
Note: Do not strike the diodes. The shock of such an impact can damage the diodes. Use proper tools in order to press the diodes in the mountings.
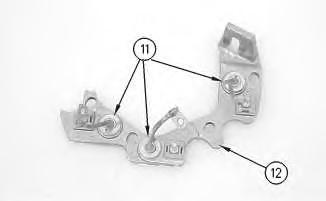
Illustration 1
1. Install 3 diodes (11) in heat sink (12) .
g00628072
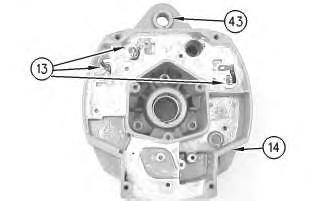
Illustration 2
g00628068
Note: Do not strike the bushing. Shocks from striking the housing can cause damage.
2. Press bushing (43) in housing (14) .
3. Install 3 diodes (13) in housing (14) .
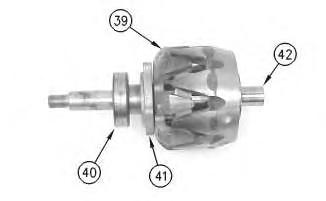
Illustration 3
This is the sample of the manual click on the download link for complete manual
DOWNLOAD LINK
For some reason if link does not work download this pdf and then click
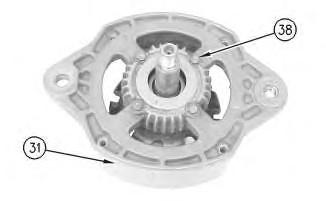
Illustration 4
g00628063
7. Press housing (31) on rotor (39) and bearing (40) .
8. Install 4 screws (38) in housing (31) .
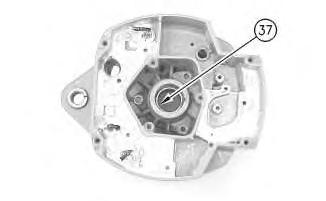
Illustration 5
g00628057
Note: Do not strike the bearing. Shocks from striking the housing can cause damage.
9. Install the inner race. Press bearing (37) into the housing.
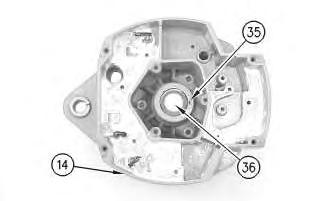
Illustration 6
10. Press cap (36) in housing (14) .
g00628043
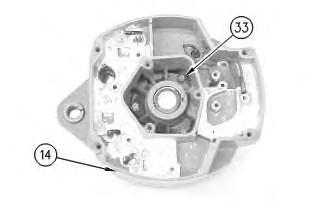
Illustration 7
g00628041
11. Install the coil and support (34) in housing (14). Guide the field leads and the grommet through the hole as the coil is installed in housing (14). Install 3 screws (33) .
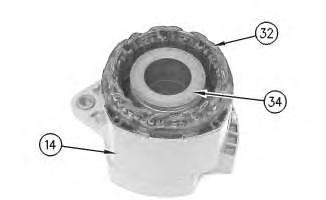
Illustration 8
g00628037
12. Press the stator (32) and housing (14) together. Guide the stator leads and the grommet through the hole as the stator is installed in housing (14) .
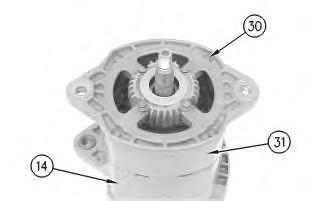
Illustration 9
g00628035
Note: Do not damage exposed stator windings or field windings. Bumping the windings or scraping the windings may break the insulation. Broken insulation may create a short circuit or a ground.
13. Join housing (31) and housing (14). Install 4 bolts (30) .
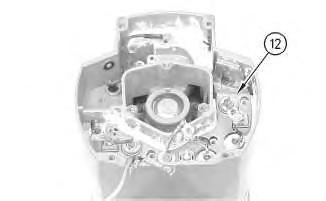
Illustration 10
g00627853
Note: Many of the alternator's internal components are covered with dielectric grease. If the grease is removed, reapply the grease.
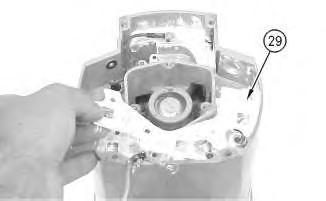
11
14. Install Insulator (29). Install the heat sink and diode assembly (12) in housing (14) .
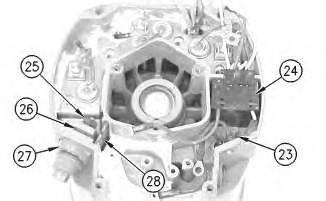
12
15. Install separator (28) .
16. Install alternator output terminal (27). Install insulator (26). Install the nut and washer (25) .
17. Install diode trio (24) and install screw (23) .
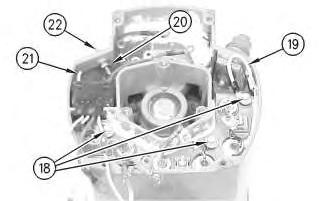
Illustration 13
g00627832
18. Install the 3 screws and insulators (18). Connect wire (19) .
19. If the "R" terminal is used, install the following components: nut (20), lead (21), the washer and terminal (21) .
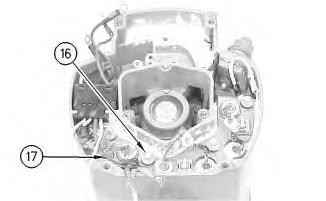
Illustration 14
g00627820
20. Install the screw and insulator (16). Connect capacitor lead (17) .
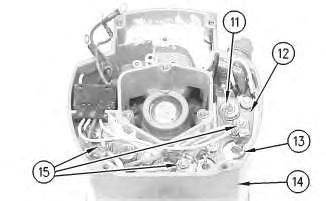
Illustration 15
g00627810
Note: The 3 output diodes (11) are located in heat sink (12). These diodes are identical in polarity. Diode (11) has red insulation on the wire. The 3 ground diodes (13) are located in housing (14). These diodes are identical in polarity. Diode (13) has black insulation on the wire.
21. Connect 6 diode leads. Connect 3 phase leads. Connect 3 stator phase leads. Install 3 nuts (15).
Table 1
Alternator Ground
Negative
Current Flow of the Output Diodes
Lead to the Heat Sink
Current Flow of the Ground Diodes
Housing to the Lead Red Wire Black Wire
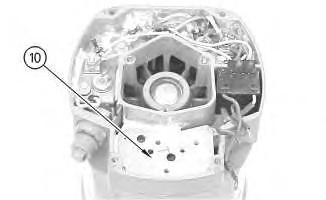
Illustration 16
22. Install mounting plate (10).
g00627808
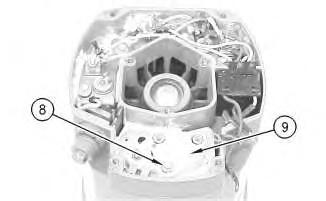
Illustration 17
23. Install regulator (9) .
24. Install grounded mounting screw (8) .
g00627804
18
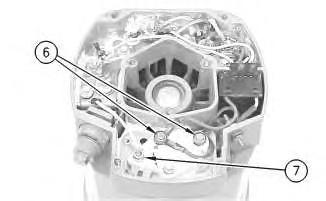
25. Install 2 insulated screws (6). Connect the 3 leads.
Note: The regulator and the mounting plate are coated with dielectric grease. If the grease is removed, reapply the grease.
26. Install nut (7) and connect the wire.
19
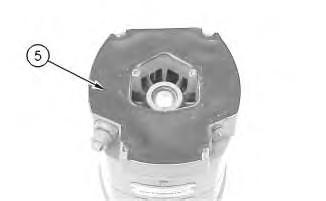
27. Install gasket (5) .
20
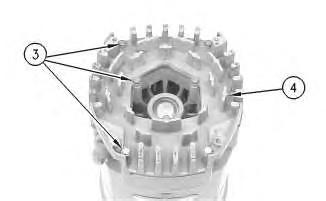
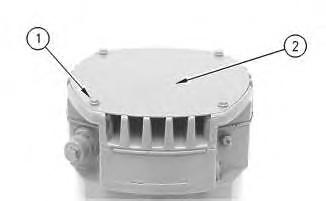
28. Position cover (4). Install 7 screws (3) .
21
29. Position plate (2). Install 4 screws (1) .
30. Install the fan, the pulley, the washer, and the pulley nut.
1993 - 2024 Caterpillar Inc.
Rights Reserved.
Network For SIS Licensees. Wed Mar 27 23:31:52 UTC+0530 2024
Product: INTEGRATED TOOLCARRIER
Model: IT18 INTEGRATED TOOLCARRIER 7ZB
Configuration: 1T18 INTEGRATED TOOLCARRIER 7ZB00001-UP (MACHINE) POWERED BY 3204 ENGINE
Disassembly and Assembly
26SI Series Alternator
Media Number -RENR1252-01 Publication Date -01/10/1999 Date Updated -09/10/2001
Alternator - Disassemble
SMCS - 1405-015
Disassembly Procedure
Table 1
Required Tools
i01167081
Start By:
A. Remove the alternator. Refer to Disassembly and Assembly, "Alternator - Remove" for the machine that is being serviced.
Note: Cleanliness is an important factor. Before the disassembly procedure, the exterior of the component should be thoroughly cleaned. This will help to prevent dirt from entering the internal mechanism.
1. Remove the pulley nut, the washer, the pulley, and the fan.
Illustration 1
2. Remove 4 screws (1). Remove plate (2) .
Illustration 2
3. Remove 7 screws (3). Remove cover (4) .
Illustration 3
4. Remove gasket (5) .
Illustration 4
5. Remove 2 insulated screws (6). Remove the 3 leads.
Note: The regulator and the mounting plate are coated with dielectric grease. If the grease is removed, reapply the grease.
6. Remove nut (7) .
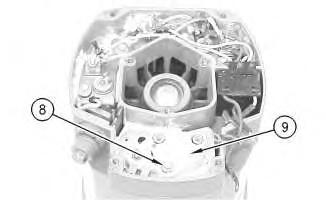
Illustration 5
7. Remove grounded mounting screw (8) .
8. Remove regulator (9) .
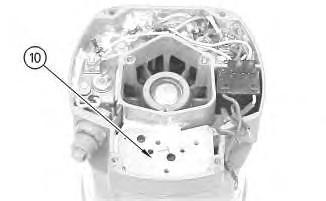
Illustration 6
g00627808
9. Remove mounting plate (10). The mounting plate may be stuck to the regulator.
Illustration 7
g00627810
Note: The 3 output diodes (11) are located in heat sink (12). These diodes are identical in polarity. Diode (11) has red insulation on the wire. The 3 ground diodes (13) are located in housing (14). These diodes are identical in polarity. Diode (13) has black insulation on the wire.
10. Remove 3 nuts (15). Disconnect 3 stator phase leads. Disconnect 3 phase leads. Disconnect 6 diode leads.
Table 2
Alternator Ground Current Flow of the Output Diodes Current Flow of the Ground Diodes
Negative
Lead to the Heat Sink Housing to the Lead Red Wire Black Wire
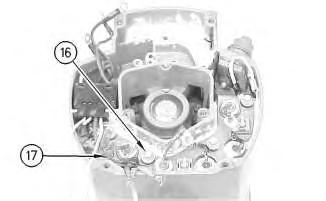
Illustration 8
g00627820
11. Remove the screw and insulator (16). Disconnect capacitor lead (17) .
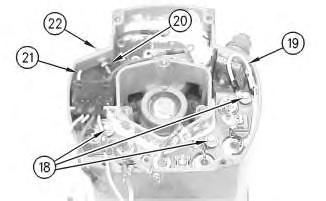
Illustration 9
g00627832
12. Remove the 3 screws and insulators (18). Disconnect wire (19) .
13. If the "R" terminal is used, remove the following components: nut (20), lead (21), the washer and terminal (21) .
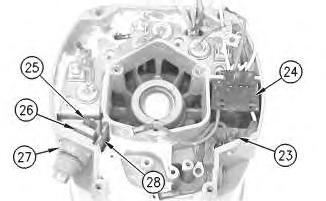
Illustration 10
14. Remove screw (23) and remove diode trio (24) .
15. Remove the nut and washer (25). Remove insulator (26). Remove alternator output terminal (27) .
16. Remove separator (28) .
Illustration 11
g00627853
Note: Many of the alternator's internal components are covered with dielectric grease. If the grease is removed, reapply the grease.
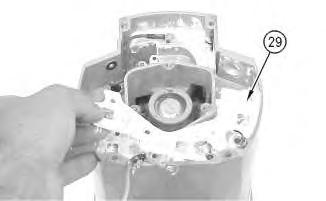
Illustration 12
g00627855
17. Remove the heat sink and diode assembly (12) from housing (14). Insulator (29) may be stuck to heat sink (12) .
Illustration 13
g00628035
Note: Do not damage exposed stator windings or field windings. Bumping the windings or scraping the windings may break the insulation. Broken insulation may create a short circuit or a ground.
18. Remove 4 bolts (30). Carefully separate housing (31) from housing (14) .
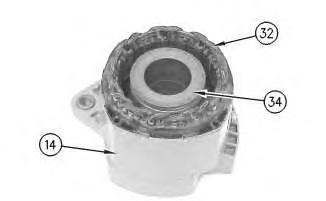
Illustration 14
g00628037
19. Pull apart stator (32) and housing (14). Guide the stator leads and the grommet through the hole as the stator is removed from housing (14) .
Illustration 15
g00628041
20. Remove 3 screws (33). Remove the coil and support (34) from housing (14). Guide the field leads and the grommet through the hole as the coil is removed from housing (14) .
Illustration 16
g00628043
21. Position a small screwdriver in slot (35). Pry cap (36) from housing (14) .
Illustration 17
g00628057
Note: Do not strike the bearing. Shocks from striking the housing can cause damage.
22. Wipe the excess grease from the bearing well. Press bearing (37) into the housing. Remove the inner race.
Illustration 18
23. Remove 4 screws (38) from housing (31) .
g00628063
24. Lift rotor (39) and bearing (40) from housing (31) .
Illustration 19
25. Pull bearing (40) from rotor (39) .
26. Pull retainer (41) from rotor (39) .
27. Pull collar (42) from rotor (39) .
g00628067
Illustration 20
g00628068
Note: Do not strike the bushing. Shocks from striking the housing can cause damage.
28. Press bushing (43) from housing (14) .
Note: Do not strike the diodes. The shock of such an impact can damage the diodes. Use proper tools in order to press or pull the diodes from the mountings. As much as 890 N (200 lb) of force may be needed to remove a diode.
29. Remove 3 diodes (13) from housing (14) .
Illustration 21
30. Remove diode (11) from heat sink (12) .
g00628072
Copyright 1993 - 2024 Caterpillar Inc. All Rights Reserved. Private Network For SIS Licensees.
Wed Mar 27 23:31:27 UTC+0530 2024
Product: INTEGRATED TOOLCARRIER
Model: IT18 INTEGRATED TOOLCARRIER 7ZB
Configuration: 1T18 INTEGRATED TOOLCARRIER 7ZB00001-UP (MACHINE) POWERED BY 3204 ENGINE
Disassembly and Assembly
SUPPLEMENT FOR IT18 & IT28 INTEGRATED TOOLCARRIER - 3204 VEH
Media Number -SENR3228-00
Air Cleaner Housing
SMCS - 1051-010
Publication Date -01/03/1986
Date Updated -11/10/2001
Remove And Install Air Cleaner Housing
1. Remove the precleaner assembly from the machine.
2. Remove the four bolts that hold the hood in place. Use two persons, and remove the hood from the machine. The weight of the hood is 17 kg (38 lb.).
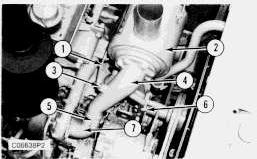
3. Loosen hose clamp (5) that connects hose (7) to pipe assembly (4).
4. Disconnect tube assembly (air indicator) (1) from elbow (3) in pipe assembly (4).
5. Remove four bolts (6) and the nuts. Use two persons, and remove air cleaner housing (2) and pipe assembly (4) as a unit. The weight of the air cleaner assembly and pipe assembly is 28 kg (62 lb.).
NOTE: The following steps are for the installation of the air cleaner housing.
6. Put air cleaner housing (2) and pipe assembly (4) in position as a unit. Install four bolts (6) that hold them in place.
7. Connect tube assembly (air indicator) (1) to elbow (3) in pipe assembly (4).
8. Tighten hose clamp (5) that connects hose (7) to pipe assembly (4).
9. Put the head in position on the machine, and install the four bolts that hold it in place.
10. Put the precleaner assembly in position on the machine. Copyright 1993 - 2024 Caterpillar Inc. All Rights Reserved. Private Network For SIS Licensees.
Wed Mar 27 23:41:11 UTC+0530 2024
Product: INTEGRATED TOOLCARRIER
Model: IT18 INTEGRATED TOOLCARRIER 7ZB
Configuration: 1T18 INTEGRATED TOOLCARRIER 7ZB00001-UP (MACHINE) POWERED BY 3204 ENGINE
Disassembly and Assembly
SUPPLEMENT FOR IT18 & IT28 INTEGRATED TOOLCARRIER - 3204 VEH
Media Number -SENR3228-00
Air Compressor
SMCS - 1803-010
Publication Date -01/03/1986
Date Updated -11/10/2001
Remove And Install Air Compressor
1. Drain the coolant from the radiator.
To prevent personal injury, be sure the pressure in the air system has been released before disconnecting any air lines.
2. Open the drain valve on the air tank.
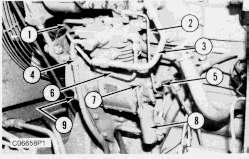
3. Disconnect tube assembly (water inlet) (1) from the air compressor.
4. Remove tube assembly (water outlet) (6) from the timing gear cover and the air compressor.
5. Remove tube assembly (air inlet) (3) from the elbow (air transfer) and the air compressor.
6. Disconnect hose assembly (4) from the air compressor.
7. Remove tube assembly (oil supply) (5) from the engine and the air compressor.
8. Remove tube assembly (2) from the air compressor governor and the air compressor.
9. Remove two bolts (7), and disconnect the bracket and air compressor governor (8) as a unit from the air compressor.
10. Remove two bolts (9) from the front side of the timing gear cover that hold the air compressor in position on the back side of the timing gear plate. remove the air compressor and the gasket from the timing gear cover.
NOTE: For more information and to disassemble and assemble the air compressor, see Air Compressor, Form No. REG00914-03 in the Vehicle Systems section.
NOTE: The following steps are for the installation of the air compressor.
11. Make sure all gasket surfaces are clean and free of dirt.
12. Put the gasket and the air compressor in position on the back side of the timing gear plate. Install two bolts (9) in the front side of the timing gear cover that hold it in place.
13. Put air compressor governor (8) and the bracket in position on the air compressor as a unit. Install two bolts (7) that hold it in place.
14. Install tube assembly (2) on the air compressor governor and the air compressor.
15. Install tube assembly (oil supply) (5) on the engine and the air compressor.
16. Connect hose assembly (4) to the air compressor.
17. Install tube assembly (air inlet) (3) on the elbow (air transfer) and the air compressor.
18. Install tube assembly (water outlet) (6) on the timing gear cover and the air compressor.
19. Connect tube assembly (water inlet) (1) to the air compressor.
20. Close the drain valve on the air tank.
21. Fill the cooling system with coolant to the correct level. See Maintenance Guide. Copyright 1993 - 2024 Caterpillar Inc.
Product: INTEGRATED TOOLCARRIER
Model: IT18 INTEGRATED TOOLCARRIER 7ZB
Configuration: 1T18 INTEGRATED TOOLCARRIER 7ZB00001-UP (MACHINE) POWERED BY 3204 ENGINE
Disassembly and Assembly
SUPPLEMENT FOR IT18 & IT28 INTEGRATED TOOLCARRIER - 3204 VEH
Media Number -SENR3228-00
Publication Date -01/03/1986
Air Conditioner Compressor
SMCS - 1802-010
Date Updated -11/10/2001
Remove and Install Air Conditioner Compressor

Always wear goggles when working on air conditioning systems. The system is under pressure at all times, engine running or not. Escaping Freon-12 (C C12 F2 Dichloro Difluoro Methane) can cause freezing of human flesh.
Do not smoke while working on air conditioning systems. Inhaling Freon-12 through any smoking material, although not toxic or flammable, can generate phosgene gas and cause violent illness. Also, heat must never be applied to a charged system. See Air Conditioning And Heating Service Manual, Form No. SENR7454, for more information on removal and installation of lines and refrigerant from the system.
1. Purge the system. See Air Conditioning And Heating, Purging the System, Form No. SENR7454.
This is the sample of the manual click on the download link for complete manual
DOWNLOAD LINK
For some reason if link does not work download this pdf and then click