

Note: Use Bookmarks panel to navigate

Note: Use Bookmarks panel to navigate
For some reason if link does not work download this pdf and then click

Product: WHEEL LOADER
Model: 982M WHEEL LOADER XDL
Configuration: 982M Wheel Loader XDL00001-UP (MACHINE) POWERED BY C13 Engine
Disassembly and Assembly
980M Tier 4 and 982M Tier 4 Wheel Loader Machine System
Media Number -M0075586-06
Publication Date -01/08/2019
SMCS - 4263-010
Removal Procedure
Start By:
a. Connect the steering frame lock.
b. Release the system hydraulic pressure.
c. Retain the hydraulic tank oil.
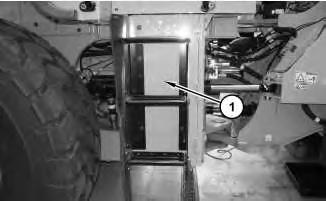
Illustration 1
1. Remove the bolts and open door (1).
g03337982
Date Updated -09/08/2019
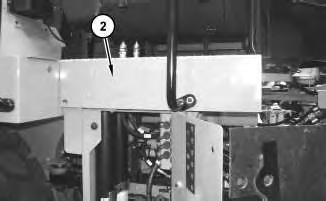
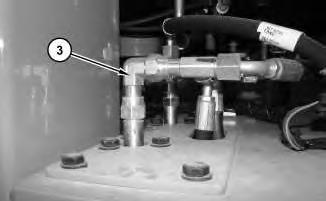
Hydraulic accumulators contain gas and oil under high pressure. DO NOT disconnect lines or disassemble any component of a pressurized accumulator. All gas pre-charge must be removed from the accumulator as instructed by the service manual before servicing or disposing of the accumulator or any accumulator component.
Failure to follow the instructions and warnings could result in personal injury or death.
Only use dry nitrogen gas to recharge accumulators. See your Cat dealer for special equipment and detailed information for accumulator service and charging.
(3).
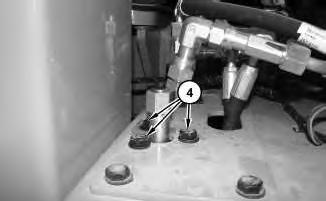
Illustration 4
4. Remove bolts (4).
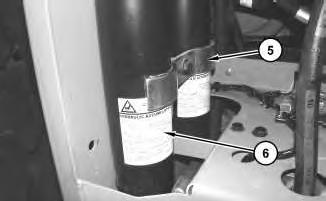
Illustration 5
5. Remove clamp (5) and remove brake accumulator (6).
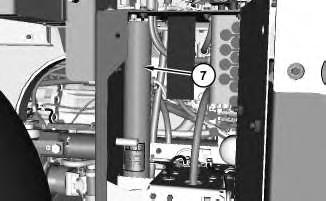
Illustration 6
6. Repeat Steps 3 through 4 for the remaining brake accumulator (7).
7. Remove brake accumulator (7).
8. Discharge the brake accumulators. Refer to Special Instruction, "Accumulator Discharging and Charging Procedures" for the proper procedure.
1. Install brake accumulators (7) and (6) in the reverse order of removal. Copyright 1993 - 2024 Caterpillar Inc.
Product: WHEEL LOADER
Model: 982M WHEEL LOADER XDL
Configuration: 982M Wheel Loader XDL00001-UP (MACHINE) POWERED BY C13 Engine
Disassembly and Assembly
980M Tier 4 and 982M Tier 4 Wheel Loader Machine System
Media Number -M0075586-06 Publication Date -01/08/2019 Date Updated -09/08/2019
SMCS - 4282-010
Removal Procedure
Start By:
a. Connect the steering frame lock.
b. Release the system pressure.
c. Retain the hydraulic tank oil.
Personal injury can result from hydraulic oil pressure and hot oil.
Hydraulic oil pressure can remain in the hydraulic system after the engine has been stopped. Serious injury can be caused if this pressure is not released before any service is done on the hydraulic system.
Make sure all of the work tools have been lowered to the ground, and the oil is cool before removing any components or lines. Remove the oil filler cap only when the engine is stopped, and the filler cap is cool enough to touch with your bare hand.
NOTICE
Care must be taken to ensure that fluids are contained during performance of inspection, maintenance, testing, adjusting, and repair
of the product. Be prepared to collect the fluid with suitable containers before opening any compartment or disassembling any component containing fluids.
Refer to Special Publication, PERJ1017, "Dealer Service Tool Catalog" for tools and supplies suitable to collect and contain fluids on Cat® products.
Dispose of all fluids according to local regulations and mandates.
Keep all parts clean from contaminants.
Contaminants may cause rapid wear and shortened component life.
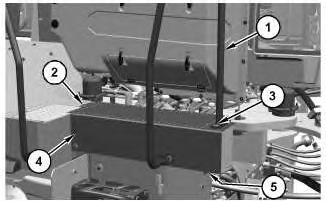
Illustration 1
g06375132
1. Remove bolts (3) and handrail assembly (1).
2. Use two people to remove platform assembly (4). The weight of platform assembly (4) is approximately 25 kg (55 lb). Remove screws (2), bolts (5), and platform assembly (4).
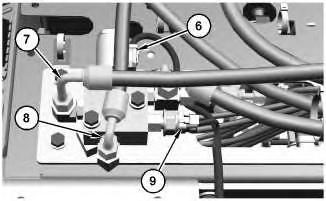
Illustration 2 g06375133
3. Disconnect harness assemblies (6) and (9).
4. Disconnect hose assemblies (7) and (8).
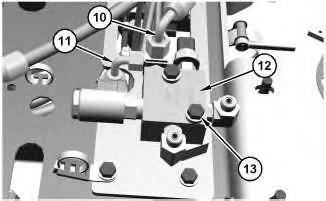
Illustration 3
5. Disconnect hose assemblies (10) and (11).
g06375134
6. Remove bolts (13) and parking brake control valve (12).
Installation Procedure
1. Install parking brake control valve (12) in the reverse order of removal.
Product: WHEEL LOADER
Model: 982M WHEEL LOADER XDL
Configuration: 982M Wheel Loader XDL00001-UP (MACHINE) POWERED BY C13 Engine
Disassembly and Assembly
980M Tier 4 and 982M Tier 4 Wheel Loader Machine System
Media Number -M0075586-06 Publication Date -01/08/2019 Date Updated -09/08/2019
SMCS - 4265-010
Removal Procedure
Start By:
a. Connect the steering frame lock.
b. Release the system pressure.
c. Retain the hydraulic tank oil.
Personal injury can result from hydraulic oil pressure and hot oil.
Hydraulic oil pressure can remain in the hydraulic system after the engine has been stopped. Serious injury can be caused if this pressure is not released before any service is done on the hydraulic system.
Make sure all of the work tools have been lowered to the ground, and the oil is cool before removing any components or lines. Remove the oil filler cap only when the engine is stopped, and the filler cap is cool enough to touch with your bare hand.
NOTICE
Care must be taken to ensure that fluids are contained during performance of inspection, maintenance, testing, adjusting, and repair
of the product. Be prepared to collect the fluid with suitable containers before opening any compartment or disassembling any component containing fluids.
Refer to Special Publication, NENG2500, "Dealer Service Tool Catalog" for tools and supplies suitable to collect and contain fluids on Cat® products.
Dispose of all fluids according to local regulations and mandates.
1
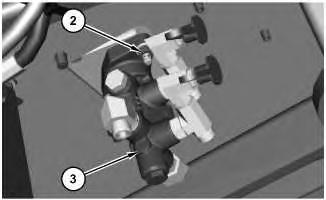
Illustration 2
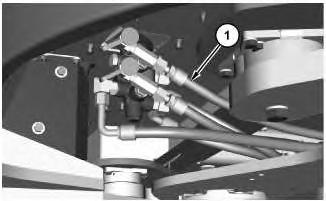
1. Disconnect hose assemblies (1). Remove nuts (2) and brake control valve (3).
1. Install brake control valve (3) in the reverse order of the removal.
Copyright 1993 - 2024 Caterpillar Inc. All Rights Reserved. Tue Oct 22 22:23:59 UTC+0530 2024
Product: WHEEL LOADER
Model: 982M WHEEL LOADER XDL
Configuration: 982M Wheel Loader XDL00001-UP (MACHINE) POWERED BY C13 Engine
Disassembly and Assembly
980M Tier 4 and 982M Tier 4 Wheel Loader Machine System Media
Bucket - Remove and Install
SMCS - 6001-010; 6101-010
S/N - MK61-UP
S/N - WMD1-UP
S/N - XDL1-UP
Removal Procedure Table 1
Start By:
a. Connect the steering frame lock.
1. Position the bucket flat on the ground.
2. Release the hydraulic system pressure.
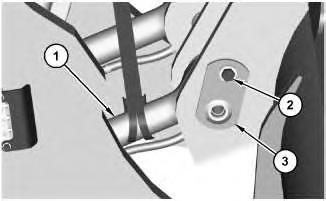
Illustration 1 g06124459
3. Attach a suitable lifting device to bucket tilt link (1). The weight of bucket tilt link (1) is approximately 60 kg (132 lb). Remove bolt (2), the washer, and the spacer from pin assembly (3).
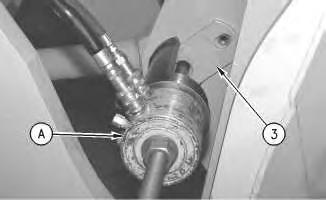
Illustration 2 g00391840
4. Attach Tooling (A) to pin assembly (3). Use two people to remove pin assembly (3) and Tooling (A). The weight of pin assembly (3) and Tooling (A) is approximately 36 kg (80 lb). Remove pin assembly (3).
5. Repeat Step 3 and Step 4 to remove the pin assembly from the opposite side of the bucket.
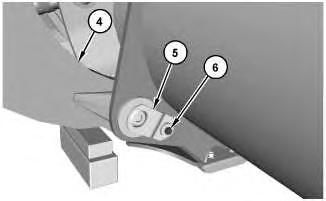
Illustration 3
6. Position suitable cribbing under lift arms (4).
7. Remove bolt (6), the washers, and the spacer from pin assembly (5).
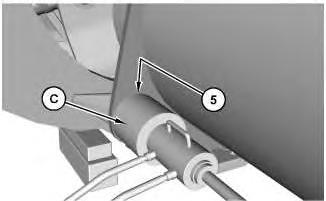
Illustration 4
g06430691
8. Attach Tooling (C) to pin assembly (5) (not shown). Use two people to remove pin assembly (5) and Tooling (A). The weight of pin assembly (5) and Tooling (C) is approximately 36 kg (80 lb). Remove pin assembly (5).
9. Repeat Step 7 and Step 8 to remove the pin assembly from the opposite side of the bucket.
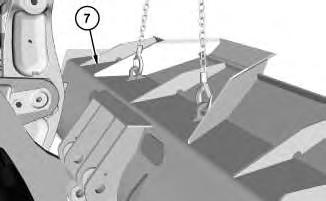
5
10. Attach suitable lifting device to bucket (7). The weight of bucket (7) is approximately 3700 kg (8157 lb). Remove bucket (7).
1. Install bucket (7) in the reverse order of the removal.
a. Apply Tooling (B) to the bores of the pin assemblies before installation. Copyright 1993 - 2024 Caterpillar Inc. All Rights Reserved.
Network For SIS Licensees. Tue Oct 22 22:36:04 UTC+0530 2024
Product: WHEEL LOADER
Model: 982M WHEEL LOADER XDL
Configuration: 982M Wheel Loader XDL00001-UP (MACHINE) POWERED BY C13 Engine
Disassembly and Assembly
980M Tier 4 and 982M Tier 4 Wheel Loader Machine System
SMCS - 7301-010; 7325-010
Removal Procedure Table 1
Required Tools
Personal injury can result from contact with refrigerant.
Contact with refrigerant can cause frost bite. Keep face and hands away to help prevent injury.
Protective goggles must always be worn when refrigerant lines are opened, even if the gauges indicate the system is empty of refrigerant.
Always use precaution when a fitting is removed. Slowly loosen the fitting. If the system is still under pressure, release it slowly in a well ventilated area.
Personal injury or death can result from inhaling refrigerant through a lit cigarette.
Inhaling air conditioner refrigerant gas through a lit cigarette or other smoking method or inhaling fumes released from a flame contacting air conditioner refrigerant gas, can cause bodily harm or death.
Do not smoke when servicing air conditioners or wherever refrigerant gas may be present.
Use a certified recovery and recycling cart to properly remove the refrigerant from the air conditioning system.
Personal injury can result from hydraulic oil pressure and hot oil.
Hydraulic oil pressure can remain in the hydraulic system after the engine has been stopped. Serious injury can be caused if this pressure is not released before any service is done on the hydraulic system.
Make sure all of the work tools have been lowered to the ground, and the oil is cool before removing any components or lines. Remove the oil filler cap only when the engine is stopped, and the filler cap is cool enough to touch with your bare hand.
1. Refer to Service Manual, SENR5664, "Air Conditioning and Heating Systems with R-134a Refrigerant" for the recovery and the charging procedure. Refer to Special Publication, NENG2500, "Air Conditioning Tools" for the correct tools.
2. Drain the engine coolant into a suitable container for storage or disposal.
1
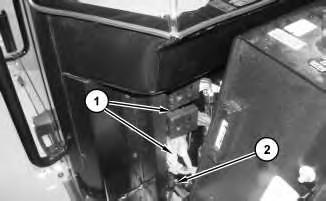
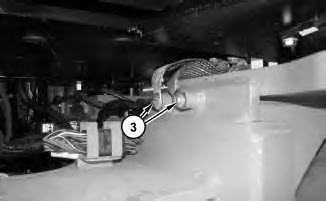
3. Disconnect harness assemblies (1) and cable assembly (2).
2
3
4
5
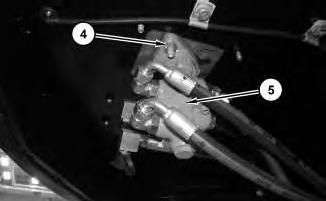
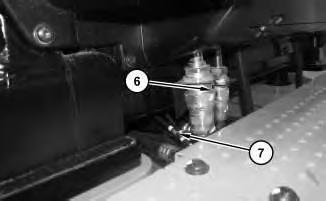
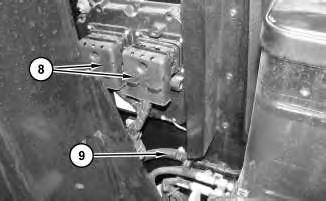
7. Disconnect harness assemblies (8). Disconnect hoses (9).
6
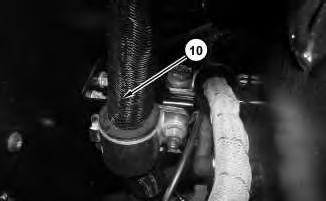
8. Remove harness assembly (10).
7
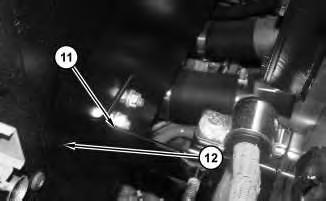
9. Remove bracket (11) from cab (12).
8
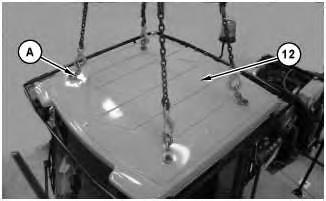
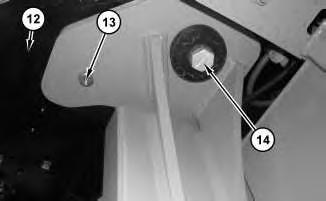
10. Attach Tooling (A) and a suitable lifting device to cab (12). The weight of cab (12) is approximately 1270 kg (2800 lb).
9
g03862337
11. Remove bolts (13) and (14). Remove cab (12).
Installation Procedure
1. Install cab (12) in the reverse order of removal.
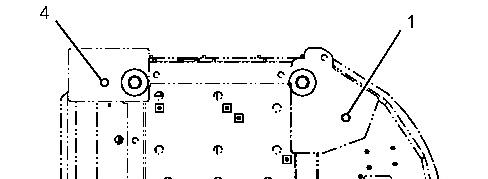
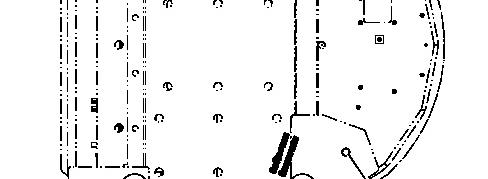

Illustration 10 g03862642
a. Tighten bolts (13) in the sequence, as shown.
b. Tighten bolts (14) to a torque of 850 ± 100 N·m (627 ± 74 lb ft).
Copyright 1993 - 2024 Caterpillar Inc. All Rights Reserved. Private Network For SIS Licensees.
Tue Oct 22 22:40:09 UTC+0530 2024
Product: WHEEL LOADER
Model: 982M WHEEL LOADER XDL
Configuration: 982M Wheel Loader XDL00001-UP (MACHINE) POWERED BY C13 Engine
Disassembly and Assembly
980M Tier 4 and 982M Tier 4 Wheel Loader Machine System
Media Number -M0075586-06
Publication Date -01/08/2019
Date Updated -09/08/2019
SMCS - 5064-016
S/N - MK21-UP
S/N - MK61-UP
S/N - XDJ1-UP
S/N - XDL1-UP
Assembly Procedure
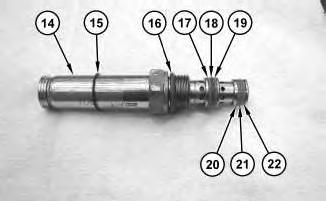
Illustration 1 g03336759
1. Install O-ring seal (15), O-ring seal (16), backup ring (17), O-ring seal (18), and backup ring (19) onto cartridge assembly (14).
2. Install backup ring (20), O-ring seal (21), and backup ring (22) onto cartridge assembly (14)
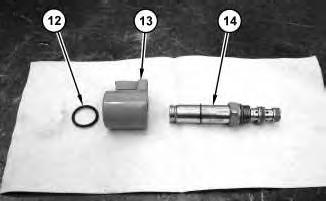
Illustration 2
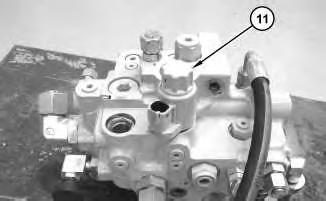
Illustration 3
g03336748
3. Install cartridge assembly (14). Tighten cartridge assembly (14) to a torque of 27.5 ± 2.5 N·m (243.4 ± 22.1 lb in).
4. Install solenoid assembly (13), O-ring seal (12), and nut (11). Tighten nut (11) to a torque of 5 ± 1 N·m (44 ± 9 lb in).
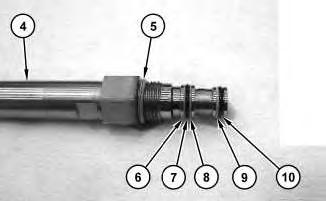
Illustration 4
g03336704
5. Install O-ring seal (5), backup ring (6), O-ring seal (7), backup ring (8), backup ring (9), and O-ring seal (10) onto cartridge assembly (4).
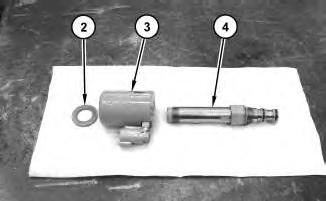
Illustration 5
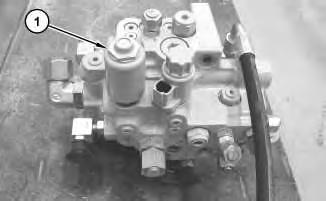
Illustration 6
g03336644
6. Install cartridge assembly (4). Tighten cartridge assembly (4) to a torque of 50 ± 7 N·m (37 ± 5 lb ft).
7. Install solenoid assembly (3), washer (2), and nut (1). Tighten nut (1) to a torque of 35 ± 3 N·m (26 ± 2 lb ft).
Copyright 1993 - 2024 Caterpillar Inc. All Rights Reserved. Private Network For SIS Licensees. Tue Oct 22 22:23:39 UTC+0530 2024
Product: WHEEL LOADER
Model: 982M WHEEL LOADER XDL
Configuration: 982M Wheel Loader XDL00001-UP (MACHINE) POWERED BY C13 Engine
Disassembly and Assembly
980M Tier 4 and 982M Tier 4 Wheel Loader Machine System
Media Number -M0075586-06
Publication Date -01/08/2019
Date Updated -09/08/2019
Supply, Steering
SMCS - 5064-016
Assembly Procedure
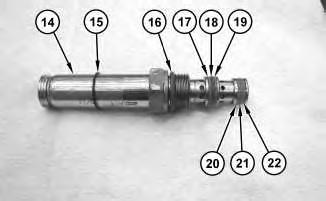
Illustration 1
g03336759
1. Install O-ring seal (15), O-ring seal (16), backup ring (17), O-ring seal (18), and backup ring (19) onto cartridge assembly (14).
2. Install backup ring (20), O-ring seal (21), and backup ring (22) onto cartridge assembly (14)
For some reason if link does not work download this pdf and then click