
6 minute read
3. Using Smart Life APP


3.1 Notice
This device can be connected and controlled through the "Smart Life" AP P. Please download the "Smart Life" APP in advance from the app store. The relevant guide details are as follows:
3.2 Download APP - Smart Life
Users can search "Smart Life" in major global app stores or scan the QR code below to download.
(1) iOS users, please scan the iOS link QR code.
(2) Android users, please scan the QR code of the Google Play link
(3) All users can scan the QR code of the official website link to download with guide.
3.3 APP Sign up & Login
3.3.1. Sign up Smart Life APP account
(1) When the user uses the Smart Life APP for the first time, the APP will pop up "Login In" and "Sign Up" options.
(2) The user can register an account by clicking the "Sign Up" option. After clicking " Sign Up ", the "User Agreement and Privacy Policy" will appear, please read it carefully and click "Agree".
(3) After clicking "Agree", the account registration interface will appear. Two options will appear in the interface: "Country", "Mobile Number/E -mail".
(4) Users need to select their own country from the "Countr y" option.
(5) In the "Mobile Number/E -mail" option, It is recommended that users enter their mobile phone number and click: "Get verification code", then the APP interface will jump to: "Enter verification code", and the user can fill in the six-digit verification code received into the APP.
(6) After finishing the previous step, the interface will pop up to set the "password". Users can set the APP login password according to their own preferences or habits. After the password is set successfully , the APP will pop up to enter the "User Authorization Interface", the user can choose to authorize, and click "Enter APP" after authorization to enter the APP interface.
3.3.2. Log in the account
Users can log in to the APP with a registered account and passwo rd.
3.4 Connect Security Box to APP
Notice Please connect your mobile phone to the 2.4G WiFi network before using Smart Life APP to connect the device.
Steps
(1) Open the "Smart Life" APP and enter the "Home" interface of the APP.
(2) Click the "+" in the upper right corner of the interface and select "Add Device"
(3) Click the "Sensors" option, and then click "Alarm (WiFi)", the interface will display the WiFi connected to the phone.
(4) Input the WiFi password.
(5) After input the WiFi password, click "next" and choose "Confirm the indicator is blinking rapidly" in the pop-up interface.
(6) Click "next" and "adding device" will be displayed in the app interface.
(7) Plug in the external power supply, turn on the security box, then press and hold for 5 seconds to enter the WiFi network configuration mode.
(8) When the device is successfully connected to the APP, the device will give a voice prompt of "Setup successful". The APP will also show that the device ha s been added successfully.
(9) Users can set the name of the device according to their preferences. If the user does not want to change the device name, they can click "Done" in the upper right corner.
(10) In order to allow users to use APP to realize remote control equipment more conveniently. As long as the device and the APP are connected, even if the phone is not connected to the original WiFi network, the user can use the APP to remotely control the device.
3.5 User interface of Smart Life APP
status bar
External power supply
Control Bar
Power supply status
Device status
Battery power supply
It indicates that the current device uses external power supply.
It indicates that the current device is powered by battery and battery power
Real-time display of the current device status: armed, at home, emergency, disarmed.
Away Arm Control the security box enter the "Away arm" state Stay Arm Control the security box enter the "Stay arm" state
SOS Control the security box enter the "SOS alarm" state
Disarm Control the security box enter the "Disarm" state
History records
Accessories
Display the alarm record and operation record of the security box
You can add, delete, view, and rename accessories
Setting Various settings of the security box
3.6 Setting Security Box on APP
Arm delay
Timer
Alarm do not disturb
Volume Adjustment
Door and Window open reminder
Siren duration
Doorbell notification
Doorbell do not disturb
Set the device arming delay, the range is 0~180 seconds, the default value is 0 seconds.
The device can be automatically armed and disarmed according to the set time.
When the alarm is triggered, whether the device send out an alarm, status: on/off; default: off.
Set the volume of the device's voice prompts, the range i s 0 (mute) ~ 15, the default value is 6.
When the doors and windows are opened, the device will ring to remind you, status: on/off; default: on
Set the device alarm duration, the range is 0~30 minutes, the default value is 3 minutes.
Whether to push notifications to the APP after the doorbell is triggered, status: on/off; default: off.
Whether to prompt after the doorbell is triggered, status: on/off; default: off.
Alarm message propel
Alarm delay
Doorbell ringtone
Restore factor settings
Whether to push notifications to the APP after the device alarms, status: on/off; default: on.
Set the device alarm delay time, the range is 0~180 seconds, the default value is 30 seconds.
Set the device's doorbell ringtones, ranging from 1 to 30, and the default value is 1.
After clicking confirm, the device data will be initialized, please use it with caution.
3.7 Setting Accessories on APP
The way of user setting accessories on APP is as follow:
(1) Open the APP, click "Accessories", you can view the number of remote controls, detectors, doorbells that have been added, as well as the type and attributes of the defense zone.
(2) Accessories can be added remotely through the "+" button in the upper right corner of the interface. After clicking "+", the accessories will be triggered around the box to achieve quick pairing between the box and the accessories, as shown in the "Accessories Interface".
(3) Press and slide the accessory to the left to delete or modify the accessory.
(4) The accessories can be renamed for easier management and more detailed alarm content;
The type and attributes of each detector c an be modified on the APP
4. Specifications
Input power: 5V 0.5A, Micro USB
Built-in battery: 3.7V 320mAh lithium battery
Working power consumption: <1W
Wireless parameters: 433MHz frequency band, eV1527 encoding.
5. Accessories
5.1 Door/Window Sensor
WIFI standard: IEEE802.11b/g/n 2.4Ghz
Product size: 80*80*9.9mm
Working temperature: -10 ~ 55℃
Relative humidity: < 95% (no condensation)
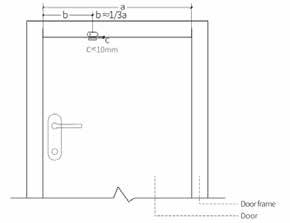
The door sensor should be installed on the door or window.
(1) First, wipe the corresponding position on the door clean, take out the door sensor, and stick doublesided tape on the bottom.
(2) The door sensor transmitter (large) and the door sensor magnet (small) should be installed separately, that is, the transmitter should be installed on a fixed door frame, and the magnet should be installed on the movable door.
(3) The triangle marks on the transmitter and the magnet should be facing each other, and the distance between the two is less than 10mm.
(4) When the door is opened after installation, the indicator light will be on for 2 seconds to indicate that the installation is complete.
NOTICE:
(1) The magnetic transmission distance is 100M (without obstacles), please test the distance before installation, the transmission distance will be different for diffe rent obstacles.
(2) The door sensor indicator light is on for 2 seconds to indicate an alarm, and the indicator light flashes for 2 seconds to indicate a low battery.
(3) If the door sensor is installed on the iron door, the distance C should be as small as possi ble.
(4) It is not advisable to install multiple detectors in the same detection area to avoid interference caused by simultaneous triggering.
5.2 Doorbell Button
Features:
(1) Two installation methods: support glue and screw fixation.
(2) No standby power consumption.
(3) Using DC12V power supply, higher transmitting power, longer wireless distance.
Installation Step:
1. Hold the lower cover tightly with your left hand, fasten the upper cover and the lower cover with your right hand, and then press along the edges, as shown in the following figure.

2. Installation is complete, as shown in the following picture:
Disassembling Step:
1. Hold the lower cover tightly with your left hand, open the upper cover with your right hand, and then open it upwards along the bottom of the upper cover, as shown in the figure below:

