5 minute read
ASSEMBLY STARTS ON PAGE 9 Downloading and Using the App


To control and program the drone and other robots in this kit, you will need a free app. You can download the app for iOS devices from the iOS App Store, or for Android devices from Google Play.
For device requirements, see the information section on the app’s download pages.
Advertisement
To get the app:
1. Scan the QR code to the right to take you to the product page for this kit (or search for the “Gigo Robotics Drones app”).
2. On the product page, scroll down until you see the downloads section containing the app icon. Follow the links for the correct app store based on your device.
3. Follow the steps on the app download page to download and install the app on your device.
4. Open the app and the main menu will appear.
The app communicates with the robot (the drone) via a Wi-Fi connection. After you have assembled your robot (pages 9 and on), follow these steps to connect it to the app:
1. Make sure the robot is powered on and was recently charged. 2. Go to the Wi-Fi (or wireless) settings on your device (tablet or smartphone). 3. Look for the network named “Drone-” followed by some numbers. This is your robot’s unique ID number. Select this network to connect to your robot.
4. If you don’t see the network, power down your device and the robot, remove and replug in the camera wire, and turn the device and the robot back on. Gigo Robotics Drones app icon
iOS Android
ESTABLISHING A WI-FI CONNECTION
TROUBLESHOOTING THE WI-FI CONNECTION
If the wireless connection isn’t working: – Make sure the battery is fully charged and the robot is turned on (the LED light is blinking). – Make sure Wi-Fi is enabled on your device and that your smart device satisfies the device requirements on the app download page. – Try restarting the app, the device, and/or the robot. – Try disconnecting and reconnecting the camera wire and/or the battery to reset the robot.
Here is an overview of the controls in drone remote control mode. Use this mode with the drone only. Read the safety rules on page 3 and the flying instructions on page 12.

1. Return to main menu 2. Take photo 3. Take video
4. Motion control: Steer the drone by moving your smart device. 5. Flight speed setting: Set the speed at which the drone moves. 6. 360 flip: The drone will do a somersault in the air. Flight speed must be set to medium or fast. 7. Track flight route: Draw a path in the app for your drone to follow. 8. LED status: Controls the light on the drone.
9. Setup menu: 10. Rotate screen
11. Split screen (helpful for VR viewing)
12. Reset the drone’s balance 13. Show/hide remote control interface


Drone remote controls (B): 14. Rotate counterclockwise 15. Rotate clockwise
16. Go up (away from floor) 17. Go down (toward floor) 18. Auto take off: Press this when you want your drone to take off and hover 19. Selfie mode: Speak the voice command
“photo” and the drone will take a picture 20. Auto landing: Press this when you want your drone to lower itself back to the floor
21. Go left 22. Go right 23. Go forward 24. Go backward
25. Rotation (yaw) trim: If your drone keeps turning to one side, use this to compensate
26. Emergency stop
27. Left/right trim: If your drone keeps drifting to one side, use this to compensate 28. Forward/backward trim: Same as left/right trim, but on the forward/backward axis
Remote controls for the other models (C): Use these controls to power the motors for the other models you can build in this kit.

1 2 3 4
A
5 6 7 8 9
14 16
15
B
17
25
29 30 31
34
C
36 18
19
20
26 21
35
38 23
22 28
24
27
32 33
37
2 1
4 3 3
2
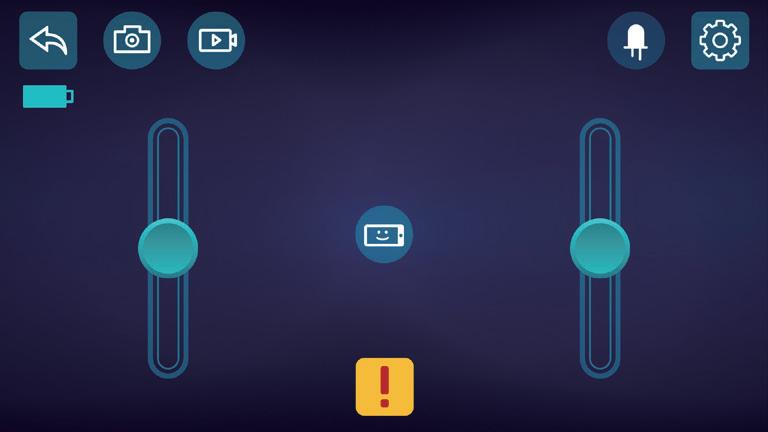
You can program your drone to follow a predetermined set of instructions in the drone programming mode. Here’s an overview of the controls in this mode:


1. Return to main menu
2. Take photo: When the program is running, you decide when the drone takes a photo by pressing this button. 3. Take video: Manually start and stop the video capture when the program is running. 4. Program sequence area: This is where the active program commands are arranged in order from left to right. 5. Change the LED status
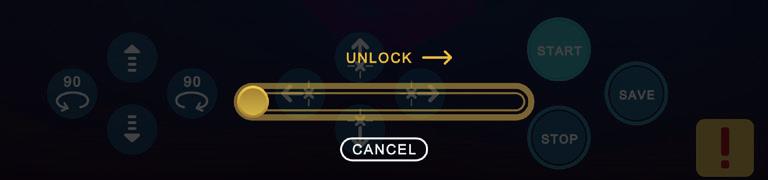
6. Emergency stop Program commands:
7. Rotate counterclockwise 90 degrees 8. Rotate clockwise 90 degrees 9. Go up half a meter (about 50cm) 10. Go down half a meter 11. Go left half a meter 12. Go right half a meter 13. Go forward half a meter 14. Go backward half a meter
15. Start (run) the program 16. Stop the program
17. Save the program. Saved programs can be accessed via the program menu (20). 18. New command steps are entered into the blank space in the program sequence area (18).

1
19
7
A
B

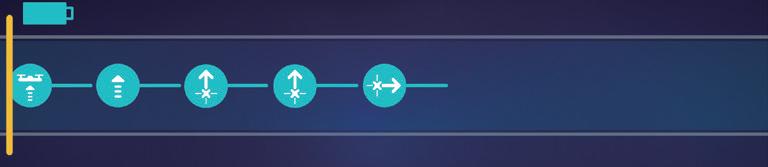
Here’s an example that shows you how to write a program:
A. In programming mode, the program always starts with the take off command (19). B. Press the go up button to enter a command into the program that will tell the drone to go up half a meter (21). C. Add a go forward command (22). D. Add another go forward command, and then a go right command (23). E. Add a rotate clockwise command (24). F. After tapping start to run a program, you need to swipe the unlock bar (25) to confirm that you want to run the program and it is safe to do so.
Make sure you follow all of the safety rules on page 3 and the general flying instructions on page 12.
C