in.clear
in.mix
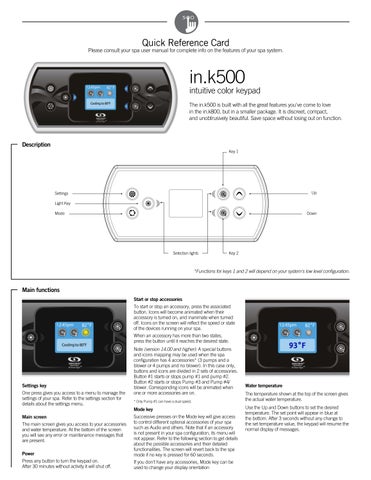
Quick Reference Card
Please consult your spa user manual for complete info on the features of your spa system.
in.k500
intuitive color keypad in.clear-200 / linked version (version 13.00 and higher)
Press on the Mode key to access your in.clear module.
The in.k500 keypad can be used with the in.clear sanitization system. The in.clear section allows you to configure your maintenance settings and Boost level. For more information on maintenance and Boost settings, see the in.clear user manual.
This menu allows you to activate or deactivate your in.clear, to start or stop a Boost, and to enter diagnostic mode.
Use the Up and Down keys to make your selection, then light key to confirm.
Control the Boost level
Use the Up and Down keys to change the maintenance or Boost value, and light key to confirm. * If the maintenance value is modified by more than 2, a warning message will appear with an option to cancel or confirm the change.
Turning the in.clear on/off Press the power key to turn the in.clear on or off. Press on the Boost activation/deactivation key to start a Boost, and again to cancel. To adjust the Boost level use the arrow keys.* A message indicating that Boost mode is active is displayed at the bottom of the main screen for the duration of the Boost. * See the in.clear user manual for more details about Boost levels.
The in.k500 is built with all the great features you've come to love in the in.k800, but in a smaller package. It is discreet, compact, and unobtrusively beautiful. Save space without losing out on function.
Diagnostic Mode
in.mix operation
Press on the Diagnostic key to start a BromiCharge concentration level test. To exit diagnostic mode press on the Diagnostic key again. The system will automatically exit after 15 minutes.
This menu is only present if an in.mix system is detected.
In diagnostic mode, the BromiCharge gauge indicates the approximate level of BromiCharge in the spa water. Do not add BromiCharge if the indicator is in the green zone. When BromiCharge is added the indicator will move slowly to the right. When water is added to the spa the indicator will move to the left. To obtain a good level of BromiCharge, start the pumps and add the specified amount of BromiCharge** and allow 5 minutes for the indicator to adjust before adding more.
Press on the Mode key to access your in.mix. By default, the in.mix selects Zone 1 when you access the menu. After the first use, the menu will automatically return to the last zone selected. Zone selection The zone selection keys allow you to select a zone to modify its color.
Changing colors Once a zone is selected, use the arrow keys to change the colors by moving up and down in the color wheel.
Description Key 1
Synchronizing zones The synchronization/desynchronization key allows you to match the color of the selected zone to the other zones. Up
Settings
• Press once to select the zone. • Press a second time to deactivate the zone.
Light Key Mode
Down
For optimal performance, aim for the middle of the green zone. ** For more information on adjusting your BromiCharge level see the in.clear user manual.
Selection lights
Key 2
Wi-Fi (in.touch only) *Functions for keys 1 and 2 will depend on your system's low level configuration.
Main functions Start or stop accessories To start or stop an accessory, press the associated button. Icons will become animated when their accessory is turned on, and inanimate when turned off. Icons on the screen will reflect the speed or state of the devices running on your spa. When an accessory has more than two states, press the button until it reaches the desired state.
WIFI (version 7.00 and higher) For the WiFi menu to appear in the Settings menu your in.touch module must be equipped with software version 11.00 or higher. This menu allows you to connect your in.touch module to a WiFi network or to change its network. For more details about other in.touch connection methods please see the in.touch techbook. To connect your in.touch module to a wireless network, use the Up/Down keys to go to the WiFi option in the Settings menu and Light key to select it.
After a few seconds the available networks will appear on the screen, as well as their signal strength. Use the Up/Down keys to move through the list. Select your network by pressing on Light key. If the WiFi network is password protected enter it when prompted. • Use the arrow keys to choose your letters and change the type of character (uppercase, lowercase, number, symbol). • Use Key 2 to move the curser forward • Use Key 1 to backspace • Use Light key to confim
Once the in.touch module is connected to a WiFi network a check mark in a green circle will appear in the WiFi menu, and the network logo will change to green in Settings menu. Note: WiFi logo color in Settings menu corresponds to the in.touch connection state.
Settings key One press gives you access to a menu to manage the settings of your spa. Refer to the settings section for details about the settings menu.
Yellow = not connected Green = connected to a network Yellow with wait icon = connection attempt to a network Red with wait icon = in.touch no longer detected (in.touch must be reset before next connection attempt)
Main screen The main screen gives you access to your accessories and water temperature. At the bottom of the screen you will see any error or maintenance messages that are present.
If no password is required the in.touch will connect automatically. © Groupe Gecko Alliance Inc., 2023 All trademarks or registered trademarks are the property of their respective owners.
9919-1012012-K
Rev. 03-2023
Printed in Canada
www.geckoalliance.com
Power Press any button to turn the keypad on. After 30 minutes without activity it will shut off.
Note (version 14.00 and higher): A special buttons and icons mapping may be used when the spa configuration has 4 accessories* (3 pumps and a blower or 4 pumps and no blower). In this case only, buttons and icons are divided in 2 sets of accessories. Button #1 starts or stops pump #1 and pump #2. Button #2 starts or stops Pump #3 and Pump #4/ blower. Corresponding icons will be animated when one or more accessories are on. * Only Pump #1 can have a dual speed.
Mode key Successive presses on the Mode key will give access to control different optional accessories of your spa such as Audio and others. Note that if an accessory is not present in your spa configuration, its menu will not appear. Refer to the following section to get details about the possible accessories and their detailed functionalities. The screen will revert back to the spa mode if no key is pressed for 60 seconds. If you don't have any accessories, Mode key can be used to change your display orientation
Water temperature The temperature shown at the top of the screen gives the actual water temperature. Use the Up and Down buttons to set the desired temperature. The set point will appear in blue at the bottom. After 3 seconds without any change to the set temperature value, the keypad will resume the normal display of messages.