
Love Birds Quilt - Version 2

Page 1


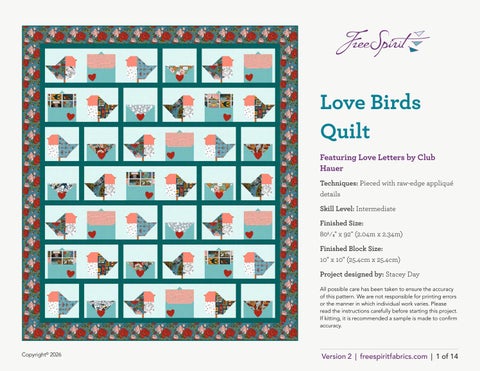
Love Birds Quilt

Featuring Love Letters by Club Hauer

Techniques: Pieced with raw-edge appliquΓ© details

Skill Level: Intermediate

Finished Size: 801⁄2" x 92" (2.04m x 2.34m)

Finished Block Size: 10" x 10" (25.4cm x 25.4cm)

Project designed by: Stacey Day

All possible care has been taken to ensure the accuracy of this pattern. We are not responsible for printing errors or the manner in which individual work varies. Please read the instructions carefully before starting this project. If kitting, it is recommended a sample is made to confirm accuracy.

Love Birds Quilt

FABRIC REQUIREMENTS

(Tech edited by: Alison

Design Color Item ID Yardage

A Air Mail Blue PWRH128.BLUE F8

B Love Bugs Teal PWRH129.TEAL 3⁄8 yard (0.34m)

C Cancellation Stamps White PWRH130.WHITE 1⁄4 yard (0.23m)

D Cloud Hearts Blue PWRH131.BLUE F8

E Pen Pals Multi PWRH132.MULTI F8

F Postcards Multi PWRH133.MULTI 1⁄3 yard (0.30m)

G Roses are Falling Teal PWRH134.TEAL 2 yards (1.83m)

H Snail Mail Blue PWRH135.BLUE F8

I Postage Stamps Teal PWRH136.TEAL 1⁄3 yard (0.30m)

J Sweet Nothings Pink PWRH138.PINK 1⁄3 yard (0.30m)

K Mail Toile Multi PWRH139.MULTI 1⁄3 yard (0.30m)

L Toile White PWRH140.WHITE 1⁄4 yard (0.23m)

M You’ve Got Mail Aqua PWRH141.AQUA F8

N Designer Essential Solid Snapdragon

CSFSESS.SNAPDRAGON 1⁄8 yard (0.11m)

O Designer Essential Solid Taffy CSFSESS.TAFFY 1⁄4 yard (0.23m)

P Designer Essential Solid Whimsy CSFSESS.WHIMSY 31⁄2 yards (3.20m)

Q Aboriginal Dot Red GP71.REDD 1⁄4 yard (0.23m)

R Shot Cotton Solid Glacier

S Shot Cotton Solid Emerald

* includes binding

Backing (Purchased Separately)

44" (1.12m) wide

SCGP124.GLACIER 1 yard (0.91m)

SCGP125.EMERALD* 21⁄8 yards (1.94m)

Swatches

ADDITIONAL REQUIREMENTS

β€’ 100% cotton thread

Pen Pals Multi PWRH132.MULTI 55⁄8 yards (5.14m)

OR 108" (2.74m) wide 21⁄2 yards (2.29m)

β€’ 89" x 100" (2.26m x 2.54m) batting

β€’ Optional: 1⁄3 yard double-side fusible interfacing/web if desired for appliquΓ©

Love Birds Quilt

CUTTING

WOF = Width of Fabric

β€’ Cut in the order listed, from largest to smallest, and reuse leftover strips, for most efficient use of fabric.

β€’ Cut sizes of pieces are listed as width x height.

β€’ Some prints are directional, so cutting instructions allow for keeping directional prints right-reading.

Fabrics A, D, E, H, and M, cut from each:

(1) 67⁄8" x 67⁄8", then cut on one diagonal into 2 triangles

Fabric C, cut:

(1) 41⁄4" x WOF; subcut

(11) 31⁄2" x 41⁄4"

Fabric F, cut:

Fabric B, cut:

(1) 41⁄2" x WOF; subcut

(6) 31⁄2" x 41⁄2"

(2) 31⁄2" x WOF; subcut

(12) 31⁄2" x 31⁄2"

(2) 43⁄4" x WOF; subcut

(5) 9" x 43⁄4"

Fabric G, cut:

(1) 41⁄2" x WOF; subcut

(6) 31⁄2" x 41⁄2"

(2) 31⁄2" x WOF; subcut

(12) 31⁄2" x 31⁄2"

(9*) 51⁄2" x WOF for border

*Cut 1 additional WOF strip if planning to join strips for borders with diagonal seams.

Fabric I, cut:

(1) 41⁄2" x WOF; subcut

(5) 31⁄2" x 41⁄2"

(1) 31⁄2" x WOF; subcut

(10) 31⁄2" x 31⁄2"

Fabric J, cut:

(2) 43⁄4" x WOF; subcut

(6) 9" x 43⁄4"

Fabric K, cut:

(1) 41⁄2" x WOF; subcut

(4) 31⁄2" x 41⁄2"

(1) 31⁄2" x WOF; subcut

(8) 31⁄2" x 31⁄2"

Fabric L, cut:

(1) 41⁄4" x WOF; subcut

(10) 31⁄2" x 41⁄4"

Fabric N, cut:

(2) 1" x WOF; subcut

(21) 1" x 1"

(21) 11⁄2" x 1"

Fabric O, cut:

(2) 31⁄2" x WOF; subcut

(21) 31⁄2" x 31⁄2"

Fabric P, cut:

(1) 101⁄2" x WOF; subcut

(18) 2" x 101⁄2" short sashing strips

(10) 51⁄2" x WOF; subcut

(10) 101⁄2" x 51⁄2"

(21) 61⁄2" x 51⁄2"

(21) 31⁄2" x 51⁄2"

(20) 11⁄4" x 51⁄2"

(2) 23⁄4" x WOF; subcut

(21) 31⁄2" x 23⁄4"

(4) 21⁄4" x WOF; subcut

(22) 63⁄8" x 21⁄4"

(12) 11⁄2" x WOF; subcut

(21) 71⁄4" x 11⁄2"

Love Birds Quilt

(21) 33⁄4" x 11⁄2"

(21) 31⁄2" x 11⁄2"

(21) 3" x 11⁄2"

(42) 11⁄2" x 11⁄2"

(7) 11⁄4" x WOF; subcut

(22) 83⁄4" x 11⁄4"

(21) 11⁄4" x 11⁄4"

Fabric Q*, cut:

(21) hearts using Heart appliquΓ© template pattern on page 14.

*If you prefer fusible appliquΓ©, follow manufacturer’s instructions to fuse double-sided fusible interfacing/web to the wrong side of the fabric first, then trace the shapes onto the wrong side of the fused fabric.

Fabric R, cut:

(2) 57⁄8" x WOF; subcut

(10) 57⁄8" x 57⁄8", then cut on one diagonal into

(20) triangles

(3) 41⁄2" x WOF; subcut

(11) 9" x 41⁄2"

(1) 21⁄4" x WOF; subcut

(11) 21⁄4" x 21⁄4"

(1) 11⁄2" x WOF; subcut

(22) 11⁄2" x 11⁄2"

Fabric S, cut:

(2) 101⁄2" x WOF; subcut

(31) 2" x 101⁄2" short sashing strips

(15) 2" x WOF for long sashing strips

(9) 21⁄2" x WOF for binding

Love Birds Quilt

INSTRUCTIONS

Notes: All seam allowances are 1⁄4" and pieces are sewn right sides together. Press seam allowances as directed. Cut sizes of pieces are listed as width x height as they are oriented in each step to aid in placement.

Envelope Blocks

1 Draw a diagonal line from corner to corner on the wrong side of all the Fabric R 21⁄4" and 11⁄2" squares. All marked fabric pieces will be used for stitch & flip corners using the following method -

β€’ Place the marked square right sides together with the piece as directed in each step, noting the orientation of each piece and the marked lines.

β€’ Sew along the line, trim the seam allowance to 1⁄4", and press as directed.

2 Follow the stitch & flip corners method detailed in step 1 to add Fabric R 11⁄2" squares to both bottom corners of each Fabric F and Fabric J 9" x 43⁄4" rectangle as shown (Fig. 1), pressing towards Fabric R to make Unit A. Make (5) with Fabric F and (6) with Fabric J (11 total).

Fig. 1

3 Follow the stitch & flip corners method to add a Fabric R 21⁄4" square to the lower right corner of a Fabric P 63⁄8" x 21⁄4" piece as shown, pressing towards Fabric P (Fig. 2a). Then mark a second Fabric P 63⁄8" x 21⁄4" piece, noting the orientation of the line (Fig. 2b). Place the marked piece on top of the stitched unit, so the line is perpendicular to the diagonal seam (Fig. 2c). Follow the stitch & flip corners method again, pressing towards Fabric P, to complete Unit B (Fig. 2d). Make (11).

Fig. 2a

Fig. 2b

Fig. 2c

Fig. 2d

4

Arrange (1) each Units A and B, a Fabric R 9" x 41⁄2" rectangle, and (2) Fabric P 11⁄4" x 83⁄4" strips together as shown (Fig. 3). Sew together in the order shown to make an Open Envelope Block (101⁄2" x 101⁄2" including seam allowances). Make (5) with Fabric F and (6) with Fabric J (11 total).

3

Open Envelope Block Make 11

Love Birds Quilt

5 Sew a Fabric A 67⁄8" triangle and a Fabric R 57⁄8" triangle together as shown (Fig. 4), handling carefully to avoid stretching the bias edges. Press towards Fabric A. Trim the extended tip of the Fabric R triangle in line with the short side of the Fabric A triangle, then sew a second Fabric R 57⁄8" triangle to the piece, making sure to offset the triangles at the bottom edge so as to achieve a straight line when sewn and pressed. Trim from the right-hand side, keeping the diagonal seam centered in the corner, to 101⁄2" wide x 51⁄2" high, to complete Unit C. Repeat to make (2) each with Fabrics A, D, E, H, and M (10 total).

Tip: Sew with the bias edge (in this case, the Fabric R triangles) towards the feed dogs to help manage the bias and reduce stretching.

Fig. 4

Fig.

6

Arrange (1) Unit C, (1) Fabric P 101⁄2" x 51⁄2" rectangle, and (2) Fabric P 11⁄4" x 51⁄2" strips together as shown (Fig. 5). Sew together in the order shown to make a Closed Envelope Block (101⁄2" x 101⁄2" including seam allowances). Make (2) each with Fabrics A, D, E, H, and M (10 total).

Love Birds Quilt

7 Following the diagrams below for placement, pin or glue baste a heart appliquΓ© to each Envelope block, approximately 5⁄8" from the bottom raw edges. If using fusible interfacing/web, fuse following manufacturer’s instructions. AppliquΓ© in place using a blanket stitch in matching thread.

All Closed Envelope Blocks

Heart appliquΓ© placement

Fig. 5
Closed Envelope Block
Fig. 6
Open Envelope Blocks

Bird Blocks

8 Sew a Fabric N 1" x 11⁄2" piece to the short end of a Fabric P 3" x 11⁄2" piece as shown (Fig. 7) to make Unit D. Make 21.

Fig. 7

9 Draw a diagonal line from corner to corner on the wrong side of all the Fabric N 1", Fabric P 11⁄4" and 11⁄2" , and Fabric B, G, I and K 31⁄2" squares.

Love Birds Quilt

10 Follow the stitch & flip corners method to add a Fabric N 1" square to the upper right corner of a Fabric P 11⁄2" x 71⁄4" strip as shown (Fig. 8), pressing towards Fabric N. Sew

Fabric P 11⁄2" x 33⁄4" strip to top to make Unit E. Make (10)

Unit E and (11) Unit Er (the β€˜r’ indicates a reversed, or mirror image unit) as shown.

Fig. 8

11 Follow the stitch & flip corners method to add a Fabric P 11⁄2" square to the upper left corner of a Fabric O 31⁄2" square as shown (Fig. 9), pressing towards Fabric P. Sew a Fabric P 31⁄2" x 23⁄4" piece to the top to make Unit F. Make (11) Unit F and (10) Unit Fr.

Fig. 9

Love Birds Quilt

12 Follow the stitch & flip corners method to add a Fabric P 11⁄2" square to the bottom left corner of a Fabric C 31⁄2" x 41⁄4" piece as shown (Fig. 10), pressing towards Fabric P. Sew a Fabric P 31⁄2" x 11⁄2" piece to the bottom to make

Unit G. Make (11) Unit G. Repeat with Fabric L to make (10)

Unit Gr.

Fig. 10

G - Make 11

Gr - Make 10

13 Follow the stitch & flip corners method to add a Fabric B

31⁄2" square, to the bottom left corner of a Fabric P

61⁄2" x 51⁄2" piece as shown (Fig. 11), pressing towards Fabric B, to make Unit H. Make (6) Fabric B and (5) Fabric I (11 total). Repeat with Fabric G to make (6) Unit Hr and Fabric K to make (4) Unit Hr (10 total). Fig. 11

Fig. 11

Love Birds Quilt

14 Follow the stitch & flip corners method to add a Fabric B

31⁄2" square to the upper left corner of a Fabric P 31⁄2" x

51⁄2" piece as shown (Fig. 12), pressing towards Fabric B, to make Unit I. Make (6) Fabric B and (5) Fabric I (11 total).

Repeat with Fabric G to make (6) Unit Ir and Fabric K to make (4) Unit Ir (10 total).

Fig. 12

3

15 Follow the stitch & flip corners method to add a Fabric P 11⁄4" square to the bottom right corner of a Fabric B 31⁄2" x 41⁄2" piece as shown (Fig. 13), pressing towards Fabric B. Sew a Unit D to the bottom to make Unit J. Make (6) Fabric B and (5) Fabric I (11 total). Repeat with Fabric G to make (6) Unit Jr and Fabric K to make (4) Unit Jr (10 total).

13

Love Birds Quilt

16 Arrange (1) of each Units E-J, matching the print fabric of Units H, I , and J, as shown (Fig. 14). Sew together in order as shown to complete a Bird Block (101⁄2" x 101⁄2"). Make (6) of Fabric B and (5) of Fabric I (11 total).

Fig. 14

Block Make 11

Fig.

17 Repeat the previous step using Units Er-Jr, to make 10 total Reversed Bird Blocks - (6) of Fabric G and (4) of Fabric K

Fig. 15 Reversed Bird Block Make 10

QUILT TOP ASSEMBLY

Note: Follow the Quilt Layout diagram (page 13) while assembling the quilt. Press seam allowances towards the sashing. Measure the Quilt Center width and height before cutting and adding borders and adjust border measurements if necessary to match your measurements.

Love Birds Quilt

18 Arrange both types of Envelope and Bird blocks and the Fabric P and S 2" x 101⁄2" sashing strips together into (7) rows, using (6) blocks and (7) sashing strips in each.

19 Sew the blocks and sashing strips together into rows.

20 Sew the Fabric S 2" x WOF strips together end to end. Cut (8) 71" long strips for row sashing.

21 Sew the block rows together from top to bottom with a Fabric S row sashing strip between each block row, and on the top and bottom, to complete the quilt center (71" x 821⁄2" including seam allowances).

22 Sew the Fabric G 51⁄2" x WOF strips together end to end. Cut (2) 821⁄2" long strips for the side borders and (2) 81" long strips for the top and bottom borders.

23 Sew the Fabric G 51⁄2" x 821⁄2" borders to the sides of the quilt center, matching ends and centers. Press towards Fabric G, then sew the Fabric G 51⁄2" x 81" borders to the top and bottom and press towards Fabric G to complete the quilt top.

Love Birds Quilt

FINISHING

24 Sew together the 21⁄2" Fabric S binding strips end-to-end using diagonal seams. Press seams open. Press the binding strip in half wrong sides together.

25 Layer backing (wrong side up), batting, and quilt top (right side up). Baste the layers together and quilt as desired. Trim excess batting and backing even with the top after quilting is completed.

26 Leaving an 8" tail of binding, sew the binding to the top of the quilt through all layers matching all raw edges. Miter corners. Stop approximately 12" from where you started. Lay both loose ends of binding flat along quilt edge. Where the loose ends meet, fold them back on themselves and press to form a crease. Using this crease as your stitching line, sew the two open ends of the binding right sides together. Trim seam to 1⁄4" and press open. Finish sewing binding to quilt.

27 Turn the binding to the back of quilt and handstitch in place.

Quilt Layout

Love Birds Quilt Heart AppliquΓ© Template no seam allowance needed

Love Birds Quilt

This square should measure 1" x 1" (2.54cm x 2.54cm) when printed.

*** Measure templates before cutting to confirm printing at 100%***

All possible care has been taken to ensure the accuracy of this pattern. We are not responsible for printing errors or the manner in which individual work varies. Please read the instructions carefully before starting this project. If kitting it is recommended a sample is made to confirm accuracy.

All possible care has been taken to ensure the accuracy of this pattern. We are not responsible for printing errors or the manner in which individual work varies. Please read the instructions carefully before starting this project. If kitting it is recommended a sample is made to confirm accuracy.

Turn static files into dynamic content formats.

CreateΒ aΒ flipbook
Love Birds Quilt - Version 2 by FreeSpirit Fabrics - Issuu