31 minute read
The Polo Horse


Now we have reached the point where the teammate the horse comes in. The horse’s dynamics are of distinctive importance for the polo swing. This chapter deals with the polo ponies’ characteristics and the specifics of polo riding. Above all, some basic principles of a good communication with the horse will be explained, which will help you understand its reactions.
Characteristics of the Polo Horse
Advertisement
A polo pony must be physically and mentally fit for the sport. The polo horse should be:
n n n n n n n n n n n n Sure-footed Fast Agile Motivated Good-tempered Socialized Physically fit Trained Strong-nerved Trusty Steady Balanced
In polo a horse is demanded to carry out tight turns, quick stops and turnings and much more. For polo, you need a well-balanced horse which has learned by training to keep its own body and that of the horseman in balance.
Here, horses which fit the shape and proportion of “quarter horses” with a preferably low center of gravity are favored. You might draw parallels to motorsport, of course.


The Balance of a Polo Horse – Static and Balance Point of a Horse’s Body
“A horse keeps its balance as long as the perpendicular of its balance points stays within the horse’s base of support” (EVRARD 2008: 6). In order to understand this quotation and help the horse in balancing throughout riding, you have to acquaint yourself with some basics of the static and dynamics of a horse.
The main part of a horse’s body weight rests on its forehand. This is about 55–60 percent, as a result of the head and neck. The horse’s neck operates as a rudder and stabilizer; for example, the horse is able to counterbalance its balance point with the help of its neck. Therefore, the proportions, flexibility and the position of the neck have a major influence on a horse’s balance. Watching a free-roaming horse, you will notice it nodding with a gentle up-and-down motion of the head accompanied by a slight movement of the neck backwards and forwards. The horse’s body can be roughly divided into three parts. The forequarter consists of head, neck, shoulder and forearms. The thorax, the rump and the withers with the back make up the body, while hip, croup, hind legs and tail are part of the hindquarter.
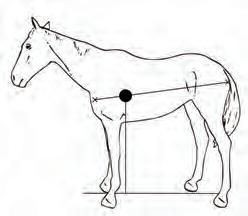
The center of gravity of a horse at the standstill is approximately situated at the back end of its sternum; a point of crossing between a horizontal line that drops from the highest point of withers to the floor and the connecting line from the ischial tuberosity (buttock) to the point of the shoulder. A person’s or a horse’s center of gravity can be found beyond the body’s boundaries, as is the case in tight turns for example.
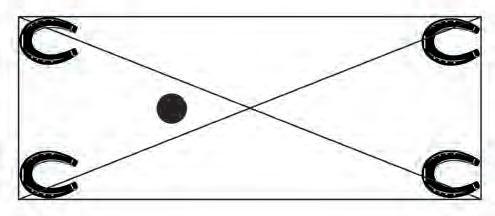
A horse’s center of gravity includes the area of a rectangle which is formed by connecting the horse’s four limbs. A standing horse’s balance point is situated somewhat in front of the point of crossing between the diagonals of this rectangle. In motion, the location of the balance point will shift.
Looking at rectangular-shaped horses, you will realize that their length exceeds their height, proportionally seen; because of this fact they have a wider base of support (in comparison to horses with the same height as length) and tend to have a point of balance which is nearer to the ground. This is the reason why they are much easier to keep in balance than horses with a square-shaped frame, whose body length and height are almost identical.
Looking at the drawings on the left you can see that the rectangular-shaped horses show the desired deep ribcage, a low point of balance and ample space for big lungs.
A horse’s conformation allows for quick movements. Its legs operate as a means of support and locomotion. As the largest proportion of the body weighs on the forehand, the forearms are at work as springs and shock absorbers. The horse’s hind limbs are primarily relevant for the forward thrust. The hind quarters often are denoted as the horse’s motor or impulse. A horse is barely able to twist its legs sideward.
riding Polo Horses
Some people are born riders; others have to develop a feeling for it and overcome certain fears before they dare to mount a horse. Beginners in polo will fairly easily notice that a polo pony is usually very well trained and schooled, so the inexperienced horseman has an easy time developing confidence on horseback. Through regular training (never-used groups of muscles will often be found here), the beginner gains confidence at an early stage and learns to control the horse. The intention is to make the pony react to the player’s faintest signals, while he is concentrating on strategy and polo swings during the game. In riding, balance is of immense importance. If the player sits on his pony in a balanced position, he will be able to instruct the pony precisely and properly without affecting its balance.
This book is not supposed to be a course book for riding but for conveying the technique of the proper polo swing. The riding should always be supervised and guided by a professional instructor.
As for the swing, the communication with your horse, the balance between player and horse and – above all – the horse’s dynamics are essential. We therefore look at some particularly important details of polo riding and the typical seat in polo, known as the half-seat, as this builds the basis for the correct hitting position.
Peculiarities of Polo Riding
The photographs below show the most important elements of the polo horse’s saddle and tack. Various types of bit are permitted in the sport of polo. A standing martingale is obligatory in tournaments. The overgirth on the saddle serves as an additional safety strap in the event of the girth tearing.
Bridle
Reins Dropband

Bit Martingale Saddle Pommel Breast Collar Knee Roll Overgirth Stirrup Leather and Iron Girth


In polo, reins and whips are held in the left hand. In a tournament, polo ponies must be controlled with double reins, i.e. the player has to hold four reins in one hand. The following illustration shows the correct gathering up of the reins; variations are possible.
The correct rein handling should be as follows: n The left hand forms a fi st. n The two upper reins are positioned between thumb and index fi nger. n The two lower reins are positioned between index and middle fi nger. n The thumb is placed on top. n The reins must be straight, i.e. they must be twisted or crossed. n The respective ends of every rein go alongside the palm. n The ends of the reins are positioned at the left side of the horse’s neck. n Both pairs should be held the same length, i.e. the upper reins run parallel and the respective right hand or left hand reins shall have the same distance from the horse’s bit to the rein hand. n The reins are held gently connected to the horse’s mouth; you should feel its mouth slightly, though the reins should not be used too heavily either.
Re-grasping and lengthening the reins: Re-grasping the reins means you shorten them. To do so, you have to grip the reins with your hitting hand (the right one) behind the rein hand (left one) towards the end of the reins. Now you can open the rein fi st slightly and have the rein hand move along the reins in the direction of the horse’s ears until you have shortened them to the length you wish. Here, the reins glide between your fi ngers. Re-grasping requires a bit of practice – especially with the mallet held in your right hand. To lengthen the reins you have to open the rein hand slightly, too, and allow the reins to glide easily through the palm.
The whip is held together with the reins in the left hand. Here you should make sure that it does not affect the nearside swing. Moreover, it has to be kept close to the body in order not to interfere with the opponent during riding-off.
Tips from the Pro
n When your reins are too long: Knot the ends together to prevent them from entangling with the rest of your equipment.
n Practice re-grasping during your training in order to make this a routine action.

n Keep your rein fi st clenched while you are riding, so the reins do not glide off your hand accidentally; make sure the thumb is on top, like a roof, and clutches the fi st.
n The whip is one part of your basic equipment. You should get used to holding the whip together with the reins in your left hand.
n If the whip has a loop, put it over your wrist.

4

7
A polo player’s balance depends on his seat while sitting in the saddle. The balance and the technique of a polo swing are also mainly affected by the seat. Stirrups give the horseman firmness in the saddle and help him in balancing on horseback and while performing the swing. There are two methods that may help you to determine the appropriate length:
1. 2. You can determine the length of the stirrups according to the length of your arms. You should be able to fit a fist between your bottom and the pommel when standing up in the saddle.
On the ground: Stretch your arm and place your fingertips on the pommel. Stirrup leather and stirrup iron should be as long as it needs to touch your armpit.
On horseback: Rule of thumb is: The upright fist should fit between the horseman’s bottom and the saddle when standing up in the stirrup irons.
Consequences of overly short stirrups
If the stirrups are too short, the horseman’s knee will not find enough footing at the knee roll. The horseman then tends to “sit over the horse”, and the point of gravity is shifted.
Consequences of overly long stirrups
If the stirrups are too long, the player cannot possibly raise his weight off the saddle. A correct hip rotation will not be possible and there will be a danger of gliding out of the stirrups and losing them.
Getting into the stirrups correctly
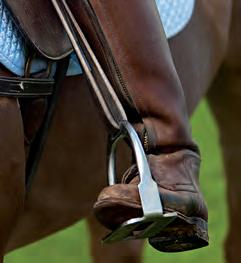
Always enter into your stirrups from the outside. Make sure the stirrup leather is positioned flatly at the knee roll and you put on the stirrups from their outside branch. The adjacent illustration shall demonstrate the correct positioning of the stirrup leathers. In the stirrups, put your weight on the balls of your feet, raise your toes slightly and push down the heels. In this way the joints of your feet can absorb shock from the horse’s movements.
Correct placement of the stirrup: Heels down, the stirrup iron does not shove towards the heels, but is placed at the balls of the feet (which is the widest part of the foot). In this area, typical polo boots wrinkle up.
Tips from the Pro
n The horse’s fi eld of vision is a lateral one, i.e. they are able to see the horseman’s actions and the horseman has a sensation that the horse guesses his intentions. However, this can lead to confusion if aids are not given clearly or the horse is made insecure by the player’s actions. In the course of the play this wastes precious time and the horse’s and rider’s energy.


n Take your time to adjust your stirrups to the fi tting length and mark the stirrup leathers at this point.
n While you are riding, keep in mind getting into your stirrups correctly, and push down the heels. Maintain your boots especially in the ankle region and ensure that the leather is soft and elastic enough to allow this movement.
The Seat in Polo Riding – Sitting Balanced – Out of the Horse – Half-Seat
Polo riding demands an assured, effortless and unclasped seat. By means of the correct seat the drive and the dynamics of the horse’s body can be used for the swing. In quick maneuvers, like tight turns and quick stops, the seat shall help the horseman to stay in balance and support the horse in keeping its balance.The riding seat in polo should be assured, light and independent. Hereby the horseman should sit in his saddle comfortably and naturally.
Assured means that the rider should have control over his and his horse’s movements. Light means that the polo player sits in the half-seat position while galloping and at the moment of basic position for the swing. That is, he takes his weight off the saddle. This is what is called sitting “outside the pony”; the horse’s back is relieved. Independent means the player’s two hands operate independently from the rest of his body. This holds true for the rein and hitting hand! In order not to confuse the horse, the swinging movement (movement of the body) must be as independent as possible from the rider’s seat, i.e. from the rider’s legs.
Basics of the Rider Seat
For an assured, comfortable and natural seat you have to develop a sense for the horse’s rhythm of motion. When riding, the horseman’s hip follows the horse’s movements (the same in half-seat and in hitting position). Your back should be erect, the abdominal muscles slightly tensed. The head is upright but relaxed; shoulder blades gently squeezed together, falling backwards, but with the torso staying straight and upright. You should make sure not to bend your hips rightwards or leftwards.
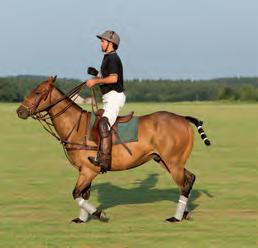
The Half-Seat – Outside of the Horse
In half-seat you sit out of the horse. For this, you shift the weight off the saddle; the momentum change results mostly from the knees and lower legs. The half-seat is modified from the twopoint-seat in English riding. The half-seat is similar to the position you adopt standing up while your horse is trotting. Mainly you steer your horse with your knees and lower leg. For this you have to develop a tight grip with your knees on the saddle (knee roll).
You must adapt a good, tight knee position with heels down first, then place your foot on the outside of the stirrup and put more weight on the balls of your feet. Bring your lower legs outwards and downwards as an extension of your knees, and you will gain pressure on your knees.
You might sometimes hear the advice to squeeze your knees, but mostly this will have an undesired effect. If you squeeze your knees to the knee roll you will lose pressure on the stirrups and heels.
Features of the adjacent picture:
n Heels down, knees bent and deep, i.e. in a downward rolling motion, ankle joint is elastic and absorbs shock.
n
n Pressure in stirrups, foot is positioned outwards – this helps to get the knee tight to the knee roll.
Bend your torso forward – from the hips – weight is on stirrups, the balance point is slightly shifted forwards. Horse’s back is relieved, the rider seats in half-seat/outside the horse. A maximal rotation of the shoulder is possible now.
n A soft connection the horse’s mouth, though hand should not be too deep and in the direction of the horse’s ears.
The half-seat and the correct, balanced position of the mallet in the starting position are essential for the correct hitting technique. The transition from the half-seat to the hitting position will be explained in a later chapter.
Internalizing some of the basic principles of equestrian behavior and the ways of communicating with a horse has proved to be quite helpful for polo riding. Primarily you should be aware of the fact that horses are herd and flight animals. They are animals which are able and willing to live in a subordinate structure. By means of breeding and selection these characteristics have been made use of over the years to domesticate the horse as a working and domestic animal. And yet a horse’s nature still complies with that of a prey and flight animal, having learned by practice and familiarization to oppress these instincts, which are still essential for surviving in the wild.
For this reason, please be aware that horses have a refined perception together with an immediate reaction!
A horse’s perception is affected by its field of vision. Horses have an amazing peripheral vision (an angle of about 190 degrees for one eye). The horse’s eyes are set on the sides of its head, allowing it to observe different objects separately. Binocular vision is only possible in the area where the fields of vision of both eyes overlap. As the eyes are located toward the sides of the head, horses have a blind spot directly in front of the forehead. This blind spot is overcome by raising, lowering or turning the head. Always remember that horses are clearly able to perceive the horseman’s actions which he performs with his body, legs, arms and mallet – and they can even be confused by these actions.

Tips from the Pro
n Give enough reins to the horse so it is able to use its neck as a balance pole and its vision field is not too limited.

n Pay attention to a precise carrying of the mallet.
The principle of “actio et reactio” is also adaptive to horsemanship. A rider’s action will cause an immediate reaction by the horse. The conscious acting is called “riding aids”. For a wild horse herd, a clear and well-defined hierarchy is vital. As horses are herd animals they behave as silently as possible and communicate with the help of their body language. Horses can learn to interpret the faintest body signals.
Your communication with a horse should always be
n n n clear, immediate and well-defined.
For a communication with his horse, the horseman can choose from these riding aids:
n n n n n Legs/thighs Reins/hand Weight Voice Aids like whip or spurs
Aids can be motivating or restraining and even have a calming effect (voice). Aids should be given clearly and in a well-defined manner and at the same as faintly as possible and as strongly as needed.
Weight A proper weight shifting will help the horse; an inaccurate one will destabilize it! You should always have the feeling that the horse is in front of you but never have the feeling of being in front of its point of balance.

As polo horses have an ideal height of about 156 cm and a weight of 400–500 kg, the horseman can exert considerable influence on the horse’s balance with the help of his weight. Weight as a riding aid in polo is an important means of communication between horseman and horse.
You can imagine the effect of the horseman’s weight on the horse as follows:
A first-grader strolls along with an oversized, stuffed satchel. The child can easily be destabilized or redirected by grabbing the handle. While the child is preventing himself from falling, he will try to compensate the for weight of the satchel by shifting weight or by sidestepping. A horse will do the same with a horseman on its back. It will always be anxious to keep its own and the horseman’s weight in balance.
Leg/Thighs Thighs as riding aids are used to give impulse with the help of your legs. In polo, these impulses are mainly transferred with knees and lower legs.
Reins/Hand The reins are used to restrain a horse, to block or contain its forward movement or to turn it. You also can call the horse’s attention by gently pulling back the reins. In polo, you make use of neck reining, too, and this will be discussed later. Pulling back the reins can be established by holding the reins steadily and firmly, because this affects the horse’s natural up-and-down neck movement, i.e. the bit puts pressure on the horse’s mouth.
A Horse’s Dynamic – the Horse’s Motion Sequences
Playing polo stands for the ability to adapt to different speeds. When swinging, the pony’s speed and momentum influence
n n n the extent of the body twist, shoulder rotation and aiming and impact.
The influence of horse gaits on the polo seat and the polo swing is described in a later chapter. Now we will explain some of the basics of a horse’s dynamics. There are three gaits with which a polo pony moves: Walk, trot and gallop.
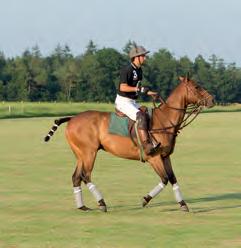
Walk
The walk is the slowest basic gait, which is a natural four-beat movement. The motion sequence of the walk can be divided into eight phases. There is no period of suspension, and at least two of the horse’s hooves touch the ground, which means that the horse’s legs follow regular 1-2-3-4 sequences. The pony lifts his hooves as follows: Left front leg, right hind leg, right front leg, left hind leg.

In walk, the rider sits in the saddle, and yet he has constant pressure on his ankle joints and the balls of his feet. The heels should be pushed down as far as possible, toes up. For hitting, the horseman stands up in the stirrups and passes to half-seat and further to the hitting position.
The trot is a steady two-beat gait, which is divided into four phases. In the first and third phase of trot the diagonals, i.e. one front leg and the opposite hind leg, touch the ground at the same time. In between these phases – that is, in the second and fourth phase – no hoof touches the ground. This phase is called period of suspension.
In polo you will mostly ride in rising trot. In English riding and dressage a horseman sits the trot rather than post it, i.e, he stays in the saddle moving along the horse’s strides.


In rising trot, the rider rises with every other beat and absorbs the horse’s jolts. This technique requires some practice. It is necessary to learn rising up and down in the correct rhythm.
The rider should allow himself to be thrown up slightly and lower himself immediately after that. Raising your seat is done by gently stretching knees and hips with hardly any physical effort.
Faults are mostly made because a horseman rises too slowly, too wide or too long. When practicing, it may help to count the pony’s beat (1, 2, 1, 2 … or up, down, up, down…). Losing your balance when rising indicates you have risen too high or your stirrups are too long. You will feel a double bounce sitting down if you stand in your stirrups for too long.
The same applies if you fall back in your saddle with every stride. Try to have yourself pulled back into the saddle with every upwards motion of the horse’s back.

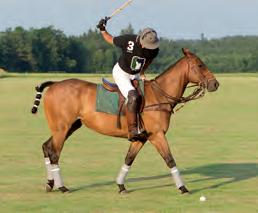
Gallop – the Right-Lead Gallop and the Left-Lead Gallop
Gallop is a three-beat gait, and the swiftest of the three gaits. It consists of six phases, with a suspension phase in between every gallop stride when all four hooves are off the ground.
Unlike walk and trot, in gallop one distinguishes between right-lead gallop and left-lead gallop. Whether a horse is galloping left-lead or right-lead can be judged by watching its front legs. In right-lead, the horse’s right front leg is thrown further forward than the other – the horse’s weight moves to the right.
As penalties, hit-ins and others are generally performed from the offside, polo ponies are used to galloping on right-lead. A proper gallop, i.e. the corresponding pony’s footfall and the swing of the gallop stride, can be used for the polo swing.
When hitting at gallop you should make your horse gallop left-lead for nearside swings, and right-lead for offside swings.
Horses can change to gallop during the jump stride (flying change) or by a short switch through walk or trot (simple change). In both right-lead and left-lead, the pony should jump the gallop correctly, i.e. it should keep to the correct sequence of footfalls.
If the pony gallops beginning from the right front leg and the left hind leg or vice versa, this is called cross-galloping.


Footfall in gallop:
n n n n The respective outer hind leg is lifted first, the inner hind leg and the outer front leg follow simultaneously, closely behind the inner front leg; after that the pony is in a suspension phase.
As soon as the pony has jumped into gallop, the rider sits in the half-seat position. When he wants to change speed, he pushes the pony by intensifying its motions in propelling forward with legs and weight. He can also reduce the pony’s motions by rising up or leaning backwards and thus adding weight to the saddle.
Generally speaking, if you want to slow down or halt your pony, you have to shift your point of balance backwards on the pony’s hind legs. You can cue your pony by either keeping the rein hand in its position while leaning back (this exerts pressure inside the pony’s mouth, because the hand will not follow its movements anymore) or by pulling back on the reins.
In order to economize strength, polo players often perform the up-and-down movement analogously to the rising trot.


The following information is about controlling a horse in halting, turning and changing of gaits and, moreover, keeping it in balance.
Changing of Gaits – Transition
The most frequent transition in a polo match is that from walk or halt to gallop or vice versa.
For starting the gallop, you take up the reins and thus make the pony raise his head a bit and then cue it to a proper and quick pace by giving leg aids and driving it forward with hip and body. This will help make the pony alert. The right-lead gallop is achieved by putting increasing pressure with the left (outer) leg and slightly shifting body weight to the right. If you edge your fist hand rightwards, it can support this action. Now the aids are intensified by an impulse given with both legs and a weight shift forwards. Reins are taken forward and support this action. Without trotting the pony should change – jump – into gallop. When galloping you should always keep in mind that playing polo means steering and controlling with the help of your legs!
How to Stop a Horse
The hindquarter is said to be the horse’s motor and impulse. This power is transferred through back and torso to the rest of the body. The front legs sustain the main part of the weight.
Polo is a fast-paced sport with a constant alternating of halting, turning, starting, and short or longer sprints. Often, a halt is followed by a turn or a quick start. The pony should always have his hind legs under the barrel and shift its weight (and that of the horseman) to his hindquarter in order to be capable of performing the halt and the successive maneuver correctly (to prevent damage to its locomotor system). This is referred to as a pony halting on its hind legs.
Sitting back and deeply in and thus putting weight in the saddle and retarding the pony’s motion makes it halt. Restraining a horse like this makes it understand that it has to slow down or even halt. The halting movement is intensified by closing and squeezing the legs and gathering the reins. The latter should be as gentle as possible and as strong as necessary; rather than pulling back, it should resemble keeping the rein hand in its position. Here, the rein fist is closed more firmly than before. Now that the hand stops following the pony’s movements, the pony will feel pressure on its mouth. Try to avoid rapid and pulling actions; if the pony gets too much pressure on its mouth it will tend to halt on its forequarter, i.e. it will toss its head and will thus neither be able to halt nor to perform the following maneuver correctly. Moreover, the pony’s mouth will become insensitive over time.
The following exercise demonstrates how the horseman’s weight is transferred to the pony. Sit down on a chair in an upright position and put your hands under your buttocks, palms up. Now bend your torso backwards and keep your back straight. Try this weight shifting also to the left and to the right.
With every halt you should pay attention to preparing the pony for this maneuver. Take care not to stop breathing and not to draw back your knees during the halting. Practice halts from walk pace first and slowly increase the pony’s speed.
Tips from the Pro
n Before starting any maneuver, call the horse’s attention.
n You should always be aware that a halt calls for a lot of energy from the pony.
n Try to set yourself a limit of ten halts per chukka. This will help you avoid unnecessary runs and play in a more anticipatory manner.
n
n
n Make sure your seat is proper and secure while halting. Both legs as well as weight should be close to the pony’s body.


You should never have the feeling of fighting with your pony during the process of halting. Try to carry out the transitions as harmoniously as possible.
If your horse did the halt properly, you should give it a rest for about ten seconds before changing into another gait. In doing so, all four legs should be balanced and put due weight on. If you change too quickly, the horse will get used to performing the stops incorrectly (i.e. not on his hind legs) and shove forwards or sidewards.
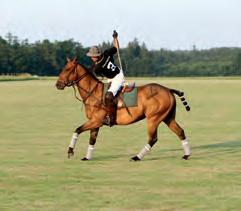
Turning of the Horse
Having the pony turn without halting is called a rollback, which is a common technique in polo. Directly from the movement it performs a 180-degree turn on its hind legs. This should be done continuously after the stop in a bouncing movement. The rollback is also referred to as “jumped pivot on the hindquarters”.
Beneath its own weight, the pony has to counterbalance the horseman’s weight and will always be eager to keep in balance. Thus, it is important to give the pony enough time for precise reaction and the respective cue for a correct performance of this maneuver. The more prepared and the more alert it is, the fainter and subtler the aids will have to be.
Initiation of turn In turnings and rollbacks it is important to always look behind you, i.e. look over the shoulder at the direction you want to turn to. Fix the intended direction with your eyes; this makes your body rotate around its vertical axis (analogously to the polo swings). The pony will be anxious to follow this movement and take the turn together with its horseman – it will try to follow the rider’s view.
In turnings you can take advantage of the so-called neck-reining. The pony will react on the rein pressure and thus try to draw aside it. Moving your rein hand to the left of the pony’s neck will lead to spin to the left as the rein squeezes on the right side and the pony therefore draws aside rightwards and vice versa.
A right turn performed with the help of neck reining works as follows:
n
n
n Move your rein hand forward and rightward with a clear impulsion, but take care not to pull the bit!
The pony feels the leather squeeze against its neck and tries to draw aside by turning its head and neck rightwards. The impulsion given on the bit should be very weak only.
In order keep its balance the pony will be anxious to follow this evasive movement with its body and your reins hereby work as aids on its neck.
However, the main aid in maneuvers is your weight, i.e. your weight shifting. Neck reining has only
a supportive function here.

Weight shifting to the right

The impulsion of neck reining


The pony responds and intensifies turn
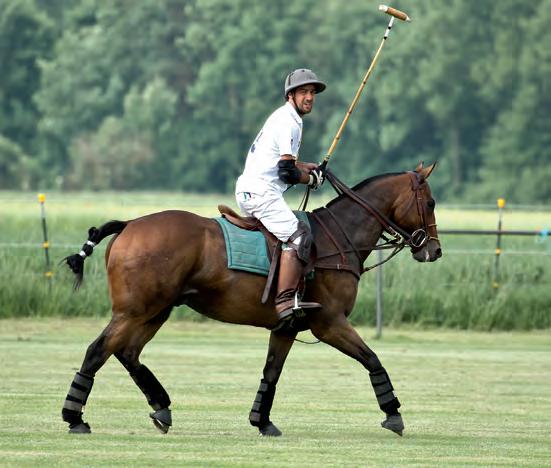
It spins on its hindquarters Santiago twists his body with the hips similar to a corkscrew. His weight and that of the pony are shifted to the right, yet both are balanced!
Pay attention to the following checkpoints in turning right:
n
n
n
n
n
n Look back over your right shoulder.
Your right shoulder should twist in the direction of the pony’s tail, your torso is upright and yet bent slightly forwards, the back is straight.
In this movement your left knee will feel more pressure and your body weight is shifted rightwards, so you put more pressure on the right stirrup.
Now your pony is prepared. Give the rein cue (move your fist to the right side of the pony’s neck) – see neck reining.
The pony will feel the squeeze of the reins on its left side of the neck and try to draw aside.
During this maneuver, your legs embrace the pony’s barrel, they transfer impulse and weight
aids to the pony’s body.

And powerfully jumps out after the turn


Finalizing of the turn

End of the turn

Treat the Horse’s Strengths and resources with Care
Out of respect to the pony and to ensure safety during the game, you should always be anxious to ride as correctly as possible and to intensively practice riding skills. Always keep in mind: These ponies shall be used for this sport for as long as possible. The basis for a healthy, long-living pony is found in its breeding, rearing, training and keeping.
Both the pony’s owner and the horseman are responsible for acting in terms of animal welfare and to sustain the pony’s health, motivation and enthusiasm for the game. The pony’s strength should always be treated with care. Experienced polo players will be anxious to involve their teammates into their play by planning ahead and making far-sighted use of the speed of the ball. If you pay heed to these factors you will be on the best path to becoming a good team player and a real horseman.
Of course, horsemanship also requires profound knowledge about the keeping, maintenance and training of ponies. The aesthetic of this sport is chiefly down to subtle riding. Take your time and watch professional players and compare their riding styles. Graceful are those riders who control their pony without apparent aids. They are able to turn their pony with ease on its hindquarters on the smallest spots and then immediately stretch it and gallop along the field at high speed in an oftentimes exciting chase after the ball.


