4 minute read
KIDS & EDUCATION

by Camy Reynolds
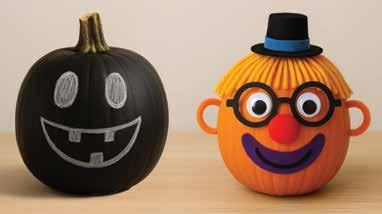
Chalkboard Pumpkin
Pumpkin (real or artificial)
Black chalkboard paint (or spray paint version)
Paintbrush or foam brush (if not spraying)
Chalk (regular or colored)
Damp cloth or eraser
Give your pumpkins a playful twist this year with easy, kid-friendly decorating ideas that make holiday prep as fun as the festivities themselves.
Around The House Pumpkin
Choose Your Pumpkin: Pick one with a flat side so decorations will stick better. Wipe it clean and dry.
Plan the Face: Before gluing, lay out googly eyes, a pom-pom nose, and a felt mouth to see how it looks. Move pieces around until you like the expression.
Choose Your Pumpkin: Pick a pumpkin with a smooth surface. The smoother it is, the easier it will be to write and draw on.
Prep the Surface: Wipe the pumpkin clean and dry. If it has a glossy finish, lightly sand it so the paint sticks better.
Apply the Chalkboard Paint: Brush or spray on a thin, even coat of chalkboard paint. Let it dry completely (usually 1–2 hours). Apply a second coat for solid coverage.
Cure the Surface: Once dry, rub a piece of chalk sideways all over the pumpkin, then wipe it off. This “seasons” the paint so drawings erase cleanly.
Decorate & Redecorate! Use chalk to draw faces, doodles, or messages. Wipe off with a damp cloth and start over as many times as you like.
Variations
Use colored chalk for extra fun.
Add stripes or shapes by taping off sections before painting.
Write countdowns like “Days Until Halloween!”
Attach the Eyes: Glue on googly eyes or buttons. For a silly look, try different-sized eyes or place them crooked.
Make the Nose: Use a pom-pom, bead, or rolledup piece of felt. Glue it in the center under the eyes.
Add a Mouth: Cut a smile, frown, or silly teeth from felt/foam. Glue below the nose.
Create Hair or Accessories: Glue yarn, feathers, or pipe cleaners on top for crazy hair. Bend pipe cleaners into mustaches, glasses, or whiskers. Add a little hat, bow, or crown for extra fun.
Final Touches: Use paint pens or markers to add freckles, eyebrows, or rosy cheeks.
Let It Dry: Give the glue time to set before moving the pumpkin.
Variations
Animal Faces: Cat with pipe cleaner whiskers, dog with felt ears, or owl with big button eyes.
Silly Monsters: Add multiple eyes, zig-zag mouths, and wild pipe cleaner “antennae.”
People Faces: Yarn hair, pom-pom noses, paper glasses, even mini hats.

Cut the top or bottom with a serrated knife and scoop seeds and pulp until the inside walls are fairly smooth and thin (~ 1 inch thick).
With washable marker, draw dots or outlines—simple shapes (hearts, stars, circles) or patterns (spirals, constellations, nature).
Choose Drill Bits: Small bits = pinprick twinkle lights • Larger bits = bold circles of light. Mix sizes for visual interest.
Place pumpkin on a steady surface, hold the drill straight and gently press through at each marked spot. Wipe pumpkin skin clean as you go (it may become damp or slippery).
Drilled Pumpkin
Create Patterns: For geometric: evenly spaced rows or spirals. For nature-inspired: outline a leaf or flower with drilled holes. For freestyle: random dots give a starry night look.
Light It Up: Place a candle or LED light inside. For brighter glow, cluster multiple battery tea lights or use a string of fairy lights.
Display: Turn off surrounding lights to really see the glowing patterns. Perfect for walkways, porches, or as a table centerpiece.
Variations
Use painter’s tape: Stick tape to the pumpkin, draw your design on it, then drill through. When you peel it off, the pumpkin looks cleaner.
Colored light: Try LED lights in orange, purple, or green for extra Halloween flair.
Double-layer pattern: Drill larger holes first, then fill the spaces with tiny pinholes for depth.
Shaving Cream Ghost Pumpkin
Small pumpkin (white works best, but any color will do)
Foaming shaving cream
Bowl or tray (for the mess!)
Plastic spoon or Popsicle stick
Black construction paper, felt, or googly eyes
Glue or tape
Prepare the Pumpkin: Wipe pumpkin clean and dry. Place on a tray or plate for easy cleanup.
Make the Foam “Ghost” Coating: Spray shaving cream into a bowl. Kids can stir with a spoon or stick for extra fluff.
Cover: Spread the shaving cream all over the pumpkin to create a ghostly, puffy look. (The mess is part of the fun!)
Add the Face: Stick on googly eyes, or cut out big oval eyes and a mouth from black paper/felt. Lightly press them into the shaving cream so they stay in place.
Optional Sparkle: Sprinkle glitter on top while the shaving cream is still wet for a magical ghost effect.
Display & Play: Let kids admire their ghost pumpkin!
Note: shaving cream will dry out in a day or two, so this is more of a temporary, sensory project than a long-lasting decoration.