Daewoo 1760XL D430 Engine Workshop Manual For Daewoo 1760XL Skid Steer Loaders with D430 Diesel Engine Daewoo D430 Engine Parts Contact: Email: EngineParts@HeavyEquipmentRestorationParts.com Phone: 269 673 1638 Website: www.HeavyEquipmentRestorationParts.com Alternate email: engineparts2@gmail.com

Engine Identification www.HeavyEquipmentRestorationParts.com Email: EngineParts@HeavyEquipmentRestorationParts.com Alternate email: engineparts2@gmail.com
Important Safety Information
Most accidents involving product operation, maintenance and repair are caused by failure to observe basic safety rules or precautions. An accident can often be avoided by recognizing potentially hazardous situations before an accident occurs. Aperson must be alert to potential hazards. This person should also have the necessary training, skills and tools to perform these functions properly.
Improper operation, Iubrication, maintenance or repair of this product can be dangerous and could result in injury or death.
Do not operate or perform any Iubrication, maintenance or repair on this product, until you have read and understood the operation, Iubrication, maintenance and repair information.
Safety precautions and warnings are provided in this manual and on the product. If these hazard warnings are not heeded, bodily injury or death could occur to you or other persons.
The hazards are identified by the "Safety Alert Symbol" and followed by a "Signal Word" such as "WARNING" as shown below.
WARNING
The meaning of this safety alert symbol is as follows :
Attention! Become Alert! Your Safety is Involved.
The Message that appears under the warning, explaining the hazard, can be either written or pictorially presented.
Operations that may cause product damage are identified by NOTICE labels on the product and in this publication.
DOOSAN cannot anticipate every possible circumstance that might involve a potential hazard. The warnings in this publication and on the product are therefore not all inclusive. If a tool, procedure, work method or operating technique not specifically recommended by DOOSAN is used, you must satisfy yourself that it is safe for you and others. You should also ensure that the product will not be damaged or made unsafe by the operation, Iubrication, maintenance or repair procedures you choose.
The information, specifications, and illustrations in this publication are on the basis of information available at the time it was written. The specifications, torques, pressures, measurements, adjustments, illustrations, and other items can change at any time. These changes can affect the service given to the product.
Obtain the complete and most current information before starting any job. DAEWOO dealers have the most current information available.
Vehicle Systems Specifications
1
Index Engine
Engine Disassembly..................................................5
Inspection and Repair.............................................10
Cylinder Head Inspection...................................10
Replacing Combustion Chamber Insert.............10
Valve Spring Inspection.....................................10
Valve Inspection.................................................11
Valve Stem and Guide Inspection......................11
Replacing Valve Guide.......................................11
Valve Seat Inspection and Refacing .................12
Checking Contact between Valve and Valve Seat ...12
Rocker Arm and Shaft Inspection......................12
Cylinder Block Inspection...................................13
Liner Inspection..................................................13
Checking Piston Clearance................................14
Piston and Piston Ring Inspection.....................14
Checking Piston Pin and Bush..........................14
Checking Connecting Rod Alignment................15
Crankshaft and Bearing Inspection....................15
Camshaft Inspection..........................................16
Checking Idlegear and Spindle..........................17
Checking Tappet and Guide Clearance.............17
Checking Push Rod...........................................17
Cylinder Liner Repalcement .............................18
D430
Index
Diseel Engine
System Lubricating Circuit ..................................................28 Oil Pump ................................................................29 Oil Pressure Relief Valve .......................................31 Oil Pressure Switch ................................................31 Checking Oil Pressure ...........................................31 Oil Filter ..................................................................32 Cooling System Cooling Circuit.........................................................33 Antifreeze Solution..................................................34 Radiator Inspection.................................................34 Thermostat..............................................................34 Water Pump.............................................................35 “V” Belt and Tension Adjustment.............................37 Fuel System Fuel Flow System....................................................38 Fuel Filter................................................................38 Fuel Injection Pump.................................................38 Magnet Valve...........................................................44 Fuel Injection
Electrical System Summary.................................................................48 Trouble Shooting.....................................................49 Alternator.................................................................50 Starting Motor..........................................................53 Glow Plug................................................................58 Glow Plug Relay......................................................58 Technical Data.........................................................59 Technical Data ..............................................59 3
Engine Assembly ....................................................19 Engine Installation ..................................................27 Checking Compression Pressure ...........................27 Lubrication
Nozzles.............................................45
Daewoo D430 Engine
Engine Disassembly
Disassemble the engine following the order numbered in Figs. 1-4, 1-5, 1-6 and 1-7.
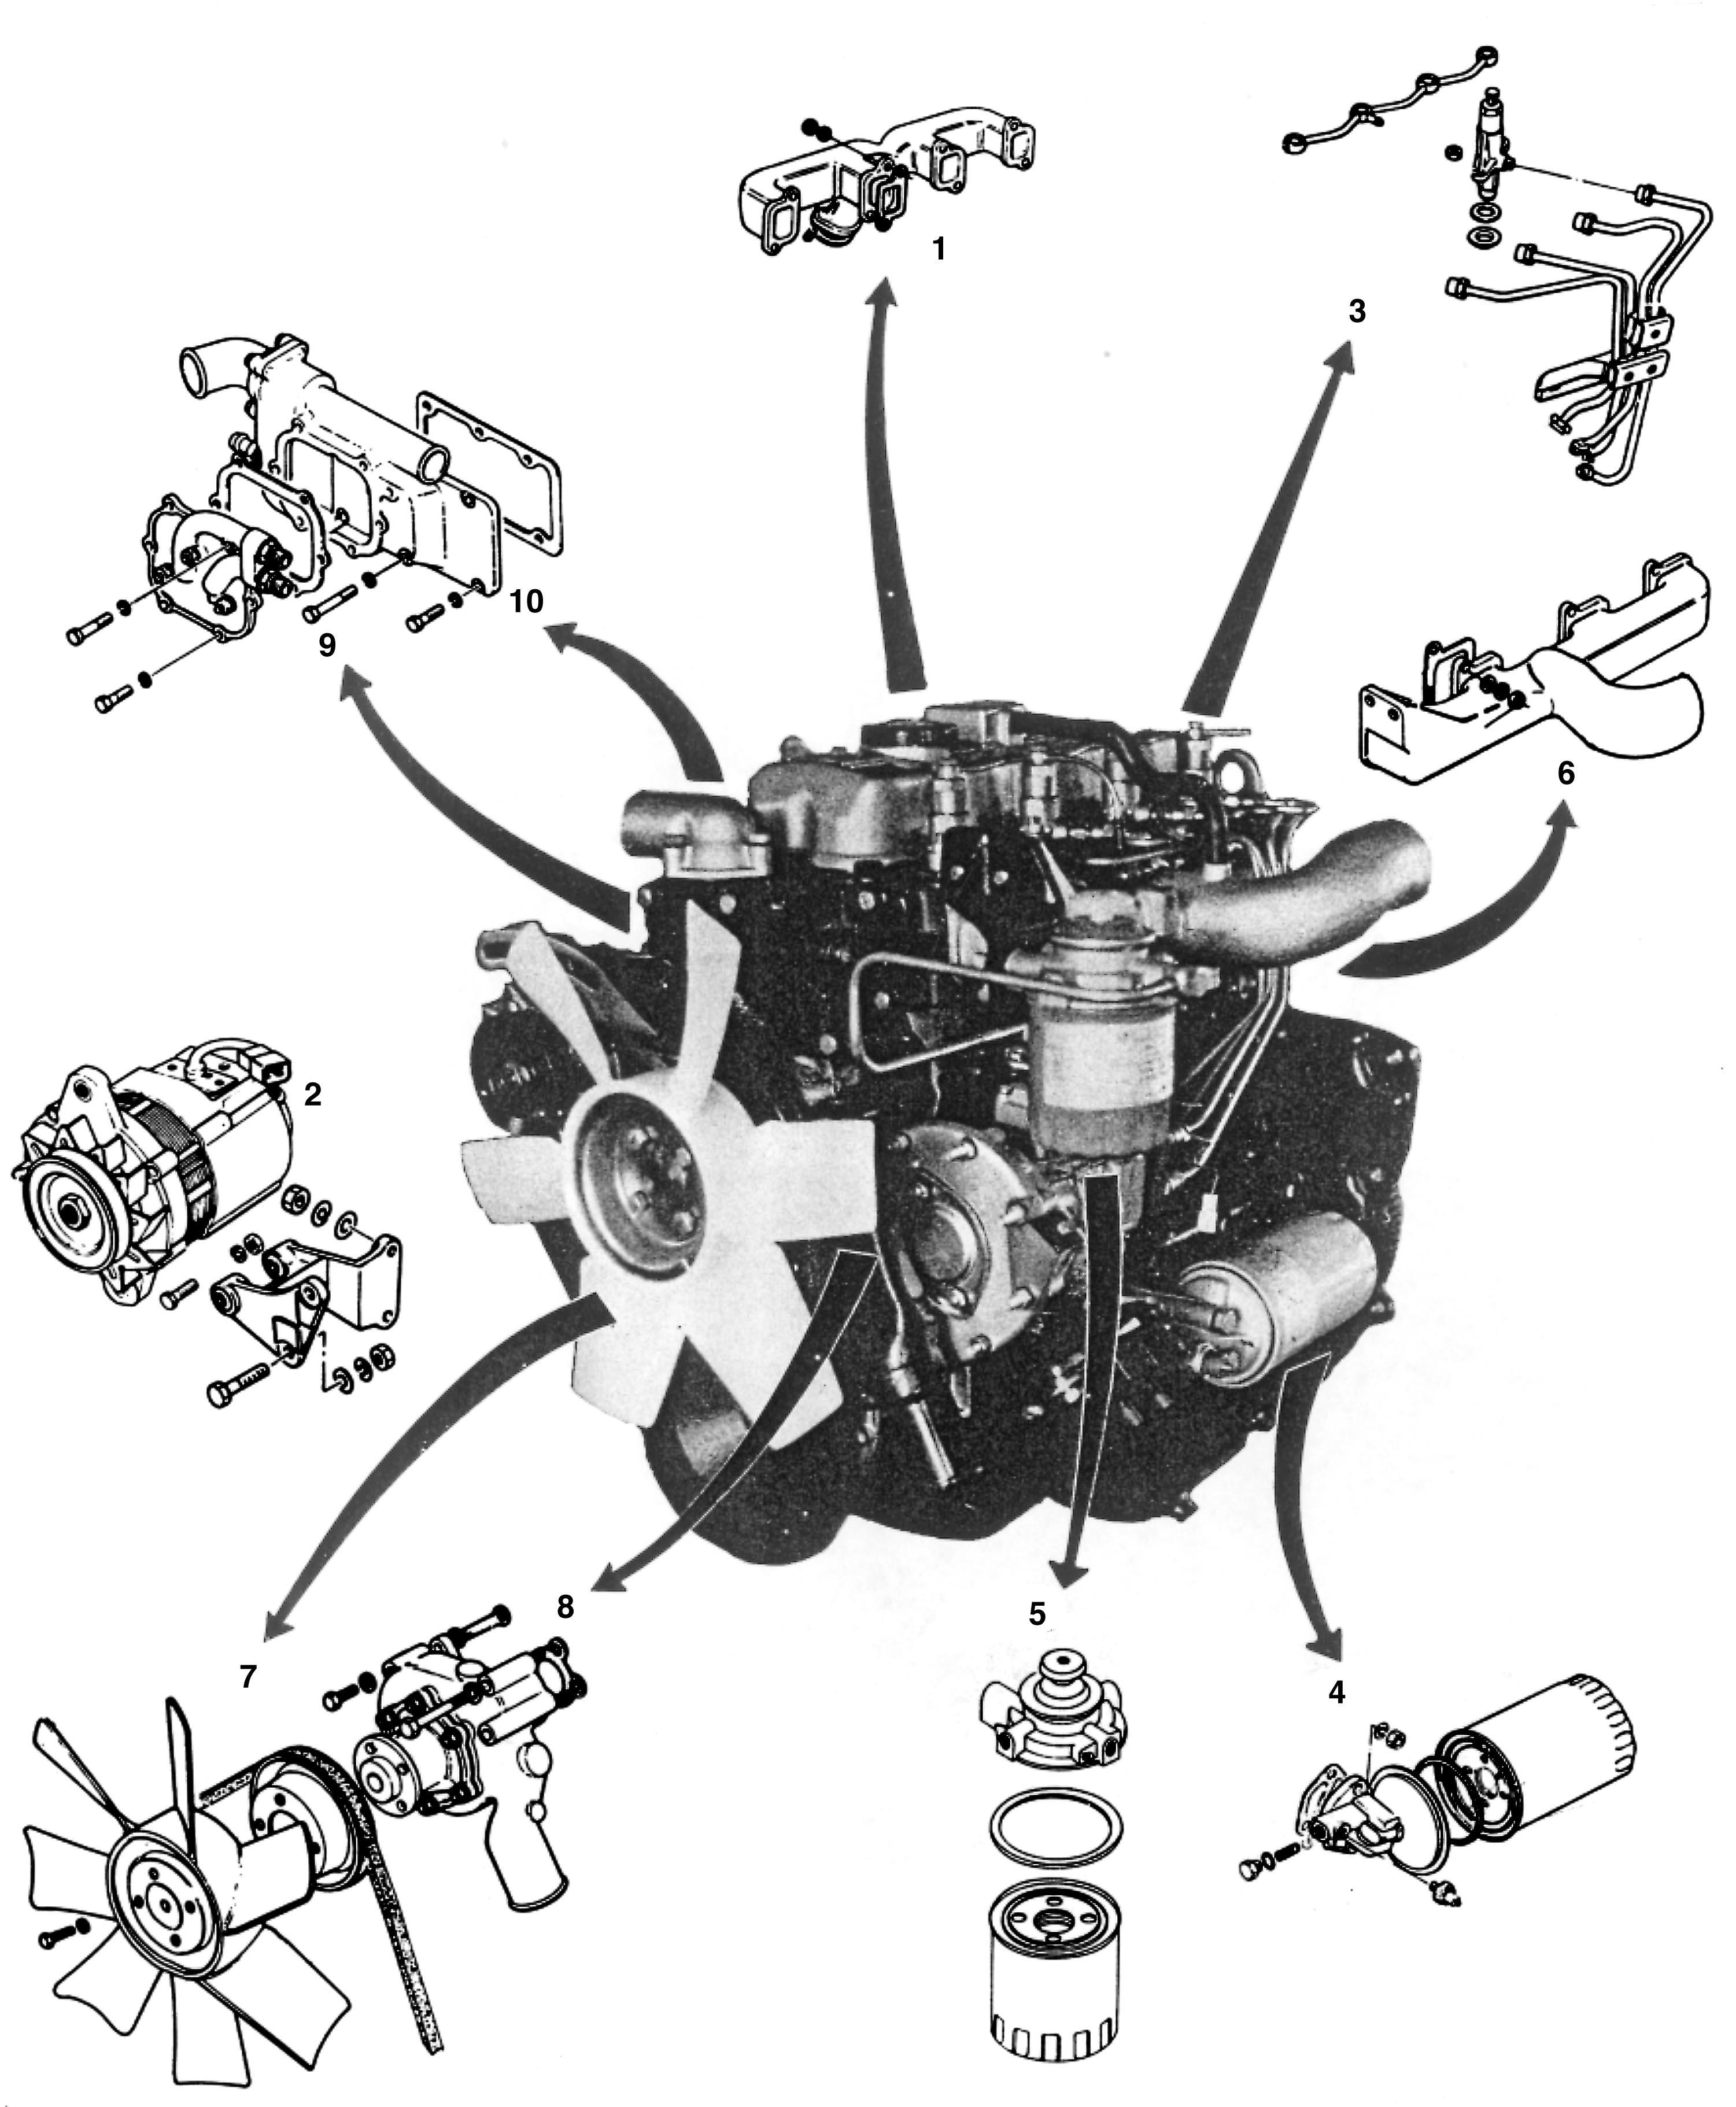
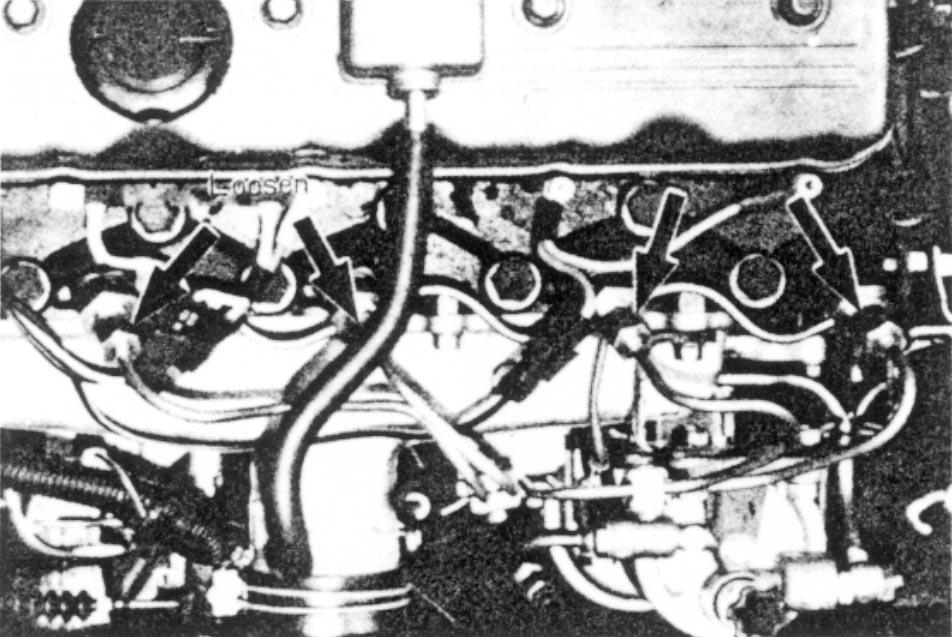
Fig.1-4 Daewoo D430 engine parts contact: engineparts2@gmail.com
(1)Exhaust manifold. (2) Alternator/bracket. (3) Injection pipe/nozzle holder/fuel leak pipe. (4) Oil filter. (5)Fuel filter/separate mount on frame. (6) Intake manifold. (7) Cooling fan/belt/pulley assembly. (8) Water pump assembly (9)Oil cooler assembly. (10) Thermostat housing assembly
D430 Diesel Engine Engine 5
Fig.1-5
(12)Hose band. (13) Bleeder hose. (14) Bolt/seal washer. (15) Rocker arm cover/gasket. (16) Cylinder head bolt/washer. (17)Rocker arm assembly. (18) Push rod. (19) Cylinder head bolt/washer. (20) Cylinder head. (21) Head gasket. (22) Cotter. (23)Valve spring upper seat. (24) Oil deflector. (25) Valve spring outer. (26) Valve spring inner. (27) Valve spring lower seat. (28)IN./EX. Valve. (29) Valve Cap.
NOTE : Identify parts as they are removed to ensure reinstallation in original position.
D430 Diesel Engine Engine 6
Daewoo D430 engine parts contact: engineparts2@gmail.com
(29)Crank pulley lock bolt. (30) Crank pulley. (31) Timing gear cover. (32) Oil deflector. (34) Crank shaft gear. (35) Nut. (36) Nut. (37)Idle gear thrust plate. (38) Idle gear. (39) Injection pump drive gear. (40) Idle gear spindle. (44) Bolt. (45) Washer. (46)Flywheel. (47) Bolt/washer. (48) Flywheel housing. (49) Bolt/washer. (50) Seal. (51) Oil pan. (52) Gasket.
D430 Diesel Engine Engine 7
Daewoo
Fig.1-6
D430 engine parts contact: engineparts2@gmail.com
(54)Bolt/washer. (55) Rear oil seal assembly. (56) Gasket. (57) Bolt/washer. (58) Oil pump lock screw/nut. (59) Oil pump assembly. (60)Bolt/washer. (61) Cam shaft/gear assembly. (62) Bolt/washer. (63) Timing gear case. (64) Gasket. (65) Tappet. (66)Connecting rod cap/bearing/bolt/nut. (67) Piston/connecting rod assembly. (68) Main bearing cap bolt. (69) Main bearing cap. (70)Main bearing/thrust bearing. (71) Crank shaft. (72) Main bearing/thrust bearing.
D430 Diesel Engine Engine 8
Fig.1-7 Daewoo D430 engine parts contact: engineparts2@gmail.com
Fig.1-8
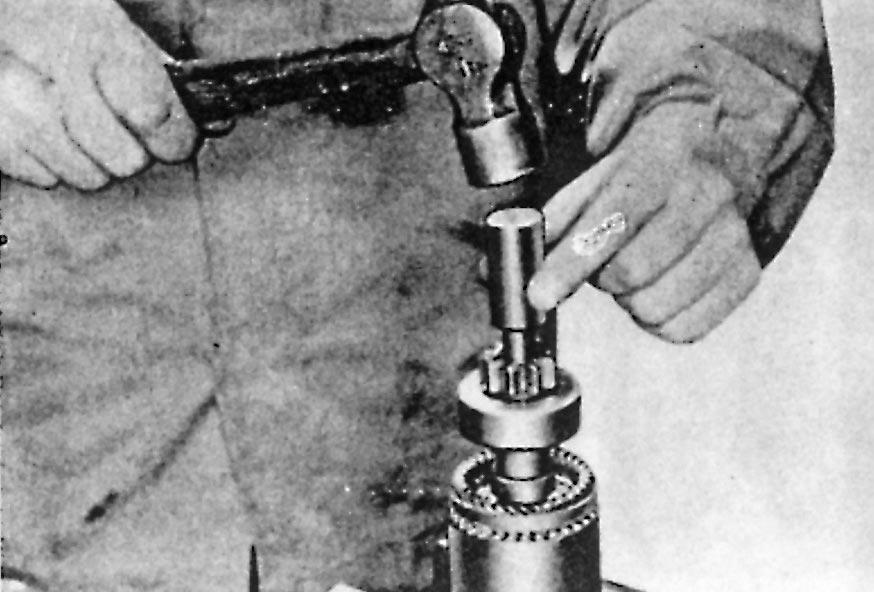
Remove the injection pump gear, using the gear puller
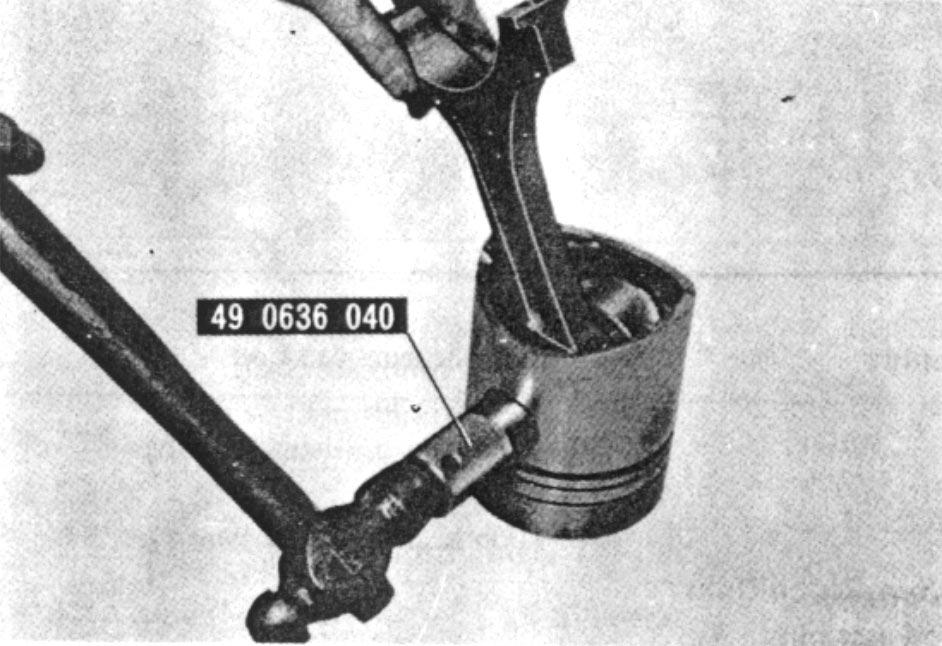

Fig.1-11
Remove the piston pin by using the piston pin installer
Fig.1-9


Remove the crank shaft pulley, pressure plate and flywheel by using the ring gear brake
Fig.1-10
Loosen the lock screw of oil pump and remove the oil pump.
Remove the camshaft and gear.
D430 Diesel Engine Engine
9
Valve Spring


D430 Diesel Engine Engine
Repair
Inspection and
Daewoo D430 Replacing Combustion Chamber Insert
Press out the insert with a suitable mandrel.
Cylinder Head Inspection Check for cylinder head distortion. If the distortion exceeds limit replace the head. Max. permissible distortion A, B.................................................0.1 mm (0.004 in) C,D,E,F.........................................0.25 mm (0.010 in)
1.
2. Locate new insert on the cylinder head as shown in Fig. 114 with the welch washer which fits in a recess provided. 3. Secure the insert by means of expansion the welch washer.
10
Daewoo D430 engine parts contact: engineparts2@gmail.com
Inspection Examine the springs for corrosion or acid etching. If it is severe, replace with new ones. Check the springs and replace with new ones if the free length is decreased more than the following dimension. Fig.1-14
Fig.1-16 Fig.1-15 Fig.1-12 Fig.1-13
Inner SpringOuter Spring

Limit42.0mm (1.653in)43.6mm (1.715 in)
Standard Dimension44.1mm (1.736in)45.9mm (1.807 in)
Valve Stem and Guide Inspection
Fig.1-17
Out of squareness should be less than 3 mm. per 100 mm (0.03 in per 1.00 in).
Daewoo D430
Intake Valve Inspection Exhaust Valve Inspection
Fig.1-18
Inspect all valves for warpage, cracks or excessive burning and replace if any of these conditions is found.
Replace any worn, pitted or corroded valves that cannot be cleaned or refaced.

Measure the stem diameter. If the wear exceeds limit, replace the valve.
Standard:
IN. 7.925 ~ 7.950 mm (0.3120 ~ 0.3130 in)
EX. 7.912 ~ 7.937 mm (0.3115 ~ 0.3125 in)
Limit:
IN. 7.880 mm (0.3102 in)
EX. 7.867 mm (0.3097 in)
Fig.1-19
Check the clearance with a suitably mounted dial indicator, or feel the clearance by moving the valve stem back and forth.
Standard:
IN. 0.046 ~ 0.096 mm (0.0018 ~ 0.0038 in)
EX. 0.059~ 0.109 mm (0.0023 ~ 0.0043 in) Limit; 0.127 mm (0.0050 in)
Replacing Valve Guide

Fig.1-20
1. Press out the guide with the valve guide remover.
2. Press fit a new guide to the cylinder head, using the valve guide remover and adaptor until the adaptor comes in contact with the cylinder head.
D430 Diesel
Engine
Engine
11
Fig 1-21
If the adaptor is not available, take care the distance shown in Fig. 1-21 to be 16.5 mm (0.65 in).
Valve Seat Inspection and Refacing
Checking Contact between Valve and Valve Seat
Fig.1-22
Inspect the valve seats for cracks, burns, ridges of improper angle and width. When necessary to reface the valve seat, use a valve seat grinder or a valve seat cutter and grind to the specified angle as shown in Fig. 1-23.

NOTE: If the valve guides are to be replaced, this must be done before refacing the valve seat.
Fig 1-23
An even transfer indicates accurate valve and valve seat refacing. If uneven, the valve must be lapped into the valve seat using a suitable lapping compound. Next, check its width with a seat width scale or a steel scale placed across the face of the valve seat.

Rocker Arm and Shaft Inspection
Make sure that the oil passage of the rocker arm shaft is open.
Fig.1-24
1. Check the clearance between the rocker arm bore and shaft. If it is more than specification, replace the rocker arm bush or shaft.
Standard: 0.016 ~ 0.061 mm (0.0006 ~ 0.0024 in)
Limit: 0.070 mm (0.0028 in)
D430 Diesel Engine Engine
12
Fig.1-25
2. To replace the rocker arm bush, proceed as follows:
1)Press out the old bush with a suitable mandrel.
2)Press fit the new bush, being sure to align the oil holes of the bush and rocker arm.
3)Finish the bush with a reamer or pin hole grinder to the correct fit.
Cylinder Block Inspection

Liner Inspection
Fig.1-27
Check the cylinder liner bores for wear, scratching and waveness. Measure the diameter of the cylinder liner bore by using a cylinder gauge as shown in Fig. 1-27.

Fig.1-26

Examine the cylinder block for crack and any damage. Examine all machined surfaces of the block for burrs and scores.
Check for cylinder block distortion in the same way as instructed in Cylinder head inspection.
Fig.1-28

This measurement should be taken in the X-X direction and the Y-Ydirection at each of the 3 places, upper, middle and lower, of one cylinder liner, as shown in Fig. 1-28. The difference between the minimum and maximum values out of the 6 measured values is regarded as the amount of wear. If the wear of cylinder liner bore is 0.20 mm (0.008 in) or more, it should be replaced.
NOTE: Honing and reboring cannot be made on this cylinder liner.
D430 Diesel Engine Engine
13
Daewoo D430 Engine Parts Contact: Email: EngineParts@HeavyEquipmentRestorationParts.com Phone: 269 673 1638 Website: www.HeavyEquipmentRestorationParts.com
Checking Piston Clearance
Fig.1-29
Check the clearance between each piston and cylinder by measuring the diameter of the piston and cylinder bore. Refer to Liner Inspection for the bore measurement procedure. Measure the piston diameter at 90 degrees to the pin bore axis and 58.4 mm (2.299 in) below the piston top. If it is excessive the piston or liner must be replaced.


Standard: 0.187 ~ 0.212 mm (0.0074 ~ 0.0084 in)
Daewoo D430 Piston and Piston Rings Inspection
Fig.1-31 Fig.1-32 Fig.1-30

3. Place the piston in the cylinder bore below the ring travel, using a piston head to push the ring in sequarely.

Check the piston ring end gap.
If it exceeds limit, the piston ring must be replaced.
Limit: 1.5 mm (0.06 in)
Checking Piston Pin and Bush
1. Check to see that the fir of the bush and piston pin is 0.014~0.044 mm (0.001~0.002 in).
If it exceeds limit, the bush or piston pin must be replaced.
Limit: 0.05 mm (0.0020 in)
1. Carefully inspect the piston and replace if it is severely scored, scrached burned.
2. Check the side clearance of the piston rings at several places. If it exceeds limit, replace the piston ring or piston.
Standard: 0.050 ~ 0.096 mm (0.0020 ~ 0.0038 in)
Limit: 0.3 mm (0.012 in)
D430 Diesel Engine Engine
14
D430 engine parts contact: engineparts2@gmail.com
Fig.1-33
2. To replace the bush, proceed as follows:
1)Press out the old bush with a suitable mandrel.
2)Press fit the new bush, being sure to align the holes of the bush and connecting rod.
3)Finish the bush with a reamer or a pin hole grinder to the correct fit.
Checking Connecting Rod Alignment
Daewoo
Bearing housing mark
D430 Cranshaft

Inspection
Man journal Bearing Bearing ColorDiameter color clearance
Green 75.812~75.819mm Green 0.061~0.087mm “A” (2.9847~2.9850in) (0.0024~0.0034in)
Mark White 75.819~75.825mm Yellow 0.065~0.090mm (2.9850~2.9852in) (0.0026~0.0035in)
Green 75.812~75.819mm Brown 0.060~0.086mm No (2.9847~2.9850in)(0.0024~0.0034in)
mark White 75.819~75.825mm Green 0.065~0.090mm (2.9850~2.9852in) (0.0025~0.0035in)
Green 75.812~75.819mm Black 0.059~0.085mm “C” (2.9847~2.9850in)(0.0023~0.0033in) Mark White 75.819~75.825mm Brown 0.063~0.087mm (2.9850~2.9852in)(0.0025~0.0034in)
1. Inspect the bearings carefully and replace if they are worn, scored or flacked.
The standard main bearing, main journal and bearing housing are classified into several groups.
To obtain the accurate main bearing clearance, the combination of those related parts should be made properly, referring to the table.
Fig.1-34
Check the connecting rod alignment by using a feeler gauge and an aligner. The standard deflection is less than 0.05 mm per 100 mm (0.0020 in per 4 in). If realignment is necessary, correct by using a press and applying a gradual pressure to the rod.

Fig.1-35
2. Measure the diameter of each crankpin and main journal. If the wear exceeds limit, the crankshaft should be ground to the under size of 0.254 mm (0.01 in) or replaced.
NOTE: The undersize connecting rod and main journal bearings are 0.254 mm (0.01 in) only.
CrankpinMain journalWear diameter (STD)diameter (STD)Limit 61.112~61.225 mm75.812~75.825 mm0.05 mm (2.4060~2.4065 in)(2.9847~2.9852 in)(0.002 in)
D430 Diesel Engine Engine
15
Fig.1-36 Fig.1-38
3. Check the crankshaft run-out. If it is not within the specification, correct with a press or replace.
Max. allowable run-out0.05 mm (0.002 in)

Camshaft Inspection


2. Measure the diameters of the camshaft journals. The permissible diameters of the journals are in the following table.
Permissible Diameter
FrontNo. 151.902 mm (2.0434 in) No. 251.652 mm (2.0336 in) No. 351.402 mm (2.0237 in) RearNo. 451.152 mm (2.0139 in)
Standard clearance: 0.06~0.12 mm (0.0024~0.0047 in)
Fig.1-37 Fig.1-39
1. Measure the cam height and replace the camshaft if the wear exceeds limit.
Inlet and Exhaustt

Standard Limit
Camheight 42.587 mm42.485 mm (1.6767 in)(1.6728 in)
3. Check the camshaft run-out with a dial-indicator.
If it is not within specification, correct with a press or replace.
Max. allowable run-out0.08 mm (0.0031 in)
D430 Diesel Engine Engine
16
Fig.1-40
4. Check the end play with a feeler gauge.
The permissible limit of end play is 0.3 mm (0.012 in).
Checking Idle Gear and Spindle
Checking Tappet and Guide Clearance
Fig.1-41
Check for chipped, worn or broken teeth.
Check the clearance between the spindle. If it exceeds limit, replace the spindle or gear.


Standard: 0.034~0.084 mm (0.0013~0.0033 in)
Limit: 0.15 mm (0.006 in)
Fig.1-42
The standard tappet and guide clearance is 0.039~0.095 mm (0.0015~0.0037 in).

Replace if the contact surface of the tappet with the cam is worn abnormally.
Checking Push Rod
Fig.1-43
To check the push rod for bend, place the push rod on the surface plate and determine the clearance between the push rod and surface plate with a feeler gauge. If it exceeds 0.19 mm (0.007 in), repair or replace with a new one.

D430 Diesel Engine Engine
17
Cylinder Liner Replacement
Removal:
1. Use the liner remover and press out the liner.
2. Check the cylinder block bore for any scratches.

NOTE: Remove the scratches by oil soaked fine emery paper for proper installation liner.
Installation:
1. Press fit liner straight with the same tool, taking special care so as not to distort the liner.
NOTE:
1)New liner supplied as spare parts should be installed with lighter pressure than the removing.
2)There is no necessary to hone the cylinder liner bore after installation.
D430 Diesel
Engine
Engine
18
Fig.1-44 Fig.1-45 Press Press D430 engine parts contact: engineparts2@gmail.com
Engine Assembly
Assemble the engine following the order numbered in Figs. 1-46, 1-47, 1-48 and 1-49.
(1)Piston pin. (2) Clip. (3) Piston ring. (4) Piston/connecting rod assembly. (5) Connecting rod bearing. (6) Tappet. (7)Main bearing/thrust bearing. (8) Crank shaft. (9) Main bearing cap. (11) Cap bolt. (12) Connecting rod bearing/cap/bolt/nut. (13)Idle gear spindle. (14) Gasket. (15) Timing gear case. (16) Bolt/washer. (17) Camshaft/gear assembly. (18) Bolt/washer. (19)Gasket. (20) Rear oil seal assembly. (21) Bolt/washer. (22) Gasket. (23) Oil pump assembly. (24) Bolt/washer. (25)Lock bolt/nut.
D430 Diesel Engine Engine 19
Fig.1-46 D430 engine parts contact: engineparts2@gmail.com
(26)Crank shaft gear. (27) Injection pump drive gear. (28) Idle gear. (29) Idle gear thrust plate. (30) Nut. (31) Nut. (32)Oil deflector. (33) Gasket. (34) Timing gear cover. (35) Gasket. (36) Oil pan gasket. (37) Oil pan. (39) Bolt/washer. (40)End plate. (41) Bolt/washer. (42) Flywheel. (43) washer. (44) Bolt. (49) Crank pulley. (50) Bolt.
Fig.1-47 D430 engine parts contact: engineparts2@gmail.com
D430 Diesel Engine Engine 20
Fig.1-48
D430 Diesel Engine Engine 21
(51)Valve/spring assembly. (52) Head gasket. (53) Cylinder head. (54) Push rod. (55) Rocker arm assembly. (56)Cylinder head bolt/washer. (57) Cylinder head bolt/washer. (58) Rocker arm cover/gasket. (59) Bolt/seal washer. (60)Bleeder hose. (61) Hose band. D430 engine parts contact: engineparts2@gmail.com
Fig.1-49

D430 Diesel Engine Engine 22
(62)Water pump assembly. (63) Thermostat casing assembly. (64) Oil cooler assembly. (65) Intake manifold. (66)Fuel filter assembly. (67) Oil filter/oil pipe. (68) Injection pipe/nozzle holder/fuel leak pipe. (69) Cooling fan/“V” belt/fan pulley. (70)Alternator/bracket. (72) Exhaust manifold. D430 engine parts contact: engineparts2@gmail.com
Fig.1-50
Assemble the piston and connecting rod. Align the direction, piston and connecting rod as shown in Fig. 1-50.


Fig.1-53
Place the piston rings at about 90°apart as shown in Fig. 1-53.

Fig.1-51
Insert the piston pin with the installer . Preheat the piston, if tightly.
Fig.1-52
Install the piston rings with the inscription mark upward.
Fig.1-54
Install the piston and connecting rod assembly by using the suitable piston guide.
NOTE: “F” mark of piston top should be faced front.
Fig.1-55

Install the main bearing and thrust washer.
NOTE: Fit the thrust washer with a oil groove facing outward.
Install the crankshaft and bearing cap.
D430 Diesel Engine Engine
23
Fig.1-56
Checking main bearing oil clearance.
1)Place the “plastigauge” on the main journal in the axial direction.
2)Tighten the cap bolts to 11.0~11.7 kg•m (80~85 lb•ft).
NOTE: Do not turn the crankshaft.
Compare the flattened width of “Plastigauge” with measuring scale to determine the oil clearance.
Oil clearance: New...........0.059~0.090 mm (0.0023~0.0035 in) Limit.....................................0.12 mm (0.0047 in)
Fig.1-58
Install the caps to the connecting rods, ensuring that the identification numbers are matched.


NOTE: After tightening the nut turn the crankshaft and make sure that the rotation is light and smooth.
Fig.1-57
Check the crankshaft end play.
Check the end play with a dial indicator or a feeler gauge. If it exceeds limit, use oversized thrust washer.
Standard: 0.14~0.39 mm (0.006~0.015 in)

Limit: 0.4 mm (0.016 in)
Oversized thrust washer: 0.178 mm (0.007 in)

Fig.1-59
Check the connecting rod oil clearance in the same manner for the main bearing.
Tightening torque of bearing caps ......................................7.6~8.3 kg•m (55~60 lb•ft)
Oil clearance New..........0.036~0.076 mm (0.0014~0.0030 in) Limit....................................0.10 mm (0.0039 in)
D430
Diesel Engine Engine
24
Fig.1-60
Check the connecting rod side play with a dialindicator or feeler gauge.
Standard: 0.239~0.330 mm (0.009~0.013 in)
Limit: 0.4 mm (0.016 in)
Fig.1-61
Check the piston height.
When the piston has been replaced with new one, the distance between the cylinder block face and piston crown should be checked to ensure the limit of -0.05~-0.15 mm (-0.002~-0.006 in), has been maintained when that piston is at top dead center.
Fig.1-62
Install the idle gear spindle, aligning the oil hole.
Fig.1-63
Install the timing gears, aligning the timing marks as shown in Fig. 1-63.


Fig.1-54
Check the timing gears.
Check the backlash with a dial-indicator or a feeler gauge.
If it exceeds limit, replace with new one.
Standard: 0.1~0.2 mm (0.004~0.008 in)
Limit: 0.3 mm (0.012 in)
D430 Diesel Engine Engine
25
Fig.1-65
Check the idle gear end play with a feeler gauge.
Standard: 0.15~0.30 mm (0.006~0.012 in)
Fig.1-66

Install the timing gear cover. Before tightening the nuts and bolts, install the timing gear cover centering tool (49 0636 245) in the timing gear cover oil seal as shown in Fig. 1-66.


NOTE: It is important that centering tool be used to align the timing gear cover so that crankshaft pulley installation will not damage and to prevent oil seal leak.
Fig.1-67
Cut off the excess gaskets along the mounting surfaces of the oil pan.
Before installing the oil pan, make a final internal inspection.
Apply a thin coat of gasket past on the oil pan.
Install a new gasket and the oil pan.
Fig.1-68
Check the rocker arm offset both of the exhaust and inlet side rocker arms 1 mm (0.04 in) from the valve stem center.
Fig.1-69
Face the flat surface on the ball on each of the rocker arms downward.

D430 Diesel Engine Engine
26
Daewoo D430 Head Bolt Tightening Sequence
Engine Installation


Carry out the removing operations in the reverse order.
Checking Compression Pressure
Tighten the cylinder head bolts to 11.0~11.7 kg•m (80~85 lb•ft) in the order shown in Fig. 1-70.
Tighten the nut of the two stud bolts locating the rocker arm shaft.
Adjust the valve clearance to 0.3 mm (0.012 in) for both inlet and exhaust.
NOTE: Whenever the engine is overhauld, warm up the engine and readjust the valve clearance after tightening the cylinder head bolts to the specified torque.
1. Before measuring the compression pressure, inspect the valve clearance and the functions of the battery and the starting motor.
2. Run the engine until it obtains normal operating temperature.
3. Disconnect the air hose from the inlet manifold.
4. Remove all injection nozzles.
5. Install the adaptor in the nozzle hole.
6. Set the fuel stop lever at stop position.
7. Connect the compression tester on the adaptor, one after the other, and turn the engine over with starting motor until the pressure reaches a maximum value.
Compression pressure:
Standard Limit
30.0 kg/cm2 (427 lb/in2)27.0 kg/cm2 (384 lb/in2) at 200rpm at 200 rpm
Special Tools :
Adaptor, Compression gaugePivot, Valve spring lifter
Puller, Injection pump gearReplacer, Valve guide Installer, Piston pinOil seal replacer, Timing cover Lifter, Valve springCentering tool, Timing cover
D430 Diesel Engine Engine
27
Fig.1-70 Fig.1-71
Lubrication System
Lubricating Circuit
Fig.2-1
1. Oil that has been filtered through the oil filter is forced to the oil cooler and to the main oil gallery and to the main bearings and others through the passages.
2. The cylinder walls, piston pins and bushes are lubricated by splash and oil mist.
3. Oil from the No. 3 main bearing lubricates the oil pump drive shaft and pump driven gear.
4. Oil from the No. 1 camshaft bearing is directed up to the No. 1 rocker arm support through a passage, then passes through inside of the rockers shaft and lubricates rocker arm bush and shaft. Also, oil lubricates the valve stem, and other valve train surface.
D430 Diesel Engine Lubrication System 28
Oil Pump
Disassembling Oil Pump
Fig.2-2
Disassemble the parts in the order numbered above.
29 D430 Diesel Engine Lubrication System
(1)Bolt/washer. (2) Oil pipe. (3) Gasket. (4) Bolt/washer. (5) Oil strainer. (6) Gasket. (7) Bolt/washer. (8)Cover. (9) Drive gear. (10) Rotor/shaft assembly. (11) Outer rotor. (12) Pin. (13) Inner rotor. (14)Drive shaft. (15) Relief valve assembly. Daewoo D430 Engine Parts Contact: Email: EngineParts@HeavyEquipmentRestorationParts.com Phone: 269 673 1638 Website: www.HeavyEquipmentRestorationParts.com
Checking Oil Pump
Fig.2-3
1. Check the clearance between the lobes of the rotors with a feeler gauge.
If the clearance exceeds limit, replace both rotors.
Limit............................................0.3 mm (0.012 in)
Fig.2-5
3. Check the end float of the rotors. Place a straight edge across the pump body and measure the clearance between the rotor and straight edge with a feeler gauge.
Then, place a straight edge across the pump cover and measure the clearance between the straight edge and the cover.
Fig.2-4
2. Check the clearance between the outer rotor and pump body with a feeler gauge.


If the clearance exceeds limit, replace the rotor or pump body.
Limit............................................0.3 mm (0.012 in)
Fig.2-6
If the end float exceeds limit, correct the pump cover by grinding.
Limit .........................................0.15 mm (0.006 in)
D430 Diesel Engine Lubrication System
30
Assembling Oil Pump
Carry out the disassembling operations in the revers order.
Oil Pressure Relief Valve
Oil Pressure Switch
Fig.2-7
When the engine revolution becomes high and excessive oil pressure develops in the system, the relief valve opens to relieve the pressure and to return the excess oil to the oil pan. Thus, the oil pressure maintains within the maximum pressure of 4.0 kg/cm2 (57 lb/in2).
Fig.2-8
Safe minimum pressure is 0.4 kg/cm2 (6 lb/in2) at idle. If the oil pressure drops below 0.4 kg/cm2 (6 lb/in2), the oil pressure warning lamp lights up to indicate some troubles in the lubricating system.
Checking Oil Pressure

Fig.2-9
Warm up the engine to the normal operating temperature. Remove the oil pressure switch and connect the oil pressure gauge (49 0187 280) instead.
The following table shows the normal oil pressure.
Oil pressure:..........................4.0 kg/cm2 (57 lb/in2) at 3,600 rpm. of engine
D430
Lubrication System
Diesel Engine
31
Oil Filter
The filter cartridge should be replaced at intervals, following the maintenance schedule. To replace, proceed as follows:
1. Remove the oil filter cartridge with the suitable wrench.

2. Apply oil onto the oil seal on a new filter cartridge.
3. Position the filter and turn clockwise until the gasket surface contacts sealing surface. Then, give the filter an additional 5/6 turn by hand.
4. Start the engine and check that the joints are not leaking. Top up with oil if necessary.
D430 Diesel Engine Lubrication System
32 Fig.2-10
Cooling System
Cooling Circuit
When the engine gets warm, the coolant flows to the water pump from the outlet in the lower left side of the radiator. After passing through the pump, the coolant is forced to the cylinder block. After cooling off the cylinder block, the coolant circulates in the cylinder head. Then the coolant flows through the thermostat and back into the radiator.
Antifreeze Solution
To prevent freezing, add anti-freeze solution to the water which lowers the freezing point of the coolant. Before adding anti-freeze, inspect the cooling system to be sure it is clean and leaktight.
D430 Diesel Engine Cooling System 33
Fig.3-1
Radiator Inspection
Thermostat

Removing Thermostat
1. Check the pressure cap function. To check, first wet the cap rubber gasket to insure an air tight seal and then attach a tester to the cap. Valve opening pressure 1.0 kg/cm2 (14.2 lb/in2)
2. Inspect the cooling system for leaks.
1)Attach a tester in place of radiator pressure cap.
2)Run the engine until it reaches normal operating temperature.
3)With the engine running and tester installed, pump up the system to approx. 1.0 kg/cm2 (14.2 lb/in2) and observe the gauge.
If pressure drops rapidly, visually inspect all external parts for leaks. If no external leaks appear and pressure continues to drop, inspect the engine oil to determine whether or not coolant is leaking into the crankcase due to a cracked cylinder block or leaking head gasket.
(1)Cover. (2) Gasket. (3) Thermostat


After draining until the coolant level is below the thermostat housing, remove the thermostat following the orders numberd in Fig.3-5.
Checking Thermostat
To test the thermostat, place it in water with a thermometer and heat up the water gradually and check the temperature when the thermostat starts to open and when it opens fully. And also measure the lift height when the thermostat is fully opened. If the reading shows a large difference from the specifications, replace with a new thermostat.
D430 Diesel Engine Cooling System
34
Fig.3-3 Fig.3-5
3 Daewoo D430 Engine Parts Contact: Email: EngineParts@HeavyEquipmentRestorationParts.com Phone: 269 673 1638 Website: www.HeavyEquipmentRestorationParts.com
Fig.3-6 1 2
Fig.3-7
Starts to open82° L 1.5°C (180° L 2.7°F)
Fully opens at95°C (203°F)
Lift 8 mm (0.315 in) or more
Installing Thermostat
Follow the removal procedure in the reverse order. Fill the cooling system. Operate the engine and check for leaks.
Water Pump
Checking Water Pump
Fig.3-8
Check the water pump for leaks and excessive play or looseness of the shaft and bearings. If there is evidence of excessive play when the fan blades are manually moved up and down, it shows that the bearings are rough. If water leaks from the hole located on the pump body, it indicates defective seal necessitating overhaul of the pump.
Removing Water Pump
Fig.3-9
(1)Bolt/washer. (2) Cooling fan. (3) “V”belt. (4) Pulley (5)Nut/washer. (6) Water pump. (7) Gasket.
After draining cooling system, remove the water pump following the order numbered in Fig. 3-9.

D430 Diesel Engine Cooling System
35
Disassembling Daewoo D430 Water Pump
Use puller to remove
Fig.3-10
(1)Nut/washer. (2) Bearing housing. (3) Gasket. (4) Pulley boss. (5) Snap ring. (6) Shaft, spacer/bearing assembly. (7) Impeller. (8)Seal assembly. (9) Bearing. (10) Spacer. (11) Bearing. (12) Baffle plate. (13) Dust seal. (14)Snap ring.
Disassemble the parts in the order numbered above.
D430 Diesel
Cooling System
Engine
36
D430 engine parts contact: engineparts2@gmail.com
Assembling Water Pump
“V” Belt and Tension Adjustment
Fig.3-11
Assemble the water pump in the reverse order of disassembling, take care the cautions in Fig. 3-11.
Installing Water Pump
Install the water pump in the reverse order of removing.
NOTE:
1)Adjust the belt tension, as discribed in ‘V’Belt and tension adjustment.

b)Fill the cooling system. Operate the engine and check for leaks.
Fig.3-12
1. If the belt is broken, glazed, or worn, replace the belt with a new one. If the belt is stretched so that it cannot be tightened sufficiently, install a new belt.
2. If the belt is noisy, check the tension of the belt. Also, check for misaligned pulleys.
3. When the belt is pressed down with 10 kg (22 lb) force, the belt should deflect the specified amount.
For new belt10~13 mm (0.4~0.5 in) For used belt13~16 mm (0.5~0.6 in)
D430 Diesel Engine Cooling System
37
Daewoo D430 Engine Parts Contact: Email: EngineParts@HeavyEquipmentRestorationParts.com Phone: 269 673 1638 Website: www.HeavyEquipmentRestorationParts.com
Press down here with 10kg(22lb) force
Fuel System
Fuel Flow System
Fig.4-1
The fuel flow system, as shown in Fig. 4-1.
Fuel filter
Fuel Filter
The element of the filter is sealed in the container as a unit.
The element should be replaced at intervals, following the maintenance schedule.
1. Remove the fuel filter cartridge with the suitable wrench.
2. Apply fuel onto the oil seal on a new filter cartridge.
3. Position the filter and turn clockwise until the gasket surface contacts sealing surface. Then, give the filter an additional 2/3 turn .
4. After replacing the filter element, make sure that the air is bled from the system. Push the priming pump on top of the fuel filter adapter against the spring to allow air mixed with fuel to escape throught the bleeder screw. Ensure that excess fuel is collected in a container or rag to prevent fuel from getting onto engine parts. Repeat the pumping action until no bubbles are visible in the flowing fuel. Tighten the bleeder screw.
5. Start the engine and check that joints are not leaking.
Fuel Injection Pump
Important Service Points
If the inside of the injection pump is disassembled for maintenance, be sure to properly use the checking device such as pump tester, and carefully inspect each component parts. Disassembly and maintenance should be made at a clean place and the parts should be thoroughly cleaned.
For the disassembling/reassembling, checking and adjusting procedures for the injection pump itself, see the service manual, “Repair Service and Maintenance”, prepared by manufacturer of injection pump.
(1)Adapter. (2) Filter catridge. (3) Bleeder screw
To replace proceed as follows:
D430 Diesel Engine Fuel System
Fig.4-2 38
Construction of VE Injection Pump
D430 Diesel Engine Fuel System 39
Fig.4-5
Checking Idle Speed
Adjusting Idle Speed
1. Warm up the engine.
2. Remove any specks on the crankshaft pulley with a waste cloth and place a piece of suitable reflecting tape on the pulley to facilitate use of a photo-electric type tachometer.

3. Start and idle the engine.
4. Aim the light of the tachometer onto the reflecting tape to confirm the engine speed.
5. Adjust the idle speed if the engine speed is not within the specified value.
Standard idling speed: 1100 L 25 rpm
Fig.4-10
1. Inspect the deflection of accelerator cable.
NOTE:To lengthen the play of the accelerator wire, loosen the lock nut 1 of the wire bracket and tighten the adjust nut 2
2. Loosen the lock nut 3 of the idle adjust bolt and adjust the play by turning the idle adjust bolt 4.
NOTE: Idle speed will increase when the adjust bolt is turned clockwise and decrease when turned counter clockwise.

3. After the adjustment, race the engine two or three times to inspect the returning of the accelerator wire.

D430 Diesel Engine Fuel System
40
Fig.4-8 Fig.4-9
Fig.4-11 Sultable reflecting tape 3 4
Checking Injection Timing
Bolt
Fig.4-14
Fig.4-12
1. Disconnect the fuel injection pipes from the injection pump.
2. Remove the bolt and gasket installed on the distributor head of the injection pump.
4. Set the flywheel ring gear to approximately 30°of BTDC and find the position in which the needle of the dial gauge does not deflect even when the flywheel is turned.
5. When it is confirmed that the dial gauge needle does not deflect, set the needle to “O” on the scale.
Fig.4-13
3. Set the measuring device on the injection pump. Make sure that the tip of the feeler needle of the measuring device is in contact with plunger end at this time.
Fig.4-15
6. Turn the flywheel in the normal direction until TDC is indicated.
The injection timing is normal when the dial gauge needle of advanced 1.00 mm ahead of the value set in the above 5.
Beginning of matic injection: Cam lift 1.00 mm (0.0394 in.).
If the advance is more than 1.00 mm, adjust the injection timing.
D430 Diesel Engine Fuel System
41
Adjusting Injection Pump
Removal
Fig.4-16
1. If the injection timing is faulty, turn the injection pump to a position in which the dial gauge needle indicates 1.00 mm.
•When the cam lift is larger than 1.00 mm, turn the injection pump all the way in the engine revolving direction once, and then turn it in the reverse direction once, adjusting the cam lift to the 1.00 mm point.
•If the cam lift is smaller than 1.00 mm, adjust the lift by turning the pump in the direction inverse to the engine revolving direction.
2. After the adjustment, install the head bolt and gasket.
3. Use a new head bolt and gasket.
Fig.4-17
Key groove

Fig.4-18
1. Disconnect both positive and negative terminals of the battery
2. Remove the upper fan shroud and cooling fan.
3. Remove the air hose.
4. Remove the fuel pipe and fuel injection pipes.
5. Disconnect the accelerator cable from the injection pump.
6. Disconnect the wiring of the magnet valve (for fuel cut).
7. Remove the injection pump cover.
8. Remove the lock nut.
9. Remove the plain washer. Remove the plain washer with a wire, etc., taking care not to drop it in the gear case.
10. While checking the injection pump shaft key by using a mirror, turn the flywheel through the clutch cover timing hole until the key comes to the top position.
D430 Diesel Engine Fuel System
42
Fig.4-19

Support bracke
Installation
Install in the reverse order of removal and pay attention to the following matters.
NOTE:
•Before installing the key on the drive shaft of the injection pump, lightly tap the key groove of the shaft with a hammer to assure that the key is tightly inserted in the key groove.
•After installing the injection pump, evacuate air.
Drive gear tightening torque: 4.0 - 7.0 kg•m (29 - 51 lb•ft).
Air-Bleeding Fuel System
Whenever the fuel filter is replaced or the sedimentor is cleaned, the filter must be air-bled in the following manner:
Fig.4-20
11. Remove the auxiliary bracket tightening bolts used for fixing the lower side of the injection pump.
12. Remove the injection pump mounting nuts.
13. Separate the pump shaft and gear.
•Set the extractor (Be sure to use the side with M mark at all times).
•Separate the shaft and gear by tightening the extractor bolts.
14. Remove the injection pump. Gradually remove the injection pump by pressing the pump gear against the injection pump side, ensuring not to drop the key into the gear case.
15. Remove the extractor.
1. Loosen the air bleeder screw of fuel filter.
2. Loosen the fuel pump priming plunger by turning counter-clockwise. Then pump the plunger in Up and Down motions.
3. Continue to pump until fuel flows from the air bleeder screw hole free of air bubbles.
D430 Diesel Engine Fuel System
4. Depress the fuel pump priming plunger and close the fuel filter air bleeder screw. Secure the priming plunger by turning clockwise. 43
Fig.4-21
Fig.4-22
If the engine should run out of fuel during operation and air enters the injection system or whenever the injection pump is removed, the system must be airbled in the following manner:

1. Air-bleed the fuel filter.
2. Loosen the air bleeder screw Aand operate the fuel pump priming plunger with hand until fuel flows from the air bleeder screw hole free of air bubbles.
3. Close the air bleeder screw Awith the priming plunger depressed.
4. Loosen the injection pipe nipples on the nozzle holders and crank the engine until fuel flows from the pipes free of air bubbles, and tighten the nipples.
Magnet Valve Checking
Fig.4-23
5. Disconnect the injection nozzle side of the injection pipe.
6. Turn the engine switch to the start position, crank the engine and make sure that the fuel flows out of the injection pipe.
Fig.4-24
Magnet valve O-ring Spring Armature
Fig.4-25
The magnet valve is in normal condition; The engine runs smoothly when the engine switch is turned on, but the engine running is stopped when the engine switch is turned off.

If the engine does not stop, check the wiring connection or disconnect the wiring of the magnet valve and check the flow of electric current.
If the electric current is flowing through the coupler when the engine switch is on and is shut off when the switch is off, the engine switch and wiring are in normal condition and the magnet valve is faulty. When the magnet valve is faulty, replace the part shown in Fig. 4-28 as a complete set.
D430 Diesel Engine Fuel System
44
Air bleeder screw A
Fuel out magnet valve
Loosen
Fuel Injection Nozzles
Disassembling Nozzle Holder
Disassembling nozzle holder following order numbered in Fig. 4-38.
(1)Joint bolt & Gasket. (2) Fuel Leak pipe. (3) Injection pipe. (4)Nut. (5) Nozzle holder. (6) Gasket & Dust seal.
As the function of the injection nozzles greatly influences the engine performances, all the injection nozzles must be checked at every 3,000 km (2,000 miles) according to the following method.
Removing Nozzle Holder
Remove the nozzle holder following order numbered in Fig. 4-37.
Fig.4-27
(1)Nozzle nut. (2) Nozzle. (3) Body. (4) Cap nut. (5) Gasket. (6)Spring adjust screw. (7) Nozzle spring seat. (8)Nozzle spring. (9) Push rod.
NOTE:
1)Greatest possible care should be taken in handling the nozzles as they are the parts with high precision.
2)As the nozzle and the needle valve are in pairs, mixing up of the original combinations must be prevented by disassembling and washing one nozzle assembly after another separately.
3)Carbon deposit on the nozzle body must be removed with a piece of hard wood. However, it would be advisable not to clean the surrounding area of the nozzle orifice to avoid possible damage to the orifice. After cleaning, wash the nozzle body in clean gasoline in a container.
CAUTION: Never assemble the nozzle needle valve and the nozzle body and slide them on each other in gasoline.
D430 Diesel Engine Fuel System
45 Daewoo D430 Engine Parts Contact: Email: EngineParts@HeavyEquipmentRestorationParts.com Phone: 269 673 1638 Website: www.HeavyEquipmentRestorationParts.com
Fig.4-26
Checking Injection Nozzle
Testing Injection Nozzle
Test the nozzles using light oil under temperature of about 20°C (68°F).
Fig.4-28
Make sure to needle valve comes down until the valve seat by its weight when it is pushed in the nozzle body about 18 mm (0.70 in). If any defect is found, always replace the needle valve and the nozzle body as a unit.
Assembling Injection Nozzle
Assemble the injection nozzle in the reverse order of disassemble.
Fig.4-29
1)Checking Oiltightness of Sliding Portion of Nozzle
Needle Valve:


Set the adjusting screw and operate the hand lever to raise the pressure up to 250 kg/cm2 (3600 lb/in2) and see how soon the pressure drops from the level to 200 kg/cm2 (2800 lb/in2).
If it takes longer than 3 seconds, the oiltightness will be satisfactory. Aremarkably quick drop of pressure indicates an excessive clearance at the sliding portion between the needle valve and the nozzle body due to wear, so in such a case replace both needle valve and nozzle body.
Fig.4-30
2)Checking Injection Starting Pressure:
Operate the hand lever at 60 st/min to check for the pressure under which injection is started. Adjust the pressure to the prescribed value of 135 kg/cm2 (1,920 lb/in2) by turning the adjusting screw, and then tighten the cap nut with torque of 3.5 kg•m (25 lb•ft).
D430 Diesel Engine Fuel System
46
Fig.4-31
3) Checking Oiltightness of Needle Valve Seat:
Operate the hand lever to raise the pressure up to 115 kg/cm2 (1635 lb/in2), which is 20 kg/cm2 (280 lb/in2) lower than the injection starting pressure. If fuel does not drip from the nozzle orifice under the pressure, oiltightness is satisfactory. Dripping of fuel, on the other hand, is indicative of damage on the needle valve or the valve body, or mal-contact between both.
In that event, both needle valve and valve body must be replaced.
Checking Fuel Injection:
Fig.4-32
Operate the hand lever quickly and verify that fuel is injected correctly from the nozzle orifice in the direction of the nozzle axis.
At fuel injection check, inspect for fuel staying at the nozzle orifice after several times of injection. Alarge amount of fuel staying there or dripping of fuel therefrom are due to mal-contact between the needle valve and the valve seat. In such a case, renew both nozzle needle valve and nozzle body.

Installing Injection Nozzles
Fig.4-33
Install the injection nozzle holder in the reverse order of removing.
NOTE: When installing the nozzle holder, use the new gasket, and tighten the nuts to 1.6 ~ 2.4 kg•m (12 ~ 17 lb•ft).
Fit the fuel pipe to the nozzle holder.
D430 Diesel Engine Fuel System
47
Electrical System
Summary
Structural View (1)Alternator. (2) Glow plug. (3) External resistor. (4) Glow cord. (5) Battery. (6) Starting motor. (7) Oil pressure switch. (8)Magnet valve (Fuel cut solenoid). (9) Water temperature gauge unit.
Fig.5-1
D430 engine parts contact: engineparts2@gmail.com
D430 Diesel Engine Electrical System 48
Specification
Starting motorNominal output12V12V - 2.5kW
AlternatorNominal output12V12V, 60A
Glow plug TypeSheathed type Voltage, amperage 12V10.5V, 16.5A
Troubleshooting
TroublePossible CauseAction to be Taken
Starting motor does not turn, or turns too slowly to start the engine
Battery and related parts
• Faulty contact of battery terminals
• Faulty grounding of negative cable
• Voltage drop caused by discharging
• Insufficient voltage caused by faulty battery
Engine switch (ignition switch)
• Faulty contact on engine switch
• Loose engine switch wiring and connectors
• Broken wire between engine switch and magnetic switch
Magnetic switch and related parts
• Loose wiring and connectors
• Faulty contact of magnetic switch contact plate
• Broken wire of magnetic switch pull-in coil
• Broken wire of magnetic switch holding coil
Starting motor and related parts
• Faulty contact of brushes
• Fatigued brush spring
• Faulty grounding of field coil
• Faulty soldering of field coil
• Faulty commutator
• Faulty grounding of armature
• Wear on parts
Starting motor turns, but the engine does not start
Starting motor turns, but pinion gear does not mesh with ring gear
Starting motor turns continuously and does not stop
Battery discharge
Insufficient battery capacity
Quick start system and related parts
• Faulty glow plug relay control unit
• Faulty glow plug relay
• Faulty glow plug
• Tip of overrunning clutch pinion is worn
• Raced overrunning clutch
• Faculty sliding surface of spline
• Worn bushing
• Worn ring gear
• Sticking contact plate of magnetic switch
• Layer short of magnetic switch coil
• Engine (ignition) switch does not return properly
• Loose V-belt
• Grounded or broken stator coil
• Broken rotor coil
• Faulty contact between brush and slip ring
• Faulty rectifier
• Faulty IC regulator
• Insufficient or unsuitable battery electrolyte
• Faulty battery electrode (internal shortcircuit)
• Faulty contact of battery terminal
• Excessive electric load
Overcharged battery
• Faulty IC regulator
• Clean and tighten
• Clean and repair
• Charge
• Charge
• Replace
• Repair
• Repair or replace
• Repair
• Replace
• Replace
• Replace
• Repair replace
• Replace
• Replace
• Repair
• Repair
• Replace
• Replace
• Charge
• Replace
• Replace
• Replace
• Replace
• Replace
• Repair or replace
• Replace
• Replace
• Replace
• Replace
• Replace
• Adjust
• Replace
• Replace
• Clean or replace
• Replace
• Replace
• Adjust
• Replace
• Clean, tighten
• Check power consumption
• Replace
D430 Diesel Engine Electrical System 49
Alternator
Disassembling Alternator
(1) Brush/holder assembly. (4) Rotor/vane. (5) Through bolt. (6) Rear housing assembly. (7) Front housing assembly. (8) Nut/washer. (9) Pully/fan. (10) Spacer. (11) Front housing. (12) Rotor/bearing. (13) Rear housing. (14) Stator/heat sink.
Disassemble the parts in the order numbered above.

D430
Diesel Engine Electrical System
50
Fig.5-5
Fig.5-7
Separate the rear housing assembly.
Remove the heat sink attaching screws and remove the heat sink from the rear housing.
Alternator Inspection
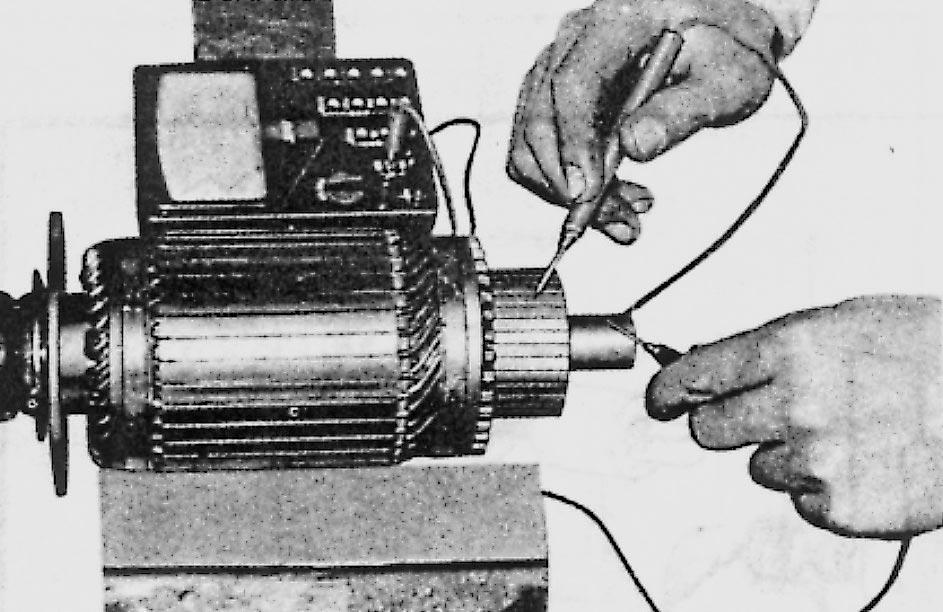
Fig.5-9
To check for ground, connect one prod to the core and the other to each lead wire.

If a ground is present, the current will flow and the stator coil must be repaired or replaced.
Fig.5-8
a. Checking stator coil

Check the stator coil. To check for open, connect the prods to each of the two leads. If there is no flow of current, the coil is open circuit and must be repaired or replaced.
Fig.5-10
b. Checking rotor

To check for open circuit place both prods of an ohmmeter on the slip rings. If the reading is 5~6 ohms, there is no trouble in the rotor.
To check for ground, connect one prod to the slip ring and other prod to the core.
If the current flows, the rotor must be repaired or replaced.

D430 Diesel Engine Electrical System
51
Fig.5-11
c. Checking diodes
To check diode, read the resistance between the lead wire and case with a tester.

Then reverse the tester lead and note the reading. If both readings are very low or high, the diode is defective.
Agood diode will give one low reading and one high reading.
NOTE: The diodes and heat sink are serviced as an assembly.
Assembling Alternator
Assemble the alternator in the reverse order of disassembling.
NOTE: The soldering of the diode leads should be performed in less than twenty seconds as the excessive heat may damage the diode.
Fig.5-12
d. Checking brushes and springs
The brushes should be replaced when one - third of the original length is worm away.
Standard tension 350 L 52.5 gr (0.8 L 0.12 lb)
If the tension is too low or if excessive corrosion exists, the spring must be replaced.
D430 Diesel Engine Electrical System
52
Starting Motor
Checking Starting Circuit
Fig.5-17
(1)Weak battery. (2) Corroded or loose battery terminal. (3) Loose starting motor terminal. (4)Broken or loose wires of the starting circuit. (5) Faulty ignition switch.
When the starting motor fails to operated or does not satisfactorily operate, check the above points before removing the starting motor.
D430 Diesel Engine Electrical System
53
Disassembling Starting Motor
Fig.5-18
(1) Field strap. (2) Screw. (3) Magnet switch/plunger. (4) Through bolt. (5) Rear cover. (6) Insulator/washer. (7) Yoke assembly. (8) Rubber ring/spring/driving lever. (9) Center bracket. (10) Armature assembly. (11) Stop ring. (12) Piston stop coller. (13) Over running clutch/pinion. (14) Screw/pole core. (15) Brush spring/brush.
Disassemble the parts in the order numbered above.
D430 Diesel Engine Electrical System
54
Short-circuit test:
Fig.5-19
Drive the pinion stop collar toward the armature, and remove the stop ring. Then, slide the stop collar and over-running clutch off the armature shaft.
Inspecting Starting Motor
a. Checking armature
Ground test:
Fig.5-20
Touch one prod of an ohmmeter to each segment and the other prod to the core or shaft. An infinite reading should be obtained for each segment.
If the meter reading is not infinite, the armature windings are shorted to the core and shaft, and the armature must be replaced.
Fig.5-21
Place a armature against the core of the growler tester, and hold a steel strip on the armature. Then, rotate the armature slowly by hand. If the armature coil is shorted, the steel strip will become magnetized and vibrate. Replace the armature if a short is found.
b. Checking commutator
Fig.5-22
If the commutator is dirty, discolored or worn, clean it with emery paper and wash with clean solvent. After cleaning. undercut the mica between the segment to the depth of 05 ~ 0.8 mm (0.020 ~ 0.031 in) shown in Fig. 5-20.

D430 Diesel Engine Electrical System
55
c. Checking field coil
Magnetic Switch Test
a. Pull-in coil test


Fig.5-23
To test the field coil for ground with a tester, place one prod on the yoke or pole core and the other prod to the field terminal. (for each prod) If it is grounded, the current will no flow, and the field coil must be repaired or replaced.
d. Checking brushes and brush springs
Fig.5-25
Apply the specified voltage (12V) between the “S” terminal and “M” terminal. If the magnetic switch is forcefully attached, the pull-in coil is in good condition.

b. Holding coil test
Fig.5-24
The brushes should be replaced when one - third of the original length is worn away.
Standard length 19 mm (0.748 in)
Standard tension 2.0 L 0.3 Kg (4.4 L 0.661 lb)
Fig.5-26
Ground the (M) terminal to the magnetic switch body with lead and impose the specified voltage (12V) upon the “S” terminal to pull in the plunger. If the plunger remains attracted after disconnecting the lead at the (M) terminal, there is no trouble with the holding coil.
D430 Diesel Engine Electrical System
56
Fig.5-27
Push in the plunger with hand and apply the specified voltage between the (M) terminal and the magnetic switch body. If the plunger is not attracted, there is no trouble.
Assembling Starting Motor
To assemble the starting motor, reverse the procedure of Par. 5-D-3.
Testing Starting Motor
a. Free running test:
NOTE: When the magnetic switch is engaged, the clearance between the pinion and stop collar should be 0.5~2.0 mm (0.020~0.079 in).

This clearance can be adjusted by inserting the adjusting washer between the magnetic switch body and the driving housing.

Fig.5-29
1. Connect an ammeter as illustrated.
2. Apply the battery voltage adjusted to 11 volts to the starting motor.
less
D430 Diesel Engine Electrical System c.
Return test
Voltage3.0V Current1200Aor
Torque3.5
57
3. Operate the starting motor and take a reading. Specified current 200Aor less at 3,000 rpm. or more b. Lock registance test: Test the lock registance, following the instructions of the test equipment of manufacturer. Fig.5-28 0.5~2.0mm (0.020~0.079in) Daewoo D430 Engine Parts Contact: Email: EngineParts@HeavyEquipmentRestorationParts.com Phone: 269 673 1638 Website: www.HeavyEquipmentRestorationParts.com Alternate email: engineparts2@gmail.com
kg•m
Glow Plug
Checking Open Circuit of Glow Plug
Glow Plug Relay
Checking Glow Plug Relay
Fig.5-30
Check the continuity between the positive terminal of the glow plug and cylinder head with a circuit tester. If there is no continuity, replace the glow plug.
Removal
Remove in the following order.
Fig.5-31
1. Glow plug connector attaching nut. Use a suitable driver.
2. Resistor
3. Glow plug connector
4. Glow plug
NOTE: Turn the glow plug counter-clockwise and remove it.
5. To install the glow plug, reverse order of removal.
Glow plug relay Glow plug
Engine switch Battery
Fig.5-33
Check continuity between “B” terminal and “C” terminal of glow plug relay when engine switch is “OFF” position.
•If the continuity does not exist, the glow plug relay is correct.
•If the continuity exists, replace the glow plug relay.
Check continuity between “B” terminal and “C” terminal of glow plug relay when engine switch is turned to “NO” position or “START” Position.
•If the continuity exists, the glow plug relay is correct.
•If the continuity does not exist, replace the glow plug relay.
D430 Diesel Engine Electrical System
58
Technical Data
1. ENGINE
TypeFour cylinder four stroke engine in line, water cooled, overhead valve
Bore 95 mm (3.74 in)
Stroke 105 mm (4.13 in) Piston displacement 2977 cc (181.7 cu-in)
Compression ratio21.5 : 1
Compression pressure (at 200 rpm)
Standard30.0 Kg/cm2 (427 lb•in2) Limit27.0 Kg/cm2 (384 lb•in2)
Valve clearance (Warm engine)
Inlet0.30 mm (0.012 in) Exhaust0.30 mm (0.012 in)
Cylinder head Permissible distortion of cylinder0.10 mm (0.004 in) head surface Cylinder head height82.5 +0.1 -0 mm (3.2481 -0 +0.0039 in)
Valve seat
Valve seat angle Inlet45° Exhaust30°
Valve seat width Inlet2.0 mm (0.079 in) Exhaust2.0 mm (0.079 in)
Valve guide
Protrusion from cylinder head16.5 mm (0.6496)
Inner diameter7.988~8.014mm (0.3145~0.3155in) Stem to guide clearance limit0.127 mm (0.005 in)
Valve-Inlet
Overall length114.5 mm (4.5079 in) Head diameter40 L 0.1 mm (1.5748 L 0.0039 in) Face angle45° Stem diameter Standard7.925~7.950mm (0.3120~0.3130in) Limit7.880 mm (0.3102 in) Valve margin Limit1.35 mm (0.0532 in)
Valve-Exhaust
Overall length114.6 mm (4.5118 in) Head diameter36 L 0.13 mm (1.4173 L 0.0051 in)
Face angle30°
Stem diameter Standard7.912~7.937mm (0.3115~0.3125in) Limit7.867 mm (0.3097 in)
Valve margin Limit1.35 mm (0.0532 in)
Valve spring-Outer Wire diameter4.5 mm (0.177 in)
Outer coil diameter38.0 mm (1.496 in)
Free length Standard45.9 mm (1.807 in) Limit43.6 mm (1.717 in)
Fitting length40.3 mm (1.587 in)
Fitting load Standard18.0 L 0.9 Kg (39.7 L 2.0 lb) Limit14.5 Kg (32.0 lb)
Daewoo D430 Engine Parts Contact: Phone: 269 673 1638 Email: EngineParts@HeavyEquipmentRestorationParts.com Website: www.HeavyEquipmentRestorationParts.com
1. ENGINE
Valve spring-Inner
Wire diameter3.5 mm (0.138 in)
Outer coil diameter27.5 mm (1.083 in)
Free length Standard44.1 mm (1.736 in) Limit42.8 mm (1.685 in)
Fitting length37.8 mm (1.486 in)
Fitting load Standard12.7 L 0.6 Kg (28.0 L 1.3 lb) Limit10.3 Kg (22.7 lb)
Rocker arm
Bore in rocker arm18.258~18.278 mm (0.7188~0.7196 in)
Rocker arm bushing
Inner diameter 15.876~15.896 mm (0.6250~0.6258 in)
Outer diameter 18.288~18.309 mm (0.7200~0.7208 in)
Rocker arm shaft
Outer diameter15.835~15.860 mm (0.6234~0.6244 in)
Clearance in rocker arm Standard0.016~0.061 mm (0.0006~0.0024 in) Limit0.07 mm (0.003 in)
Tappet
Outer diameter
14.244~14.249 mm (0.5600~0.5610 in)
Bore in cylinder block14.288~14.319 mm (0.5625~0.5637 in)
Clearance in cylinder block bore
Standard0.039~0.095 mm (0.0015~0.0037 in) Limit0.10 mm (0.004 in)
Camshaft
Journal diameter (Standard)
No.1 (Front)51.910~51,940 mm (2.0437~2.0449 in) No.2 (Center)51.660~51.690 mm (2.0339~2.0351 in) No.3 (Rear)51.410~51.440 mm (2.0240~2.0252 in) No.451.160~51.190 mm (2.0142~2.0154 in)
Wear limit of journal0.008 mm (0.0003 in)
Cam elevation
Inlet
Standard42.587 mm (1.6767 in) Limit42.485 mm (1.6728 in)
Exhaust
Standard42.587 mm (1.6767 in) Limit42.485 mm (1.6728 in)
Camshaft end play
Standard0.020~0.180 mm (0.001~0.007 in)
Limit0.30 mm (0.012 in)
Camshaft run-out
Limit0.080 mm (0.0031 in)
D430 Diesel Engine Technical Data 60
1. ENGINE
Camshaft support bore
Bore in cylinder block
No.1 (Front)52.000~52.030 mm (2.0473~2.0485 in) No.2 (Center)51.750~51.780 mm (2.0374~2.0386 in) No. 3 (Rear)51.500~51.530 mm (2.0276~2.0288 in) No.451.250~51.280 mm (2.0177~2.0189 in)
Camshaft to bore clearance
New0.060~0.120 mm (0.0024~0.0047 in) Limit0.145 mm (0.0057 in)
Backlash between gears Standard0.10~0.20 mm (0.004~0.008 in) Limit0.30 mm (0.012 in)
Idle gear Bore in idle gear boss48.000~48.025 mm (1.8898~1.8908 in) End play0.15~0.30 mm (0.006~0.012 in)
Idle gear bushing
Inner diameter44.009~44.034 mm (1.7327~1.7336 in) Outer diameter48.043~48.068 mm (1.8915~1.8925 in)
Idle gear spindle
Length28.95~29.05 mm (1.1398~1.1437 in)
Outer diameter43.950~43.975 mm (1.729~1.731 in)
Spindle and bushing clearance Standard0.034~0.084 mm (0.0013~0.0033 in) Limit0.15 mm (0.006 in)
Valve timing
Inlet valve opens14°BTDC Inlet valve closes44°ABDC Exhaust valve opens48°BBDC Exhaust valve closes10°ATDC
Connecting rod
Permissible bend or twist0.05 mm per 100 mm (0.0020 in per 3.937 in)
Side clearance standard0.239~0.330 m (0.0094~0.0130 in) Limit0.4 mm (0.0157 in)
Small end bushing
Inner diameter31.763~31.788 mm (1.2505~1.2515 in)
Outer diameter35.014~35.052 mm (1.3785~1.3800 in)
Bore in connecting rod34.919~34.955 mm (1.3748~1.3762 in)
Piston pin and small end bushing clearance Standard0.014~0.044 mm (0.0006~0.0017 in) Limit0.05 mm (0.0020 in)
D430 Diesel Engine Technical Data 61
1. ENGINE
Connecting rod bearing Bearing clearance
Standard0.036~0.076 mm (0.0014~0.0030 in)
Limit0.1 mm (0.004 in)
Available undersize bearing0.254 mm (0.010 in) 0.508 mm (0.020 in) 0.762 mm (0.030 in)
Piston Diameter
Piston pin hole bore
Ring groove width
94.825~94.851 mm (3.7333~3.7344 in) Measure at 90°to the piston pin bore axis and 58.4 mm (2.299 in) below the piston top.
31.737~31.750 mm (1.2495~1.2500 in)
Top2.433~2.459 mm (0.0958~0.0968 in)
Second2.433~2.459 mm (0.0958~0.0968 in)
Oil4.813~4.839 mm (0.1895~0.1905 in)
Piston and cylinder clearance 0.817~0.212 mm (0.0074~0.0084 in)
Piston ring Width
Top
Second
3.7~3.9 mm (0.1457~0.1535 in)
3.7~3.9 mm (0.1457~0.1535 in)
Oil 2.75~3.15 mm (0.1083~0.1240 in)
Expander oil ring outer diameter2.55~2.65 mm (0.1004~0.1043 in)
Thickness
Top2.363~2.383 mm (0.0930~0.0938 in)
Second 2.363~2.383 mm (0.0930~0.0938 in)
Oil 4.743~4.763 mm (0.1867~0.1875 in)
Side clearance
Top
Second
Oil
0.050~0.096 mm (0.0020~0.0038 in)
0.050~0.096 mm (0.0020~0.0038 in)
0.050~0.096 mm (0.0020~0.0038 in)
Side clearance limit0.3 mm(0.0118 in)
D430 Diesel Engine Technical Data 62
1. ENGINE
End gap
Top
Second
Oil
0.4~0.6 mm (0.0157~0.0236 in)
0.4~0.6 mm (0.0157~0.0236 in)
0.4~0.53 mm (0.0157~0.0209 in)
End gap limit1.5 mm (0.0591 in)
Ring tension
Top1.85 L 0.3 Kg (4.08 L 0.66 lb) Second1.85 L 0.3 Kg (4.08 L 0.66 lb) Oil4.47 L 0.45 Kg (9.85 L 0.99 lb)
Expander oil ring4.5 L 0.45 Kg (9.92 L 0.99 lb)
Piston pin
Diameter31.744~31.749 mm (1.2498~1.2500 in)
Clearance between piston and pin-0.012~0.006 mm (-0.0005~0.0002 in)
Crankshaft
Main journal diameter Standard
75.812~75.825 mm (2.9848~2.9853 in)
Wear limit0.05 mm (0.0020 in)
Crankpin diameter Standard 61.112~61.125 mm (2.4060~2.4065 in)
Wear limit0.05 mm (0.0020 in)
Crankshaft end play Standard0.140~0.390 mm (0.0055~0.0154 in) Limit0.40 mm (0.0157 in)
Crankshaft run-out Limit0.05 mm (0.0020 in)
Main bearing
Bearing clearance
Standard0.059~0.090 mm (0.0023~0.0035 in) Limit0.12 mm (0.0047 in)
Available undersize bearing
Undersize bearing0.254 mm (0.010 in) 0.508 mm (0.020 in) 0.762 mm (0.030 in)
Main journal processing diameter0.762 mm (0.030 in)
Cylinder block Bore 98.500~98.526 mm (3.8780~3.8790 in)
D430 Diesel Engine Technical Data 63
1. ENGINE
Wear limit of bore0.20 mm (0.0079 in) Warpage limit0.10 mm (0.0039 in)
Liner protrusion above cylinder0.659~0.790 mm block(0.0259~0.0311 in)
Cylinder liner Length
191.092~191.350 mm (7.5234~7.5336 in)
Inner diameter 95.025~95.050 mm (3.7412~3.7422 in)
Outer diameter 98.551~98.576 mm (3.8800~3.8810 in)
Flywheel Run-out
Limit0.20 mm (0.0079 in)
2. LUBRICATING SYSTEM
Oil pressure3.6 Kg/cm2(51 lb/in2) and more at 3600rpm
Safe minimum pressure at idle0.3 L 0.1 Kg/cm2 (4.3 L 1.4 lb/in2)
Oil pump
Outer rotor and body clearance Standard0.14~0.20 mm (0.006~0.008 in) Limit0.30 mm (0.012 in)
Clearance between rotor lobes Standard0.04~0.20 mm (0.002~0.008 in) Limit0.30 mm (0.012 in)
Rotor end float
Standard 0.04~0.10 mm (0.002~0.004 in) Limit0.15 mm (0.006 in) Clearance between pump shaft and body0.10 mm (0.004 in)
3. COOLING SYSTEM
Fan belt tension (Slack)
New belt10~13 mm (0.39~0.51 in) Used belt13~16 mm (0.51~0.63 in)
Fan Fan diameter430 L 2 mm (16.93 L 0.08 in)
Number of blades 6
Ratio of crankshaft and fan
Thermostat1 : 1.25
TypeWax pellet
Starts to open82 L 1.5°C (180 L 2.7°F)
Fully opens at95°C (203°F) Lift8 mm (0.315 in) or more
D430 Diesel Engine Technical Data 64
4. FUELSYSTEM
Idle speed
Fuel injection pump
1100 L 25
TypeDistributor type
Plunger diameter10.0 mm (0.393 in)
Cm lift2.2 mm (0.08 in)
GovernorMechanical type, All speed Injection timing0°TDC
Injection nozzle Type
Throttle type
Number of nozzle and diameter1-0.8 mm (0.031 in)
Injection pressure135+5 -0 Kg/cm2 (1920+71 -0 lb/in2)
Glow plug TypeSheathed type
Preheating methodPre-combustion chamber preheating
5. ELECTRICALSYSTEM
Alternator
Ground polarityNegative No load test
Voltage14 volt Current0 amp. Revolution950 rpm or less
Load test
Voltage13.5 volt Current56 amp. Revolution5000 rpm or less
Starting motor Lock test
Voltage3.0 volt Current1200 amp. or less Torque3.5 kg•m
Free running test
Voltage11 volt Current200 amp. or less Speed3000 rpm or more
D430 Diesel Engine Technical Data 65
Daewoo D430 Engine Parts Contact: Email: EngineParts@HeavyEquipmentRestorationParts.com Phone: 269 673 1638 Website: www.HeavyEquipmentRestorationParts.com Alternate email: engineparts2@gmail.com
