Physical AI with Raspberry Pi
Create Intelligent Vision, Voice, and Sensor Projects Using AI Fusion Lab Kit
Dogan Ibrahim

Create Intelligent Vision, Voice, and Sensor Projects Using AI Fusion Lab Kit
● Dogan Ibrahim
● This is an Elektor Publication. Elektor is the media brand of Elektor International Media B.V.
PO Box 11, NL-6114-ZG Susteren, The Netherlands
Phone: +31 46 4389444
● All rights reserved. No part of this book may be reproduced in any material form, including photocopying, or storing in any medium by electronic means and whether or not transiently or incidentally to some other use of this publication, without the written permission of the copyright holder except in accordance with the provisions of the Copyright Designs and Patents Act 1988 or under the terms of a licence issued by the Copyright Licencing Agency Ltd., 90 Tottenham Court Road, London, England W1P 9HE. Applications for the copyright holder's permission to reproduce any part of the publication should be addressed to the publishers.
● Declaration
The author and publisher have used their best efforts in ensuring the correctness of the information contained in this book. They do not assume, or hereby disclaim, any liability to any party for any loss or damage caused by errors or omissions in this book, whether such errors or omissions result from negligence, accident or any other cause.
The author wishes to express his sincere thanks to SunFounder Company for giving permission to use the Fritzing diagrams and some program codes from their web sites and from their web-based documents, located at the following links:
https://docs.sunfounder.com/projects/ai-lab-kit/en/latest/index.html https://docs.sunfounder.com/projects/ai-lab-kit
● British Library Cataloguing in Publication Data
A catalogue record for this book is available from the British Library
● ISBN 978-3-89576-754-8 Print ISBN 978-3-89576-755-5 eBook
● © Copyright 2026 Elektor International Media www.elektor.com
Editor: Elektor Team
Prepress Production: D-Vision, Julian van den Berg
Printers: Ipskamp, Enschede, The Netherlands
Elektor is the world's leading source of essential technical information and electronics products for pro engineers, electronics designers, and the companies seeking to engage them. Each day, our international team develops and delivers high-quality content - via a variety of media channels (including magazines, video, digital media, and social media) in several languages - relating to electronics design and DIY electronics. www.elektormagazine.com
This book was written to make modern electronics, embedded systems, artificial intelligence, and computer vision accessible to anyone with curiosity and a willingness to experiment. The combination of the Raspberry Pi, the SunFounder Fusion HAT+ board, and the wide variety of sensors and actuators included in the SunFounder AI Fusion Lab Kit provides a powerful platform for learning by building real projects. Rather than focusing only on theory, this book emphasizes practical applications that can be assembled, programmed, tested, and expanded into larger systems. Every chapter is designed to help readers gradually develop confidence with hardware interfaces, software development, and intelligent systems while enjoying the creative process of experimentation.
One of the major goals of this book is to bridge the gap between traditional electronics projects and modern AI-driven applications. In the past, many introductory electronics books concentrated mainly on LEDs, switches, timers, and simple sensors. While these remain important foundations, today's intelligent systems combine electronics with machine learning, natural language interaction, computer vision, and autonomous decision making. For this reason, the projects in this book evolve from basic input-output experiments into systems that can speak, listen, recognize objects, interpret images, and respond intelligently to human interaction.
The early chapters introduce the essential foundations needed for successful project development. Readers learn how to assemble the Fusion HAT+ board, install the Raspberry Pi operating system, establish remote access, organize project files, and operate the system. These setup procedures are explained in a practical manner so that readers can quickly begin experimenting with hardware and software.
The digital and analog input-output projects provide the building blocks for later intelligent systems. LEDs, relays, sensors, displays, motors, and buzzers may appear simple individually, but they represent the fundamental components used in sophisticated automation and robotics systems. By working through these projects, readers gain experience with GPIO control, PWM generation, analog-to-digital conversion, interrupts, timing operations, and sensor integration.
As the projects progress, readers begin combining multiple hardware and software elements into larger applications. Environmental monitoring, distance measurement, motion detection, motor control, and display systems demonstrate how embedded systems can gather data, process information, and provide meaningful output.
A particularly exciting aspect of this book is the strong emphasis placed on artificial intelligence and intelligent interaction. Recent advances in AI have made technologies such as natural language processing, speech synthesis, voice recognition, and image analysis available to individual developers using affordable hardware platforms. The Raspberry Pi is now capable of running AI models locally or connecting to powerful cloud-based services,
enabling the creation of projects that were once considered far beyond the reach of hobbyists and students.
The OpenAI-based projects demonstrate how conversational AI can be integrated into physical computing systems. Readers will learn how to create applications capable of speaking responses, answering questions, generating images, recognizing objects, and interacting naturally through voice commands. These projects highlight the growing convergence of software intelligence and embedded hardware. Instead of simply pressing buttons or reading sensor values, users can now communicate with systems using natural speech and receive intelligent responses in real time.
One of the first AI projects introduces the use of text-to-speech technology powered by AI services. In this project, the Raspberry Pi generates natural sounding spoken messages through the connected speaker system. This forms the basis for many future applications such as intelligent assistants, warning systems, educational tools, and interactive robots. Another project allows users to ask questions directly to an AI model and receive intelligent answers, effectively transforming the Raspberry Pi into a conversational assistant capable of understanding natural language requests.
The object recognition project introduces the use of AI vision systems to identify objects viewed by the camera. Such techniques are widely used in robotics, autonomous vehicles, smart surveillance systems, and industrial automation.
An important feature of this book is the inclusion of Ollama-based large language model projects. Running AI models locally represents a major advancement for embedded systems because it allows intelligent applications to operate without constant internet connectivity. Readers will learn how to install and use local large language models directly on the Raspberry Pi platform. These projects demonstrate how AI assistants can answer questions, provide explanations, summarize information, and analyze user input entirely on local hardware.
The AI Voice Assistant project brings together speech recognition, text processing, and speech synthesis into a complete conversational system. Using a microphone and speaker, readers create a device capable of listening to spoken commands, processing requests through an AI model, and responding with synthesized speech. This project demonstrates many of the core technologies used in commercial smart assistants and interactive robots.
Another innovative project uses voice commands to control a pan-tilt camera platform. Readers can issue spoken instructions such as moving the camera left, right, up, or down while observing the system respond in real time. The voice-controlled DC motor project demonstrates practical industrial-style control using natural language commands. These projects illustrate how AI can be used to simplify human-machine interaction and improve accessibility in robotic systems.
Additional AI projects further explore the practical use of machine learning and intelligent automation.
Computer vision also plays a major role throughout this book. OpenCV, MediaPipe, and YOLO introduce readers to image processing, face detection, object tracking, gesture recognition, and custom object detection systems. These technologies are now widely used in robotics, autonomous systems, industrial automation, healthcare, surveillance, augmented reality, and smart devices. The projects included here provide hands-on exposure to these important technologies using affordable and accessible hardware.
The OpenCV projects teach readers how to process images and video streams in real time. Edge detection, face recognition, and object tracking projects provide insight into how computers interpret visual information. MediaPipe projects extend these capabilities further by introducing hand tracking, gesture recognition, face analysis, and pose estimation. Readers can even create virtual drawing systems controlled entirely by hand movements captured by the camera.
The YOLO object detection projects introduce one of the most powerful modern AI vision technologies. Readers learn how to identify objects in images and video streams with high speed and accuracy. More advanced projects demonstrate how detected objects can be tracked automatically using a pan-tilt camera mechanism. The custom YOLO training project provides an introduction to machine learning model training, allowing readers to build AI systems capable of recognizing their own custom objects and environments.
Throughout the book, emphasis is placed on experimentation, creativity, and understanding rather than simply reproducing code examples. Every project provides opportunities for extension and customization. Readers are encouraged to modify parameters, combine ideas from multiple chapters, and design entirely new systems using the techniques learned. Some projects are intentionally simple to reinforce core concepts, while others introduce more advanced ideas that can serve as foundations for future development.
This book is suitable for a wide audience, including students, educators, hobbyists, makers, and practicing engineers interested in modern embedded AI systems. Readers with little previous experience can begin with the introductory projects and gradually progress toward advanced AI and computer vision applications. More experienced readers can use the projects as starting points for research, rapid prototyping, or commercial product development.
The rapid growth of artificial intelligence is reshaping engineering, education, and technology development across the world. Understanding how AI integrates with sensors, electronics, embedded computers, and real-world devices is becoming an increasingly valuable skill. By working through the projects in this book, readers will not only learn technical concepts but also gain practical insight into how intelligent systems are designed and implemented.
It is hoped that this book will serve both as a learning guide and as a source of inspiration. Many important innovations begin as simple experiments carried out on a workbench or desktop computer. The projects presented here are intended to encourage exploration, curiosity, and creativity while providing a strong practical foundation in embedded systems and artificial intelligence. Whether the goal is education, experimentation, research, or
product development, the knowledge gained from these projects can open the door to countless possibilities in the rapidly evolving world of intelligent technology.
Dr. Dogan Ibrahim
The AI Fusion Lab Kit is an all-in-one educational kit consisting of many electronic components, designed to teach artificial intelligence, programming, and electronics through hands-on projects. The brain of the kit is a Raspberry Pi computer, programmed using the Python programming language.
The kit:
• Combines hardware and software
• Is aimed at beginners, students, and makers. Suitable for technical colleges and universities
• Encourages creativity and experimentation
• Can be used either as either a beginner or as an AI based advanced kit
• Focuses on advanced learning by building real AI projects
The key features of the kit are:
• All-in-one system: The kit includes many electronic components and tools
• Hand-on-learning: Many practical projects can be designed using the kit
• AI support: The kit can be used to develop AI based advanced projects
• Breadboard friendly: The projects can be built on a supplied breadboard using supplied jumper wires
Main components of the kit are listed below (a full list of components is given in a later section; the Raspberry Pi board is not included in the kit):
• Camera module: Required for computer vision tasks
• Sensors & electronic components: Required for many interactive projects
• Fusion HAT board + battery pack: Required for power and control
• Pan-tilt module: Required for camera movement
Using the kit you can build many projects, including:
• LED, buzzer, and motor-based applications
• AI based face or object recognition systems
• AI based voice-controlled assistants
• AI based smart cameras with tracking
• AI-powered robots or devices
• Interactive sensor-based applications
Requirements:
• A Raspberry Pi 3/4/5 or Zero 2W board with at least 2 GB RAM is required. However, 4 GB or more is recommended for smoother performance, especially when running AI programs. In this book a Raspberry Pi 5 is used with 4 GB RAM.
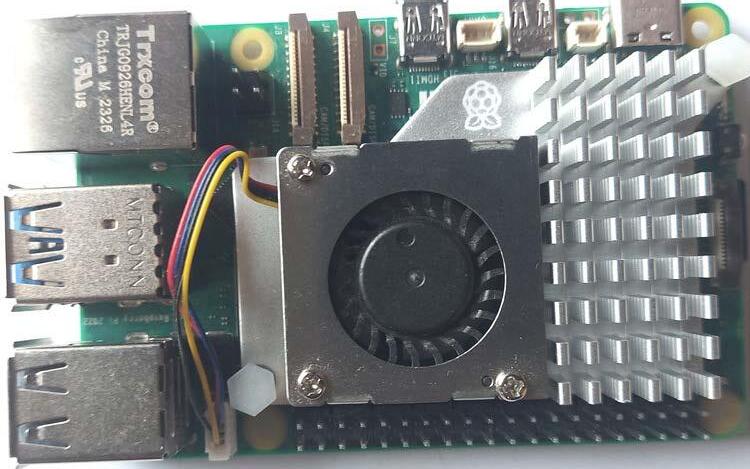
• An active cooler is recommended for the Raspberry Pi 5.
• A microSD card is required for the Raspberry Pi operating system. The minimum required size is 16 GB or preferably 32 GB.
• Optional hardware such as a HDMI monitor, keyboard, and mouse can be helpful, especially for beginners.
Advantages
The AI Fusion Lab Kit supports hands-on learning, allowing users to understand artificial intelligence by building real projects instead of only studying theory. It is beginner-friendly, with step-by-step instructions that help students and hobbyists get started easily. The kit combines different areas such as programming, electronics, and AI, so users can develop a wide range of skills in one package. It also encourages creativity and problemsolving through experimentation and project building. Additionally, it introduces modern technologies like computer vision and voice recognition, which are useful in real-world applications.
Disadvantages
The kit requires a Raspberry Pi, which increases the overall cost. The setup process can be difficult for complete beginners, especially those without prior experience in coding or electronics. Its performance is limited by the hardware, meaning more advanced AI tasks may not run efficiently. Users may also need extra time to troubleshoot technical issues during projects. Overall, it may not be suitable for those who want very simple setups or highly advanced AI capabilities.
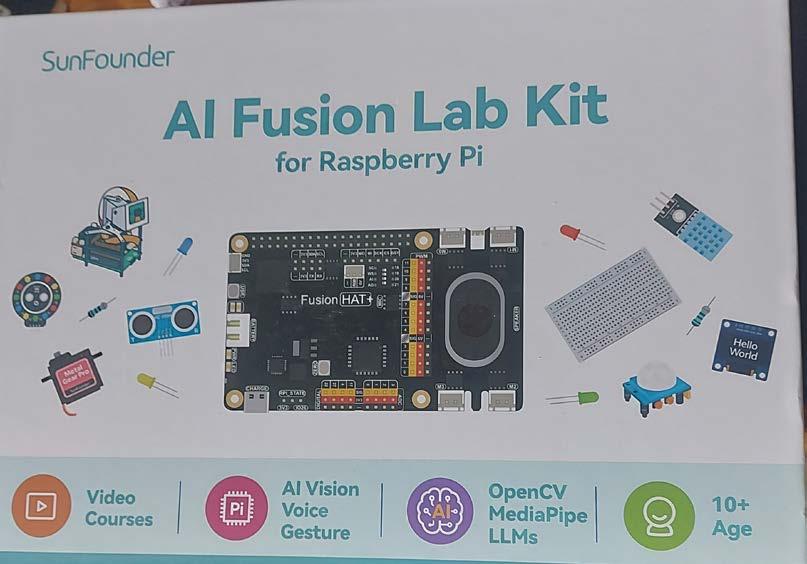
Figure 1.1 shows the box of the kit
The following components are supplied inside the box (Figure 1.2). See link:
https://docs.sunfounder.com/projects/ai-lab-kit/en/latest/#
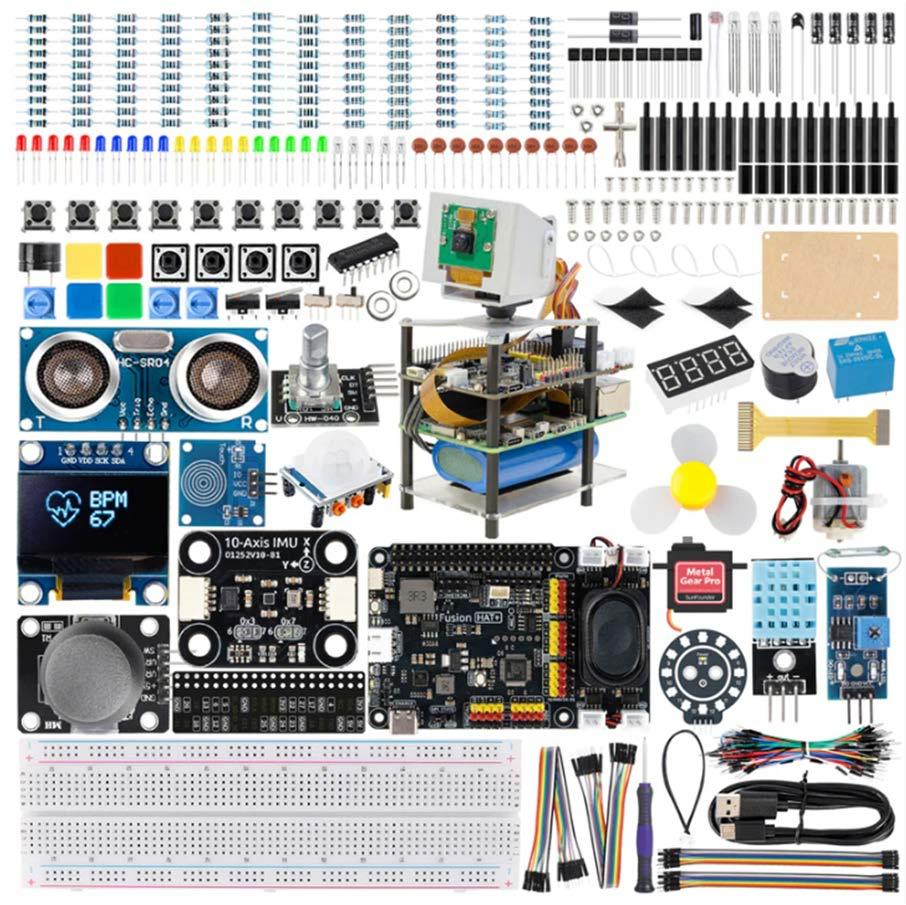
Resistors
• 10× 10 Ω
• 10× 100 Ω
• 10× 220 Ω
• 10× 330 Ω
• 10× 1 kΩ
• 10× 2 kΩ
• 10× 5.1 kΩ
• 10× 10 kΩ
• 10× 100 kΩ
• 10× 1 MΩ
• 3× Potentiometer
• 1× Photoresistor
Capacitors
• 5× 10 µF
• 10× 100 nF
Semiconductors
• 2× 1N4007 diode
• 1× Thermistor
• 5× S8550 transistor
• 5× S8050 transistor
• 1× Phototransistor
• 1× 74HC595
• 1× Fusion HAT+
• 1× 10-Axis IMU
• 1× Ultrasonic module
Sensors
• 1× Touch sensor
• 1× Reed switch module
• 1× DHT11
• 1× Motion sensor module
• 1× Rotary encoder module
Motors
• 1× DC motor
• 2× Metal-gear pro servo
LEDs
• 25× LEDs (various colours)
• 3× RGB LEDs
Displays
• 1× 4-digit 7-segment display
• 1× OLED display
Switches and buttons
• 10× Buttons
• 2× Micro switches
• 2× Slide switches
• 4× Button caps
• 1× Tilt switch
• 1× Relay
Others
• 1× Active buzzer
• 1× Passive buzzer
• 2× 2-mm washer
• 1× FPC cable
• 3× M2.5 Nut
• 6× M2 Nut
• 6× PB2.5 Screw
• 3× PB1.5 Screw
• 6× M2 Screw
• 8× M2.5 Screw
• 2× Loop tape
• 1× Philips socket
• 1× Acrylic plate
• 8× M2.5 Standoff
• 6× M2.5 Standoff
• 4× Cable tie
• 10× M2.5 Standoff
• 1× Camera module
• 1× Joystick module
• 1× PinPal
• 1× Battery pack
• 1× Fan
• 1× Breadboard
• 1× Screwdriver
• 20× pieces F/M jumper wire
• 40× pieces F/F jumper wire
• 1× Pan-Tilt mount
• 2× SH1.0-4P Wire
• 65× pieces M/M jumper wire
• 1× Type C-USB cable
1.3 The Fusion HAT+ board
The kit can be used with the Raspberry Pi 3/4/5 or the Raspberry Pi Zero 2W. In this book an 8-GB Raspberry Pi 5 is used. Although the Raspberry PI 5 can be used with the supplied sensors, it is recommended to install the Fusion HAT+ board on top of the Raspberry Pi before using the kit so that AI-based advanced projects can be built more easily.
Before assembling the hardware, it is worthwhile to look at the features of the Fusion HAT+ board as it is one of the main components of the kit.
Figure 1.3 shows the Fusion HAT+ board.
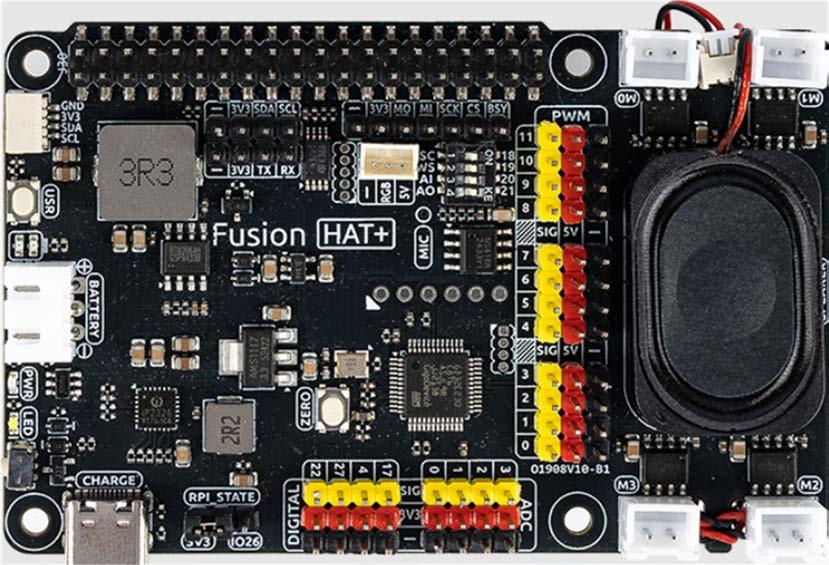
Figure 1.3 The Fusion HAT board (https://docs.sunfounder.com/projects/ai-lab-kit/en/latest/_shared/component/ cpn_fusion_hat.html)
The Fusion HAT+ is a powerful and versatile expansion board designed to transform a Raspberry Pi into a fully functional AI system with minimal setup. It can also support advanced automation projects. At the heart of the Fusion HAT+ is a microcontroller (MCU), which significantly extends the Raspberry Pi's functionality by providing additional PWM outputs and ADC inputs—capabilities that are typically absent on standard Raspberry Pi models.
Compact in size yet rich in functionality, the Fusion HAT+ integrates four motor driver chips, supporting independent control of up to four DC motors. It also features a digital I2S audio module and a built-in mono speaker, enabling high-quality audio playback and interactive sound features directly from the board. The board accepts a 6.0 V to 8.4 V power input via a 3-pin XH2.54 connector. It includes two power indicator LEDs for monitoring system status, a user-programmable LED for custom signalling, and convenient onboard buttons for immediate function testing or input simulation—making development and debugging more efficient and user-friendly.
The key features of the Fusion HAT+ board are (https://docs.sunfounder.com/projects/ fusion-hat/en/latest/):
• Standby current: 40 mA
• Power Input: USB Type-C, 5 V / 3 A
• Charging Power: 7.4 V / 1.5 A 15 W
• Output Power: 5 V / 5 A, 3.3 V / 1 A
• Included Batteries: 2× 3.7 V 18650 Lithium-ion Batteries, XH2.54 3P Interface
• Battery Protection: Reverse polarity protection
• Charging Protection: Input undervoltage protection, input overvoltage protection, charging balance, overheat protection
• Onboard Power Indicator Light: PWR
• Onboard two Battery Level Indicator LEDs
• Onboard User LED, two tactile switches
• Motor Driver: 4-channel 5 V / 1.8 A
• 4-channel 12-bit ADC
• 12-channel PWM (8 channels shared with motor)
• 4-channel digital signals
• Onboard SPI interface, UART interface, I²C interface, WS2812 interface
• Mono Speaker: 42.5 W
• Power Button: Safe shutdown
• Microphone: Onboard I2S microphone
PinPal
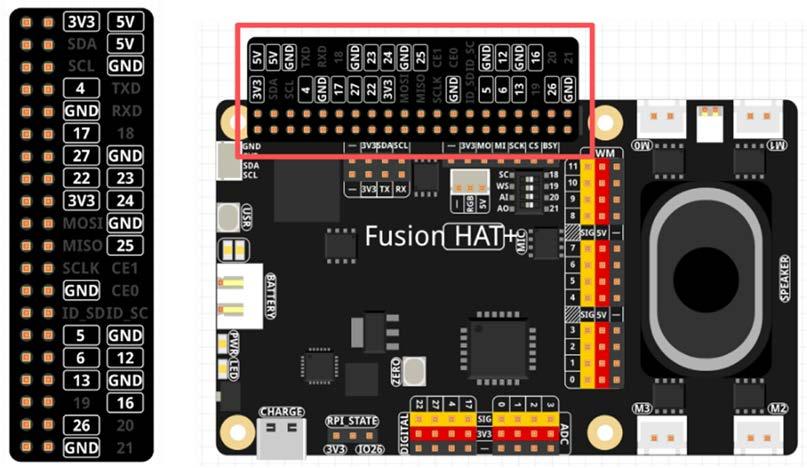
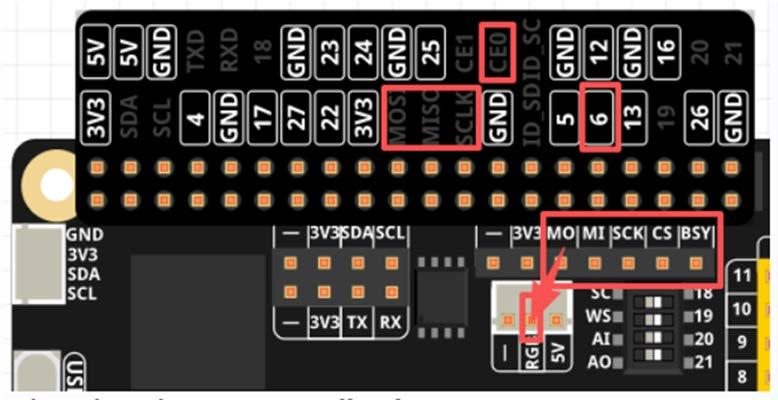
PinPal is a small PCB board designed by SunFounder with Raspberry Pi pin labels. You can place it directly onto the pin header of the Fusion HAT+, making it easy to identify each pin's function clearly and quickly while building your project. This helps reduce mistakes and speeds up wiring. Figure 1.4 shows the PinPal together with the Fusion HAT+. Some pins on PinPal are not recommended for direct use because they are already used by the Fusion HAT+ or share functions that may cause conflicts.
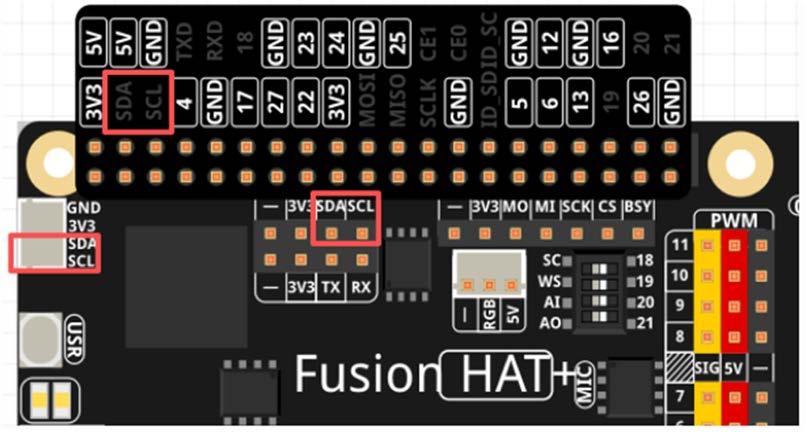
1. SDA / SCL — I²C (GPIO2 / GPIO3) – Figure 1.5
- Raspberry Pi's main I²C pins.
- Fusion HAT+ also provides a P2.54 I²C header and an SH1.0 Qwiic/STEMMA QT port.
- All three share the same bus, so only one can be used at a time.
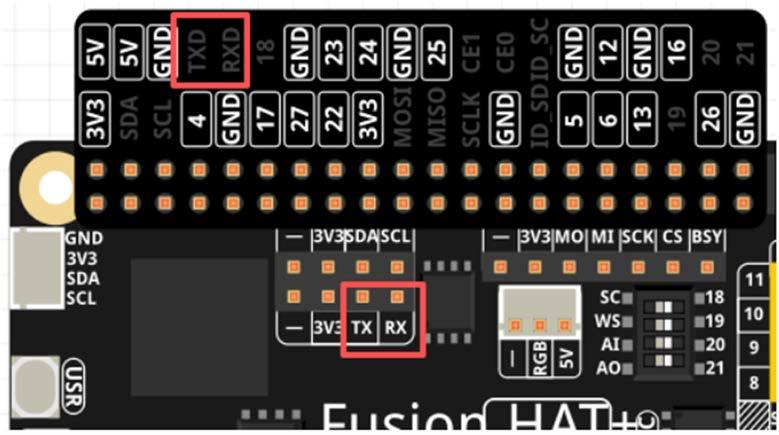
2. TXD / RXD — UART (GPIO14 / GPIO15) – Figure 1.6
- Raspberry Pi's main UART pins.
- Fusion HAT+ includes another UART header, sharing the same pins—choose only one.
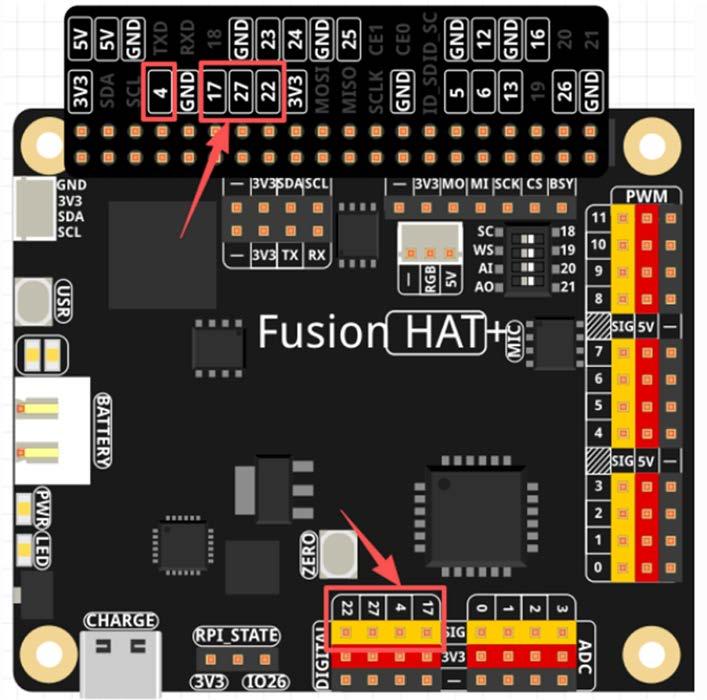
3. GPIO 17 / 4 / 27 / 22 — General GPIO – Figure 1.7
- Fusion HAT+ provides an extra set of these pins, but they map to the same Raspberry Pi GPIOs.
- Use only one group to avoid conflicts.
4. MOSI / MISO / SCLK / CE0 / GPIO6 — SPI Pins – Figure 1.8
- Fusion HAT+ provides another SPI header.
- The RGB (WS2812) connector uses the MOSI pin.
- Use only one SPI group to prevent conflicts.
Signal Pin Mapping
BSY GPIO6
CS CE0 / GPIO8
SCK SCLK / GPIO11
MI MISO / GPIO9
MO MOSI / GPIO10
5. GPIO 18 / 19 / 20 / 21 — I2S Audio Pins – Figure 1.9
- Fusion HAT+ includes onboard I2S audio (speaker + microphone). More details: I2S.
- You may reuse these pins only when the audio system is switched off.
- Do not use WS or SCLK while audio components are active.
Signal Raspberry Pi Pin
WS
SCLK
Audio OUT (Speaker)
Audio IN (MIC)
GPIO19
GPIO18
GPIO21
GPIO20
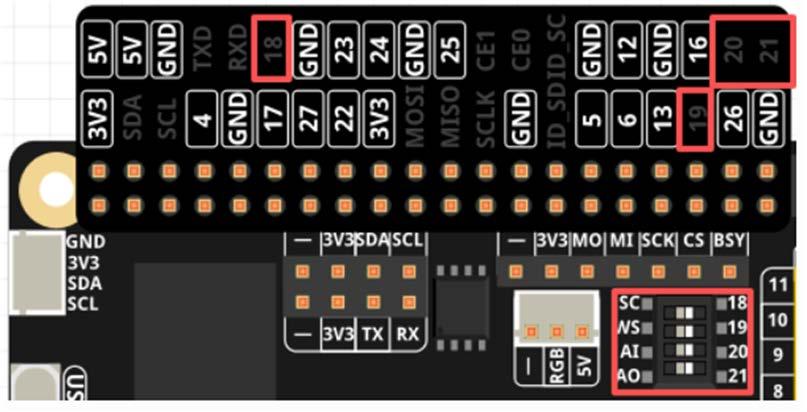
1.9 GPIO 18/19/20/21 pins
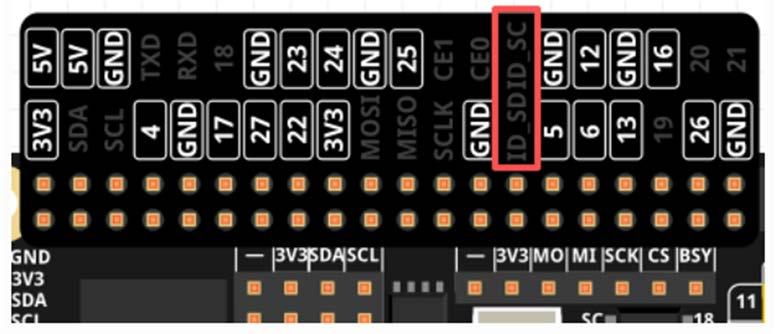
6. ID_SD / ID_SC — HAT EEPROM Pins – Figure 1.10
These pins are reserved for the Raspberry Pi HAT EEPROM, which stores board identification data. Fusion HAT+ uses these pins for its onboard EEPROM, so ID_SD (GPIO0) and ID_SC (GPIO1) must not be used for any other purpose.
1.4 Assembling the Fusion HAT+ board
The steps to install the Fusion Hat+ are (assuming you have a Raspberry Pi 5):
• Install the active cooler on your Raspberry Pi 5 (Figure 1.11)
• The required components for the base are shown in Figure 1.12.

Figure 1.12 Base components
• Peel the brown paper from both sides of the acrylic plate
• Use four M2.5×25 plus 6 Standoff pillars at the four corners of the plate and four M2.5×8 Standoff pillars at the bottom corners of the plate
• Peel the papers from the loop tape and stick one to the middle of the acrylic plate and the other one on the battery. Place the battery on the acrylic tape as shown in Figure 1.13.
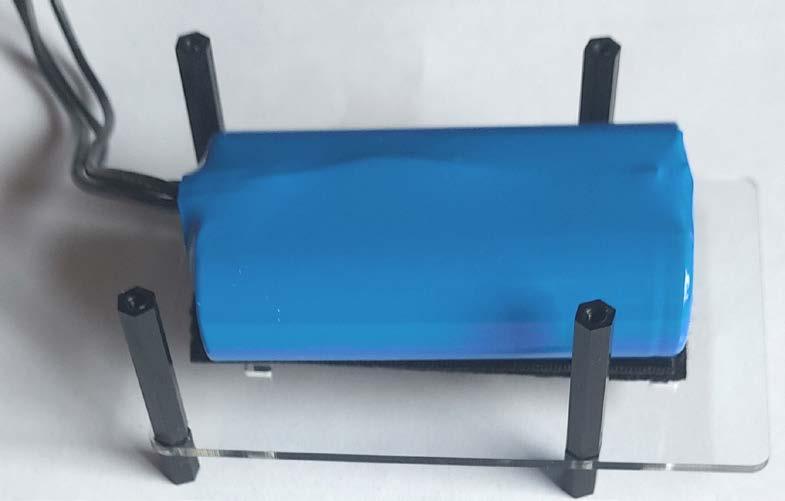
Figure 1.13 Place the battery
• Place the Raspberry Pi 5 on top of the acrylic plate and use M2.5×20+6 Standoffs to screw at all four corners to the Standoffs on the acrylic plate.
• Install the Raspberry Pi active cooler
• Install the camera cable to one of the camera sockets (https://docs.sunfounder. com/projects/ai-lab-kit/en/latest/quick_start/assemble_power_hat.html#connectfusion-hat-to-raspberry-pi)
• Use the supplied Standoff pillars and the screws to install the Fusion HAT+ on top of your Raspberry Pi 5 (Figure 1.14)
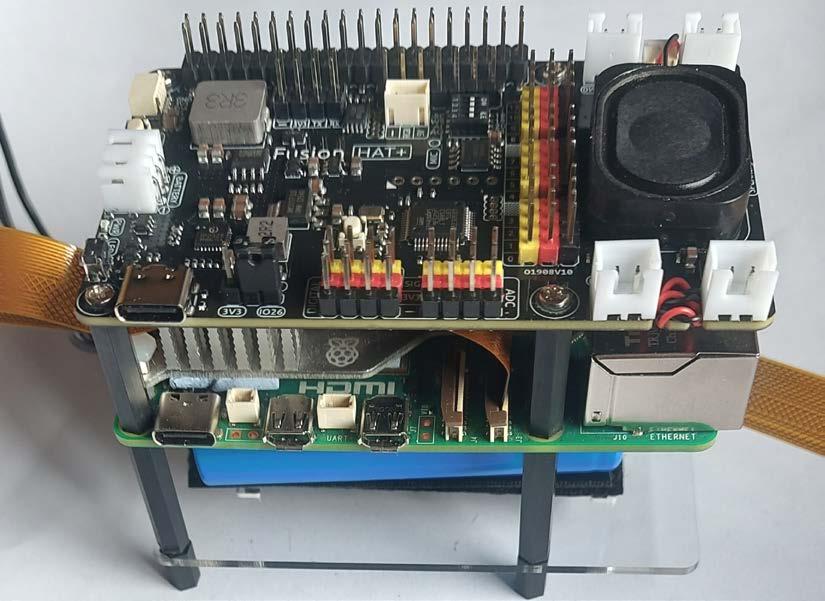
1.14 Install the Fusion HAT+ on top of your Raspberry Pi 5
• The assembly of the Fusion HAT+ is now complete. The next stage is to charge the battery. Connect the battery cable to the 2-pin white socket near the USB-C port.
• It is recommended to use a 5 V 3 A USB-C type power supply, such as the official Raspberry Pi 5 15 W adapter. You can also use a USB-C PD charger or a QC 2.0 fast charger. Charging from 0% to full takes about 2 hours.
• Two battery indicator LEDs show the battery voltage level as follows:
When charging, one of the LEDs will blink to indicate charging progress as follows:
1 LED ON, 1 LED blinking
1 LED blinking
After fully charging, both LEDs will be ON if the Fusion HAT+ is ON. If the Fusion HAT+ is OFF, then both LEDs will be OFF.
Power ON button and LED
The power button on the Fusion HAT+ turns ON the system (Figure 1.15) At this moment the PWR LED will turn ON, and the battery LEDs will also turn ON. The Raspberry Pi 5 will power ON automatically.
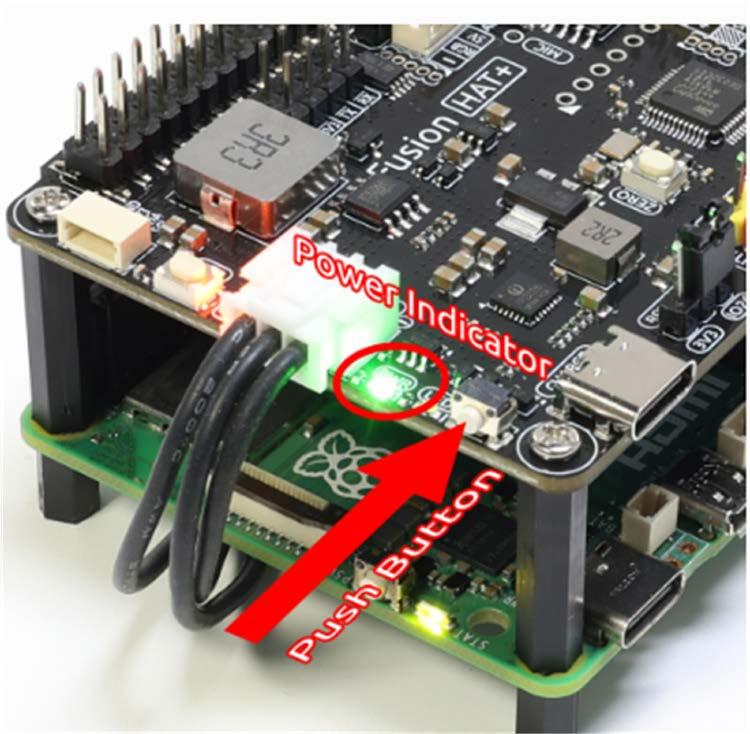
Figure 1.15 Turn ON the power
1.5 Installing the Raspberry Pi operating system
The Raspberry Pi operating system can be installed on a 16 GB microSD card. It is however recommended to use a 32 GB or even a 64 GB card for future expansion. The steps to install the operating system are:
• Install the Raspberry Pi Imager onto your PC from the site: https://www.raspberrypi.com/software/
• Use your operating system and click Download for Windows if you are using a Windows based PC (Figure 1.16). At the time of writing this book the imager software version was: 2.0.7.
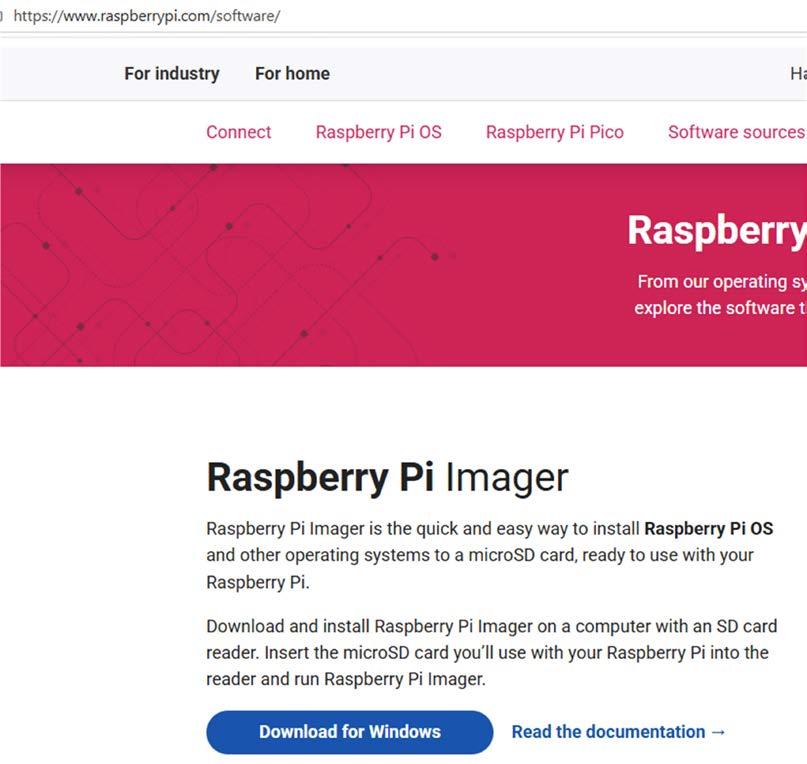
Figure 1.16 Click to download the Imager software
• Insert your blank microSD card into your computer using an adapter if necessary.
• Download the AI Fusion Lab Kit operating system image file from the link (Figure 1.17). The image is based on the Raspberry Pi OS and comes with the AI Fusion Lab Kit pre-integrated into the system. It includes all the software, example code, and related configurations required for the AI Fusion Lab Kit. Note that the 64-bit Bookworm, Debian12 is the only compatible OS for the Fusion HAT+ hardware. At the time of writing this book the filename was: ai.fusion.lab. kit-01.0.zip. The file is large and wait until it is downloaded to your Downloads folder.
https://sunfounder.github.io/download/ai-fusion-lab-kit/index.html
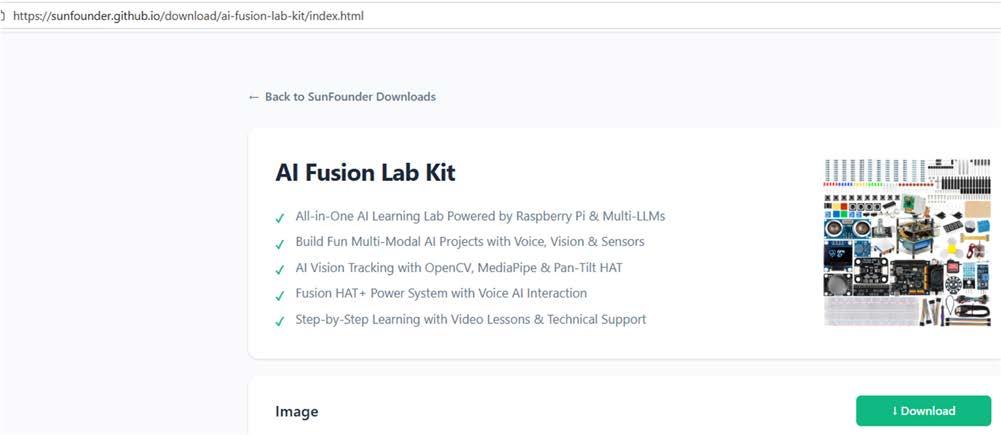
Figure 1.17 Download the system image file
• Click to start the Imager software and follow the initial screens, create a shortcut.
• Click the Imager icon on your Desktop to start the software.
• Choose Device as Raspberry Pi 5. Click OS and scroll down to choose Use custom
• Browse and select the downloaded system image file
• Click Next and select your microSD card.
Note: The version of the Raspberry Pi Imager at the time of writing this book was 2.0.7. Unfortunately, the versions after 2.0 have been changed and it was not possible to use the Customization option to enter the Wi-Fi details. You can however use an earlier version (e.g. 1.9.6) to enter the Wi-Fi details. If you have an earlier version, follow the Customization steps and skip the following details up to section 1.6. Link to version 1.9.6 of the Imager is given below:
https://github.com/raspberrypi/rpi-imager/releases/tag/v1.9.6
• Click Next and click to Write the image onto the microSD card. All the data on the microSD card will be erased (Figure 1.18).

Figure 1.18 Click to start writing onto the microSD card
• Wait until the writing is confirmed (Figure 1.19)
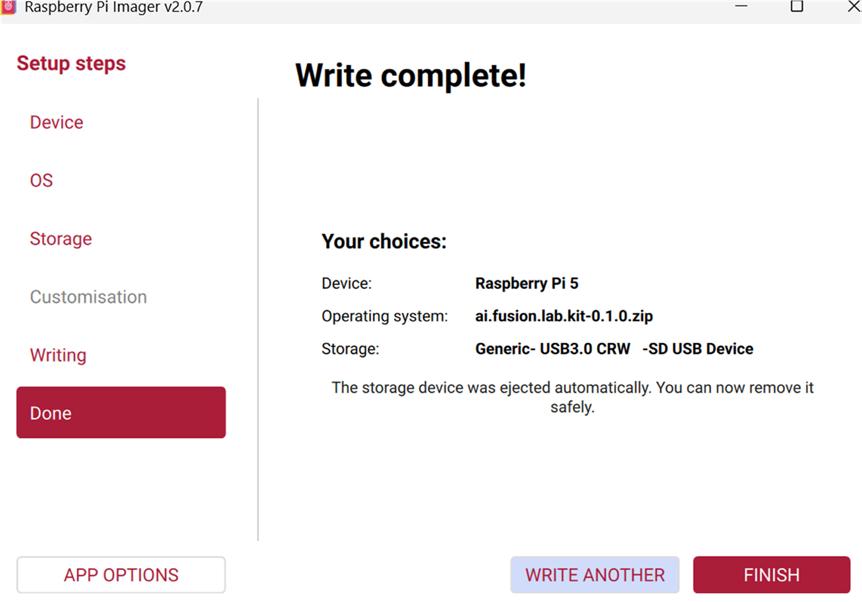
Figure 1.19 Writing complete
• At the time of writing this book, the user was not given the option to customize the installation during running the imager software. Especially, it was not possible to enter the Wi-Fi details to access the Raspberry Pi over a Wi-Fi link. The steps below can be followed to connect your Raspberry Pi to your Wi-Fi router:
• Create a blank file called ssh with no file extension and store this file at the root directory of the installation microSD card.
• Remove the microSD card and insert into the slot on the underside of your Raspberry Pi 5. Your Raspberry Pi is now ready to boot.
• Connect your Raspberry Pi to your Wi-Fi router using an Ethernet cable.
• Start the Powershell on your PC by entering the command mode and then enter the following command:
ssh pi@ai-fusion.local
• Enter yes to confirm the SSH certificate, and then you will be asked to enter the default password (Figure 1.20) which is set to 123456 by default.

Figure 1.20 Enter the Raspberry Pi default password
• You will then be logged in to your Raspberry Pi. Enter the ls command to display a list of the files/folders in your home directory (Figure 1.21).
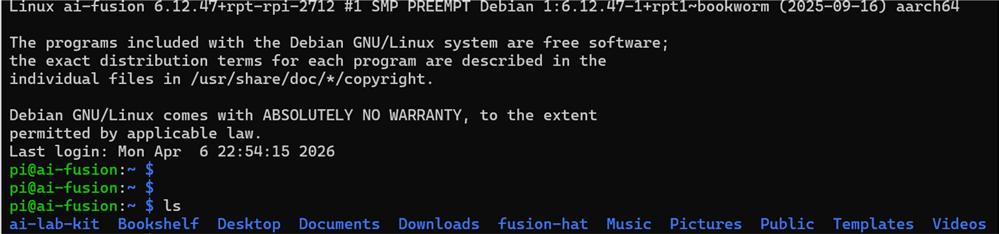
Figure 1.21 Files/folders in the home directory
• Enter command ifconfig (Figure 1.22) or hostname -I to display the IP address assigned to your Raspberry Pi. In author's system, the assigned IP address was 192.168.1.252.
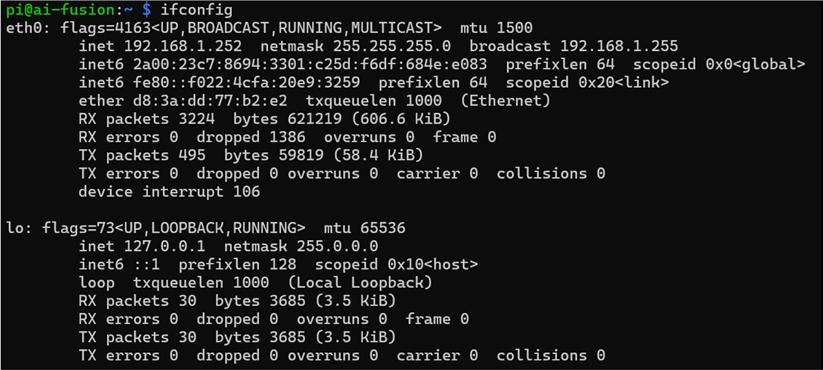
Figure 1.22 Command ifconfig
• Enter the following commands to connect your Raspberry Pi to your Wi-Fi router:
sudo nmcli radio wifi on sudo nmcli dev wifi connect "SSID" password "pwd"
where SSID and pwd are the network name and password of your Wi-Fi router respectively. You should see a message displayed similar to the following:
Device 'wlan0' successfully activated '12c2617xxxxxxxxxx'
You can now disconnect your Raspberry Pi from your Wi-Fi router and access it remotely if you wish. This is explained in the next section.
1.6 Accessing your Raspberry Pi
In this section you will learn how to access your Raspberry Pi so that you can program it. Basically, there are two methods:
• Using a dedicated monitor, keyboard, and mouse
• Setting up a headless connection for remote access (e.g. from your PC).
1.6.1 Using dedicated monitor, keyboard and mouse
This type of access requires the following:
• Raspberry Pi
• Official power supply
• microSD card with the OS on it
• HDMI cable to connect the Raspberry Pi to a monitor
• HDMI monitor
• USB keyboard and mouse
The steps to access using this method are:
• Insert the microSD card into your Raspberry Pi
• Connect the keyboard, mouse, and monitor
• Apply power on your Raspberry Pi
• Wait until the system is booted, after this time the Raspberry Pi OS Desktop will be displayed on the monitor
• Click to open a Terminal and enter your commands
1.6.2 Headless connection for remote access
This is the method preferred by many people. The author uses this method to access his Raspberry Pi 5 from his Windows PC.
The required components are:
• Raspberry Pi
• Official power supply
• microSD card
• A computer (e.g. PC) on the same network
There are several ways that you can access using headless connection.
Using SSH
The easiest method is to connect via SSH. There are several ways of doing it:
1. As described earlier, enter the following command from Powershell on your PC:
ssh pi@ai-fusion.local
The username is pi, and the default password is 123456
2. Connect using the IP address of your Raspberry pi. For example, assuming the IP address of your Pi is 192.168.1.252, enter the following command:
ssh pi@192.168.1.252
3. Using a terminal emulator software (e.g. Putty)
This is the method preferred and used by the author. The steps are:
• Apply power to your Raspberry Pi
• Install a terminal emulation software on your PC. e.g. the Putty program from the following web site:
https://putty.software/
• Find the IP address of your Raspberry Pi either from your router's DHCP list or use a smart phone apps to find the devices connected to your network with a list of their IP addresses. In author's case the IP address when working with Wi-Fi was 192.168.1.251.
• Start the Putty program and select SSH, enter the IP address and click Open (Figure 1.23).
Using the Raspberry Pi and the AI Fusion Lab Kit, this book takes you step by step from the fundamentals of hardware interfacing to the development of intelligent systems capable of seeing, listening, speaking, and making decisions. Whether you are a student, educator, maker, or professional engineer, you will gain valuable experience through projects designed to build both knowledge and confidence.
Beginning with system setup, GPIO programming, sensors, displays, motors, and automation techniques, the book gradually introduces more advanced topics, including speech recognition, text-to-speech synthesis, conversational AI, object recognition, and machine learning. Along the way, you will learn how to create voice-controlled devices, intelligent assistants, camera tracking systems, environmental monitoring solutions, and AI-powered embedded applications.
Explore modern technologies such as OpenAI services, Ollama local large language models, OpenCV, MediaPipe, and YOLO object detection while gaining practical experience with real-world applications used in robotics, industrial automation, smart devices, and autonomous systems. You’ll discover how intelligent software can interact with sensors, cameras, motors, and displays to create systems that respond naturally to the world around them.
Rather than simply following code examples, you will be encouraged to experiment, customize, and expand every project. The techniques and skills developed throughout this book provide a solid foundation for future innovation, rapid prototyping, research, and product development. If you are ready to move beyond traditional electronics and explore the future of intelligent embedded systems, this book will guide you every step of the way.

Prof Dr Dogan Ibrahim has a BSc degree in Electronic Engineering, an MSc degree in Automatic Control Engineering, and a PhD degree in Digital Signal Processing. He worked in many industrial organizations before he returned to academic life.
Prof Ibrahim is the author of over 120 technical books and published over 200 technical articles on microcontrollers, microprocessors, and related fields. He is a chartered electrical engineer and a Fellow of the Institution of Engineering and Technology. He is a certified Arduino professional.