I N S T A L L AT I O N Maywood Studio Creative T iles Design Wall System includes twelve tiles per pack, creating a 3 x 4 grid design area right out of the box. Designed for long-ter m placement, the tiles adhere securely to smooth, clean sur faces. Once applied, the tiles create a stable, pinnable sur face ideal for quilt blocks, fabric swatches, sketches, and more. Tur n any smooth wall into a functional and stylish creative workspace.
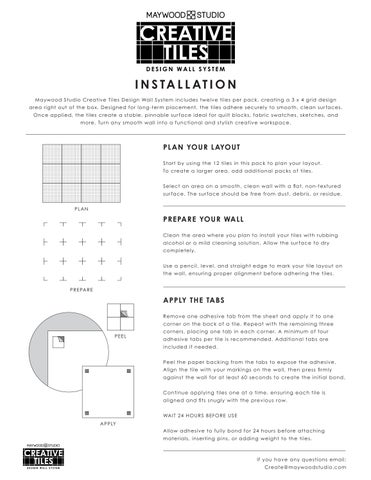
PLAN YOUR LAYOUT Start by using the 12 tiles in this pack to plan your layout. To create a larger area, add additional packs of tiles. Select an area on a smooth, clean wall with a flat, non-textured sur face. The sur face should be free from dust, debris, or residue. PLAN
PREPARE YOUR WALL Clean the area where you plan to install your tiles with rubbing alcohol or a mild cleaning solution. Allow the sur face to dry completely. Use a pencil, level, and straight edge to mark your tile layout on the wall, ensuring proper alignment before adhering the tiles. PREPARE
APPLY THE TABS Remove one adhesive tab from the sheet and apply it to one cor ner on the back of a tile. Repeat with the remaining three PEEL
cor ners, placing one tab in each cor ner. A minimum of four adhesive tabs per tile is recommended. Additional tabs are included if needed. Peel the paper backing from the tabs to expose the adhesive. Align the tile with your markings on the wall, then press fir mly against the wall for at least 60 seconds to create the initial bond. Continue applying tiles one at a time, ensuring each tile is aligned and fits snugly with the previous row. WAIT 24 HOURS BEFORE USE
APPLY Allow adhesive to fully bond for 24 hours before attaching materials, inserting pins, or adding weight to the tiles.
If you have any questions email: Create@maywoodstudio.com