
www.studio e fabrics.com
www.studio e fabrics.com
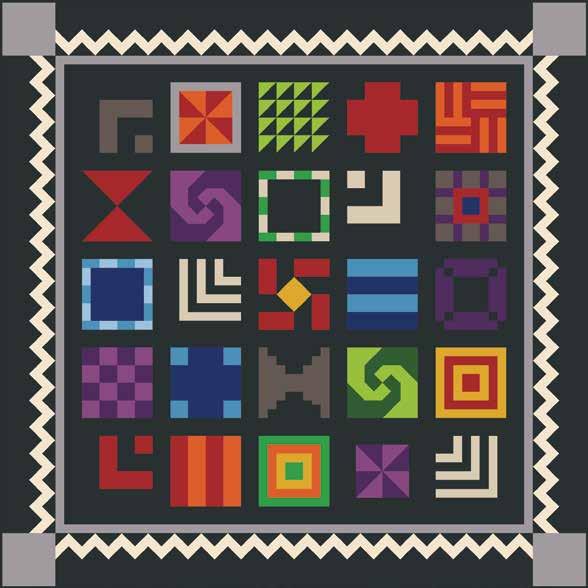
Featuring fabrics from the Brushstrokes collection by Pepper Cory for
Fabric Requirements
(A) 3051-91 ............. 4 ⅛ yards*
(B) 3051-33 .............. ⅔ yard
(C) 3051-09 .............. ⅔ yard
(D) 3051-39 .............. ¼ yard
(E) 3051-43 .............. ⅓ yard
(F) 3051-88 .............. ⅔ yard
(G) 3051-46 .............. ⅓ yard
(H) 3051-66 .............. ⅓ yard
(I) 3051-67 ............... ¼ yard
(J) 3051-58 ............... ¼ yard
(K) 3051-55 .............. ½ yard
(L) 3051-77 .............. ½ yard
(M) 3051-11 ............. ⅛ yard
(N) 3051-71 .............. ¼ yard
(O) 3051-44 .............. ¼ yard
(P) 3051-03 .............. 1 yard
Backing 3051-91 .............. 4 ¼ yards
Additional Supplies Needed
Batting: 74” x 74”
Piecing & sewing thread
Quilting & sewing supplies
Quilts designed by: Megan Downer
Finished Quilt Size: 66" x 66"
*Includes Binding
We have included two patterns that use a retired line of Brushstrokes by Pepper Cory. Pepper has translated the colors from Brushstrokes line to the current Peppered Cottons colors: Brushstrokes
3051-91
3051-33
3051-09
3051-39
3051-77
3051-11
Cutting Instructions
Please note: All strips are cut across the width of fabric (WOF) from selvage to selvage edge.
WOF= Width of Fabric • LOF = Length of Fabric
Fabric A (3051-91 Brushstrokes – Raven), cut:
• (9) 2 ½” x WOF strips. Sew strips together end to end, with diagonal seams, and cut (6) 2 ½” x 52 ½” strips.
• (3) 8 ½” x WOF strips, sub-cut (33) 2 ½” x 8 ½” strips, (3) 2 ½” x 6 ½” strips and (3) 2 ½” x 4 ½” strips.
• (4) 3 ½” x WOF strips, sub-cut (72) 2” x 3 ½” strips.
• (7) 2” x WOF strips, sub-cut (144) 2” squares.
• (2) 2 ½” x WOF strips, sub-cut (17) 2 ½” squares.
• (1) 9 ¼” x WOF strip, sub-cut (1) 9 ¼” square and (1) 6 ½” square. Cut the 9 ¼” square across both diagonals to make (4) 9 ¼” triangles. Note: You will only use (2) of the triangles.
• (6) 3 ½” x WOF strips. Sew strips together end to end, with diagonal seams, and cut (4) 3 ½” x 54 ½” strips.
• (1) 4 ½” x WOF strip, sub-cut (1) 4 ½” square, (8) 1 ½” squares and (2) 1 ½” x 2 ½” strips.
• (1) 8 ½” x WOF strip, sub-cut (6) 1 ½” x 8 ½” strips, (2) 1 ½” x 7 ½” strips, (6) 1 ½” x 6 ½” strips, (2)1 ½” x 5 ½” strips, (4) 1 ½” x 4 ½” strips and (2) 1 ½” x 3 ½” strips.
• (7) 2 ½” x WOF strips for the binding.
Fabric B (3051-33 Brushstrokes – Mushroom), cut:
• (1) 7 ½” x WOF strip, sub-cut (2) 1 ½” x 7 ½” strips, (2) 1 ½” x 6 ½” strips, (2) 1 ½” x 5 ½” strips, (2)1 ½” x 4 ½” strips, (2) 1 ½” x 3 ½” strips, (9) 1 ½” x 2 ½” strips, (1) 2 ½” square, (1) 2 ½” x 4 ½” strip and (1) 2 ½” x 6 ½” strip.
Fabric C (3051-09 Brushstrokes – Pewter), cut:
• (1) 8 ½” x WOF strip, sub-cut (2) 1 ½” x 8 ½” strips, (4) 6 ½” squares, and (2) 1 ½” x 6 ½” strip.
• (3) 1 ½” x WOF strips. Sew strips together end to end, with diagonal seams, and cut (2) 1 ½” x 52 ½” strips.
• (3) 1 ½” x WOF strips. Sew strips together end to end, with diagonal seams, and cut (2) 1 ½” x 54 ½” strips.
Fabric D (3051-39 Brushstrokes – Bark), cut:
• (1) 6 ½” x WOF strip, sub-cut (1) 2 ½” x 6 ½” strip, (2) 1 ½” x 6 ½” strips, (1) 2 ½” x 4 ½” strip, (2)1 ½” x 4 ½” strips, and (10) 2 ½” squares.
Fabric E (3051-43 Brushstrokes – Tangerine), cut:
• (1) 8 ½” x WOF strip, sub-cut (2) 2 ½” x 8 ½” strips, (2) 1 ½” x 6 ½” strips, (10) 1 ½” x 4 ½” strips and (2) 3 ⅞” squares.
Fabric F (3051-88 Brushstrokes – Crimson), cut:
• (1) 9 ¼” x WOF strip, sub-cut (1) 9 ¼” square, (2) 3 ⅞” squares and (2) 1 ½” x 2 ½” strips. Cut the 9 ¼” square across both diagonals to make (4) 9 ¼” triangles. Note: You will only use (2) of the triangles.
• (1) 8 ½” x WOF strip, sub-cut (2) 2 ½” x 8 ½” strips, (2) 1 ½” x 6 ½” strips, (1) 2 ½” x 6 ½” strip, (1) 2 ½” x 4 ½” strip and (12) 1 ½” x 4 ½” strips.
• (2) 2 ½” x WOF strips, sub-cut (22) 2 ½” squares.
Fabric G (3051-46 Brushstrokes – Sprout), cut:
• (1) 2 ⅞” x WOF strip, sub-cut (8) 2 ⅞” squares.
• (1) 4 ⅞” x WOF strip, sub-cut (1) 4 ⅞” square, (1) 3 ¾” square, (1) 3” square and (2) 1 ⅞” squares. Cut the 4 ⅞” square, the 3 ¾” square and the 3” square across (1) diagonal to make (2) 4 ⅞” triangles, (2) 3 ¾” triangles and (2) 3” triangles.
Fabric H (3051-66 Brushstrokes – Kale), cut:
• (1) 2 ⅞” x WOF strip, sub-cut (8) 2 ⅞” squares.
• (1) 4 ⅞” x WOF strip, sub-cut (1) 4 ⅞” square, (1) 3 ¾” square, (1) 3” square and (2) 1 ⅞” squares. Cut the 4 ⅞” square, the 3 ¾” square and the 3” square across (1) diagonal to make (2) 4 ⅞” triangles, (2) 3 ¾” triangles and (2) 3” triangles.
Fabric I (3051-67 Brushstrokes – Shamrock), cut:
• (1) 2 ½” x WOF strip, sub-cut (7) 1 ½” x 2 ½” strips and (1) 2 ½” square.
• (1) 1 ½” x WOF strip, sub-cut (2) 1 ½” x 8 ½” strips and (2) 1 ½” x 6 ½” strips.
Fabric J (3051-058 Brushstrokes – Lotus Pink), cut:
• (1) 4 ⅞” x WOF strip, sub-cut (1) 4 ⅞” square, (2) 3 ⅞” squares, (1) 3 ¾” square, (1) 3” square and (2)1 ⅞” squares. Cut the 4 ⅞” square, the 3 ¾” square and the 3” square across (1) diagonal to make (2) 4 ⅞” triangles, (2) 3 ¾” triangles and (2) 3” triangles.
• (1) 2 ½” x WOF strip, sub-cut (8) 2 ½” squares.
Fabric K (3051-55 Brushstrokes – Mulberry), cut:
• (1) 4 ⅞” x WOF strip, sub-cut (1) 4 ⅞” square, (2) 3 ⅞” squares, (1) 3 ¾” square, (1) 3” square and (8)2 ½” squares. Cut the 4 ⅞” square, the 3 ¾” square and the 3” square across (1) diagonal to make (2) 4 ⅞” triangles, (2) 3 ¾” triangles and (2) 3” triangles.
• (1) 6 ½” x WOF strip, sub-cut (4) 1 ½” x 6 ½” strips, (4) 1 ½” x 4 ½” strips, (8) 1 ½” x 2 ½” strips and (2)1 ⅞” squares.
Fabric L (3051-77 Brushstrokes – Indigo), cut:
• (1) 6 ½” x WOF strip, sub-cut (1) 6 ½” square and (2) 2 ½” x 8 ½” strips.
• (1) 2 ½” x WOF strip, sub-cut (13) 2 ½” squares.
Fabric M (3051-11 Brushstrokes – Horizon Blue), cut:
• (1) 1 ½” x WOF strip, sub-cut (7) 1 ½” x 2 ½” strips.
Fabric N (3051-71 Brushstrokes – Bahama Blue), cut:
• (1) 1 ½” x WOF strip, sub-cut (7) 1 ½” x 2 ½” strips.
• (1) 2 ½” x WOF strip, sub-cut (2) 2 ½” x 8 ½” strips and (4) 2 ½” squares.
Fabric O (3051-44 Brushstrokes – Gold), cut:
• (1) 4 ½” x WOF strip, sub-cut (1) 4 ½” square, (4) 1 ½” x 4 ½” strips and (4) 1 ½” x 2 ½” strips.
• (1) 1 ½” x WOF strip, sub-cut (2) 1 ½” x 8 ½” strips and (2) 1 ½” x 6 ½” strips.
Fabric P (3051-03 Brushstrokes – Parchment), cut:
• (7) 2” x WOF strips, sub-cut (144) 2” squares.
• (6) 2” x WOF strips, sub-cut (72) 2” x 3 ½” strips.
Backing (3051-91 Brushstrokes – Raven), cut:
• (2) 74” x WOF strips. Sew the strips together and trim to 74” x 74” for the back.
Sew using a ¼” seam allowance with right sides together (RST) unless otherwise indicated. Always press towards the darker fabric while assembling, unless otherwise noted by the arrows.
1.Sew (1) 2 ½” Fabric A square to the left side of (1) 2 ½” Fabric D square. Sew (1) 2 ½” x 4 ½” Fabric A strip to the top of the AD strip to make (1) ADA unit (Fig. 1).
2.Sew (1) 2 ½” x 4 ½” Fabric D strip to the left side of the ADA unit. Sew (1) 2 ½” x 6 ½” Fabric D strip to the top of the ADA unit (Fig. 2).
3.Sew (1) 2 ½” x 6 ½” Fabric A strip to the left side of the ADA unit. Sew (1) 2 ½” x 8 ½” Fabric A strip to the top of the ADA unit to make (1) AD block (Fig. 3).
4.Repeat Steps 1-3 using Fabric A and Fabric B strips to make (1) AB block (Fig. 4).
5.Repeat Steps 1-3 using Fabric A and Fabric F strips to make (1) AF block (Fig. 5).
2
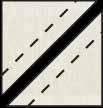
6.Place (1) 3 ⅞” Fabric E square on top of (1) 3 ⅞” Fabric F square, right sides together. Draw a line across the diagonal of the top square (Fig. 6). Sew ¼” away from each side of the drawn diagonal line (Fig. 6). Cut the two squares apart on the drawn diagonal line (Fig. 7) to make (2) FE units (Fig. 8). Trim the FE units to measure 3 ½” square. Repeat to make (4) FE units total.
7.Sew (4) FE units together to make (1) FE square (Fig. 9).
8.Sew (1) 1 ½” x 6 ½” Fabric C strip to each side of the FE square. Sew (1) 1 ½” x 8 ½” Fabric C strip to the top and to the bottom of the FE square to make (1) FEC block (Fig. 10).
9.Repeat Steps 6-8 using (2) 3 ⅞” Fabric J squares, (2) 3 ⅞” Fabric K squares, (2) 1 ½” x 6 ½” Fabric A strips and (2) 1 ½” x 8 ½” Fabric A strips to make (1) JK block (Fig. 11).
10.Repeat Step 6 using (8) 2 ⅞” Fabric G squares and (8) 2 ⅞” Fabric H squares to make (16) 2 ½” GH units (Fig. 12).
11.Sew (16) GH units together into a four by four matrix to make (1) GH block (Fig. 13).
12. Sew (12) 2 ½” Fabric F squares and (4) 2 ½” Fabric A squares together into a four by four matrix with the Fabric A squares at the corners to make (1) FA block (Fig. 14).
13. Sew (12) 2 ½” Fabric L squares and (4) 2 ½” Fabric N squares together into a four by four matrix with the Fabric N squares at the corners to make (1) NL block (Fig. 15).
14. Sew (2) 2 ½” Fabric K squares and (2) 2 ½” Fabric J squares together, alternating them, to make (1) strip. Repeat to make (4) strips total. Sew the (4) strips together to make (1) KJ block (Fig. 16).
15. Sew (2) 1 ½” x 4 ½” Fabric E strips and (2) 1 ½” x 4 ½” Fabric F strips together lengthwise, alternating them, to make (1) FE unit (Fig. 17). Repeat to make (4) FE units total.
16. Sew the (4) FE units together to make (1) FE block (Fig. 18). Pay attention to the orientation of the FE units.
17. Sew (2) 9 ¼” Fabric A triangles and (2) 9 ¼” Fabric F triangles together to make (1) FA square (Fig. 19).
18 Sew (2) 1 ⅞” Fabric K squares and (2) 1 ⅞” Fabric J squares together to make (1) KJ unit (Fig. 20).
19. Sew (1) Fabric J 3” triangle to opposite sides of the KJ unit. Sew (1) Fabric K 3” triangle to the other sides of the KJ unit (Fig. 21). Square to 4 ½”.
20. Sew (1) 3 ¾” Fabric J triangle to opposite sides of the KJ unit. Sew (1) 3 ¾” Fabric K triangle to the other sides of the KJ unit (Fig. 22). Square to 6 ⅛”.
21. Sew (1) 4 ⅞” Fabric J triangle to opposite sides of the KJ unit. Sew (1) 4 ⅞” Fabric K triangle to the other sides of the KJ unit to make (1) JK pinwheel block (Fig. 23). Square to 8 ½”.
22. Repeat Steps 18-21 using 1 ⅞” Fabric G and H squares, 3” Fabric G and H triangles; 3 ¾” Fabric G and H triangles; and 4 ⅞” Fabric G and H triangles to make (1) HG pinwheel block (Fig. 24).
23.Follow Figure 25 and sew (7) 1 ½” x 2 ½” Fabric B strips, (7) 1 ½” x 2 ½” Fabric I strips and (1) 6 ½” Fabric A square together to make (1) ABI block.
24.Repeat Step 23 using 1 ½” x 2 ½” Fabric M and Fabric N strips and (1) 6 ½” Fabric L square to make (1) LMN block (Fig. 26).
25.Follow Figure 27 and sew 2 ½” Fabric L square, (8) 2 ½” Fabric D squares, (2) 1 ½” x 2 ½” Fabric F strips, (2)1 ½” x 4 ½” Fabric F strips and (8) 1 ½” x 2 ½” Fabric K strips together to make (1) DL-block.
26.Sew (1) 1 ½” x 2 ½” Fabric B strip to the top of (1) 2 ½” Fabric A square. Sew (1) 1 ½” x 3 ½” Fabric B strip to the left side of the Fabric A square to make (1) AB unit (Fig. 28).
27.Sew (1) 1 ½” x 3 ½” Fabric A strip to the top of the AB unit. Sew 1 ½” x 4 ½” Fabric A strip to the left side of the AB unit (Fig. 29).
28.Sew (1) 1 ½” x 4 ½” Fabric B strip to the top of the AB unit. Sew 1 ½” x 5 ½” Fabric B strip to the left side of the AB unit (Fig. 30).
29.Sew (1) 1 ½” x 5 ½” Fabric A strip to the top of the AB unit. Sew 1 ½” x 6 ½” Fabric A strip to the left side of the AB unit (Fig. 31).
30.Sew (1) 1 ½” x 6 ½” Fabric B strip to the top of the AB unit. Sew 1 ½” x 7 ½” Fabric B strip to the left side of the AB unit (Fig. 32).
31.Sew (1) 1 ½” x 7 ½” Fabric A strip to the top of the AB unit. Sew 1 ½” x 8 ½” Fabric A strip to the left side of the AB unit to make (1) BA block. (Fig. 33).
32.Repeat Steps 27-31 to make a second BA block.
28Fig. 29Fig. 30Fig. 31Fig. 32Fig. 33
33.Place (1) 2 ½” Fabric A square on the top left corner of (1) 4 ½” Fabric O square, right sides together (Fig. 34). Sew across the diagonal of the smaller square from the upper right corner to the lower left corner (Fig. 34). Flip open the triangle formed and press (Fig. 35). Trim away the excess fabric from behind the triangle ¼” away from the sewn seam.
34.Follow Figure 36 for the seam direction to add a 2 ½” Fabric A square to each of the remaining corners of the 4 ½” Fabric O square to make (1) O block (Fig. 37).
35.Sew (8) 2 ½” Fabric F squares, (4) 2 ½” Fabric A squares and (1) O block together to make (1) FO block (Fig. 38).
36.Sew (2) 2 ½” x 8 ½” Fabric N strips and (2) 2 ½” x 8 ½” Fabric L strips together lengthwise, alternating them, to make (1) N block (Fig. 39).
37.Sew (2) 2 ½” x 8 ½” Fabric F strips and (2) 2 ½” x 8 ½” Fabric E strips together lengthwise, alternating them, to make (1) EF block (Fig. 40).
38.Sew (1) 1 ½” x 4 ½” Fabric K strip to each side of (1) 4 ½” Fabric A square. Sew (1) 1 ½” Fabric A squares to each end of (1) 1 ½” x 4 ½” Fabric K strip. Repeat to make a second strip. Sew the strips to the top and to the bottom of the Fabric A square to make (1) KA unit (Fig. 41).
39.Sew (1) 1 ½” x 6 ½” Fabric K strip to each side of (1) KA unit. Sew (1) 1 ½” Fabric A squares to each end of (1) 1 ½” x 6 ½” Fabric K strip. Repeat to make a second strip. Sew the strips to the top and to the bottom of the KA unit to make (1) KA block (Fig. 42).
40.Sew (1) 1 ½” x 2 ½” Fabric A strip to the top and to the bottom of (1) 2 ½” Fabric D square. Sew (1) 1 ½” x 4 ½” Fabric D strip to each side of the Fabric D square to make (1) DA unit (Fig. 43).
41.Sew (1) 1 ½” x 4 ½” Fabric A strip to the top and to the bottom of the DA unit. Sew (1) 1 ½” x 6 ½” Fabric D strip to each side of the DA unit (Fig. 44).
42.Sew (1) 1 ½” x 6 ½” Fabric A strip to the top and to the bottom of the DA unit. Sew (1) 1 ½” x 8 ½” Fabric A strip to each side of the DA unit to make (1) D block (Fig. 45).
43. Sew (1) 1 ½” x 2 ½” Fabric O strip to each side of (1) 2 ½” Fabric F square. Sew one 1 ½” x 4 ½” Fabric O strip to the top and to the bottom of the Fabric F square to make (1) OF unit (Fig. 46).
44. Sew (1) 1 ½” x 4 ½” Fabric F strip to each side of the OF unit. Sew (1) 1 ½” x 6 ½” Fabric F strip to the top and to the bottom of the OF unit (Fig. 47).
45. Sew (1) 1 ½” x 6 ½” Fabric O strip to each side of the OF unit. Sew (1) 1 ½” x 8 ½” Fabric O strip to the top and to the bottom of the OF unit to make (1) OF block (Fig. 48).
46. Repeat Steps 43-45 using (1) 2 ½” Fabric I square, (2) 1 ½” x 2 ½” Fabric O strips, (2) 1 ½” x 4 ½” Fabric O strips, (2) 1 ½” x 4 ½” Fabric E strips, (2) 1 ½” x 6 ½” Fabric E strips, (2) 1 ½” x 6 ½” Fabric I strips and (2) 1 ½” x 8 ½” Fabric I strips to make (1) IEO block (Fig. 49).
47. Place (1) 2” Fabric A square on the left side of (1) 2” x 3 ½” Fabric P strip, right sides together (Fig. 50). Sew across the diagonal of the square from the upper right corner to the lower left corner (Fig. 50). Flip open the triangle formed and press (Fig. 51). Trim away the excess fabric from behind the triangle, leaving a ¼” seam allowance.
48. Place another 2” Fabric A square on the right side of the 2” x 3 ½” Fabric P strip, right sides together (Fig. 52). Sew across the diagonal of the square from the upper left corner to the lower right corner (Fig. 52). Flip open the triangle formed and press (Fig. 53). Trim away the excess fabric from behind the triangle, leaving a ¼” seam allowance to make (1) APA unit.
49. Repeat Steps 47-48 to make (72) APA units total.
50. Repeat Steps 47-48 using (72) 2” x 3 ½” Fabric A strips and (144) 2” Fabric P squares to make (72) PAP units (Fig. 54).
51. Sew (1) PAP unit and APA unit together lengthwise to make (1) PAP block (Fig. 55). Repeat to make (72) PAP blocks total.
52. Sew (18) PAP blocks together to make (1) PAP strip (Fig. 56). Repeat to make (4) PAP strips total.
(Follow the Quilt Layout while assembling the quilt top.)
53. Sew (6) 2 ½” x 8 ½” Fabric A strips and (5) assorted blocks together, alternating them, to make (1) row. Repeat to make (5) rows total.
54. Sew (6) 2 ½” x 52 ½” Fabric A strips and the (5) rows together, alternating them, to make the quilt top.
55. Sew (1) 1 ½” x 52 ½” Fabric C strip to each side of the quilt top. Sew (1) 1 ½” x 54 ½” Fabric C strip to the top and to the bottom of the quilt top.
56. Sew (1) PAP and (1) 3 ½” x 54 ½” Fabric A strip together lengthwise to make (1) strip. Repeat to make (4) strips. Sew (1) strip to each side of the quilt top. Sew (1) 6 ½” Fabric C square to each end of the remaining (2) strips. Sew the resulting strips to the top and to the bottom of the quilt top.
57. Press the quilt top and 74” x 74” backing well. Layer backing (wrong side up), batting, pressed quilt top (right side up) and baste. Quilt as desired and trim excess batting and backing when quilting is complete.
58. Cut the ends of the (7) Fabric A binding strips at a 45-degree angle and sew end to end to make (1) continuous piece of binding. Fold in half lengthwise and press wrong sides together.
59. Sew the binding to the front of the quilt, raw edges together. Turn the folded edge to the back, and hand stitch in place.

www.studio e fabrics.com
Fabric Requirements
(A) 3213-51 ............. 1 ¾ yards
(B) 3213-01 ............. 1 ¼ yards
(C) 3213-00 .............. 1 ¼ yards
(D) 3213-16 ............. ½ yard
(E) 3213-90 .............. ½ yard
(F) 3213-20 .............. ½ yard
(G) 3213-97 ............. ½ yard
(H) 3213-99 ............. 1 ⅛ yards*
(I) 3213-91 ............... ½ yard
(J) 3213-52 ............... ½ yard
Backing (Your Choice) ........... 5 ¼ yards
*includes binding
Additional Supplies Needed
Batting 80" x 92"
Piecing and sewing thread
Quilting and sewing supplies
Quilt designed by Heidi Pridemore
Finished Quilt Size 72" x 84"
Cutting Instructions
Please Note: All strips are cut across the width of fabric (WOF) from selvage to selvage edge unless otherwise noted.
WOF= Width of Fabric • LOF = Length of Fabric
Fabric A (3213-51 Ashes of Roses), cut:
•(6) 9 ⅞” x WOF strips. Sub-cut the strips into (21) 9 ⅞” squares. Cut each square across one diagonal to make (42) large triangles.
Fabric B (3213-01 Sea Glass), cut:
•(4) 9 ½” x WOF strips. Sub-cut the strips into (42) 3 ½” x 9 ½” strips.
Fabric C (3213-00 Lake), cut:
•(4) 9 ½” x WOF strips. Sub-cut the strips into (42) 3 ½” x 9 ½” strips.
Fabric D (3213-16 Flame), cut:
•(4) 3 ½” x WOF strips. Sub-cut the strips into (42) 3 ½” squares.
Fabric E (3213-90 Grellow), cut:
•(3) 3 ⅞” x WOF strips. Sub-cut the strips into (21) 3 ⅞” squares. Cut each square across one diagonal to make (42) small triangles.
Fabric F (3213-20 Pearl), cut:
•(4) 3 ½” x WOF strips. Sub-cut the strips into (42) 3 ½” squares.
Fabric G (3213-97 Greige), cut:
•(3) 3 ⅞” x WOF strips. Sub-cut the strips into (21) 3 ⅞” squares. Cut each square across one diagonal to make (42) small triangles.
Fabric H (3213-99 True Taupe), cut:
•(4) 3 ½” x WOF strips. Sub-cut the strips into (42) 3 ½” squares.
•(8) 2 ½” x WOF strips for binding
Fabric I (3213-91 Citrus Yellow), cut:
•(4) 3 ½” x WOF strips. Sub-cut the strips into (42) 3 ½” squares.
Fabric J (3213-Sunny Aqua), cut:
•(3) 3 ⅞” x WOF strips. Sub-cut the strips into (21) 3 ⅞” squares. Cut each square across one diagonal to make (42) small triangles.
Backing (Your Choice), cut:
•(2) 92” x WOF strips. Sew the strips together and trim to make 80” x 92” piece for the backing.
Sew using a ¼” seam allowance with right sides together (RST) unless otherwise indicated. Always press towards the darker fabric while assembling, unless otherwise noted by the arrows.
1.Sew together (1) 3 ½” Fabric H square, (1) 3 ½” F square and (1) Fabric E small triangle to make Unit One (Fig. 1).
2.Sew together (1) 3 ½” Fabric I square and (1) Fabric G small triangle to make Unit Two (Fig. 2).
3.Sew together (1) Unit One, (1) Unit Two and (1) Fabric J small triangle to make (1) triangle unit (Fig. 3).
4.Sew (1) Fabric A Large triangle to the triangle unit to make (1) 9 ½” square (Fig. 4).
Fig. 1
Fig. 2
Fig. 3
5.Sew (1) 3 ½” x 9 ½” Fabric C strip to the pieced side of the 9 ½” square (Fig. 5).
6.Sew (1) 3 ½” Fabric D square to one end of (1) 3 ½” x 9 ½” Fabric B strip (Fig. 6).
7.Sew the D/B strip to the pieced bottom of the 9 ½” square to complete one 12 ½” Block (Fig. 7).
8.Repeat Steps 1-7 to make (42) blocks.
(Refer to the Quilt Layout for the block orientation.)
9.Sew the blocks together into seven rows with six blocks in each row.
10.Sew the rows together to make the quilt top.
11.Sew the (2) 92” x WOF strips together and trim to make (1) 80” x 92” backing piece.
12.Press the quilt top and backing well. Layer backing (wrong side up), batting, pressed quilt top (right side up) and baste. Quilt as desired and trim excess batting and backing when quilting is complete.
13.Cut the ends of the (8) Fabric H binding strips at a 45-degree angle and sew end to end to make one continuous piece of binding. Fold in half lengthwise and press wrong sides together.
14.Sew the binding to the front of the quilt, raw edges together. Turn the folded edge to the back, and hand stitch in place.
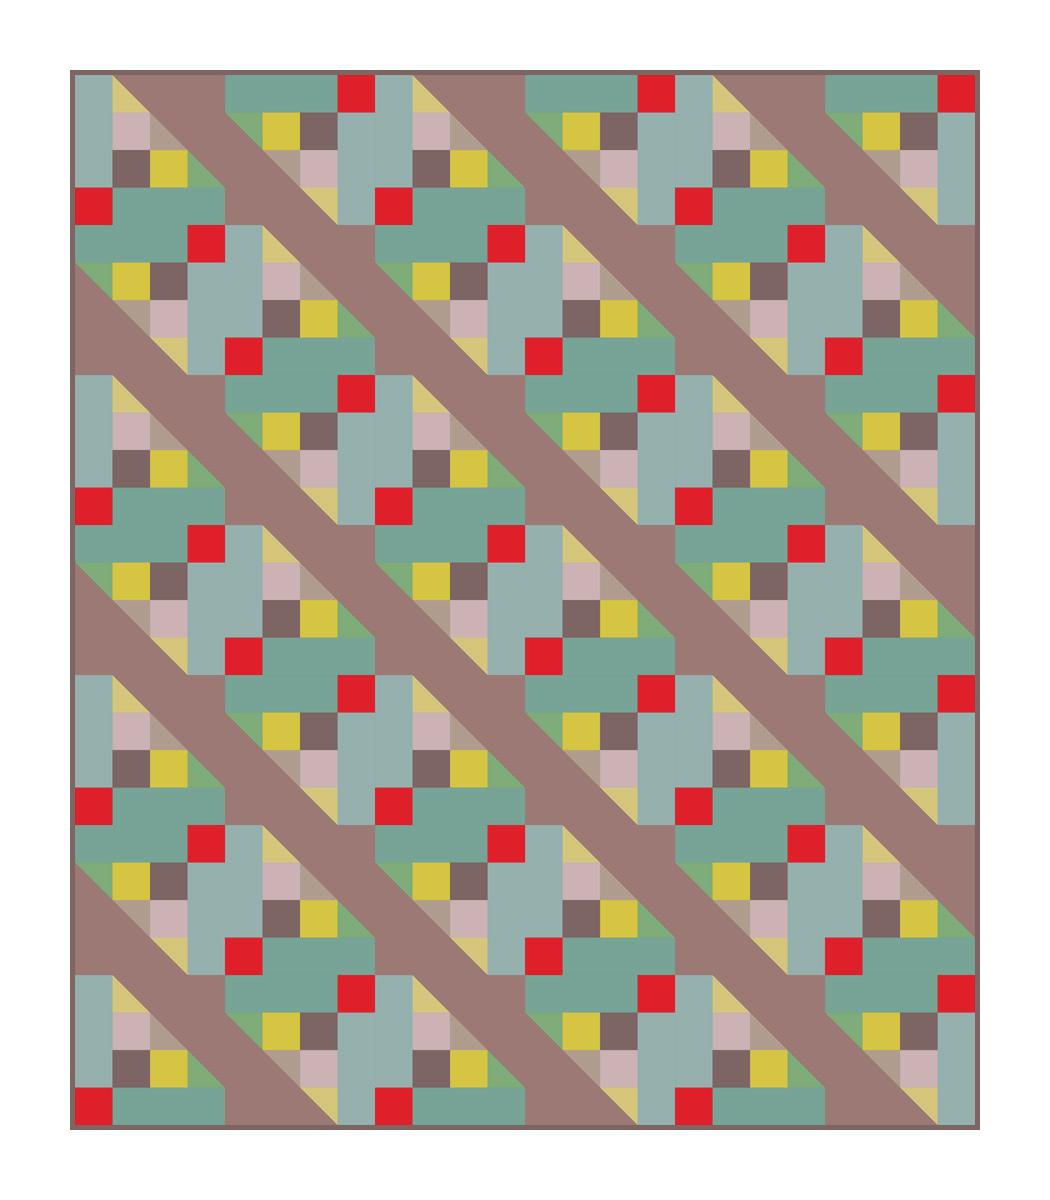
Quilt Layout
Free Project NOT FOR RESALE
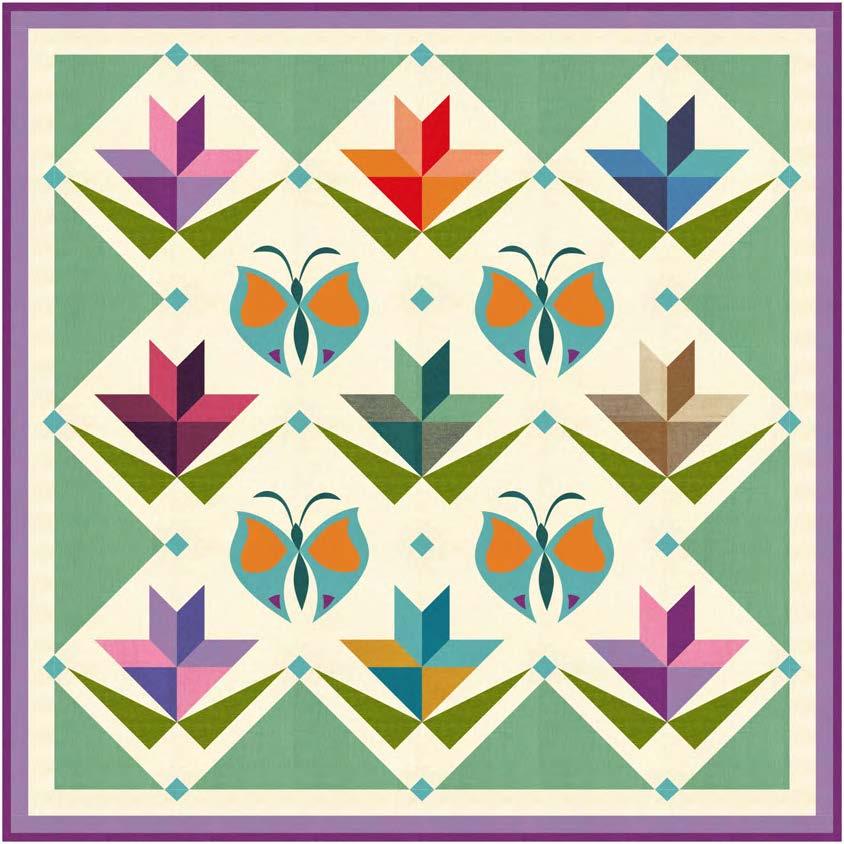
Featuring fabrics from the Peppered Cottons collection from
Fabric Requirements
(A)Carnation-59 1/8 yard
(B)Flame-16 1/8 yard
(C)Atomic Tangerine-69 1/8 yard
(D)Parrish Blue-67 1/8 yard
(E)Midnight-82 1/8 yard
(F)Cherry-19 1/8 yard
(G)Aubergine-34 1/8 yard
(H)Cinnamon Pink-65 1/8 yard
(I)Moss-38 1/8 yard
(J)Pepper-31 1/8 yard
(K)Tobacco-85 1/8 yard
(L) Sand-39 1/8 yard
(M)Hyacinth-80 1/8 yard
(N)Saffron-25 1/8 yard
(O)Lagoon-78 1/8 yard
(P)True Cheddar-36 1/4 yard
(Q)Marine Blue-11 1/4 yard
(R)Green Tea-22 1/2 yard
(S)Miami-58 1/2 yard
(T)Magenta-42* 1/2 yard
(U)Surf-75 1/2 yard
(V)Sage-72 2/3 yard
(W)Vanilla-46 2-1/8 yards

Backing Fuchsia-40 3-1/4 yards
*Includes Binding
Additional Supplies Needed
Batting: 56” x 56” piece of batting
Sewing and Quilting thread
Sewing and Quilting supplies
Fusible Web, Tracing paper
Plastic for Template
Quilt size: 48” x 48”
Skill Level: Advanced Beginner
Quilt designed by Denise Russell






















Cutting Instructions

Please note: All strips are cut across the width of the fabric (WOF) from selvage to selvage unless otherwise noted. (WOF = Width of Fabric, LOF = Length of Fabric)
Fabric A (Carnation-59), cut:
*(1) 3-1/8” x WOF strip. Sub-cut: -(4) 3-1/8” squares; and -(5) 2-3/4” squares.
Fabric B (Flame-16), cut:
*(1) 3-1/8” x WOF strip. Sub-cut:
-(2) 3-1/8” squares; and -(1) 2-3/4” square.
Fabric C (Atomic Tangerine-69),
Fabric H (Cinnamon Pink-65),
Fabric L (Sand-39) each, cut:
*(1) 3-1/8” x WOF strip. Sub-cut:
-(2) 3-1/8” squares; and -(2) 2-3/4” square.
Fabric D (Parrish Blue-67),
Fabric E (Midnight-82),
Fabric G (Aubergine-34),
Fabric I (Moss-38),
Fabric J (Pepper-31),
Fabric K (Tobacco-85),
Fabric M (Hyacinth-80),
Fabric N (Saffron-25),
Fabric O (Lagoon-78) each, cut:
*(1) 3-1/8” x WOF strip. Sub-cut: -(2) 3-1/8” squares; and -(1) 2-3/4” square.
Fabric F (Cherry-19), cut:
*(1) 3-1/8” x WOF strip. Sub-cut:
-(5) 3-1/8” squares; and -(3) 2-3/4” square.
Fabric P (True Cheddar-36), cut:
*(1) 3-1/8” x WOF strip. Sub-cut:
-(2) 3-1/8” squares; and -(1) 2-3/4” square.
*(8) Butterfly motifs D and E
Cutting Instructions
Please note: All strips are cut across the width of the fabric (WOF) from selvage to selvage unless otherwise noted. (WOF = Width of Fabric, LOF = Length of Fabric)
Fabric Q (Marine Blue-11), cut:
*(1) 3-1/8” x WOF strip. Sub-cut:
-(2) 3-1/8” squares; and
-(1) 2-3/4” square.
*(4 each) Butterfly motifs A, B, C, and H.
Fabric R (Green Tea-22), cut:
*(2) 8-1/4” x WOF strips. Sub-cut eighteen 3” x 8-1/4” rectangles.
Fabric S (Miami-58), cut:
*(1) 3-1/8” x WOF strip. Sub-cut:
-(5) 3-1/8” squares; and
-(4) 2-3/4” square.
*(5) 1-1/2” x WOF strips for border 2.
Fabric T (Magenta-42), cut:
*(4 each) Butterfly motifs I and J.
*(5) 2-1/2” x WOF strips for binding.
Fabric U (Surf-75), cut:
*(1) 1-1/2” x WOF strip. Sub-cut (12) 1-1/2” squares (cornerstones)
*(1) 1-7/8” x WOF strip. Sub-cut (6) squares once diagonally. (AA)
*(1) 2” x WOF strip. Sub-cut (24) 1-1/2” x 2” strips.
*(1) 3-1/8” x WOF strip. Sub-cut:
-(4) 3-1/8” squares; and
-(4) 2-3/4” square.
*(4 each) Butterfly wings motifs F and G.
Fabric V (Sage-72), cut:
*(1) 7-1/4” x WOF strip. Sub-cut (2) 7-1/4” squares; cut once diagonally. (BB)
*(1) 14” x WOF strip. Sub-cut (2) 14” squares; cut twice diagonally. (CC)
Fabric W (Vanilla-46), cut:
*(1) 2-3/4” x WOF strip. Sub-cut (15) 2-3/4” squares.
*(2) 3-1/4” x WOF strips. Sub-cut:
-(24) 2-1/2” x 3-1/4” rectangles; and
-(3) 2-3/4” squares (for a total of 18).
*(2) 5” x WOF strips. Sub-cut (18) 2-3/4” x 5” rectangles.
*(2) 8-1/4” x WOF strips. Sub-cut eighteen 3” x 8-1/4” rectangles.
*(3) 9-5/8” x WOF strips. Sub-cut:
-(36) 1-1/2” x 9-1/2” sashing strips; and
-(4) 9-5/8” squares for applique’ background.
*(4) 2” x WOF strips. Sub-cut for border 1:
-(4) 2” x 7” rectangles;
-(4) 2” x 8” rectangles; and
-(8) 2” x 11-3/4” rectangles.
Block Assembly
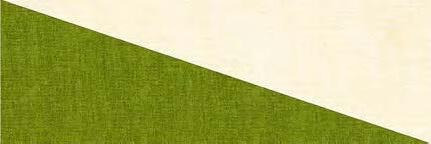
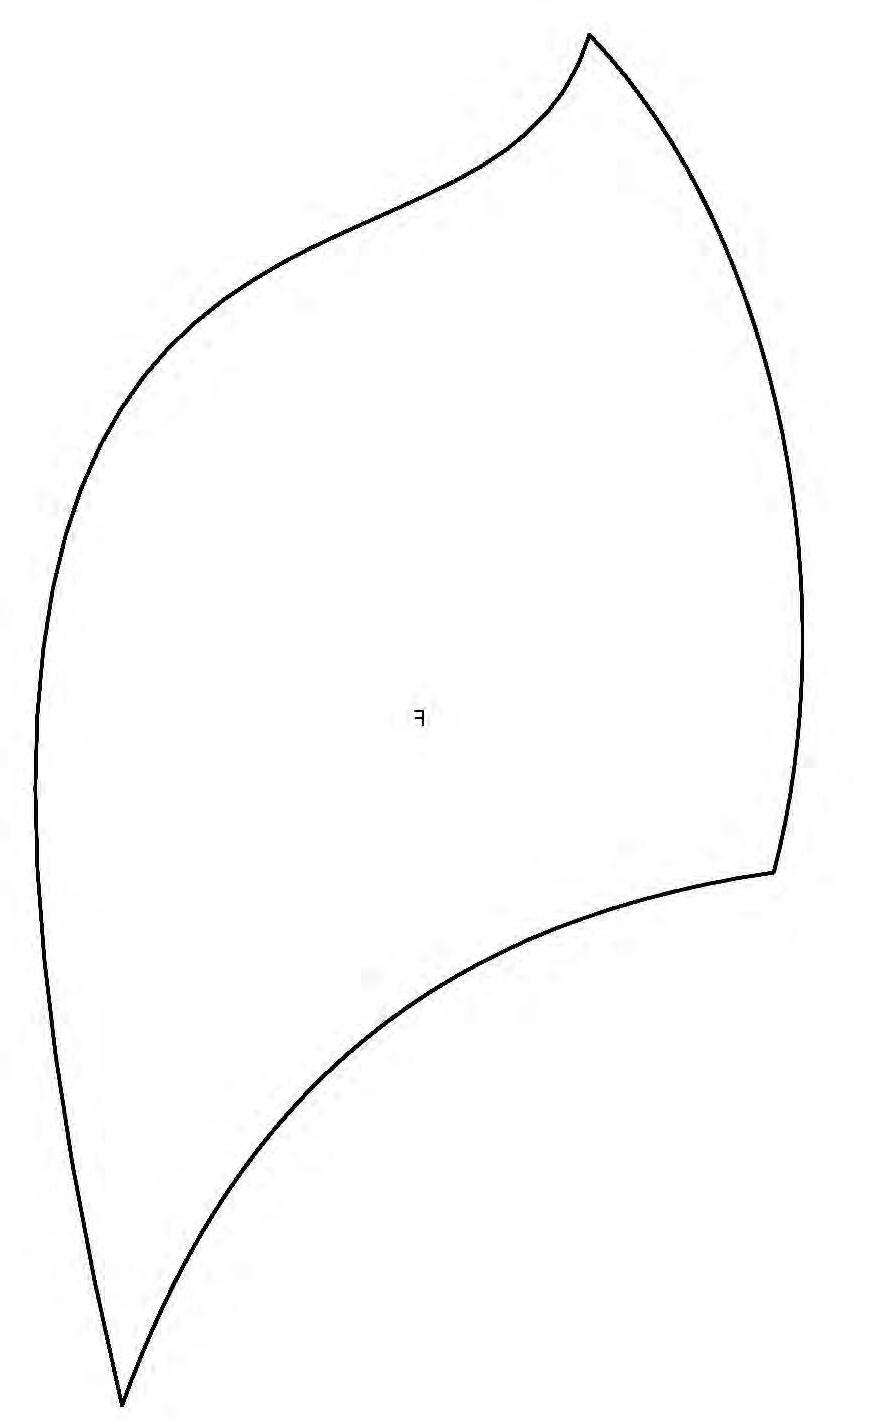
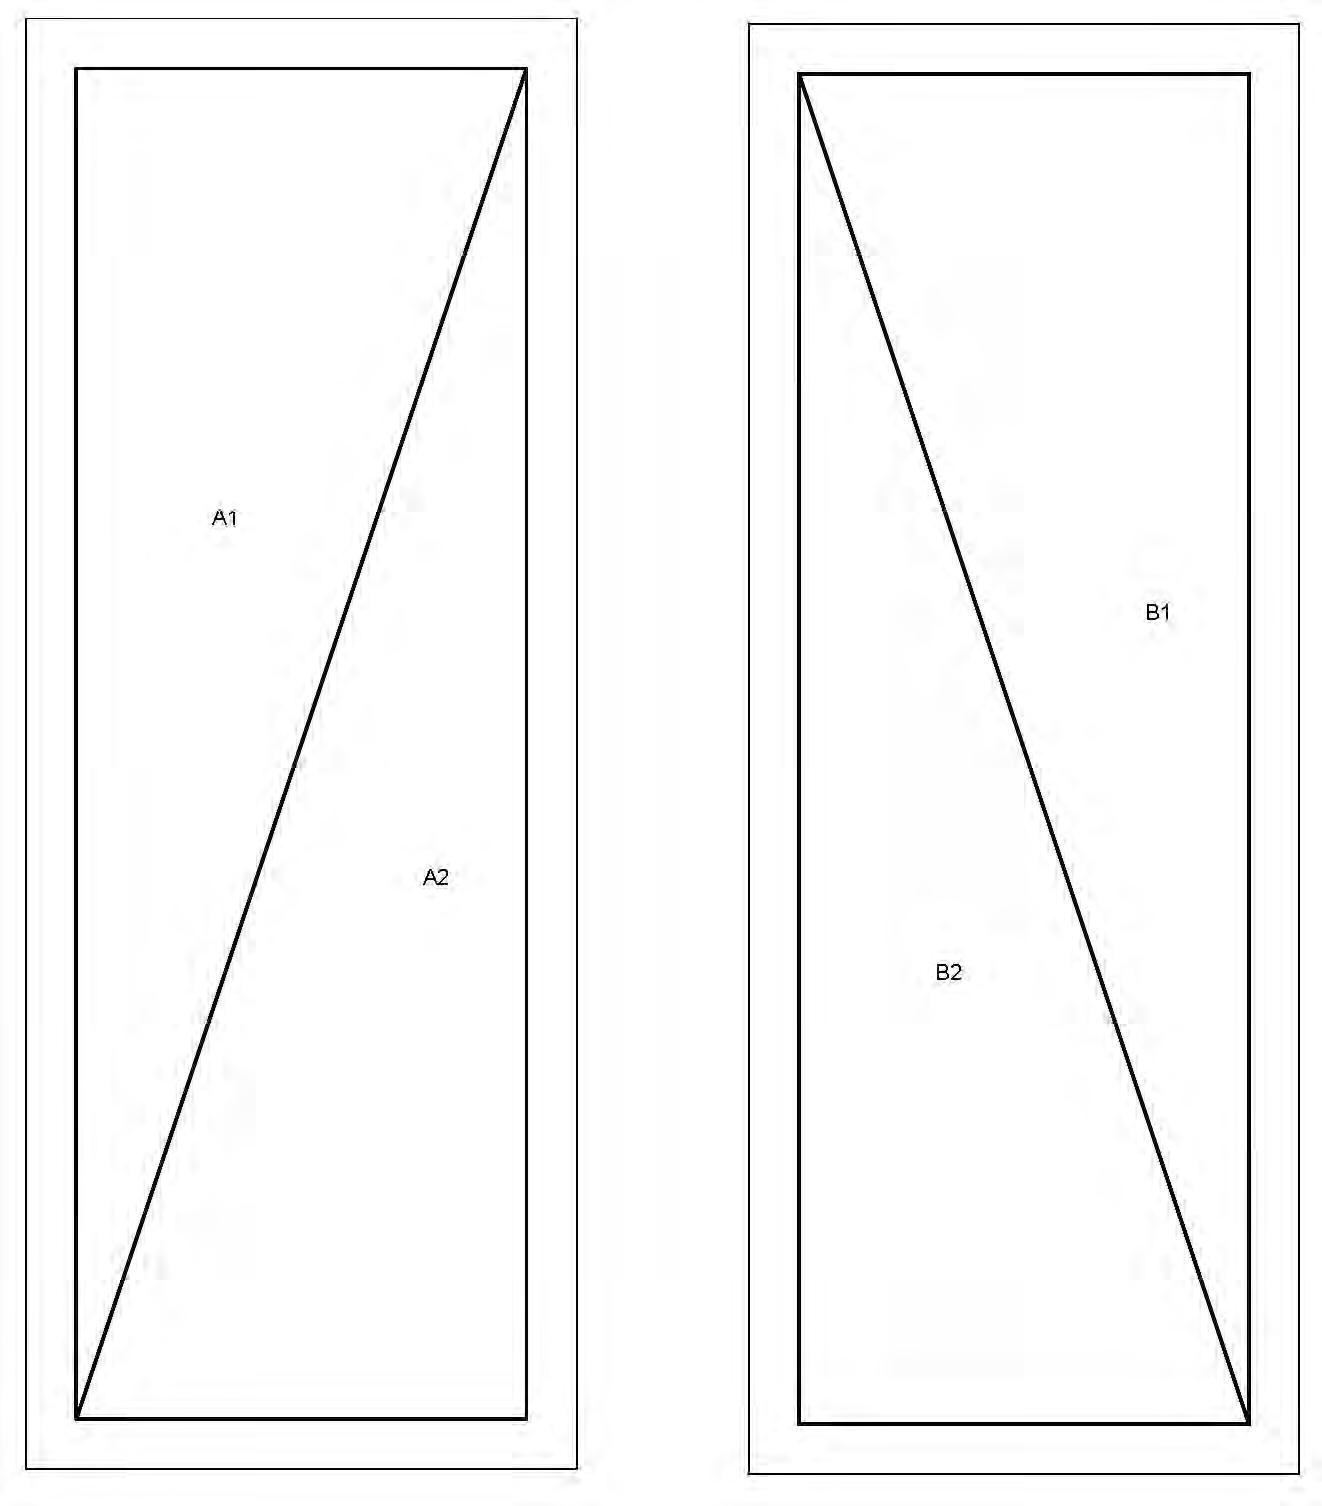
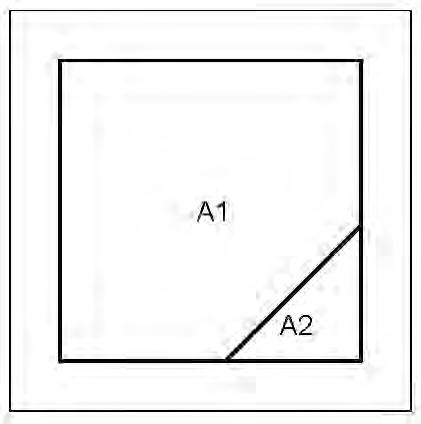
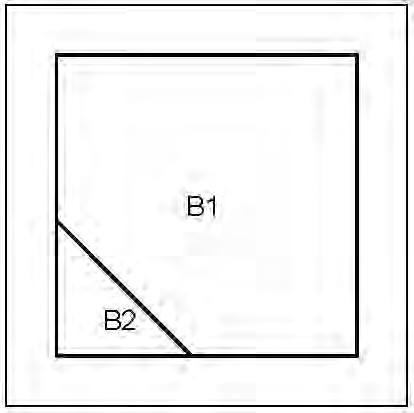
1.Trace the foundation templates for the two-color rectangles onto the tracing paper including the numbers. Stack eight tracing sheets under each sheet you just traced and staple each stack once or twice. Using the sewing machine with an old, small gauge needle and no thread (even in the bobbin), set the stitch length to 10-12 stitches per inch and carefully sew on the lines (except the outside edges). Make a total of nine copies of each. Transfer numbers onto each one.
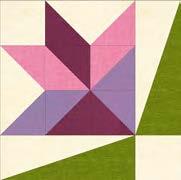
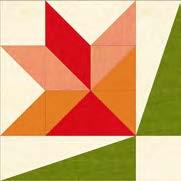
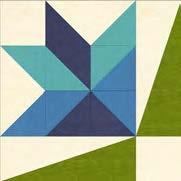
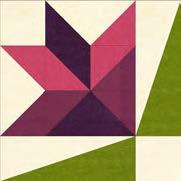
2.Use the 3” x 8-1/4” Fabric W (A1, B2 sections) and Fabric R (A2, B1 sections) rectangles and the step 1 foundation papers to make nine two-color rectangles of each type (figure 1). Do not remove paper.

3.In addition to the step 2 foundation pieced sections, use the fabrics mentioned on Table 1 to complete the 9-1/2” pieced blocks.
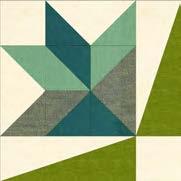
Block 5 – Make 1
Fabrics I, Q, V
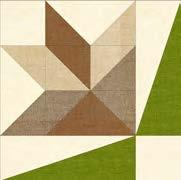
Block 6 – Make 1
Fabrics L, J, K
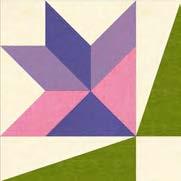
Block 7 – Make 1
Fabrics A, M, S
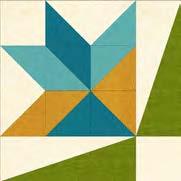
Block 8 – Make 1
Fabrics N, O, U
Table 1. Fabrics used on each flower, in addition to Fabrics R and W.
Note: The following instructions are for two Blocks 1. Repeat them for all the other blocks, making only one of each type.
Page 6 of 25
4.Draw a diagonal line on the wrong side of the 3-1/8” Fabric S squares. With right sides together, layer the marked Fabric S squares atop the 3-1/8” Fabric F squares. Stitch ¼” on each side of the marked line, cut on the drawn line, press each unit open with seams toward dark fabric, and trim dog ears (figure 2). Make four 2-3/4” half-square triangles (HST).

5.Repeat step 4 with the 3-1/8” Fabric S, Fabric A, and Fabric F squares to make four HST as shown below (figure 3).


3 – Make 2 of each.
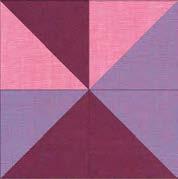
6.Sew the steps 4 and 5 HST together to make two 5” (trim if necessary) block centers (figure 4). Press the seams open.

4 – Make 2.
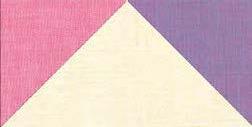
7.Draw a diagonal line on the wrong side of the 2-3/4” Fabrics A and S squares. With right sides together, layer a marked A square on the left short end of a 2-3/4” x 5” Fabric W rectangle and stitch on the drawn line. Trim 1/4” away from the seam line and press open. In the same manner, stitch a 2-3/4” Fabric S square to the opposite end of the same rectangle (figure 5). Repeat to make two flying-geese units.
5 – Make 2.
8.Repeat step 7 with two 2-3/4” x 5” Fabric W rectangles and the 2-3/4” Fabrics A and F squares to make two flying-geese units (figure 6).

Figure 6 – Make 2.
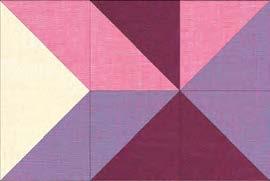
9.Noting fabric orientation, sew the step 7 units to the left side of the step 6 block centers (figure 7, next page). Press the seams toward center.
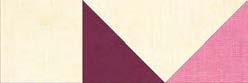
10.Sew a 2-3/4” Fabric W square to the left side of the step 8 units (figure 8). Press the seams toward square.
8
11.Sew the step 10 units to the top side of the step 9 units (figure 9). Press the seams toward center.
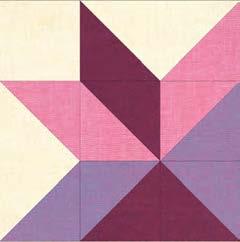
9
12.Sew two step 2 units Y to the right side of the step 11 units (figure 10). Press the seams away from center.
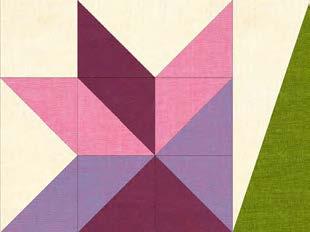
10
13.Sew two 2-3/4” Fabric W square to the right side of the step 2 units X. Sew these strips to the bottom of the step 12 units to complete two 9-1/2” blocks (figure 11, here and next page). Press the seams away from center.

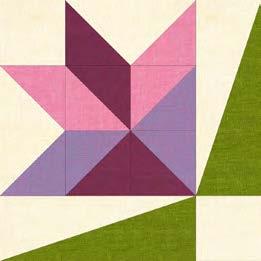
Note: Repeat steps 4-13 to make blocks 2-8.
14.Place each butterfly appliqué shape onto a light box or window pane. Layer the fusible web onto each one and trace four times. Cut each shape 1/8” outside the outline and fuse to the wrong side of the fabrics. Cut on the outline and remove paper backing.
15.Fold and crease the four 9-5/8” Fabric W background squares diagonally twice. Position appliqué shapes on squares using the creased folds as guidelines and fuse them according to manufacturer’s instructions (figure 12). Machine appliqué using matching thread and the blanket stitch. Make four blocks. Trim blocks to 9-1/2”.
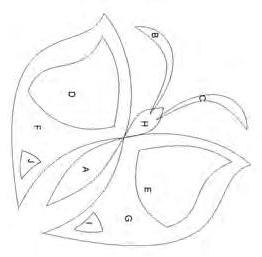

Figure 12 – Make 4.
16.Repeat step 1 using the square foundation template A, the 2-1/2” x 3-1/4” Fabric W rectangles, and the 1-1/2” x 2” Fabric U strips to make twenty-four squares for border 1. Sew the units together two by two to make twelve strips (figure 13). Press the seams in one direction.


Figure 13 – Make 12.
Quilt Top Assembly
(Follow the quilt diagram and photograph while assembling the quilt top.)
17.To make the horizontal sashing rows, alternatively sew together the 2” x 9-1/2” Fabric W sashing strips,
twelve 1-1/2” Fabric U squares (cornerstones), and twelve Fabric U triangles AA, as follows: -Rows 1 and 6: one triangle AA, one sashing strip, one triangle AA; -Rows 2 and 5: one triangle AA, three sashing strips alternating with two cornerstones, one triangle AA; and -Rows 3 and 4: one triangle AA, five sashing strips alternating with four cornerstones, one triangle AA.
18.Following the quilt photograph for placement and orientation, lay out five diagonal rows of alternating blocks, the sashing strips, and the step 16 horizontal sashing rows. Add the Fabric V setting triangles CC to the beginning and the end of the rows. Sew the setting triangles, the sashing strips, and blocks together in each row, then matching adjacent seams sew the rows together in order. Press seams in alternate directions for adjacent rows. Sew one Fabric V corner triangle BB to each quilt top corner. Remove paper from blocks.
19.Noting fabric orientation and referring to the quilt photo and diagram for block placement, arrange two 2” x 7” (the proper size of this rectangle is 2” x 6” but 7” allows for differences in sewing) Fabric W rectangles, two 2” x 11-3/4” Fabric W rectangles, and three step 16 strips for each side of the quilt. Sew patches together and sew one border strip to each side of the quilt center. Trim border strip if necessary. Press the seam toward quilt center.
20.Repeat step 19 with the 2” x 8” (the proper size of this rectangle is 2” x 7-1/2” but 8” allows for differences in sewing) Fabric W rectangles, the remaining 2” x 11-3/4” Fabric W rectangles, and the last step 16 strips to make two border strips and sew one to the top and one to the bottom of the quilt center. Trim border strips if necessary.
21.For border 2, sew the five 1-1/2” Fabric S strips together end to end using diagonal seams. Measure the vertical length of the quilt top through the center and cut two border strips that length. Sew one strip to each side of the quilt top. Measure the width of the quilt top through the center. Cut two border strips that length and sew one to the top and one to the bottom. Press the seams toward the borders. Remove paper from the border 1 blocks.
22.Create a quilt sandwich with the batting between the quilt top and the backing. Pin or baste layers together, mark quilting design, and quilt by hand or machine. When quilting is complete, remove pins or basting, and trim batting and backing even with raw edges of the quilt top.
23.Join the five 2-1/2” Fabric T binding strips together end to end using a diagonal seam to make one long strip. Fold in half lengthwise and press. Sew binding to the edges of the quilt top, mitering corners, and overlapping ends. Fold binding to the back of the quilt and stitch it in place by hand to finish.
©2019 Studio e Fabrics®
Every effort has been made to ensure that all projects are error free. All the information is presented in good faith; however, no warranty can be given nor results guaranteed as we have no control over the execution of instructions. Therefore, we assume no responsibility for the use of this information or damages that may occur as a result. When errors are brought to our attention, we make every effort to correct and post a revision as soon as possible. Please make sure to check www.studioefabrics.com for pattern updates prior to starting the project. We also recommend that you test the project prior to cutting for kits. Finally, all free projects are intended to remain free to you and are not for resale.
A Free Project Sheet NOT FOR RESALE

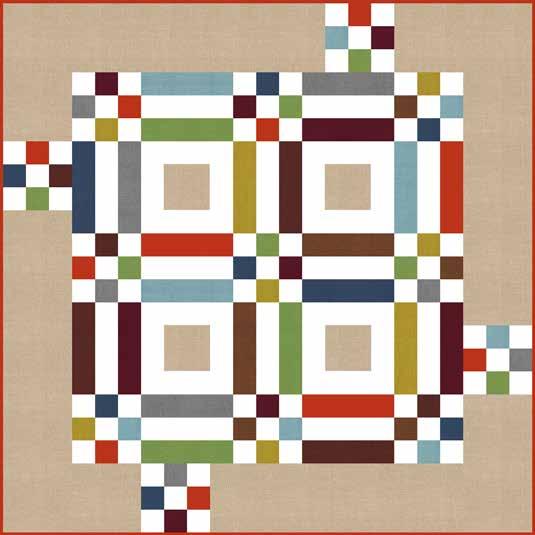
Featuring fabrics from the Peppered Cottons collection from
(A) Flax-7 ................... 1 ¼ yards
(B)Ginko Gold-27... ⅛ yard
(C) Granite-10 ......... ⅛ yard
(D) Key Lime-68...... ¼ yard
(E) Merlot-53 ........... ⅛ yard
(F)Milk Chocolate-18 ⅛ yard
(G) Storm Cloud-87 ⅛ yard
Featuring NEW Peppered Cottons Colors
(H) Tide Pool-61...... ¼ yard
(I)Tomato Red-76 ⅝ yard*
(J) Walnut-33 ........... ⅛ yard
(K)White Sugar-09 1 yard Backing Flax-7 .................. 3 yards
*Includes Binding
Batting 54” x 54” (Recommended: Air Lite® Colour Me 100% Cotton)
Piecing and sewing thread
Quilting and sewing supplies
Quilt designed by Pepper Cory
Finished Quilt Size 46” x 46”
Skill Level: Beginner
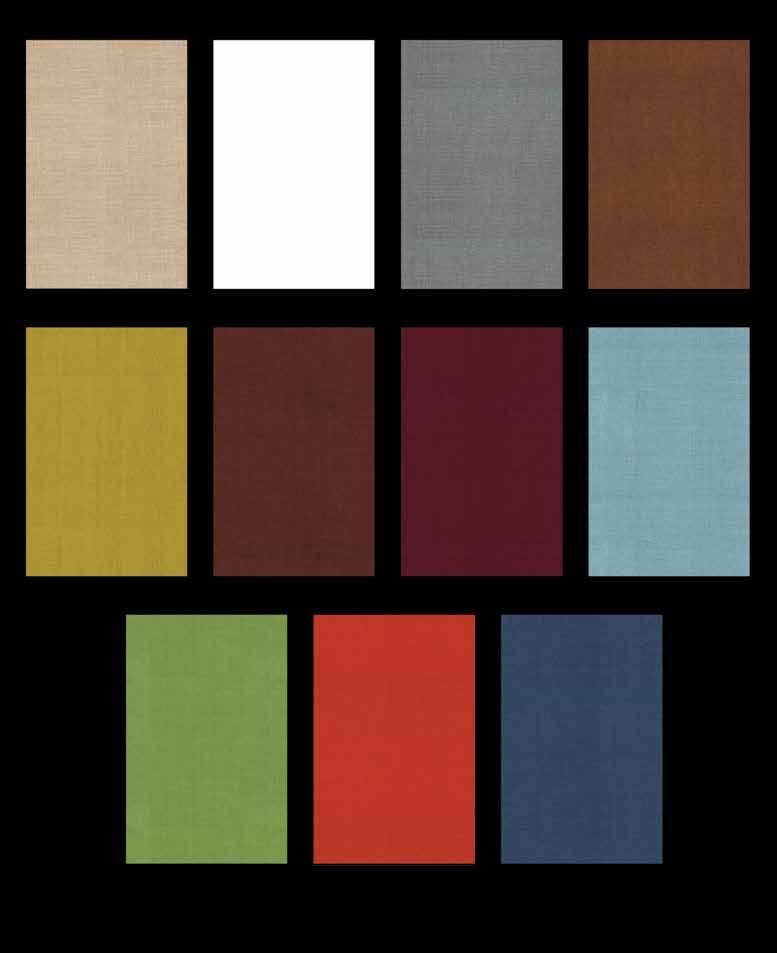
Cutting Instructions
Please note: All strips are cut across the width of fabric (WOF) from selvage to selvage edge unless otherwise noted. WOF= Width of Fabric • LOF = Length of Fabric
Fabric A (Flax-7 Peppered Cottons − Flax) cut:
•(1) 6½” x WOF strip, sub-cut (2) 6 ½” squares and (2) 6 ½” x 12 ½” strips.
•(2) 6 ½” x 22 ½” WOF strips.
•(2) 6 ½” x 28 ½” WOF strips.
•(1) 4 ½” x WOF strip, sub-cut (4) 4 ½” strips.
Fabric B (Ginko Gold-27 Peppered Cottons − Ginko Gold), cut:
•(1) 2 ½” x WOF strip, sub-cut (6) 2 ½” squares and (2) 2 ½” x 8 ½” strips.
Fabric C (Granite-10 Peppered Cottons – Granite), cut:
•(1) 2 ½” x WOF strip, sub-cut (5) 2 ½” squares and (3) 2 ½” x 8 ½” strips.
Fabric D (Key Lime-68 Peppered Cottons – Key Lime), cut:
•(1) 2 ½” x WOF strip, sub-cut (7) 2 ½” squares.
•(1) 2 ½” x WOF strip, sub-cut (3) 2 ½” x 8 ½” strips.
Fabric E (Merlot-53 Peppered Cottons − Merlot), cut:
•(1) 2 ½” x WOF strip, sub-cut (6) 2 ½” squares and (3) 2 ½” x 8 ½” strips.
Fabric F (Milk Chocolate-18 Peppered Cottons − Milk Chocolate), cut:
•(1) 2 ½” x WOF strip, sub-cut (4) 2 ½” squares and (2) 2 ½” x 8 ½” strips.
Fabric G (Storm Cloud-87 Peppered Cottons − Storm Cloud)
•(1) 2 ½” x WOF strip, sub-cut (7) 2 ½” squares and (2) 2 ½” x 8 ½” strips.
Fabric H (Tide Pool-61 Peppered Cottons − Tide Pool)
•(1) 2 ½” x WOF strip, sub-cut (6) 2 ½” squares.
•(1) 2 ½” x WOF strip, sub-cut (3) 2 ½” x 8 ½” strips.
Fabric I (Tomato Red-76 Peppered Cottons − Tomato Red)
•(1) 2 ½” x WOF strip, sub-cut (8) 2 ½” squares.
•(1) 2 ½” x WOF strip, sub-cut (3) 2 ½” x 8 ½” strips.
•(5) 2 ½” x WOF strips for the binding.
Fabric J (Walnut-33 Peppered Cottons − Walnut)
•(1) 2 ½” x WOF strip, sub-cut (3) 2 ½” squares and (3) 2 ½” x 8 ½” strips.
Fabric K (White Sugar-09 Peppered Cottons − White Sugar)
•(5) 2 ½” x WOF strips, sub-cut (65) 2 ½” squares.
•(1) 2 ½” x WOF strip, sub-cut (8) 2 ½” x 4 ½” strips.
•(5) 2 ½” x WOF strip, sub-cut (20) 2 ½” x 8 ½” strips.
Backing (Flax-7 Peppered Cottons − Flax), cut:
•(2) 54” x WOF strips. Sew the strips together and trim to 54” x 54” to make the back.
Sew using a ¼” seam allowance with right sides together (RST) unless otherwise indicated. Always press towards the darker fabric while assembling, unless otherwise noted by the arrows.
Block Assembly
Note: Pay attention to the unit orientations while assembling the various components.
1.Sew (1) 2 ½” Fabric K square to each side of (1) 2 ½” Fabric E square to make the top row.
2.Sew (1) 2 ½” Fabric C square, (1) 2 ½” Fabric K square and (1) 2 ½” Fabric I square together in that order left to right to make the middle row.
3.Sew (1) 2 ½” Fabric K square to each side of (1) 2 ½” Fabric B square to make the bottom row.
4.Sew the (3) rows from Steps 1-3 together to make (1) 6 ½” Unit 1 square (Fig. 1).
5.Repeat Steps 1-4 and refer to Figure 2 through Figure 13 for fabric identification, placement and orientation to make (1) of each square, Unit 2 through Unit 13.
Fig. 8 Fig. 9 Fig. 10Fig. 11Fig. 12Fig. 13
6.Sew (1) 2 ½” x 4 ½” Fabric K strip to each side of (1) 4 ½” Fabric A square. Sew (1)
2 ½” x 8 ½” Fabric K strip to the top and to the bottom of the Fabric A square to make (1)
8 ½” Unit 14 square (Fig. 14). Repeat to make (4) Unit 14 squares total.
7.Sew together (1) 2 ½” x 8 ½” Fabric H strip, (1) 2 ½” x 8 ½” Fabric K strip and (1)
2 ½” x 8 ½” Fabric D strip, lengthwise and in that order from top to bottom, to make (1)
6 ½” x 8 ½” Unit 15 rectangle (Fig. 15).
8.Repeat Step 7 and refer to Figures 16-25 for fabric identification, placement and orientation to make (1) Unit 16 rectangle, (2) Unit 17 rectangles and (1) each rectangle for Unit 18 through Unit 25.
16Fig. 17Fig. 18Fig. 19Fig. 20
Fig. 21Fig. 22Fig. 23Fig. 24 Fig. 25
9.Sew together (1) Unit 1 square, (1) Unit 15 rectangle, (1) Unit 2 square, (1) Unit 16 rectangle and (1) Unit 3 square, in that order from left to right, to make Row One (Fig. 26).
10.Repeat Step 9 and refer to Figure 26 for component identification, placement and orientation to make Row Two through Row Five.
11.Sew the (5) rows together, in numerical order, to make the Center Block (Fig. 26).
26
Quilt Assembly
(Follow the Quilt Layout while assembling the quilt.)
12.Sew (1) 6 ½” Fabric A square to the top of (1) Unit 10 square and (1) 6 ½” x 22 ½” Fabric A strip to the bottom of the Unit 10 square to make the Left Side Border (Fig. 27).
13.Sew (1) 6 ½” x 22 ½” Fabric A strip to the top of (1) Unit 11 square and (1) 6 ½” Fabric A square to the bottom of the Unit 11 square to make the Right Side Border (Fig. 28).
14.Sew (1) 6 ½” x 28 ½” Fabric A strip to the left side of (1) Unit 12 square and (1)6 ½” x 12 ½” Fabric A strip to the right end of the Unit 12 square to make the Top Border.
15.Sew (1) 6 ½” x 12 ½” Fabric A strip to the left side of (1) Unit 13 square and (1)6 ½” x 28 ½” Fabric A strip to the right side of the Unit 13 square to make the Bottom Border.
16.Sew the Left Side Border and Right Side Border to the left and to the right of the Center Block. Sew the Top Border and Bottom Border to the top and to the bottom of the Center Block to make the quilt top.
17.Press the quilt and 54” x 54” backing well. Layer backing (wrong side up), batting, pressed quilt (right side up) and baste. Quilt as desired and trim excess batting and backing when quilting is complete.
18.Cut the ends of the (5) Fabric I binding strips at a 45-degree angle and sew end to end to make (1) continuous piece of binding. Fold in half lengthwise and press wrong sides together.
19.Sew the binding to the front of the quilt, raw edges together. Turn the folded edge to the back, and hand stitch in place.
Every effort has been made to ensure that all projects are error free. All the
as we have no control over the execution of instructions. Therefore, we assume no responsibility
errors are brought to our attention, we make every effort to correct and post
updates prior to starting the project. We also recommend that you test the project prior
nor
and are not for resale

www.studio e fabrics.com
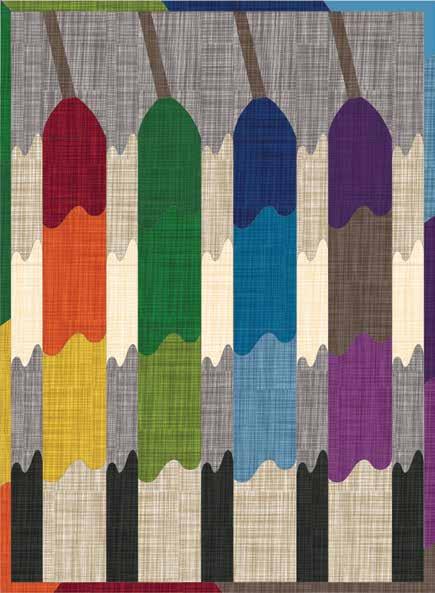
INSTRUCTIONS

SUPPLIES
Wall Hanging Front - 1 Brushstrokes Fat Quarter Bundle
Backing - 5/8 yard
Batting - 22” x 30”
Lightweight fusible web - 17” x 27”
Seam allowance of 1/4” included in all pieces.
Crimson, Kale, Indigo, Mulberry:
1 - 3 1/2” x 3 1/2“; 1 - Template A & B
1 - 2 1/2” x 8 1/4” (binding)
Tangerine, Gold, Sprout, Shamrock, Horizon Blue, Bahama Blue, Lotus Pink:
1 - 3 1/2” x 6 1/2”; 1 - Template B
1 - 2 1/2” x 8 1/4” (binding)
Bark:
1 - 3 1/2” x 6 1/2“; 1 - Template B; 4 - Template D
1 - 2 1/2” x 21” (binding)
Parchment:
5 - 2“ x 5 1/2”; 5 - Template C
Mushroom:
4 - 3 1/2“ x 6 1/2”; 5 - 2“ x 5 1/2”; 5 - Template C
Pewter:
4 - 3 1/2“ x 6 1/2”; 5 - 2” x 7 1/2“; 5 - 2” x 5 1/2”; 5 - Template C
Raven:
5 - 2“ x 5 1/2”; 5 - Template C
1. Trace templates on paper side of lightweight fusible web. Fuse on specified fabric. Cut out on drawn line; remove paper backing and fuse to background color listed. Secure edges using coordinating thread and small zigzag stitch.
2.Sew rectangles together in columns; press as shown.
3.Sew columns together, alternating Column A with a color series Column B as shown on the quilt.
4.Layer back, batting, and front. Baste together with safety pins. Free motion echo quilt following the applique shapes. Trim excess batting and backing even with the front.
5.Sew the binding strips together end to end. Fold in half lengthwise. Sew to front, matching raw edges. Sew by hand to the back.



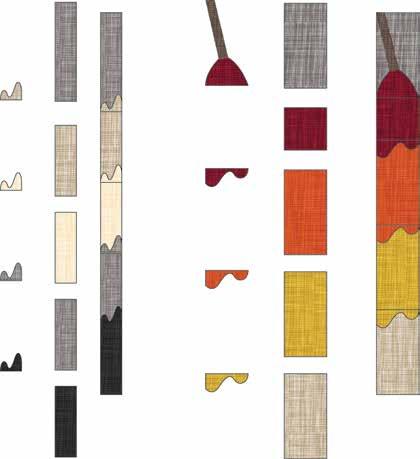
We have included two patterns that use a retired line of Brushstrokes by Pepper Cory. Pepper has translated the colors from Brushstrokes line to the current Peppered Cottons colors: Brushstrokes
3051-91
3051-33
3051-09
3051-39
3051-77
3051-11

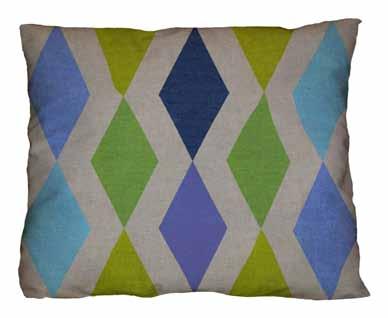
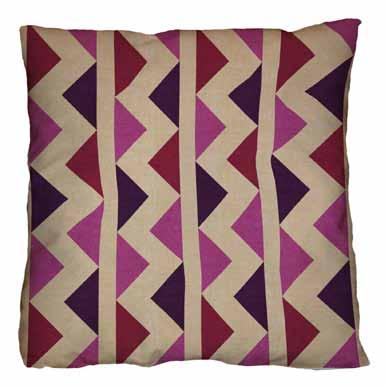
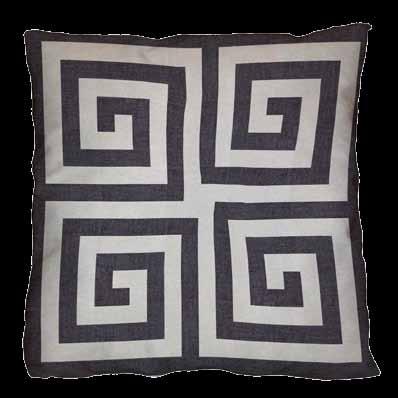
Featuring fabrics from the Peppered Cottons collection by Pepper Cory for
Fabric Requirements
Pillow #1
(A) Fog-47 ............................... ¾ yard
(B) Ink-45 ................................ ¼ yard
(C) Peacock-49....................... ¼ yard
(D) Emerald-30 ..................... ¼ yard
(E) Morning Glory-28 ......... ¼ yard
(F) Blue Jay-41 ....................... ¼ yard
(G) Green Tea-22 .................. ¼ yard
Pillow #2
(H) Sand-39 ............................ 1 ⅛ yards
(I) Fuchsia-40 ........................ ⅓ yard
(J) Garnet-26 .......................... ¼ yard
(K) Aubergine-34 ................. ¼ yard
Pillow #3
(L) Oyster-35 ......................... ¾ yard
(M) Charcoal-14 .................... ⅓ yard
Additional Supplies Needed
Pillow Forms: (1)16” x 20” & (2)20” x 20”
Piecing and sewing thread
Quilting and sewing supplies
Designs by Heidi Pridemore
Cutting Instructions
Please Note: All strips are cut across the width of fabric (WOF) from selvage to selvage edge unless otherwise noted.
WOF= Width of Fabric • LOF = Length of Fabric
Pillow #1
Fabric A (Fog-47), cut:
•(2) 4 ½” x WOF strips. See instructions to cut (20) Template One pieces and (20) Template Two pieces.
•(1) 13 ½” x WOF strip. Sub-cut the strip into (2) 13 ½” x 16 ½” strips.
Fabric B (Ink-45), cut:
•(1) 4 ½” x WOF strip. See instructions to cut (2) Template 3 pieces.
Fabric C (Peacock-49), cut:
•(1) 4 ½” x WOF strip. See instructions to cut (2) Template 3 pieces.
Fabric D (Emerald-30), cut:
•(1) 4 ½” x WOF strip. See instructions to cut (4) Template 3 pieces.
Fabric E (Morning Glory-28), cut:
•(1) 4 ½” x WOF strip. See instructions to cut (4) Template 3 pieces.
Fabric F (Blue Jay-41), cut:
•(1) 4 ½” x WOF strip. See instructions to cut (4) Template 3 pieces.
Fabric G (Green Tea-22), cut:
•(1) 4 ½” x WOF strip. See instructions to cut (4) Template 3 pieces.
Pillow #2
Fabric H (Sand-39), cut:
•(1) 2 ⅞” x WOF strip. Sub-cut the strip into (4) 2 ⅞” squares.
•(2) 1” x 20 ½” strips
•(3) 1 ½” x 20 ½” strips
•(5) 2 ½” x WOF strips. Sub-cut the strips into (72) 2 ½” squares.
•(1) 13 ½” x WOF strip. Sub-cut the strip into (2) 13 ½” x 20 ½” strips.
Fabric I (Fuchsia-40), cut:
•(1) 4 ½” x WOF strip. Sub-cut the strip into (12) 2 ½” x 4 ½” strips.
•(1) 2 ⅞” x WOF strip. Sub-cut the strip into (4) 2 ⅞” squares.
Fabric J (Garnet-26), cut:
•(1) 4 ½” x WOF strip. Sub-cut the strip into (12) 2 ½” x 4 ½” strips.
Fabric K (Aubergine-34), cut:
•(1) 4 ½” x WOF strip. Sub-cut the strip into (12) 2 ½” x 4 ½” strips.
Pillow #3
Fabric L (Oyster-35), cut:
•(1) 1 ½” x WOF strip. Sub-cut the strip into (4) 1 ½” x 8 ½” strips and (4) 1 ½” squares.
•(1) 1 ½” x WOF strip. Sub-cut the strip into (4) 1 ½” x 7 ½” strips and (4) 1 ½” x 2 ½” strips.
•(1) 1 ½” x WOF strip. Sub-cut the strip into (4) 1 ½” x 6 ½” strips and (4) 1 ½” x 3 ½” strips.
•(1) 1 ½” x WOF strip. Sub-cut the strip into (4) 1 ½” x 5 ½” strips and (4) 1 ½” x 4 ½” strips.
•(1) 1 ½” x WOF strip. Sub-cut the strip into (4) 1 ½” x 9 ½” strips.
•(1) 13 ½” x WOF strip. Sub-cut the strip into (2) 13 ½” x 20 ½” strips.
Fabric M (Charcoal-14), cut:
•(1) 1 ½” x WOF strip. Sub-cut the strip into (4) 1 ½” x 8 ½” strips and (4) 1 ½” squares.
•(1) 1 ½” x WOF strip. Sub-cut the strip into (4) 1 ½” x 7 ½” strips and (4) 1 ½” x 2 ½” strips.
•(1) 1 ½” x WOF strip. Sub-cut the strip into (4) 1 ½” x 6 ½” strips and (4) 1 ½” x 3 ½” strips.
•(1) 1 ½” x WOF strip. Sub-cut the strip into (4) 1 ½” x 5 ½” strips and (4) 1 ½” x 4 ½” strips.
•(1) 1 ½” x WOF strip. Sub-cut the strip into (4) 1 ½” x 9 ½” strips.
•(1) 1 ½” x WOF strip. Sub-cut the strip into (4) 1 ½” x 10 ½” strips.
Sew using a ¼” seam allowance with right sides together (RST) unless otherwise indicated. Always press towards the darker fabric while assembling, unless otherwise noted by the arrows.
1.Place (1) Fabric A- Template One triangle on top of (1) Fabric F Template Three triangle, right sides together, aligning the left sides (Fig. 1). Sew the (2) triangles together along the left side. Press the smaller triangle open.
2.Place (1) Fabric A Template Two triangle on top of the Fabric F Template Three triangle, right sides together, aligning the right sides (Fig. 2). Sew the (2) triangles together along the right side. Press the smaller triangle open to make (1) A/F/A unit (Fig. 3). Trim to measure 4 ½” square.
3.Repeat Steps 1-2 to make (4) A/F/A units total.
4.Repeat Steps 1-2 with (4) Fabric A Template Ones, (4) Fabric A Template Twos and (4) Fabric E Template Threes to make (4) A/E/A units (Fig. 4).
5.Repeat Steps 1-2 with (4) Fabric A Template Ones, (4) Fabric A Template Twos and (4) Fabric G Template Threes to make (4) A/G/A units (Fig. 5).
6.Repeat Steps 1-2 with (4) Fabric A-Template Ones, (4)Fabric A Template Twos and (4) Fabric D Template Threes to make (4) A/D/A units (Fig. 6).
7.Repeat Steps 1-2 with (2) Fabric A Template Ones, (2)Fabric A Template Twos and (2) Fabric C Template Threes to make (2) A/C/A units (Fig. 7).
8.Repeat Steps 1-2 with (2) Fabric A Template Ones, (2)Fabric A Template Twos and (2) Fabric B Template Threes to make (2) A/B/A units (Fig. 8).
9.Refer to Figure 9 to sew (5) assorted units together to make (1) row. Repeat to make (4)rows. Sew the rows together to make the pillow top.
10.Turn under the 16 ½” edge on (1) 13 ½” x 16 ½” Fabric A strip, approximately ¼”, press and repeat. Top stitch the folded fabric in place to make (1) back flap. Repeat with second 13 ½” x 16 ½” Fabric A strip to make a second back flap.
11.Position and pin each back flap, right sides together with the pillow front, overlapping the finished edges in the middle and aligning the raw edges with the pillow front (Fig. 10). Stitch the pillow front and back together. Turn the pillow right side out to complete the pillow case.
12.Insert the 16” x 20” pillow form into the pillow case to complete the pillow.
13.Place (1) 2 ½” Fabric H square on the left side of (1) 2 ½” x 4 ½” Fabric J strip, right sides together (Fig. 11). Sew across the diagonal of the square from the upper right corner to the lower left corner (Fig. 11). Flip open the triangle formed and press (Fig. 12). Trim away the excess fabric from behind the triangle, leaving a ¼” seam allowance.
14.Place another 2 ½” Fabric H square on the right side of the 2 ½” x 4 ½” Fabric J strip, right sides together (Fig. 13). Sew across the diagonal of the square from the upper left corner to the lower right corner (Fig. 13). Flip open the triangle formed and press (Fig. 14). Trim away the excess fabric from behind the triangle, leaving a ¼” seam allowance to complete one H/J/H unit.
15.Repeat Steps 13-14 to make (12) H/J/H units total.
16. Repeat Steps 13-14 using (12) 2 ½” x 4 ½” Fabric K strips and (24) 2 ½” Fabric H squares to make (12) H/K/H units total (Fig. 15).
17. Repeat Steps 13-14 using (12) 2 ½” x 4 ½” Fabric I strips and (24) 2 ½” Fabric H squares to make (12) H/I/H units total (Fig. 16).
18. Place (1) 2 ⅞” Fabric H square on top of (1) 2 ⅞” Fabric I square, right sides together. Draw a line across the diagonal of the top square (Fig. 17). Sew ¼” away from each side of the drawn diagonal line (Fig. 17). Cut the two squares apart on the drawn diagonal line (Fig. 18) to make (2) H/I units (Fig. 19). Trim H/I units to measure 2 ½” square. Repeat to make (8) H/I units total.
19. Follow Figure 20 and sew (3) H/J/H units, (3) H/I/H units, (3) H/K/H units and (2) H/I units together to make (1) row. Repeat to make (4) rows.
20. Sew (2) 1” x 20 ½” Fabric H strips, (3) 1 ½” x 20 ½” Fabric H strips and (4) rows from Step 19 together to make the pillow top (Fig. 21).
21. Turn under the 20 ½” edge on (1) 13 ½” x 20 ½” Fabric H strip, approximately ¼”, press and repeat. Top stitch the folded fabric in place to make (1) back flap. Repeat with second 13 ½” x 20 ½” Fabric H strip to make a second back flap.
22. Position and pin each back flap, right sides together with the pillow front, overlapping the finished edges in the middle and aligning the raw edges with the pillow front (Fig. 22). Stitch around the pillow front and back. Turn the pillow right side out.
23. Insert the pillow form to complete the pillow.
(Refer to Figure 23 for Steps 24-33. Press outward while assembling the block.)
24. Sew (1) 1 ½” Fabric M square to the left side of (1) 1 ½” Fabric L square to make the center unit.
25. Sew (1) 1 ½” x 2 ½” Fabric M strip to the top of the center unit. Sew (1) 1 ½” x 2 ½” Fabric L strip to the bottom of the center unit.
26. Sew (1) 1 ½” x 3 ½” Fabric L strip to the left side of the center unit. Sew (1) 1 ½” x 3 ½” Fabric M strip to the right side of the center unit.
27. Sew (1) 1 ½” x 4 ½” Fabric L strip to the top of the center unit. Sew (1) 1 ½” x 4 ½” Fabric M strip to the bottom of the center unit.
28. Sew (1) 1 ½” x 5 ½” Fabric M strip to the left side of the center unit. Sew (1) 1 ½” x 5 ½” Fabric L strip to the right side of the center unit.
29. Sew (1) 1 ½” x 6 ½” Fabric M strip to the top of the center unit. Sew (1) 1 ½” x 6 ½” Fabric L strip to the bottom of the center unit.
30. Sew (1) 1 ½” x 7 ½” Fabric L strip to the left side of the center unit. Sew (1) 1 ½” x 7 ½” Fabric M strip to the right side of the center unit.
31. Sew (1) 1 ½” x 8 ½” Fabric L strip to the top of the center unit. Sew (1) 1 ½” x 8 ½” Fabric M strip to the bottom of the center unit.
32. Sew (1) 1 ½” x 9 ½” Fabric M strip to the left side of the center unit. Sew (1) 1 ½” x 9 ½” Fabric L strip to the right side of the center unit.
33. Sew (1) 1 ½” x 10 ½” Fabric M strip to the top of the center unit to complete (1) 10 ½” block.
34. Repeat to make (4) blocks total.
x 8-1/2”
x 6-1/2”
x 4-1/2”
35.Follow Figure 24 and sew the (4) blocks together to make the pillow top.
36.Turn under the 20 ½” edge on (1) 13 ½” x 20 ½” Fabric L strip, approximately ¼”, press and repeat. Top stitch the folded fabric in place to make (1) back flap. Repeat with second 13 ½” x 20 ½” Fabric L strip to make a second back flap.
37.Position and pin each back flap, right sides together with the pillow front, overlapping the finished edges in the middle and aligning the raw edges with the pillow front (Fig. 25). Stitch around the pillow front and back. Turn the pillow right side out.
38.Insert the pillow form to complete the pillow.
Wrong side of fabric
Templates
Template One
Template Three
Template Two
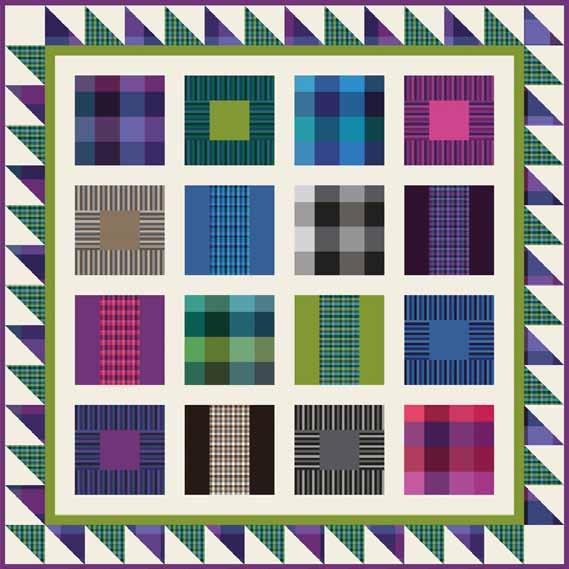
Featuring fabrics from the Peppered Plaids collection by Pepper Cory for
Fabric Requirements
(A) 2834-57 .............. ½ yard
(B) 2834-77 .............. ⅓ yard
(C) 2834-25 .............. ⅓ yard
(D) 2834-09 ............. ⅓ yard
(E) 2834-67 .............. ⅓ yard
(F) 2835-57 .............. ¼ yard
(G) 2835-77 .............. ¼ yard
(H) 2835-25 ............. ¼ yard
(I) 2835-03 ............... ¼ yard
(J) 2835-67 ............... ⅓ yard
(K) 2836-57 ............. ⅛ yard
(L) 2836-77 .............. ⅛ yard
(M) 2836-25 ............. ⅛ yard
(N) 2836-03 ............. ⅛ yard
(O) 2836-09 ............. ⅛ yard
(P) 2836-67 .............. ⅛ yard
(Q) 14* ........................ ¼ yard
(R) 22* ........................ ½ yard
(S) 28* ........................ ¼ yard
(T) 31* ........................ ¼ yard
(U) 34* ........................ ⅛ yard
(V) 35* ........................ 1 ½ yards
(W) 40* ...................... ¼ yard
(X) 42* ........................ ¾ yard**
(Y) 50* ........................ ⅛ yard
Backing 2834-67 .............. 4 yards
Additional Supplies Needed
Batting 64" x 64"
Piecing and sewing thread
Quilting and sewing supplies
Design by Laura Gilvin
Finished Quilt Size 56" x 56"
*Part of the Peppered Cottons Collections
**Includes binding
Cutting Instructions
Please Note: All strips are cut across the width of fabric (WOF) from selvage to selvage edge unless otherwise noted.
WOF= Width of Fabric • LOF = Length of Fabric
Fabric A (2834-57 Purple Haze), cut:
• (1) 4 ⅞” x WOF strip. Sub-cut the strip into (8) 4 ⅞” squares.
• (1) 9 ½” x WOF strip. Sub-cut the strip into (1) 9 ½” square and (5) 4 ⅞” squares.
Fabric B (2834-77 Deep Water), cut:
• (1) 9 ½” square.
Fabric C (2834-25 Sweetheart Pink), cut:
• (1) 9 ½” square.
Fabric D (2834-09 Gravel), cut:
• (1) 9 ½” square.
Fabric E (2834-67 Aquarium), cut:
• (1) 9 ½” square.
Fabric F (2835-57 Purple Haze), cut:
• (1) 4 ½” x 9 ½” strip.
Fabric G (2835-77 Deep Water), cut:
• (1) 4 ½” x 9 ½” strip.
Fabric H (2835-25 Sweetheart Pink), cut:
• (1) 4 ½” x 9 ½” strip.
Fabric I (2835-03 Earth), cut:
• (1) 4 ½” x 9 ½” strip.
Fabric J (2835-67 Aquarium), cut:
• (2) 4 ⅞” x WOF strips. Sub-cut the strips into (13) 4 ⅞” squares and (1) 4 ½” x 9 ½” strip.
Fabric K (2836-57 Purple Haze), cut:
• (1) 3” x WOF strip. Sub-cut the strip into (2) 3” x 4 ½” strips and (2) 3” x 9 ½” strips.
Fabric L (2836-77 Deep Water), cut:
• (1) 3” x WOF strip. Sub-cut the strip into (2) 3” x 4 ½” strips and (2) 3” x 9 ½” strips.
Fabric M (2836-25 Sweetheart Pink), cut:
• (1) 3” x WOF strip. Sub-cut the strip into (2) 3” x 4 ½” strips and (2) 3” x 9 ½” strips.
Fabric N (2836-03 Earth), cut:
• (1) 3” x WOF strip. Sub-cut the strip into (2) 3” x 4 ½” strips and (2) 3” x 9 ½” strips.
Fabric O (2836-09 Gravel), cut:
• (1) 3” x WOF strip. Sub-cut the strip into (2) 3” x 4 ½” strips and (2) 3” x 9 ½” strips.
Fabric P (2836-67 Aquarium), cut:
• (1) 3” x WOF strip. Sub-cut the strip into (2) 3” x 4 ½” strips and (2) 3” x 9 ½” strips.
Fabric Q (14 Charcoal), cut:
• (1) 4 ½” square.
Fabric R (22 Green Tea), cut:
• (1) 4 ½” x WOF strip. Sub-cut the strip into (1) 4 ½” square and (2) 3” x 9 ½” strips.
• (3) 1 ½” x WOF strips. Sew the strips together, end to end, and cut (2) 1 ½” x 48 ½” strips.
• (3) 1 ½” x WOF strips. Sew the strips together, end to end, and cut (2) 1 ½” x 46 ½” strips.
Fabric S (28 Morning Glory), cut:
• (1) 4 ½” x WOF strip. Sub-cut the strip into (1) 4 ½” square and (2) 3” x 9 ½” strips.
Fabric T (31 Pepper), cut:
• (1) 4 ½” square.
Fabric U (34 Aubergine), cut:
• (1) 3” x WOF strip. Sub-cut the strip into (2) 3” x 9 ½” strips.
Fabric V (35 Oyster), cut:
• (4) 4 ⅞” x WOF strips. Sub-cut the strips into (26) 4 ⅞” squares and (2) 4 ½” squares.
• (5) 2 ½” x WOF strips. Sub-cut the strips into (20) 2 ½” x 9 ½” strips.
• (6) 2 ½” x WOF strips. Sew the strips together, end to end, and cut (5) 2 ½” x 46 ½” strips.
Fabric W (40 Fuchsia), cut:
• (1) 4 ½” square.
Fabric X (42 Magenta), cut:
• (1) 4 ½” x WOF strip. Sub-cut the strip into (1) 4 ½” square and (2) 3” x 9 ½” strips.
• (6) 2 ½” x WOF strips for the binding.
Fabric Y (50 Coffee Bean), cut:
• (1) 3” x WOF strip. Sub-cut the strip into (2) 3” x 9 ½” strips.
Backing (2834-67 Aquarium), cut:
• (2) 64” x WOF strips.
Sew using a ¼” seam allowance with right sides together (RST) unless otherwise indicated. Always press towards the darker fabric while assembling, unless otherwise noted by the arrows.
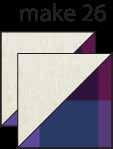
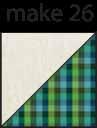
1.Place (1) 4 ⅞” Fabric V square on top of (1) Fabric A square, right sides together. Draw a line across the diagonal of the top square (Fig. 1). Sew ¼” away from each side of the drawn diagonal line (Fig. 1). Cut the two squares apart on the drawn diagonal line (Fig. 2) to make two AV units. (Fig. 3). Trim the AV units to measure 4 ½” square. Repeat to make (26) 4 ½” AV units. (Note: You will only use [25] of the units.)

2.Repeat Step 1 using (13) 4 ⅞” Fabric J squares and (13) Fabric V squares to make (26) 4 ½” JV units (Fig. 4). (Note: You will only use [25] of the units.)
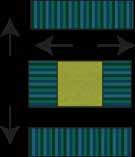
3.Follow Figure 5 and sew (2) 3” x 4 ½” Fabric P strips, (2) 3” x 9 ½” Fabric P strips and (1) 4 ½” Fabric R square together to make (1) PR block.
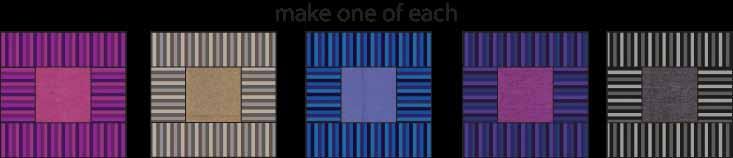
4.Repeat Step 5 to make (1) MW block, (1) NT block, (1) LS block, (1) KX block and (1) OQ block (Fig. 6).
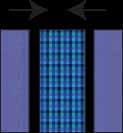
5.Follow Figure 7 and sew (1) 3” x 9 ½” Fabric S strip to each side of (1) 4 ½” x 9 ½” Fabric G strip to make (1)SG block.
6.Repeat Step 5 to make (1) UF block, (1) XH block, (1) RJ block and (1) YI block (Fig. 8).
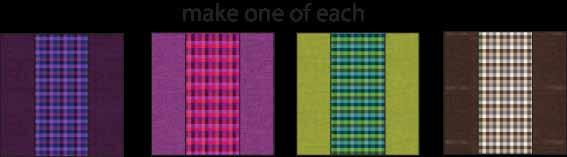
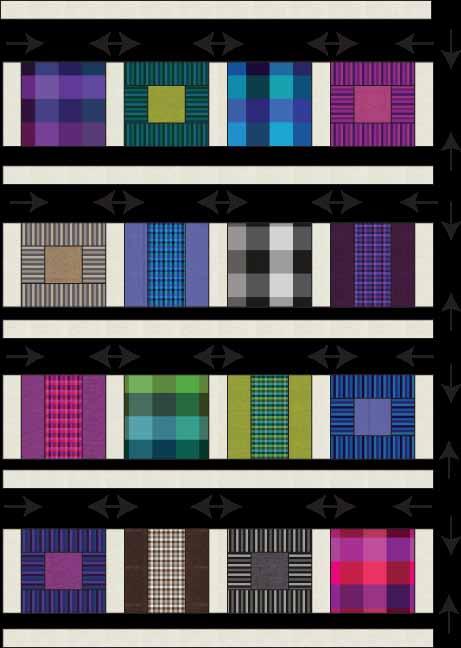
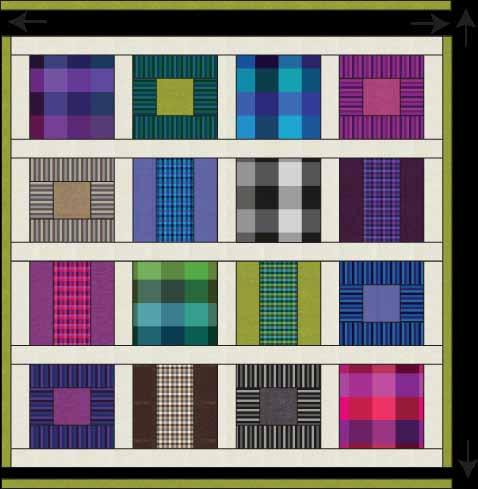
7.Refer to Figure 9 to sew the assorted blocks, assorted 9 ½” squares and (20) 2 ½” x 9 ½” Fabric V strips and (5) 2 ½” x 46 ½” Fabric V strips together to make the quilt top.
9
8.Sew (1) 1 ½” x 46 ½” Fabric R strip to each side of the quilt top. Sew (1) 1 ½” x 48 ½” Fabric R strip to the top and to the bottom of the quilt top (Fig. 10).
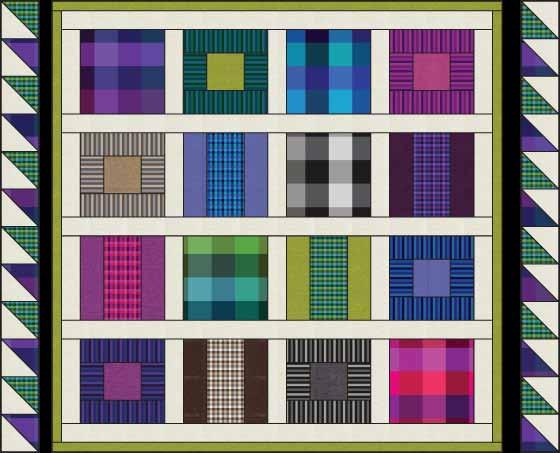
9.Sew (6) AV units and (6) JV units together, alternating them, to make (1) side border. Repeat to make a second side border. Sew the borders to each side of the quilt top (Fig. 11).
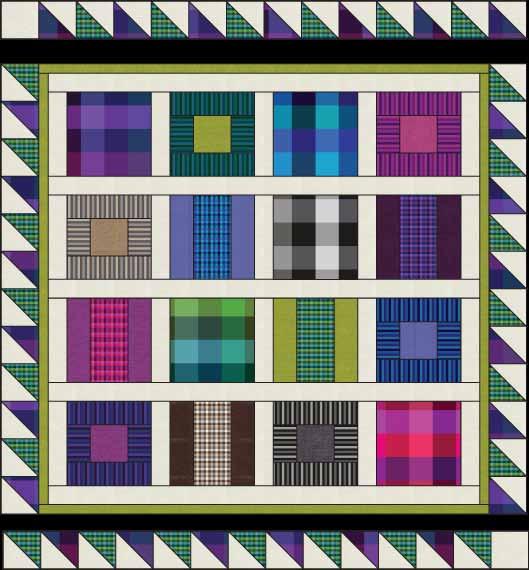
10.Sew (1) 4 ½” Fabric V square, (7) AV units and (6) JV units together to make the top border. Sew (7) JV units, (6) AV units and (1) 4 ½” Fabric V square to make the bottom border. Sew the borders to the bottom of the quilt top (Fig. 12).
11.Sew the (2) 64” x WOF strips together and trim to make (1) 64” x 64” backing piece.
12.Press the quilt top and backing well. Layer backing (wrong side up), batting, pressed quilt top (right side up) and baste. Quilt as desired and trim excess batting and backing when quilting is complete.
13.Cut the ends of the (6) Fabric X binding strips at a 45-degree angle and sew end to end to make one continuous piece of binding. Fold in half lengthwise and press wrong sides together.
14.Sew the binding to the front of the quilt, raw edges together. Turn the folded edge to the back, and hand stitch in place.
www.studio e fabrics.com
Featuring fabrics from the Peppered Cottons collection by Pepper Cory for
Fabric Requirements
(A) Oyster-35 .................... 1 ¾ yards
(B) Fog-47 .......................... 2 ⅛ yards
(C) Sand-39 ........................ 1 ¾ yards
(D) Morning Glory-28 .... ⅝ yard
(E) Ink-45 ............................. ⅝ yard
(F) Green Tea-22 .............. ⅝ yard
(G) Emerald-30 ................. ⅝ yard
(H) Paprika-32 .................. ⅝ yard
(I) Garnet-26 ..................... ⅝ yard
(J) Rain-44 ..................... ⅝ yard
(K) Plum-43 ................... ⅝ yard
(L) Peacock-49 .............. ⅝ yard
(M)Charcoal-14 ............ ⅝ yard
(N) Fuchsia-40 .............. ½ yard
(O) Aubergine-34 ........ ½ yard
Binding (Your Choice) ⅝ yard
Backing (Your Choice) 5 ¼ yards
Additional Supplies Needed
Batting 72” x 92”
Piecing and sewing thread
Quilting and sewing supplies
Quilt designed by Heidi Pridemore
Finished Quilt Size 64" x 84"
Cutting Instructions
Please note: all strips are cut across the width of fabric (WOF) from selvage to selvage edge.
WOF= Width of Fabric • LOF = Length of Fabric
Fabric A (Oyster-35), cut:
• (4) 8 ½” x WOF strips. Sub-cut the strips into (32) 4 ½” x 8 ½” strips.
• (6) 4 ½” x WOF strips. Sub-cut the strips into (48) 4 ½” squares.
Fabric B (Fog-47), cut:
• (4) 8 ½” x WOF strips. Sub-cut the strips into (32) 4 ½” x 8 ½” strips.
• (8) 4 ½” x WOF strips. Sub-cut the strips into (64) 4 ½” squares.
Fabric C (Sand-39), cut:
• (3) 8 ½” x WOF strips. Sub-cut the strips into (24) 4 ½” x 8 ½” strips.
• (6) 4 ½” x WOF strips. Sub-cut the strips into (48) 4 ½” squares.
Fabric D (Morning Glory-28), cut:
• (1) 8 ½” x WOF strip. Sub-cut the strip into (8) 4 ½” x 8 ½” strips.
• (2) 4 ½” x WOF strips. Sub-cut the strips into (16) 4 ½” squares.
Fabric E (Ink-45), cut:
• (1) 8 ½” x WOF strip. Sub-cut the strip into (8) 4 ½” x 8 ½” strips.
• (2) 4 ½” x WOF strips. Sub-cut the strips into (16) 4 ½” squares.
Fabric F (Green Tea-22), cut:
• (1) 8 ½” x WOF strip. Sub-cut the strip into (8) 4 ½” x 8 ½” strips.
• (2) 4 ½” x WOF strips. Sub-cut the strips into (16) 4 ½” squares.
Fabric G (Emerald-30), cut:
• (1) 8 ½” x WOF strip. Sub-cut the strip into (8) 4 ½” x 8 ½” strips.
• (2) 4 ½” x WOF strips. Sub-cut the strips into (16) 4 ½” squares.
Fabric H (Paprika-32), cut:
• (1) 8 ½” x WOF strip. Sub-cut the strip into (4) 4 ½” x 8 ½” strips.
• (2) 4 ½” x WOF strips. Sub-cut the strips into (16) 4 ½” squares.
Fabric I (Garnet-26), cut:
• (1) 8 ½” x WOF strip. Sub-cut the strip into (4) 4 ½” x 8 ½” strips.
• (2) 4 ½” x WOF strips. Sub-cut the strips into (16) 4 ½” squares.
Fabric J (Rain-44), cut:
• (1) 8 ½” x WOF strip. Sub-cut the strip into (8) 4 ½” x 8 ½” strips.
• (2) 4 ½” x WOF strips. Sub-cut the strips into (16) 4 ½” squares.
Fabric K (Plum-43), cut:
• (1) 8 ½” x WOF strip. Sub-cut the strip into (8) 4 ½” x 8 ½” strips.
• (2) 4 ½” x WOF strips. Sub-cut the strips into (16) 4 ½” squares.
Fabric L (Peacock-49), cut:
• (1) 8 ½” x WOF strip. Sub-cut the strip into (8) 4 ½” x 8 ½” strips.
• (1) 4 ½” x WOF strip. Sub-cut the strip into (16) 4 ½” squares.
Fabric M (Charcoal-14), cut:
• (1) 8 ½” x WOF strip. Sub-cut the strip into (8) 4 ½” x 8 ½” strips.
• (2) 4 ½” x WOF strip. Sub-cut the strip into (16) 4 ½” squares.
Fabric N (Fuchsia-40), cut:
• (1) 8 ½” x WOF strip. Sub-cut the strip into (4) 4 ½” x 8 ½” strips.
• (1) 4 ½” x WOF strip. Sub-cut the strip into (8) 4 ½” squares.
Fabric O (Aubergine-34), cut:
• (1) 8 ½” x WOF strip. Sub-cut the strip into (4) 4 ½” x 8 ½” strips.
• (1) 4 ½” x WOF strip. Sub-cut the strip into (8) 4 ½” squares.
Binding (Your Choice), cut:
• (8) 2 ½” x WOF strips for binding
Backing (Your Choice), cut:
• (2) 92” x WOF strips
Sew using a ¼” seam allowance with right sides together (RST) unless otherwise indicated. Always press towards the darker fabric while assembling, unless otherwise noted by the arrows.
Block Assembly
1.Place one 4 ½” Fabric L square on the left side of one 4 ½” x 8 ½” Fabric A strip, right sides together (Fig. 1). Sew across the diagonal of the square from the upper right corner to the lower left corner (Fig. 1). Flip open the triangle formed and press (Fig. 2). Trim away the excess fabric from behind the triangle, leaving a ¼” seam allowance.
2.Place another 4 ½” Fabric L square on the right side of the 4 ½” x 8 ½” Fabric A strip, right sides together (Fig. 3). Sew across the diagonal of the square from the upper left corner to the lower right corner (Fig. 3). Flip open the triangle formed and press (Fig. 4). Trim away the excess fabric from behind the triangle, leaving a ¼”seam allowance. This completes one L/A/L unit.
3.Repeat Steps 1-2 to make eight L/A/L units total.
4.Repeating Steps 1-2 using the following combinations to make the stated number of units:
4 ½” x 8 ½” strip 4 ½” squares Finished Unit Quantity
(8) FabricA’s (16) Fabric M’s M/A/M (8) (4) FabricA’s (8) FabricN’s N/A/N (4) (4) FabricA’s (8) FabricD’s D/A/D (4) (4) FabricA’s (8) FabricO’s O/A/O (4) (4) FabricA’s (8) FabricE’s E/A/E (4)
(8) FabricB’s (16) FabricF’s F/B/F (8) (8) FabricB’s (16) FabricG’s G/B/G (8) (4) FabricB’s (8) FabricD’s D/B/D (4) (4) FabricB’s (8) FabricE’s E/B/E (4) (4) FabricB’s (8) FabricH’s H/B/H (4) (4) FabricB’s (8) FabricI’s I/B/I (4)
(8) FabricC’s (16) FabricJ’s J/C/J (8) (8) FabricC’s (16) FabricK’s K/C/K (8) (4) FabricC’s (8) FabricH’s H/C/H (4) (4) FabricC’s (8) FabricI’s I/C/I (4)
(4) FabricD’s (8) FabricB’s B/D/B (4)
(4) FabricD’s (8) FabricC’s C/D/C (4)
(4) FabricE’s (8) FabricB’s B/E/B (4) (4) FabricE’s (8) FabricC’s C/E/C (4)
(8) FabricF’s (16) FabricC’s C/F/C (8)
(8) FabricG’s (16) FabricC’s C/G/C (8)
(4) FabricH’s (8) FabricA’s A/H/A (4)
(4) FabricI’s (8) FabricA’s A/I/A (4)
(8) FabricJ’s (16) FabricA’s A/J/A (8)
(8) FabricK’s (16) FabricA’s A/K/A (8)
(8) FabricL’s (16) FabricB’s B/L/B (8)
(8) Fabric M’s (16) FabricB’s B/M/B (8)
(4) FabricN’s (8) FabricB’s B/N/B (4)
(4) FabricO’s (8) FabricB’s B/O/B (4)
5.Sew eight of the flying geese units together to make Row One. Press the blocks to the left (Fig. 5). Follow the Quilt Layout for fabric placement and repeat to make Rows Three, Five, Seven, Nine, Eleven, Thirteen, Fifteen, Seventeen, Nineteen and Twenty-one.
6.Sew eight of the flying geese units together to make Row Two. Press the blocks to the right (Fig. 6). Follow the Quilt Layout for fabric placement and repeat to make Rows Four, Six, Eight, Ten, Twelve, Fourteen, Sixteen, Eighteen and Twenty.
7.Sew the (21) rows together in numerical order to make the quilt top (See Quilt Layout).
8.Sew the two 92” x WOF strips together and trim to make one 72" x 92” backing piece.
9.Press the quilt top and backing well. Layer backing (wrong side up), batting, pressed quilt top (right side up) and baste. Quilt as desired and trim excess batting and backing when quilting is complete.
10.Cut the ends of the eight binding strips at a 45-degree angle and sew end to end to make one continuous piece of binding. Fold in half lengthwise and press wrong sides together.
11.Sew the binding to the front of the quilt, raw edges together. Turn the folded edge to the back, and hand stitch in place.

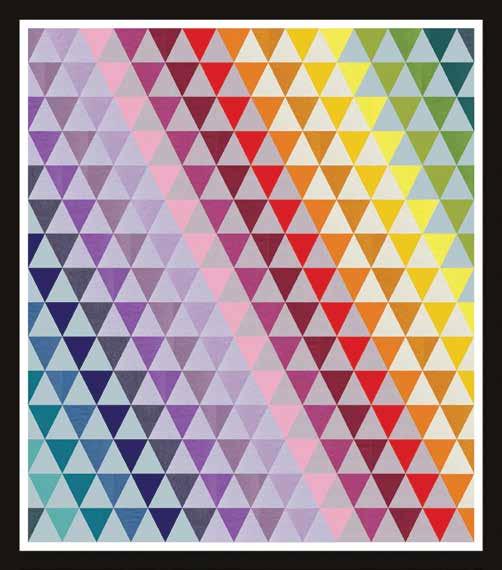
Featuring fabrics from the Peppered Cottons collection by Pepper Cory for
(A) 3051-70 ...... ⅝ yard
(B) 3051-05 ...... ⅝ yard
(C) 3051-20 ...... ⅝ yard
(D) 3051-35 ...... ½ yard
(E) 3051-49 ...... ⅛ yard
(F) 3051-75 ...... ¼ yard
(G) 3051-78 ...... ¼ yard
(H) 3051-41 ...... ¼ yard
(I) 3051-77 ........ ¼ yard
(J) 3051-79 ........ ¼ yard
(K) 3051-43 ...... ¼ yard
(L) 3051-74 ....... ¼ yard
(M) 3051-02 ...... ¼ yard
(N) 3051-06 ...... ¼ yard
(O) 3051-40 ...... ¼ yard
(P) 3051-26 ....... ¼ yard
(Q) 3051-16 ...... ¼ yard
(R) 3051-36 ...... ¼ yard
(S) 3051-25 ....... ¼ yard
(T) 3051-81 ....... ¼ yard
(U) 3051-91 ...... ¼ yard
(V) 3051-64 ....... ¼ yard
(W) 3051-30 ..... ¼ yard
(X) 3051-11 ....... ¼ yard
(Y) 3051-09 ....... ⅜ yard
(Z) 3051-98 ....... 1 ⅛ yards* Backing 3051-60 ....... 3 ¾ yards
*Includes Binding
Batting 66” x 74”
Piecing & sewing thread
Quilting & sewing supplies
Quilt designed by: Heidi Pridemore
Finished Quilt Size 58" x 66"
Skill Level: Intermediate
Cutting Instructions
Please note: All strips are cut across the width of fabric (WOF) from selvage to selvage edge unless otherwise noted.
WOF= Width of Fabric • LOF = Length of Fabric
Fabric A (3051-70 Peppered Cottons – Frost), cut:
• (41) Template 1 triangles.
• (4) Template 2 triangles.
• (5) Template 3 triangles.
Fabric B (3051-05 Peppered Cottons – Lavender), cut:
• (54) Template 1 triangles.
• (2) Template 3 triangles.
Fabric C (3051-20 Peppered Cottons – Pearl), cut:
• (60) Template 1 triangles.
Fabric D (3051-35 Peppered Cottons – Oyster), cut:
• (33) Template 1 triangles.
• (3) Template 2 triangles.
Fabric E (3051-49 Peppered Cottons – Peacock), cut:
• (1) Template 2 triangles.
• (1) Template 3 triangles.
Fabric F (3051-75 Peppered Cottons – Surf), cut:
• (2) Template 1 triangles.
• (1) Template 2 triangles.
Fabric G (3051-78 Peppered Cottons – Lagoon), cut:
• (4) Template 1 triangles.
• (2) Template 2 triangles.
Fabric H (3051-41 Peppered Cottons – Blue Jay), cut:
• (6) Template 1 triangles.
Fabric I (3051-77 Peppered Cottons – True Royal), cut:
• (8) Template 1 triangles.
• (1) Template 2 triangles.
Fabric J (3051-79 Peppered Cottons – Stonewash), cut:
• (10) Template 1 triangles.
• (1) Template 2 triangles.
Fabric K (3051-43 Peppered Cottons – Plum), cut:
• (12) Template 1 triangles.
• (1) Template 2 triangles.
Fabric L (3051-74 Peppered Cottons – Violet), cut:
• (14) Template 1 triangles.
• (1) Template 2 triangles.
Fabric M (3051-02 Peppered Cottons – Orchid), cut:
• (15) Template 1 triangles.
Fabric N (3051-06 Peppered Cottons – Cottage Rose), cut:
• (15) Template 1 triangles.
Fabric O (3051-40 Peppered Cottons – Fuchsia), cut:
• (15) Template 1 triangles.
Fabric P (3051-26 Peppered Cottons – Garnet), cut:
• (15) Template 1 triangles.
Fabric Q (3051-16 Peppered Cottons – Flame), cut:
• (15) Template 1 triangles.
Fabric R (3051-36 Peppered Cottons – True Cheddar), cut:
• (14) Template 1 triangles.
• (1) Template 3
Fabric S (3051-25 Peppered Cottons – Saffron), cut:
• (12) Template 1 triangles.
• (1) Template 3
Fabric T (3051-81 Peppered Cottons – Buttercup), cut:
• (10) Template 1 triangles.
• (1) Template 3
Fabric U (3051-91 Peppered Cottons – Citrus Yellow), cut
• (8) Template 1 triangles.
• (1) Template 3
Fabric V (3051-64 Peppered Cottons – Bright Kiwi), cut:
• (6) Template 1 triangles.
• (1) Template 3
Fabric W (3051-30 Peppered Cottons – Emerald), cut:
• (4) Template 1 triangles.
• (1) Template 3
Fabric X (3051-11 Peppered Cottons – Marine Blue), cut:
• (2) Template 1 triangles.
• (1) Template 3
Fabric Y (3051-09 Peppered Cottons – White Sugar), cut:
• (4) 1 ½” x WOF strips. Sew the strips together end to end with diagonal seams and cut (2) 1 ½” x 60 ½” strips.
• (3) 1 ½” x WOF strips. Sew the strips together end to end with diagonal seams and cut (2) 1 ½” x 54 ½” strips.
Fabric Z (3051-98 Peppered Cottons – Deep Space), cut:
• (4) 2 ½” x WOF strips. Sew the strips together end to end with diagonal seams and cut (2) 2 ½” x 62 ½” strips.
• (3) 2 ½” x WOF strips. Sew the strips together end to end with diagonal seams and cut (2) 2 ½” x 58 ½” strips.
• (7) 2 ½” x WOF strips for the binding.
Backing (3051-60 Peppered Cottons – Aluminum), cut:
• (2) 66” x WOF strips. Sew the strips together and trim to 66” x 74” for the back.
Sew using a ¼” seam allowance with right sides together (RST) unless otherwise indicated. Always press towards the darker fabric while assembling, unless otherwise noted by the arrows.
(Follow the Quilt Layout while assembling the quilt top.)
1. Sew (25) assorted Template 1 triangles, (1) Template 2 triangle and (1) Template 3 triangle together to make (1) row. Repeat to make (15) rows (Fig. 1). The Template 2 and 3 triangles either start or end a row. Pay attention to the orientation of the triangles.
2. Sew the (15) rows together to make the quilt top (Fig. 1).
3. Sew (1) 1 ½” x 60 ½” Fabric Y strip to each side of the quilt top. Sew (1) 1 ½” x 54 ½” Fabric Y strip to the top and to the bottom of the quilt top.
4. Sew (1) 2 ½” x 62 ½” Fabric Z strip to each side of the quilt top. Sew (1) 2 ½” x 58 ½” Fabric Z strip to the top and to the bottom of the quilt top.
5. Press the quilt top and 66” x 74” backing well. Layer backing (wrong side up), batting, pressed quilt top (right side up) and baste. Quilt as desired and trim excess batting and backing when quilting is complete.
6. Cut the ends of the (7) Fabric Z binding strips at a 45-degree angle and sew end to end to make (1) continuous piece of binding. Fold in half lengthwise and press wrong sides together.
7. Sew the binding to the front of the quilt, raw edges together. Turn the folded edge to the back, and hand stitch in place.
TEMPLATE2
TEMPLATE1
TEMPLATE3
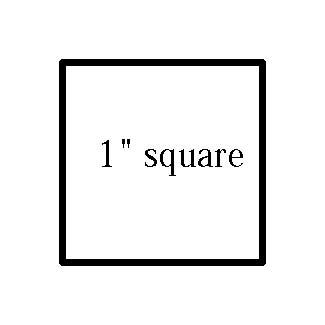
1”square forscale
Every effort has been made to ensure that all projects are error free. All the information is presented in good faith, however no warranty can be given nor results guaranteed as we have no control over the execution of instructions. Therefore, we assume no responsibility for the use of this information or damages that may occur as a result. When errors are brought to our attention, we make every effort to correct and post a revision as soon as possible. Please make sure to check www.studioefabrics.com for pattern updates prior to starting the project. We also recommend that you test the project prior to cutting for kits. Finally, all free projects are intended to remain free to you and are not for resale
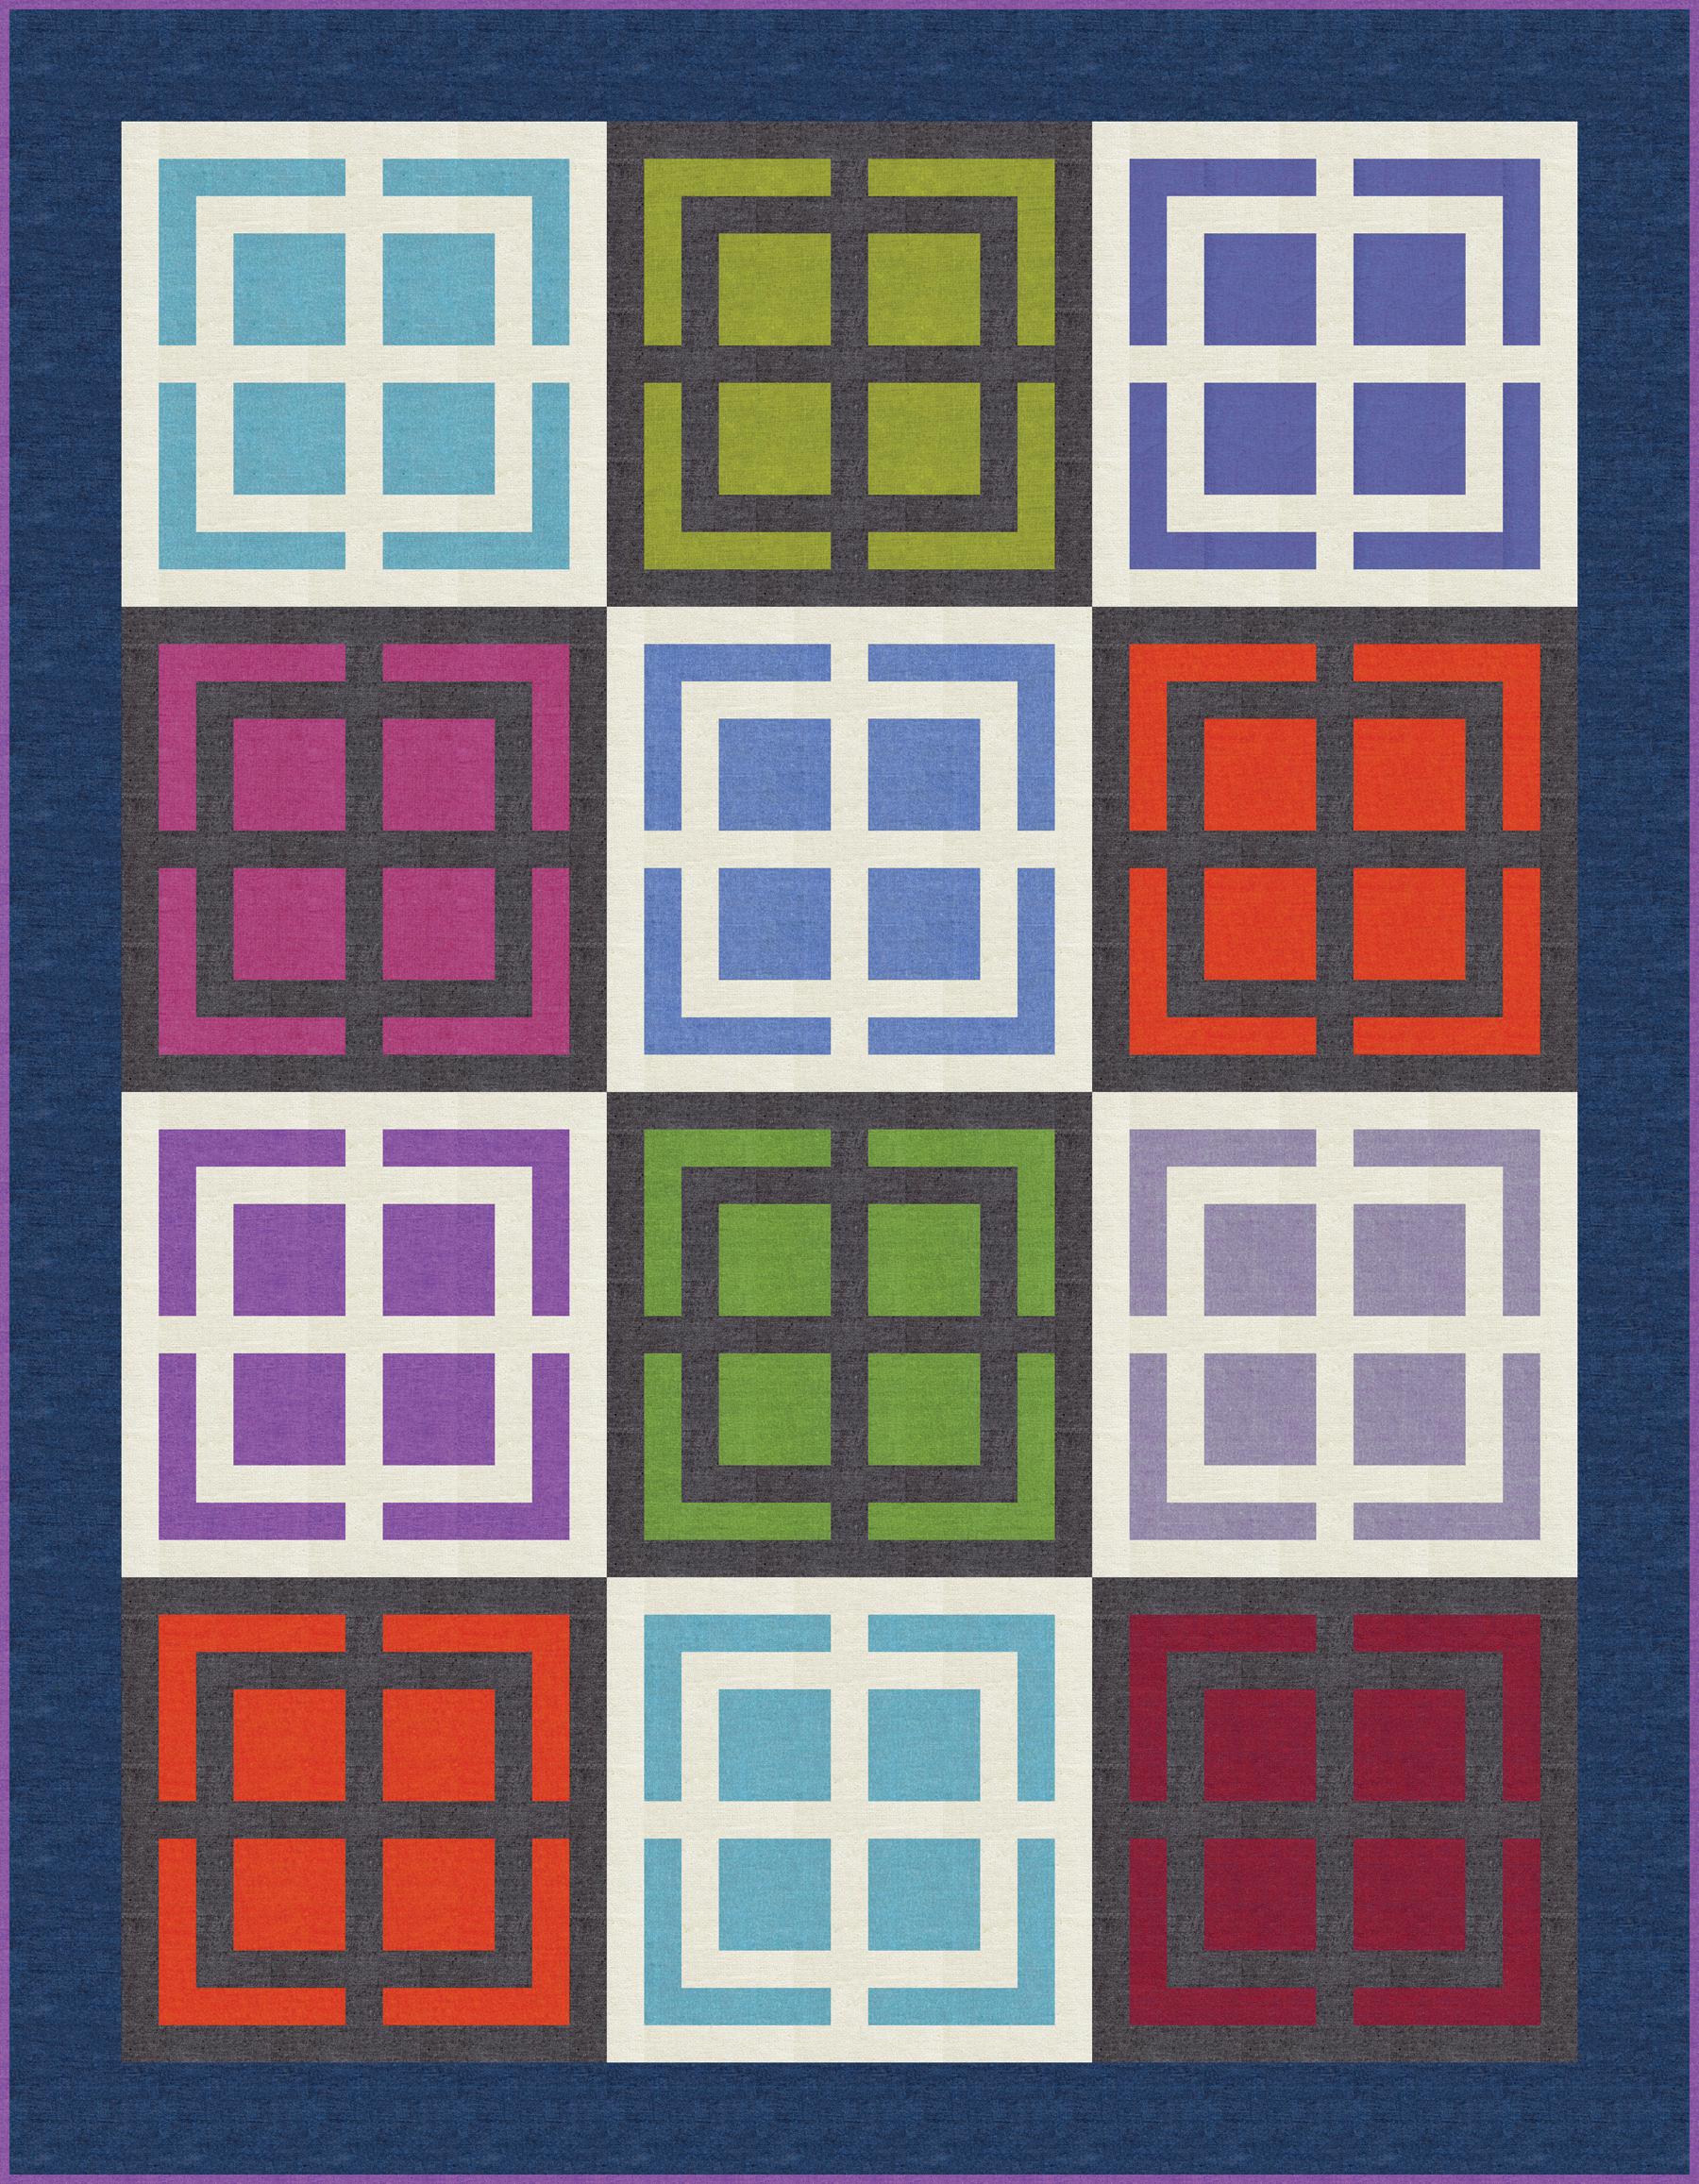
Featuring fabrics from the Peppered Cottons by Pepper Cory for
Fabric Requirements
(A) Oyster .................. 1 ⅛ yards
(B) Charcoal ............. 1 ⅛ yards
(C) Sky Blue .............. ⅓ yard
(D) Green Tea ........... ¼ yard
(E)Morning Glory .. ¼ yard
(F) Fuchsia ................ ¼ yard
(G) Blue Bell ............. ¼ yard
(H) Paprika ............... ⅜ yard
(I) Plum ...................... ¾ yard*
(J) Emerald ............... ¼ yard
(K) Rain ...................... ¼ yard
(L) Garnet .................. ¼ yard
(M) Ink ........................ ⅔ yard
Backing
Peacock .............. 3 yards
Additional Supplies Needed
Batting 53" x 66"
Piecing and sewing thread
Quilting and sewing supplies
Quilt Design by Heidi Pridemore
Finished Quilt Size 45" x 58"
*includes binding
Cutting Instructions
Please Note: All strips are cut across the width of fabric (WOF) from selvage to selvage edge unless otherwise noted.
WOF= Width of Fabric • LOF = Length of Fabric
Fabric A (Oyster), cut:
•(2) 1 ½” x width of fabric (WOF) strips. Sub-cut the strips into (6) 1 ½” x 13 ½” strips.
•(2) 6 ½” x WOF strips. Sub-cut the strips into (36) 1 ½” x 6 ½” strips.
•(1) 5 ½” x WOF strip. Sub-cut the strip into (24) 1 ½” x 5 ½” strips.
•(1) 4 ½” x WOF strip. Sub-cut the strip into (24) 1 ½” x 4 ½” strips.
•(1) 3 ½” x WOF strip. Sub-cut the strip into (24) 1 ½” x 3 ½” strips.
Fabric B (Charcoal), cut:
•(2) 1 ½” x width of fabric (WOF) strips. Sub-cut the strips into (6) 1 ½” x 13 ½” strips.
•(2) 6 ½” x WOF strips. Sub-cut the strips into (36) 1 ½” x 6 ½” strips.
•(1) 5 ½” x WOF strip. Sub-cut the strip into (24) 1 ½” x 5 ½” strips.
•(1) 4 ½” x WOF strip. Sub-cut the strip into (24) 1 ½” x 4 ½” strips.
•(1) 3 ½” x WOF strip. Sub-cut the strip into (24) 1 ½” x 3 ½” strips.
Fabric C (Sky Blue), cut:
•(1) 3 ½” x WOF strip. Sub-cut the strip into (8) 3 ½” squares.
•(1) 5 ½” x WOF strip. Sub-cut the strip into (8) 1 ½” x 5 ½” strips and (8) 1 ½” x 4 ½” strips.
Fabric D (Green Tea), cut:
•(1) 5 ½” x WOF strip. Sub-cut the strip into (4) 1 ½” x 5 ½” strips, (4) 1 ½” x 4 ½” strips and (4)3 ½” squares.
Fabric E (Morning Glory), cut:
•(1) 5 ½” x WOF strip. Sub-cut the strip into (4) 1 ½” x 5 ½” strips, (4) 1 ½” x 4 ½” strips and (4)3 ½” squares.
Fabric F (Fuchsia), cut:
•(1) 5 ½” x WOF strip. Sub-cut the strip into (4) 1 ½” x 5 ½” strips, (4) 1 ½” x 4 ½” strips and (4)3 ½” squares.
Fabric G (Blue Bell), cut:
•(1) 5 ½” x WOF strip. Sub-cut the strip into (4) 1 ½” x 5 ½” strips, (4) 1 ½” x 4 ½” strips and (4)3 ½” squares.
Fabric H (Paprika), cut:
•(2) 5 ½” x WOF strips. Sub-cut the strips into (8) 1 ½” x 5 ½” strips, (8) 1 ½” x 4 ½” strips and (8)3 ½” squares.
Fabric I (Plum), cut:
•(1) 5 ½” x WOF strip. Sub-cut the strip into (4) 1 ½” x 5 ½” strips, (4) 1 ½” x 4 ½” strips and (4)3 ½” squares.
•(6) 2 ½” x WOF strips for the binding.
Fabric J (Emerald), cut:
•(1) 5 ½” x WOF strip. Sub-cut the strip into (4) 1 ½” x 5 ½” strips, (4) 1 ½” x 4 ½” strips and (4)3 ½” squares.
Fabric K (Rain), cut:
•(1) 5 ½” x WOF strip. Sub-cut the strip into (4) 1 ½” x 5 ½” strips, (4) 1 ½” x 4 ½” strips and (4)3 ½” squares.
Fabric L (Garnet), cut:
•(1) 5 ½” x WOF strip. Sub-cut the strip into (4) 1 ½” x 5 ½” strips, (4) 1 ½” x 4 ½” strips and (4)3 ½” squares.
Fabric M (Ink), cut:
•(6) 3 ½” x WOF strips. Sew the strips together, end to end with diagonal seams, and cut (2)3 ½” x 52 ½” strips and (2) 3 ½” x 45 ½” strips.
Backing (Peacock), cut:
•(2) 53” x WOF strips for the backing. Sew the strips together and trim to make the 53” x 66” back.
Sew using a ¼” seam allowance with right sides together (RST) unless otherwise indicated. Always press towards the darker fabric while assembling, unless otherwise noted by the arrows.
Block Assembly
1.Sew (1) 1 ½” x 3 ½” Fabric A strip to the left side of (1) 3 ½” Fabric C square. Sew (1) 1 ½” x 4 ½” Fabric A strip to the top of the 3 ½” Fabric C square (Fig. 1).
2.Sew (1) 1 ½” x 4 ½” Fabric C strip to the left side of the block. Sew (1) 1 ½” x 5 ½” Fabric C strip to the top of the block (Fig. 2).
3.Sew (1) 1 ½” x 5 ½” Fabric A strip to the left side of the block. Sew (1) 1 ½” x 6 ½” Fabric A strip to the top of the block to complete (1) Upper Left Corner block (Fig. 3). Repeat to make the Lower Right Corner.
4.Repeat Steps 1-3 and follow Figure 4 to sew one 3 ½” Fabric C square, one 1 ½” x 3 ½” Fabric A strip, one 1 ½” x 4 ½” Fabric A strip, one 1 ½” x 4 ½” Fabric C strip, one 1 ½” x 5 ½” Fabric C, one 1 ½” x 5 ½” Fabric A strip and one 1 ½” x 6 ½” Fabric A strip to make the Upper Right Corner and Lower Left Corner.
Fig. 3 Fig. 4 Fig. 1
Fig. 2
5.Sew the (4) corner blocks, (2) 1 ½” x 6 ½” Fabric A strips and (1) 1 ½” x 13 ½” Fabric A strip together to make one 13 ½” Fabric C block (Fig. 5).
6.Repeat Steps 1-5 to make a second Fabric C block.
7.Repeat Steps 1-5 to make one Fabric D block using Fabric B strips in place of Fabric A strips (Fig. 6).
8.Repeat Steps 1-5 to make one Fabric E block using Fabric A and Fabric E pieces (Fig. 7).
9.Repeat Steps 1-5 to make one Fabric F block using Fabric B and Fabric F pieces (Fig. 8).
10.Repeat Steps 1-5 to make one Fabric G block using Fabric A and Fabric G pieces (Fig. 9).
11.Repeat Steps 1-5 to make two Fabric H blocks using Fabric B and Fabric H pieces (Fig. 10).
12.Repeat Steps 1-5 to make one Fabric I block using Fabric A and Fabric I pieces (Fig. 11).
13.Repeat Steps 1-5 to make one Fabric J block using Fabric B and Fabric J pieces (Fig. 12).
14.Repeat Steps 1-5 to make one Fabric K block using Fabric A and Fabric K pieces (Fig. 13).
15.Repeat Steps 1-5 to make one Fabric L block using Fabric B and Fabric L pieces (Fig. 14).
16.Sew three blocks together to make (1) row. Repeat to make (4) rows.
17.Sew the (4) rows together to make the quilt top.
18.Sew (1) 3 ½” x 52 ½” Fabric M strip to each side of the quilt top. Sew (1) 3 ½” x 45 ½” Fabric M strip to the top and to the bottom of the quilt top (Fig. 15).
19.Press the quilt top and 53” x 66” backing well. Layer backing (wrong side up), batting, pressed quilt top (right side up) and baste. Quilt as desired and trim excess batting and backing when quilting is complete.
20.Cut the ends of the (6) Fabric I binding strips at a 45-degree angle and sew end to end to make (1) continuous piece of binding. Fold in half lengthwise and press wrong sides together.
21.Sew the binding to the front of the quilt, raw edges together. Turn the folded edge to the back, and hand stitch in place.
www.studio e
Featuring fabrics from the Peppered Cottons collection by Pepper Cory for
(A) Oyster-35 .................... 3/4 yard
(B) Carbon-23 ................... ½ yard*
(C) Sand-39 ........................ ¼ yard
(D) Tobacco-85 ................. ¼ yard
(E) Pepper-31 .................... ¼ yard
(F) Coffee Bean-50 .......... ¼ yard
(G) Fog-47 ........................... ¼ yard
(H) Charcoal-14 ................ ¼ yard
(I) Jungle-29 ..................... ¼ yard
(J) Emerald-30 ................. ¼ yard
(K) Aubergine-34 ............. ¼ yard
(L) Blue Jay-41 .................. ¼ yard
(M) Rain-44 ......................... ¼ yard
(N) Morning Glory-28 .... ¼ yard
(O) Ink-45 ........................... ¼ yard
(P) Peacock-49 .................. ¼ yard
(Q) Green Tea-22 ............. ¼ yard
(R) Moss-38 ....................... ¼ yard
(S) Begonia Leaf-21 ........ ¼ yard
(T) Plum-43 ....................... ¼ yard
(U) Magenta-42 ................ ¼ yard
(V) Fuchsia-40 .................. ¼ yard
(W) Garnet-26 ................... ¼ yard
(X) Saffron-25 ................... ¼ yard
(Y) Paprika-32 .................. ¼ yard
Backing (Your Choice) ..... 1 ½ yards *includes binding
Batting 44” x 44”
Piecing and sewing thread
Quilting and sewing supplies
Quilt designed by Heidi Pridemore
Finished Quilt Size 37" x 37"
Cutting Instructions
Please note: all strips are cut across the width of fabric (WOF) from selvage to selvage edge.
WOF= Width of Fabric • LOF = Length of Fabric
Fabric A (Oyster-35), cut:
• Cut 4 – 2 ½” x WOF strips, sub-cut into 60-2 ½” squares
• Cut 2 – 2 ½” x WOF strip, sub-cut into 12 – 2 ½” x 4 ½” strips
• Cut 4 – 2 ½” x WOF strip, sub-cut into 24 – 2 ½” x 6 ½” strips
Fabric B (Carbon-23), cut:
• Cut 1 – 5 ½” square
• Cut 4 – 2 ½” x WOF strips for binding
Fabric C (Sand-39), cut:
• Cut 1 – 5 ½” square
Fabric D (Tobacco-85), cut:
• Cut 1 – 5 ½” square
Fabric E (Pepper-31), cut:
• Cut 1 – 5 ½” square
Fabric F (Coffee Bean-50), cut:
• Cut 1 – 5 ½” square
Fabric G (Fog-47), cut:
• Cut 1 – 5 ½” square
• Cut 36 - 1 ½” x 2 ½” strips
Fabric H (Charcoal-14), cut:
• Cut 1 – 5 ½” square
Fabric I (Jungle-29), cut:
• Cut 1 – 5 ½” square
Fabric J (Emerald-30), cut:
• Cut 1 – 5 ½” square
Fabric K (Aubergine-34), cut:
• Cut 1 – 5 ½” square
Fabric L (Blue Jay-41), cut:
• Cut 1 – 5 ½” square
Fabric M (Rain-44), cut:
• Cut 1 – 5 ½” square
Fabric N (Morning Glory-28), cut:
• Cut 1 – 5 ½” square
Fabric O (Ink-45), cut:
• Cut 1 – 5 ½” square
Fabric P (Peacock-49), cut:
• Cut 1 – 5 ½” square
Fabric Q (Green Tea-22), cut:
• Cut 1 – 5 ½” square
• Cut 8 – 1 ½” x 2 ½” strips
Fabric R (Moss-38), cut:
• Cut 1 – 5 ½” square
Fabric S (Begonia Leaf-21), cut:
• Cut 1 – 5 ½” square
Fabric T (Plum-43), cut:
• Cut 2 – 5 ½” square
Fabric U (Magenta-42), cut:
• Cut 1 – 5 ½” square
Fabric V (Fuchsia-40), cut:
• Cut 1 – 5 ½” square
Fabric W (Garnet-26), cut:
• Cut 1 – 5 ½” square
Fabric X (Saffron-25), cut:
• Cut 1 – 5 ½” square
Fabric Y (Paprika-32), cut:
• Cut 1 – 5 ½” square
• Cut 16 – 1 ½” x 2 ½” strips
Backing (Your Choice), cut:
• (1) 44” x 44” piece for the backing
Sew using a ¼” seam allowance with right sides together (RST) unless otherwise indicated. Always press towards the darker fabric while assembling, unless otherwise noted by the arrows.
1. Sew one 2 ½” Fabric A square to each side of one 1 ½” x 2 ½” Fabric G strip to make one A/G/A unit (Fig. 1). Repeat to make eighteen A/G/A units total.
2. Sew one 2 ½” Fabric A square to each side of one 1 ½” x 2 ½” Fabric Y strip to make one A/Y/A unit (Fig. 2). Repeat to make eight A/Y/A units total.
3. Sew one 2 ½” Fabric A square to each side of one 1 ½” x 2 ½” Fabric Q strip to make one A/Q/A unit (Fig. 3). Repeat to make four A/Q/A units total.
Fig. 1
Fig. 2
Fig. 3
4. Follow Figure 4 to sew together five 1 ½” x 2 ½” Fabric G strips, four 2 ½” x 6 ½” Fabric A strips and two 2 ½” x 4 ½” Fabric A strips Sashing Row #1. Repeat to make Sashing Row #6.
Fig. 4
6. Follow Figure 6 to sew together one 1 ½” x 2 ½” Fabric G strip, two 1 ½” x 2 ½” Fabric Y strips, two 1 ½” x 2 ½” Fabric Q strips, four 2 ½” x 6 ½” Fabric A strips and two 2 ½” x 4 ½” Fabric A strips Sashing Row #3. Repeat to make Sashing Row #4. make 2
5. Follow Figure 5 to sew together three 1 ½” x 2 ½” Fabric G strips, two 1 ½” x 2 ½” Fabric Y strips, four 2 ½” x 6 ½” Fabric A strips and two 2 ½” x 4 ½” Fabric A strips Sashing Row #2. Repeat to make Sashing Row #5.
Fig. 5
Fig. 6
make 2
7. Refer to Figure 7 to sew together five assorted 5 ½” squares and six assorted 2 ½” x 5 ½” pieced units to make one block row. Repeat to make five block rows total.
8. Refer to Figure 7 to sew together the six assorted sashing rows and five block rows to make the quilt top.
9. Press the quilt top and backing well. Layer backing (wrong side up), batting, pressed quilt top (right side up) and baste. Quilt as desired and trim excess batting and backing when quilting is complete.
10. Cut the ends of the four binding strips at a 45-degree angle and sew end to end to make one continuous piece of binding. Fold in half lengthwise and press wrong sides together.
11. Sew the binding to the front of the quilt, raw edges together. Turn the folded edge to the back, and hand stitch in place.