9 minute read
Instructions — English

from Profin PDX IFU

Instructions — English
•Prior to initial use - always read the instructions for use. •Only for US: prescription use – for use by dental clinicians only.
Advertisement
Indication for use •A����������������������������faces and restorations.
Contraindication •No known contraindications.
Precaution/Warning Handpiece Cross-contamination •Clean, disinfect and sterilize the handpiece bef����st use and between uses. •Follow the instructions in the instructions for use. The instructions are validated by the manufacturer.
Thermal •Do not exceed 10,000 rpm. •Verify the recommended rpm on the motor before start using the handpiece. •Lubricate the handpiece between each use, debris can cause clogging and excessive friction.
Small objects •Before start working: Check for secure seating by pulling the tip with y������������������������� •If tip comes out easily, try another tip or send handpiece for service.
Malfunction •Do not disassemble any part of the handpiece. •Lubricate the handpiece between each use, debris can cause clogging and excessive friction.
Vibration •Discomfort for patient and dentist if speed is lower than 5,000 rpm.
Working tips Cross-contamination •Clean, disinfect and sterilize between uses. •Do not re-use the EVA-tips. They cannot be cleaned properly. 3
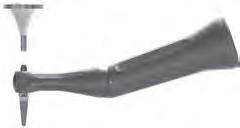
Technical Description
Profin® PDX
Description Motor coupling Material
Movement of working tip Chuck
Shank
Maximum motor speed Type of motor
Recommended speed Torque Variation of tip movement: - Tip in a self-steering mode - Fixed positions Accessories
EVA-60 PDX-F
Table 1 Contra angle handpiece. ��������ding to ISO 3964. Coupling dimensions: Long. Hard anodized aluminium. Reciprocating 1,2 mm axial stroke. Collet. Dentatus Snap-in. 10.000 rpm. Electrical (recommended) or air dental motor. Lamineer Tips: 5.000-10.000 rpm. Depending on the torque of the motor.
- For polishing procedure. - For creating anatomical corrections for esthetic alignments.
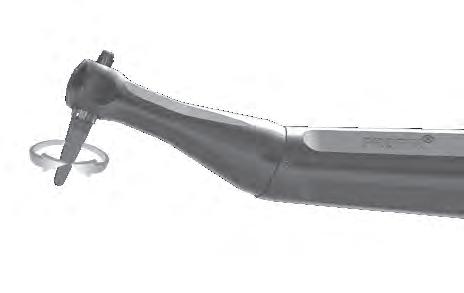
Plunger to eject tip. Water spray clip, should external water be needed.
Working tips to be used with Profin PDX
Lamineer tips EVA tips Lamineer Tips IPR
PER-IO-TOR T����������������������������� T����������������������������� Contact the manufacturer for separate instructions for use. Contact the manufacturer for separate instructions for use.
Table 2
4
Profin® Lamineer tips - LTA
Shank Cat# Colour Shape Recommended use LTA-150/2 Diamond Red LTA-S150/2 LTA-100/2 Diamond Green LTA-S100/2 LTA-75/2 Diamond Gold LTA-S75/2 LTA-50/2 Diamond Yellow LTA-S50/2 LTA-30/2 Dimond White LTA-S30/2 LTA-15/2 Diamond Violet LTA-S15/2 LTA-39/2 Tungsten Black LTA-S36/2 Carbide Removal of gross overhangs and shaping of all restorative material - use tips with large particle size (150-75 µ).
For shaping and polishing all prosthetic materials and enamel (75-50 µ).
LTA-
LTA-S
Tungsten Carbide does not scuff enamel. Fo����������f composite����������TA-39 & LTA S36).
LTA-E50/2 Diamond Yellow LTA-C50/2 Diamond Yellow LTA-D150/2 Diamond Red LTA-D100/2 Diamond Green LTA-D50/2 Diamond Yellow LTA-D30/2 Diamond White For occlusal and concave surfaces. Fo��������ulders, bevels etc.
For shaping diverging surfaces and incisal edges.
For opening incisal and gingival, approximal areas.
LTA-T50/2 Diamond Yellow LTA-T30/2 Diamond White
EVA Tips for polishing with polishing paste (Single use plastic tips) EVA-2000/100 Plastic Green EVA-5000/100 Plastic Blue
Table 3 Universal tips, only used freely rotating. Use with appropriate polishing paste
5
How to use
How to eject the tip
Prepare your Profin for work Apply the tip in the piston. Check for secure seating by pulling the tip with y�������������������� sensed. If tip comes out easily, try another tip or send the handpiece for service. Mount the Pr����������our dental motor. Internal water or spray should be turned off on the unit. Spray is under normal conditions not necessary for cooling. External water connection can be used with water spray clip. This is optional. Use the EVA-60 plunger to safely eject the tip.
EVA- 60
The tip can be used in two different positions:
- In position A, the tip is free to rotate to follow contours. ����������������ed in a position of convenience. T�������ed position, pull out the tip slightly, turn and push it back into a new position.
A B
Selection of tips
The selection of diamond grit is depending on the amount of material that has to be reduced. A general recommendation is the more material the more coarse diamonds. The removal of mat������������������� steps. NOTE: Never go from super-coarse to super������� step, but use intermediate medium-coarse tips. NOTE: The black Tungsten-Carbide-coated tips can always be used f������������������or abrasion on enamel, since Tungsten Carbide does not scar or scuff enamel. NOTE: The wearing of the Diamond Tips is low. The durability is depending on the circumstances, for continued ����������������t more than 30-40 times.
6
Examples of use:
- On enamel, metallic, ceramic and composite restorations. - F�����������������������o natural forms. - To contour and individualize anterior restorations. - To reshape and polish tooth contacting areas. - To chair����������������margins prior to cementation.
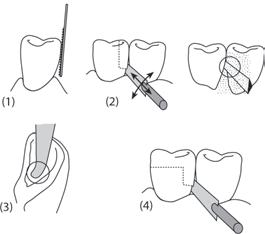
Reduction of overhangs and excess cements Apply the tip on the material t������������� in parallell to the tooth contour (1). Start the motor, move the handpiece slowly up and down, or in and out in order to remove debris (2). Change f��������������������erial has been reduced. Finish with 30 or 15 micron tip and polish with the plastic tips together with a polishing paste. When cementing laminates on incisors, the excess material in the palatinal concavity can easily and safely be removed with a bent tip (3). Adjustment of inlay margins
�������������������ogether with removal of excess luting material (4). The procedure is similar to removal of overhangs. If inlays/onlays are being made on adjacent tee���������ooth after cementation for easier access, and polish when all have been cemented.
7
Removal of subgingival excess cements
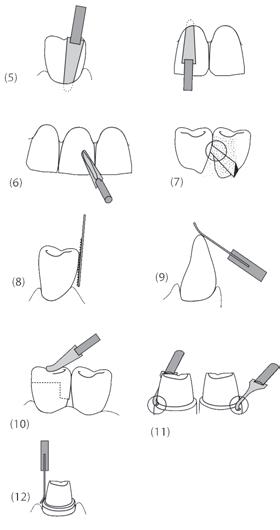
The tips are non-traumatic to soft tissue and can be used subgingival (5). Select a suitable tip (normally this procedure does not require super-coarse or coarse tips). Apply the tip on the subgingival surface and start the motor��������������ed or in a swirel position whichever provides the best tactile sense. For subgingival polishing the blue spatula-shaped tip EVA -5000 may be used.
Additional uses for Profin:
- Shaping and adjustment of corners (6) - Shaping of approximal embrasures (7) - Shaping of contours (8) - Shaping/adjustment of incisal edges (9) - Adjustment of occlusion (10) - Finishing of shoulders (11) - Preparation of bevels (12)
8
Processing Instructions
Profin PDX
WARNINGS
Limitations on processing INSTRUCTIONS Do not immerse the handpiece into disinfection solutions or into ultrasonic batch. The solutions may contain chemicals that may impede or freeze the handpiece drive mechanism. Do not use washer disinfector. Anodized aluminium is not suitable for washer disinfector. The hand piece is not tested for repeated cycles in washer disinfector. The handpiece shall NOT be disassembled. Sterilize the handpiece for a maximum of 250 cycles. We recommend that you send the handpiece to the manufacturer for service after 250 uses/cycles, or every 12 months (whichev������st).
Initial treatment at the point of use Instruction 1. Flush instrument on unit before removal from tubing. 2. Thereafter remove the tip.
Preparation before cleaning Instruction Ensure the tip is removed from the handpiece. If hea�����������st with soaked cloth or pre-soaked wipes. The maximum period of time between start of use and start of cleaning process shall not exceed 2 hours. 1)
Cleaning: Automated 2) Equipment Automated machine for dental handpieces. Detergent In accordance with manuf�������������or the use of the automated machine. Instructions In accordance with the manuf�������������or the use of the automated machine. If soil is visible after cleaning with automated machine, perform manual cleaning. Cleaning: Manual External Equipment Non-abrasive, medium hard brush. Detergent Low alkaline. Water quality Deionized (DI) <40°C or Reverse osmosis (RO) <40°C. Instruction 1. Brush off under non-stagnant water. 2. Rinse under non-stagnant water for 15 seconds.
9
Internal Equipment Cleaning spray/dry spray intended for dental handpieces. Instruction In accordance with manuf�������������or the use of the spray(s). Hold check against clean, white wipe and repeat procedure until no visible soil remains. Disinfection: Automated Not applicable. See WARNINGS.
Disinfection: Manual Caution: The handpiece must be cleaned both internally and externally before disinfection.
External Equipment/Detergent Soaked cloth or pre-soaked wipes/Disinfectants suitable for anodized aluminium. Instruction In accordance with manuf�������������or the use of the disinfectants.
Internal Eqiupment Disinfection spray intended for dental handpieces. Instruction In accordance with manuf�������������or the use of the disinfection spray. Lubrication: Automated Equipment Automated machine for dental handpieces. Lubrication In accordance with manuf�������������or the use of the automated machine. Instruction In accordance with manuf�������������or the use of the automated machine. Lubrication: Manual Process chemicals Lubricants intended for dental handpieces. Instruction 1. Insert the spray can nozzle into the motor input of the handpiece. 2. Push the button of the can until the liquid coming out of the head of the handpiece is clear. 3. Wipe off ex�������������owel.
10
Inspection and Testing Inspection Visually inspect for damage and wear. - No scratches. - Check that there is no gap between head and body. - Check that screws are even with surface. Testing Check the chuck by inserting a tip. You should not be able to easily pull out the tip with y�����. If any of the above appears, do not use the handpiece and contact the manufacturer.
Packaging for sterilization
Sterilization Equipment Sterile goods packing. 3) 1. Pack individually. 2. Check that the bag is not stretched. 3. Check correct sealing. Caution: The handpiece must be cleaned and disinfected before sterilization. Equipment Saturated steam sterilizer including fractionated pre-vacuum before st�����������������acuum drying (B-process). 4) Temperature 134°C (273°F) Time Minimum of 3 minutes. Pressure 3.06 bar (27 psi). Vacuum drying Minimum 3 minutes.
Storage
Protect from dust, dirt and humidity, UV-light (sunlight) and extreme temperature (above room temperature). Before use ensure the sterile bag is dry, whole and clean. Additional information 1) If delayed cleaning, corrosion may affect the surface. 2) Automated machine for both internal and external cleaning. 3) Sterile goods packing according to EN 868-5. 4) Steam sterilizer shall be in accordance with standards EN 13060, EN 285 and EN ISO 17665-1. All equipment, detergents, spray, lubricants and disinfections solutions shall be CE-marked as per directive 93/42/EEC.
The instructions provided have been validated by the manufacturer of the medical device as being capable of preparing a medical device for reuse. It remains the responsibility of the processor to ensure that the processing, as actually performed using equipment and materials in the processing facility, achieves the desired result. This requires v����������alidation and routine monitoring of the process.
11
Processing Instructions
Lamineer Tips
WARNINGS Limitations on processing INSTRUCTIONS Use chemicals suitable for diamond coated stainless steel instrument. See inspection.
Initial treatment at the point of use Soak in solution. If debris remains use a cleaning stone suitable for diamond instruments. Cleaning: Automated Washer disinfector (in accordance with standard ISO 15883). Without or with mild detergents.
Cleaning: Manual Ultrasonic bath. Detergent. In accordance with manufacturer’s spe�����n for the use of detergent.
Disinfection: Manual Disinfection bath. Disinfectant. In accordance with manufacture��������n for the use of disinfectant. Thorough rinsing.
Inspection Visually inspection for appearance.
Sterilization Equipment B-type steam (in accordance with standards EN 13060, EN 285 and EN ISO 17665-1). Temperature/Time/Pressure 134°C (F 273°F)/Minimum of 3 minutes/3.06 bar (27 psi). Vacuum drying Minimum 3 minutes.
