11 minute read
Efflorescence in Tiling Ardex Australia


Introduction
In recent years there has been a spotlight aimed at an age old phenomena which has plagued masonry construction for a long time. That is, the development of white deposits on the surface, which are Commonly described as ‘efflorescence’. The development of efflorescence leads to the appearance of unsightly white deposits and marking on stonework, concrete construction, screeded areas and tiled surfaces on grout lines and drainage points. In effect, the classic form of efflorescence is analogous to the development of stalagmites and stalactites in limestone caves.
Advertisement
The relatively new demand for large format, non-porous and commonly dark coloured porcelain tiles, with narrow grout lines has spawned a vexing problem, and that is the development of a severe outbreak of efflorescence in certain external conditions. In this article we will examine efflorescence, and the contribution that large format tiles and poor application techniques have on the prevalence of efflorescence.
What is efflorescence?
It useful to understand the terminology in use for this complex problem; there is primary and secondary efflorescence. In essence, efflorescence is solubilised and deposited materials that appear on various constructional elements, but is normally associated with masonry.
Primary efflorescence is an internally generated material, and typically occurs during the initial cure of a cementitious product and is derived from partially soluble salts formed in the cement reaction. The reaction of the calcium silicate hydrate with water generates lime (calcium hydroxide), which can be mobilised in solution and reacts with carbon dioxide in the air to form calcium carbonate which can then deposit. When the salt laden fluid escapes the construction, moisture evaporates the dissolved materials deposit out as the typical white crystalline or fluffy solids. Secondary efflorescence is usually due to the external influence of concrete poisons, such as chlorides, but can be sulphates or other mobile salts. Sources can be rising damp, ground water, salt laden water such as bore water or even marine fall out.
ARDEX defines efflorescence as anything that leaches out of the system, and this is not just limited to lime (calcium hydroxide) deposits, but can include other solubilised materials including organics.
What is the problem?
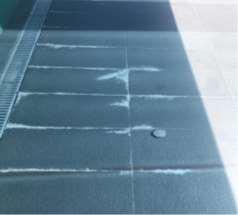
ARDEX’s experience with efflorescence is predominantly related to its appearance on tiled surfaces, emanating from the grout lines in the main, but it can also appear from breaks in surface coatings. Whilst not causing any physical damage or effects, the white deposits are unsightly, especially against dark coloured surfaces, and a number of states list efflorescence as a defect in their Fair Trading guides for building tolerances. These deposits then have to be cleaned away, but it usually re-appears over time, associated with moisture such as washing or rainfall. The customer perception is usually that the grout as ‘failed’ but this is a wrong assessment as we shall explain in more detail.
What are the causative factors?
The underlying cause as we have already noted is the presence of soluble salts which move through the construction system. The main consideration is primary efflorescence from Portland cement containing components in the construction. This means materials such as concrete (poured and blocks), renders and mortars, sand-cement screeds, cement based tile adhesive and cement based grouts. We will now focus on a specific problem which is efflorescence associated with, ceramic and stone tile installations. In this system there are normally a masonry base (concrete or a screed), cement based adhesive and cement based grout. Therefore a number of components can contribute to development of efflorescence by supplying leachable salts.
Large format and dense tiles
In the last 15 years there has been a manufacturing trend towards high fired, dense and glassy porcelain tiles. This is allied directly with the increase of tile size from traditional large tiles ~350mm square maximum, to sizes which range between 350mm and 600mm each side and bigger, to some tiles types which are individually square metres in size.
These tiles bring a whole raft of new issues to the industry, some of which have not been fully recognised as problems till recently, and some which have not been properly catered for in the current standards.
Impervious nature and drying
The background issue to keep in mind is that these porcelain tiles are to all intents and purposes almost like glass, and behave as an impervious barrier. Whilst this might be good from a weathering perspective, and has secondary‘positive side’ waterproofing benefits, it also means that any moisture behind them is trapped, especially if the substrate is non-porous (for example, has been waterproofed). There are two specific issues here; a. any water that gets behind the tile into any void space is trapped there, the large format and often tight fit means there are few and rather thin grout lines for it to escape, and b. standard cement based adhesives (that are non-F rated to ISO13007) display delayed drying. In fact, both processes can be occurring concurrently, and in more open systems where evaporation can occur, the loss of water through flash drying actually compromises the cure. However, with the dense porcelain tiles, whilst curing is proceeding, drying is not, because the extra water in excess of that for the reaction, and which is added for work ability cannot escape. The presence of free water also has an effect on dissolved organic additives which tend to remain partitioned in the liquid phase and are to a degree inhibited from proper reaction with the hydraulic cement binder. The trapped and unused water, then effectively saturates the mortar bed turning the system temporarily into a semi-immersed one. Added to this is any water which enters the system from external sources such as rain, leaking plumbing or even wash downs. These trapped fluids also mean that dissolved materials are free to move around if the fluid starts to travel.
Contact Coverage and Voids
There are two well-known reasons for achieving high contact coverage. They are to provide good mechanical strength in the adhesive bond and to make sure there are no sub-tile voids that allow damage to the tiles from impact and point loading. However, there is a third less well understood one, and that is to eliminate pathways for the movement of trapped and infiltrating water. So what happens? The adhesive is often spread at random angles or in fan patterns, rather than in straight lines and parallel to the perimeter of the job and normal to fall. When large tiles are laid onto the combed adhesive, the usual method seems to be to ‘drop and tap’ using a rubber mallet. The large tile then re-distributes the impact energy from the mallet blow over a large area, which then neither properly keys the tile to the adhesive, nor spreads the adhesive to get good coverage and remove voids. Installations done this way commonly show poor tile adhesion, may sound drummy (and don’t comply with AS3958), but when the tile is lifted the adhesive notch lines are commonly not compressed at all, or at best half compressed. The result is that between 25% and 50% of the area under the tile is void space, which can become a residence for trapped water that comes through grout lines, or flows downwards (down falls or down walls) along parallel or intersecting void pathways which line up from tile to tile.
When there are no voids, there can be no trapped water and therefore no solvent for the dissolved salts to travel in to appear as efflorescence at the surface as moisture evaporates from the grout lines.
The Pressure Cooker Effect
One of the features of external exposures is the presence of sunshine and rainfall. When the sun falls onto an object, the solar infrared radiation heats it up, and as a consequence of the laws of thermal radiation, darker coloured objects heat up more, whilst light coloured ones reflect the heat. Many tiles these days are supplied in dark colours, commonly shades of grey, grey green, dark brown, to black or almost black shades. These dark coloured porcelain/ceramic tiles (and stone tiles for that matter) have high emissivity values and therefore make good absorbers. The result is that external tiles exposed to direct sunlight heat up, and often do it rapidly.
In Australian conditions in summer, tile temperatures between 50 and 80’C have been observed, and even in winter the tiles can reach the high 40’s. Therefore what ever is under these tiles becomes subject to temperatures significantly raised above ambient air conditions.
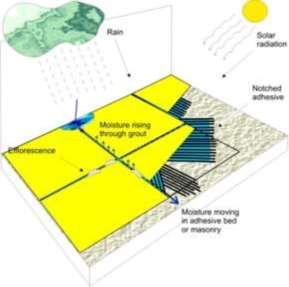
In an external situation, there is the potential for the creation of a sort of chemical pressure cooker. The tile beds are installed, typically with voids and moisture movement channels. The porcelain tiles are large format with few and narrow grout lines so it has become a pseudo impervious lid; there may also be a membrane at the base. Water can lie under the tiles in these channels from previous rain events, with any residual water from the original tile Installation. The commonly dark coloured tiles absorb solar radiation and then heat up the system. This creates the pressure cooker where heated fluids then proceed to extract soluble materials from whatever they come in contact with under the tile, and create a saturated solution. This material can them come out of solution again when the water eventually escapes from the system. Another effect of heated tiles is that they also cause the trapped water to expand and exert higher pore pressures on their surroundings. This is a sort of thermal pumping and contributes to movement of the water; it also explains why deposits can rapidly re-appear after being cleaned away, when the sunlight falls onto the tile surface (shaded areas often unaffected).
The ‘heated’ water also evaporates more rapidlywhen itis free ofthe tiled surface, and then quicklydrops its load ofdissolved materials. Since grout lines are commonlythe firstescape point, the deposits rapidlyappearon them.

System Design Issues
The final piece of the puzzle is how the system itself is designed. Particularly, issues such as having correct falls to drainage so surface water quickly escapes are critical to prevent ponding of water. The required falls for external surfaces are specified in AS4654, and for decks and veranda’s this is 1:100 as the minimum fall. The surrounding areas also need to be designed to exclude moisture and this includes things such as well sealed caps on the top edge of facades and parapets so water can’t enter and then run down behind the tiles. The adequacy of the drainage itself must be considered; there is little point in having correct falls if the drainage outlet can’t handle the volume of water falling onto the surface. There is a valid argument here for perimeter strip drains instead of multiple individual circular grates.
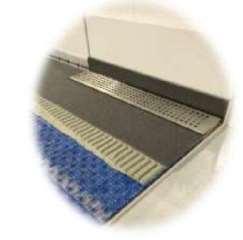
A systemic approach One way to remove efflorescence run off, and allowing for the inconsistencies in the tile adhesive bed, is to use a drainage screed. The key elements are the use of a sheet membrane, a drainage screed and sealant to replace normal grout (although ordinary grout can be used if required). The sheet membrane provides the waterproofing and then the coarse grained screed on top can provides falls (or they can be formed under the membrane), but also allows water to penetrate in and drain out to the bottom drain and not be trapped.
Solutions
Can this problem be resolved? In theory yes; the problem can be limited from the installation standpoint. Specific suggestions; • Select external grade C class adhesives that display rapid cure (F rated to ISO13007) or use R class reactive resin adhesives. Standard C class adhesives work well with good contact coverage, but require more diligence in usage, and it must be recognised that drying will be delayed. • Falls and drainage must be correctly designed and shown to work so that ponding water does not occur. Detailing of the installation must eliminate points of water access to the sub-tile bed. • Adhesive contact coverage must be 90% or greater and laid in such a way that pathways down the slope are not created. Lay adhesive by trowelling in beds at 90’ (normal) to the falls and do not create fans of the adhesive. Water must not be allowed to pond and flow in void spaces. Flow bed mortars will help eliminate void spaces. Back buttering tiles will help greatly. • Examination of expected weather conditions is a must for external installations. If rain is fore castor will clear occur, then freshly placed tiled areas, especially where the grout has not been installed, need to be protected by covers. Don’t lay tiles in high temperatures (i.e. where the air temperature exceeds 35°C or the Substrate is warm to touch—greater than 40°C). • Designing in the use of a drainage screed or drainage mat.
Conclusion
Efflorescence is a feature which occurs with cementitious materials. Cementitious tile adhesives can be, and the up-market products are, optimised to minimise these deposits. Efflorescence can also be minimised or totally eliminated by correct installation and design, for example, the use of a drainage screed or drainage mat.
Web: ardexaustralia.com Phone: 1300 788 780 Order placement atsales@ardexaustralia.com