
11 minute read
Instructional Session 21

Objective: By the end of class, you will be able to…
Beginner: write phrases or sentences in French to retell a story we studied on (day) and say what the characters thought or said, or what they were feeling.
Advertisement
Intermediate: say sentences in French to retell a story we studied on (day) and say what the characters thought or said, or what they were feeling
Advanced: say a series of connected sentences in French to retell a story we studied on (day) and say what the characters thought or said, or what they were feeling, and using transition words to say more
Preparation:
To prepare for Session 22, you will want to ask students to submit pictures to the class slideshow (if you choose to do Slide Talk) or think about three or four sketches they can draw on a card for the first lesson in Cycle Four (for Card Talk). You might set aside time at the end of a lesson in this session, Session 21, for students to brainstorm and/or submit/draw their images. In order to choose the topic of the pictures, you will need to decide on the topic of your Information cycle.
The example lessons will use the topic of “Regions of France,” but you can, of course, choose to address any other informational topic in Cycle Four. You are advised to read the introductory section of Session 22 before you assign this task to students, so you can “angle” the pictures to elicit students’ prior knowledge of the topic you will address.
The Thought Bubble Review uses “thought bubbles” or “speech bubbles” to provide a review of a story that you told previously in class. This lesson will use the example from Session 20, the story of Renart. See Session 20 for the first lesson example that serves as the foundation for this review lesson.
The example lesson uses digital thought bubbles, but you can also make them on paper. You might simply take a stack of brightly-colored Post-It notes and, prior to class, write 8-12 thoughts or speech that a character in your story could have said or thought at various points in the plot. You might want to use one color of notes for thoughts and a different color for speech. You could draw thought bubbles and speech bubbles around the words, and write the sentence in the course language, in dark marker. I like the Post-it notes that are 3 x 5 inches, lined, and neon colored like the ones in the picture.
You can also prepare the thought/speech bubbles on paper and use tape to affix them to the story. To make the preparation of these paper cards easier, you can draw a thinking bubble and a speech bubble in thick, dark marker on a sheet of plain copy paper, and then run off a good supply of them on the copy machine, perhaps using bright-colored paper, and then cut (or have a student worker cut) around the marker, so that the bubbles have a thick, dark outline and room to write inside. (Teacher tip: I have wasted a bunch of time Page 381
cutting things like this one by one. It took me a few years in the education field to wise up and start cutting four or five sheets of paper at once. Word to the wise. A good, sharp, sturdy pair of scissors is a great investment in your efficiency as an educator. I have lived and learned. My pain, your gain, I guess.)
These thoughts/dialogue can be utterances that you included in the original telling of the story, or the other activities that followed it in the lesson when you first told it, but it is more likely that they will be novel utterances that recycle some of the language used in the first lesson, and add thoughts/dialogue to express the character(s)’ reaction to the events.
Then, to teach the lesson, you will use the same format that you used to tell the story in the first lesson. If you drew as you told the story, you can either project the screenshots or pictures of the drawings (if you saved these at the end of the lesson) or you can re-draw the story to review the key points. If you used a slideshow or other prepared images, you can project then again and use them to briefly summarize the story. After you have retold the key plot points, you will use through the stack of thoughts and dialogue and tell the story again, asking students to indicate when they see a place in the plot where a character might have said or thought these things.
It is super-fun to use informal language in the bubbles that is just a tiny bit “snarky” that you think your students would enjoy learning, like however your language would express sentiments like “I don’t care!” or “Stop hassling me!” or “What a pain!” Mild curse words would be fun here, too, but maybe not the most school-appropriate choice. Depends on your school culture, I suppose. Myself, I am not quite that brave.
After all the bubbles have been “played,” you might, if time permits, retell the story with the bubbles in it, so that students can hear the story with the thinking and dialogue without all the interruptions to play the words. In your Shared Writing, you can incorporate some of the language that you added to the chart, to model the use of dialogue and inner thinking in narrative writing. Now, on to the lesson procedures:
Continue to greet the students in English review expectations, etc., and share the lesson objective. Distribute or project the text for Reading Workshop. Then, share the lesson objective if you have not already done so, check in with your Class Starter (and perhaps Videographer), and begin the lesson.
Write Inside the Story
This strategy is explained in more detail in Session Nine, when it was first introduced as a Student Application and Assessment strategy, and in Session 12, where it was first used for Reading Workshop.
In this sample lesson, I use the beginner reading from our Teachers Pay Teachers store (CI Liftoff) for Cycle Two Phase Three.
French Beginner Text
The texts for this phase are recipes. Of course, in any Reading Workshop, you can always choose to use a text that your class wrote together in a previous lesson.
As always, the lesson notes are written in English. The course language is in black. The class’s stronger shared language is grey.
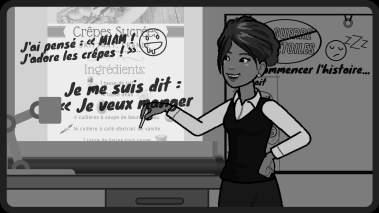
First, tell the class what the topic of the reading is, most likely speaking in the class’s stronger shared language, and then read it aloud in the course language and use the strategy, as modeled below. “I will read this recipe to you in French, for sugared crêpes. We will continue using this list of words (point to the anchor chart) to write more details about what the writer of this recipe might have thought or felt.”
(Give the signal to start class, and have your Videographer begin filming, and then read the text aloud.)


“Would this person think (pointing to the anchor chart and writing in the course language)… yum, I love crêpes (using the text and images to establish meaning) or yum, I love pizza?” (Students raise hands or call out.)
(Speaking and writing in the course language) “I thought, ‘YUM, I love crêpes!’.”
(You might want to give the class a check mark on the anchor chart or other location, to award a “point” for using an item from the chart.)
Repeat, using one or two more term(s) on your Anchor Chart to restate the information from the Reading Workshop text. After a few minutes, move into the Guided Oral Input.
It is suggested to continue the routine of a brief (2-3 minutes) calendar check-in, which (1) creates an opening/transition routine and (2) continues to reinforce, daily, and in a meaningful context, important vocabulary such as the names of the months and days, weather, numbers, preferences, and activities. For guidance on how to gradually introduce new topics/vocabulary into this daily routine, please see Session Five. The lesson procedures are provided below, in graphic format.


After about 12 to 15 minutes of Guided Oral Input, even if you have not been able to use all the thought/ speech bubbles, you will move on to Scaffolded Oral Review.
Who Said What?
Move to your Review Spot. This Scaffolded Oral Review strategy was first introduced in Session 19. It asks students to imagine what someone would say or think in reaction to various situations that are related to the facts you discussed during Guided Oral Input.
You will make a series of three to five statements that a member of the class may have said, based on what you learned in the survey, and ask who said, or would have said, each one. “Time for a review quiz. This is called “Who Said What?” I will pretend to be someone in class, and say something. Your job is to say who might say that. You will hear the answer twice. The first time, listen, don’t talk. The second time, say the person who would have said this.”

(explaining the directions again in the course language) “I will say (gesture)…Say (gesture) means say. Show me “say” (gesture). Show me “look” (gesture). “Prefer” (gesture). “Love” (gesture). “Talk” (gesture). “Like” (gesture). “Say” (gesture).”
“Number One. (hold up one finger). Who would have said (gesture) ‘It’s not fair (gesture) that Ysengrin has four (hold up four fingers) big (gesture) delicious (gesture) hams and I have none (hold up a zero sign with your hand)…shhh! Who would have said (gesture) ‘It’s not fair (gesture) that Ysengrin has four (hold up four fingers) big (gesture) delicious (gesture) hams and I have none (hold up a zero sign with your hand)!’?”
Students call out: Renart! Renart would have said! etc.
“Yes, Renart would have said (gesture) ‘It’s not fair (gesture) that Ysengrin has four (hold up four fingers) big (gesture) delicious (gesture) hams and I have none (hold up a zero sign with your hand)!
“Would Ysengrin say (gesture) ‘It’s not fair (gesture) that RENART has four (hold up four fingers) big (gesture) delicious (gesture) hams and I have none (hold up a zero sign with your hand)!
Students call out: No! Yes! Ysengrin would have said! etc.
(since there was sone debate as to whether or not Ysengrin would, in fact, have said this) Would Ysengrin say (gesture) ‘It’s not fair (gesture) that RENART has four (hold up four fingers) big (gesture) delicious (gesture) hams and I have none (hold up a zero sign with your hand)!’ at the beginning (show a slide from the Guided Oral Input) or at the end (show a slide from the Guided Oral Input)?”
Students call out: End! At the end! etc.
“Number Two. (hold up two fingers). Who would have said (gesture) in kindergarten (point to the image/word) ‘I am curious (point)!’…shhh! Who would have said (gesture) in kindergarten (point to the image/word) ‘I am curious (point)’?”
Students call out the answer, and you might ask follow-up questions as modeled above. Ask more questions, if time permits.
You will continue to use the anchor chart that you set up in the lessons in Session 20, adding a couple of new terms to it today. See the lesson outline below in graphic format.

Continue as time permits, accumulating points in the goal box as you go. If another word to narrate in the past comes up naturally as you write, and you think it is important to remember and use in the future, you can add it to the Anchor Chart. Then, move on to Shared Reading.
The “Go-To” Daily Strategies
Shared Reading is not modeled in this lesson, as you are simply continuing to use the “go-to” strategies explained and modeled in the previous sessions. Refer to Sessions one through ten for more details.
Who Said What?
Walk to your Quiz Spot. Students will need paper. Leave the Shared Writing text projected where students can look back at it, and have the thought bubbles visible. You could also hand out copies of the thought bubbles for students to refer to.
“Time for a review quiz: “Who Said What?” I will pretend to be someone in class, and say something. Your job is to write a sentence to say who said what. You will hear each one twice. Here’s an example.”
“Class, who said, ‘I’m so hungry?’ Renart or Ysengrin? Who said, ‘I’m so hungry?’ Renart or Ysengrin?” (model writing the answer, perhaps having students copy it as the first line of the quiz) “Renart said, ‘I’m so hungry.’”
Continue on to ask a few more questions, giving plenty of time for students to write.
At the end of the period, you might debrief on what went well, and perhaps setting or reviewing goals.
