8 minute read
Drawing Multi-plate Color Aquatints

from articulo
by El Cántaro


Stephen McMillan
Advertisement
An aspect that makes doing color aquatints both interesting and challenging is the mystery of how they will look when the plates are completed and printed. Even with years of experience each print presents a new test of my ability to have the colors produce the desired effect. For this article I will focus on my process in producing two three-plate aquatints I did in 2020. Each presented its own color puzzles to solve.
In drawing the key plate, I start by choosing one of my photographs to work from. I use Photoshop to reverse the photos and break them into 4 smaller pieces, which makes them easier to view while I am painting asphaltum thinned in mineral spirits onto the copper plate. I generally use a #0 series 7 watercolor brush for my paint-outs.
One of the most difficult aspects of doing a multiple-plate aquatint is drawing the various plates in register. At the start I need to decide what color to choose for the key plate. The key color should have enough tonal variation and detail to produce an image transfer that has adequate information to draw the subsequent plates in register. My color choice for the key is usually determined by this factor. I generally draw the blue plate first, though sometimes I draw the red first. I tried doing yellow first once, only to find out why this was a bad idea.
To do a tightly registered multi-plate aquatint, I use an image transfer method that uses two metal bars. The bars are generally made from the same copper plate material that is being used in the print. One bar is taped or spray mounted to the press bed. It is attached so that the long edge is parallel to the blankets, with a 90 degree notch on the inside of the side closest to the roller of the press. The notch is just deep enough so that the inner bar fits snugly, but not so long that it will pass under the blankets during printing. The other bar is cut in an “L” shape to fit snugly inside of the attached bar. Again, the angles need to be 90 degrees. The inner registration bar is in place when a plate is being positioned on the press and is carefully removed before the plate is printed. The reg. bars need to be long enough to hold everything in position firmly, with absolutely no rocking or variable positioning possible.
To set up for the transfer, after the key plate is completed, I soak paper. I soak one or two extras in case the transfer does not go right the first time. I use Arches Cover, which I generally soak overnight. I have found that it should be soaked at least two hours at the minimum. (It is good to be familiar with whatever paper you use so you know the optimal soaking time, as papers do vary). The paper must be large enough so that it can be pinned under the roller when the blankets are lifted to exchange the plates.
Before the transfer, I polish and bevel the other plate(s). They are the same size and thickness as the key. I use a drypoint needle to mark the registration corner in the back of the plates and also to indicate the order of printing. I set the blank plates by the press in the order and orientation that I will use for the transfer.
To accomplish the transfer, it is important that the transfer printing should be done in the same way that the edition printing will be done. That is, the pressure is the
same; the paper is the same; the soak is the same; the order of printing is the same; and the pace of printing is close to the same. The only difference is that only the first plate in the transfer has an etched image on it while the others are still blank. I make a diagram noting the pressure and printing order.
Next, I ink and wipe the key plate and place it on the press bed using the registration bars. I put the paper over the plate, making sure that it will be pinned under the roller when the blankets are lifted. Then I print the plate. Next, I remove the key and place the blank plate, using the registration bars. I then run this through the press which transfers ink from the key proof onto the blank plate. I set that plate aside and run the other plate or two through the press.
To etch the image transfer, I leave each plate for 30 to 40 seconds in the acid. I used to etch for two minutes, but found that a shorter etch got better results. I use a Dutch Mordant mix of 1 part Potassium Chlorate Crystals, 5 part Hydrochloric acid, and 25 parts water. I have found that Ferric Chloride etches faster, maybe twice the speed. When I have used Ferric, a time of 20 seconds worked for the transfer etch. The acid should be at least 60 degrees. If it is too cold I put the bottle of acid in a sink with warm water to warm the acid to about 70 degrees. After the etch I wash the plate in water and then quickly wipe it with mineral spirits. If the water is left on the plate even for a short time it may put streaks on the transfer image. Next, I carefully clean the plate with alcohol to get it ready to work on. Sometimes I get flaws in the transfer. More than once I have had to re-polish the plates and start over.
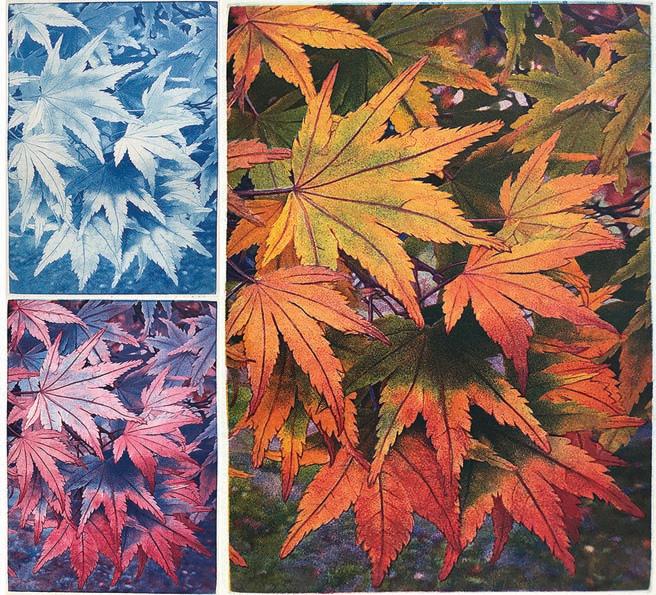
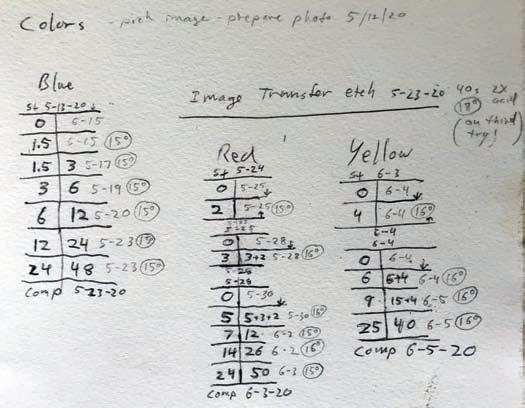
The image, Colors, is primarily a combination of green, orange, and red leaves. It was important to draw the image in a way so that the colors stay separate and do not mix into a muddy brown. The red/green bordering areas were a particular challenge. In this print I chose blue for the key plate color. Though there is a lot of orange in this print, the blue still defined what I saw as the most useful information for drawing the next two plates. The copper plate was stopped-out and etched using 7 etch times from 0 to 48 minutes. The image was then transferred onto two plates.
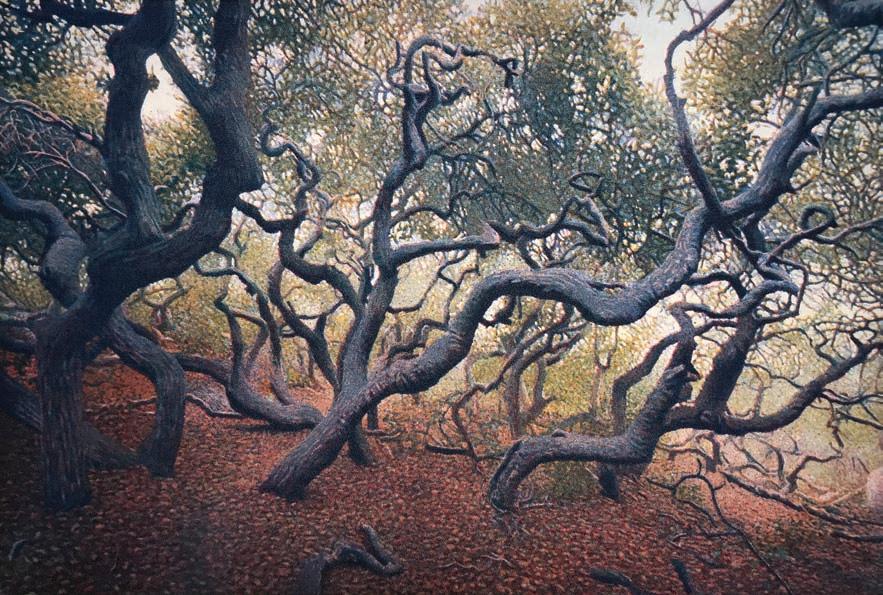
The image transfer is clearest on the plate right after the key, and becomes harder to see in subsequent plates. Therefore, I chose the second color as the one that needs the most exact registration to the key. In this case, red.
I always do the first paint-out before I aquatint the plate. This makes the subtle transfer information much easier to see. (For this reason it is even more important to keep clean paper under your hands on the plate while working. Hand grease can cause smudges in the aquatint). I then aquatinted the plate and etched it for two minutes. This etch and aquatint made it much harder to see information I needed to draw this image. Therefore I decided to wash the plate with alcohol to remove the second aquatint but not the paint-out. I did a second paint-out over the un-aquatinted plate and then re-aquatinted it for a three minute etch. Again I could not see enough, so I washed off the aquatint a third time. That is the most often I have re-rosined a plate and may be as many times as I can get away with. The next 4 etches were over the third aquatint. I proofed the blue and red plate to use as a guide in drawing the last plate. I etched the third plate for the less detailed yellow plate. For this one I only re-aquatinted once.
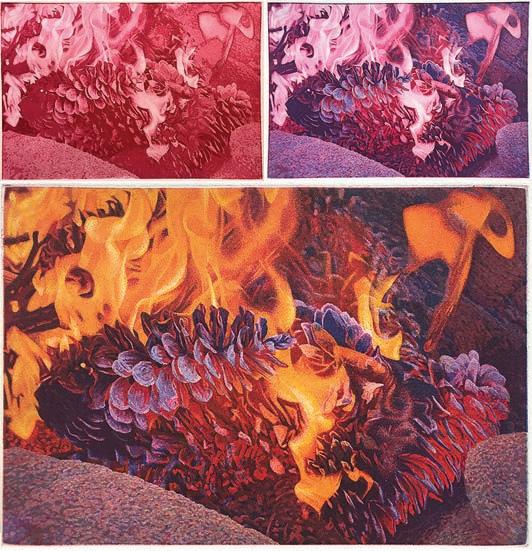
This print, Campfire, was an experiment to see if I could draw a convincing fire. I chose red for the key plate. The copper plate was etched over a medium grain aquatint using 7 etch times from 0 to 48 minutes. When I proofed the red, it looked too dark and dense in the areas I wanted to glow. Knowing that a lot happens when colors are placed next to each other, I continued to see what would happen when other colors were added. I did the transfer to two plates, choosing blue for the second plate and yellow for the third. When I proofed the red and blue plates, I was happily surprised to see the deep red areas glow next to the blue. So much of color printmaking consists of discoveries like this. Sometimes I try things that don’t work, or, as in another 2020 three plate print, have to re-draw the second and third plates to get what I wanted. Just when I think that I know what I am doing, a new surprise jumps up. Always a student!
Artist Information
Stephen McMillan has been making aquatints since 1970. 1975 to 1979 he was a member of Graphic Arts Workshop in San Francisco 1980 to 1992, a member at Kala Institute in Berkeley and has worked in his own studio since then. He currently lives in Bellingham, WA Email: aquatint@sonic.net Website: www.sonic.net/aquatint
Image Documentation
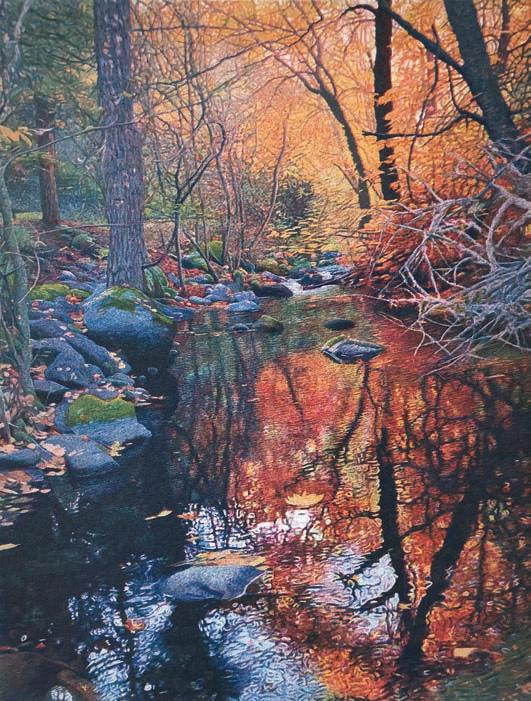
The three states for the 11" x8" aquatint, Colors, 2020 Second paint-out on key plate of, Colors The three states for the 6" x9" aquatint, Campfire, 2020 Autumn Light, 3 plate aquatint, 12" x9", 2019 Colors, etch times Elfin Forest, 3 plate aquatint, 6" x 9", 2019


