8 minute read
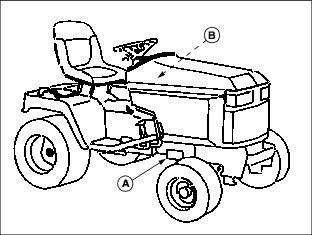
Product Identification

RecordIdentification Numbers
If you need to contact an Authorized Service Center for information on servicing, always provide the product model and serial number.
Advertisement
You will need to locate the model and serial number for the machine and for the engine of your machine and record the information in the spaces provided below.
M71459A
DATE OF PURCHASE:
DEALER NAME:
DEALER PHONE:
PRODUCT IDENTIFICATION NUMBER (A):
ENGINE SERIAL NUMBER (B):
Safety Safety-AlertSymbol
Read and recognize safety information. Be alert to the potential for personal injury when you see this safety-alert symbol.
On your machine safety labels, the words DANGER, WARNING, and CAUTION are used with this safety-alert symbol. DANGER identifies the most serious hazards. In this manual, the word CAUTION and this symbol call attention to safety messages.
WARNING:AVOIDSERIOUSINJURYORDEATH m40180A
Drive up and down slopes, not across.
· Avoid sudden turns.
· If machine stops going uphill, stop blade and back down slowly.
· Keep safety devices (guards, shields, and switches) in place and working.
Read Operator's Manual.
· When leaving machine: Stop engine, Set park brake, Remove key.
DANGER:ROTATING BLADESCUT OFF ARMSAND LEGS
M140180B
· Do not mow when children or others are around.
· Do not mow in reverse.
· Look down and behind before and while backing.
· Never carry children even with the blades off.
DANGER:EXPLOSIVEGASES
M74408
Cigarettes, flames or sparks could cause battery to explode. Always shield eyes and face from battery. Don not charge or use booster cables or adjust post connections without proper instruction and training. Keep vent caps tight and level.
POISON:CAUSES SEVERE BURNS
Contains sulfuric acid. Avoid contact with skin, eyes or clothing. In event of accident, flush with water and call a physician immediately. Keep out of reach of children.
Hot Surface
CAUTION: PRESSURIZED LINE
M71542 M71535
See operator's manual for instructions to remove.
Emission Control System Certification Label
NOTE: Tampering with emission controls and components by unauthorized personnel may result in severe fines or penalties. Emission controls and components can only be adjusted by EPA and/or CARB authorized service centers. Contact your John Deere Commercial and Consumer Equipment Retailer concerning emission controls and component questions.
The presence of an emissions label signifies that the engine has been certified with the United States Environmental Protection Agency (EPA) and/or California Air Resources Board (CARB).
The emissions warranty applies only to those engines marketed by John Deere that have been certified by the EPA and/or CARB; and used in the United States and Canada in off-road mobile equipment.
EmissionCompliance Period
If your engine has the emission compliance category listed on the emission control system certification or air index label, this indicates the number of operating hours for which the engine has been certified to meet EPA and/or CARB emission requirements. The following table provides the engine compliance period in hours associated with the category found on the certification label.
Agency
EPA C 250
EPA B 500
EPA A 1000
CARB Moderate 125
CARB Intermediate 250
CARB Extended 500
Certification
Your mower has been certified by an independent laboratory for compliance with American National Standard B-71.1, "Safety Specifications" for Power Lawn Mowers, Lawn and Garden Tractors, and Lawn Tractors.
OperateSafely
· Check brake action before you operate. Adjust or service brakes as necessary.
· Inspect machine before you operate. Be sure hardware is tight. Repair or replace damaged, badly worn, or missing parts. Be sure guards and shields are in good condition and fastened in place. Make any necessary adjustments before you operate.
· Clear work area of objects that might be thrown. Keep people and pets out of the work area. Stop machine if anyone enters the area.
If you hit an object, stop the machine and inspect it. Make repairs before you operate. Keep machine and attachments properly maintained and in good working order.
DO NOT leave machine unattended when it is running.
Only operate during daylight or with good artificial light.
Be careful of traffic when operating near or crossing roadways.
Do not wear radio or music headphones while operating the machine. Safe operation requires your full attention.
· Older adults are involved in a large percentage of riding mower accidents involving injury. These operators should evaluate their ability to operate a mower safely enough to protect the operator and others from serious injury.
Park Safely
Stop machine on a level surface, not on a slope.
Disengage PTO.
Lower attachments to the ground.
Engage park brake.
· STOP engine.
· Remove key.
· Before you leave the operator's seat, wait for engine and all moving parts to STOP.
Rotating Blades are Dangerous - Protect Children and Prevent Accidents
Protect Children
Never assume that children will remain where you last saw them. Children are attracted to mowing activity, stay alert to the presence of children.
· Keep children in the house when you are operating the machine.
· Turn machine off if a child enters the mowing area.
· Use extra care when you come to blind corners, shrubs, trees, or other objects that may block your vision.
DO NOT let children or an untrained person operate the machine.
DO NOT carry or let children ride on machine or any attachment even with blades off. DO NOT tow children in a cart or trailer.
Help Prevent Serious Or Fatal Accidents:
· Be alert at all times, drive forward carefully. People ESPECIALLY CHILDREN can move quickly into the mowing area before you know it.
· Back carefully. Shut off PTO and look behind the machine carefully, ESPECIALLY FOR CHILDREN, before you back up.
DO NOT mow in reverse unless it is absolutely necessary.
Shut off PTO when you are not mowing.
DO NOT operate machine if you are under the influence of drugs or alcohol. Avoid Tipping
DO NOT drive where machine could slip or tip.
Stay alert for holes and other hidden hazards in the terrain.
Keep away from drop-offs.
· Slow down before you make a sharp turn or operate on a slope.
· When pulling loads or using heavy equipment, use only approved hitches, limit loads to those you can safely control, and use counterweights or wheel weights when required per this manual or your attachment manual.
· Drive up and down a hill - not across. Be careful when you change direction on a slope.
· DO NOT stop when going up hill or down hill. If machine stops going up hill, STOP PTO and back down slowly.
DO NOT mow wet grass. Reduced traction could cause sliding.
DO NOT try to stabilize the machine by putting your foot on the ground.
Keep Riders Off
Only allow the operator on the machine. Keep riders off.
Riders on the machine or attachment may be struck by foreign objects or thrown off the machine causing serious injury.
· Riders obstruct the operator's view resulting in the machine being operated in an unsafe manner.
Wear Appropriate Clothing
· Wear close fitting clothing and safety equipment appropriate for the job.
· Loud noise can cause impairment or loss of hearing, wear a suitable protective device such as earplugs.
Stay Clear of Rotating Drivelines
Entanglement in rotating driveline can cause serious injury or death:
· Wear close fitting clothing.
· STOP the engine and be sure PTO driveline is stopped before getting near it.
Check Wheel Bolts
· A serious accident could occur causing serious injury if wheel bolts are not tight.
Check wheel bolt tightness often during the first 100 hours of operation.
TransportSafely
· Use safety lights and devices. Slow moving machines when driven on public roads are hard to see, especially at night. Avoid personal injury or death resulting from a collision with a vehicle.
Whenever driving on public roads, use flashing warning lights and turn signals according to local regulations. Extra flashing warning lights may need to be installed.
Practice Safe Maintenance
· Understand service procedure before doing work. Keep area clean and dry.
· Never lubricate, service, or adjust machine while it is moving. Keep safety devices in place and in working condition. Keep hardware tight.
To prevent them from getting caught, keep hands, feet, clothing, jewelry, and long hair away from any moving parts.
· Before servicing machine, lower attachments to the ground. Disengage all power and stop the engine. Move hydraulic lift levers back and forth to relieve pressure. Lock park brake and remove the key. Let tractor cool.
· Securely support any machine elements that must be raised for service work.
· Never run engine unless park brake is locked.
· Keep all parts in good condition and properly installed. Fix damage immediately. Replace worn or broken parts. Remove any buildup of grease, oil, or debris.
Disconnect battery ground cable (-) before making adjustments on electrical systems or welding on tractor.
Unauthorized modifications to the tractor may impair its function and safety.
Wear Appropriate Clothing
· Wear close fitting clothing and safety equipment appropriate for the job.
· Loud noise can cause impairment or loss of hearing, wear a suitable protective device such as earplugs.
Do not wear radio or music headphones while servicing the machine. Safe service requires your full attention.
Stay Clear of Rotating Drivelines
Entanglement in rotating driveline can cause serious injury or death:
· STOP the engine and be sure PTO driveline is stopped before getting near it.
Handling Waste Product and Chemicals
· Waste products, such as, used oil, fuel, coolant, brake fluid, and batteries, can harm the environment and people.
· DO NOT use beverage containers for waste fluids-someone may drink from them.
· See your local Recycling Center or John Deere dealer to learn how to recycle or get rid of waste products.
A Material Safety Data Sheet (MSDS) provides specific details on chemical products: physical and health hazards, safety procedures, and emergency response techniques. See your John Deere dealer for the MSDS on chemical products used with your machine.
Avoid High Pressure Fluids
· Hydraulic hoses can fail due to physical damage, kinks, age, and exposure. Check hoses regularly. Replace damaged hoses.
Escaping fluid under pressure can penetrate the skin causing serious injury. Avoid the hazard by relieving pressure before disconnecting hydraulic or other lines. Tighten all connections before applying pressure.
Search for leaks with a piece of cardboard. Protect hands and body from high pressure fluids.
If an accident occurs, see a doctor immediately. Any fluid injected into the skin must be surgically removed within a few hours or gangrene may result. Doctors unfamiliar with this type of injury should reference a knowledgeable medical source. Such information is available from Deere &
Operating
Daily Operating Checklist
o Test safety systems.
o Check tire pressure.
o Check fuel level.
o Check engine oil level.
o Check transaxle oil level.
o Check coolanat level.
o Check Air Restriction Indicator (if so equipped).
o Clean air intake screens.
o Remove grass and debris from machine.
Dash Controls

M71462
A - Hydraulic Control Levers
B - Throttle Lever
C - Indicator Lights
D - LIght Switch
E - Choke Lever (425)
F - PTO Switch
G - Key
H - Tilt Steering Wheel Button

I - Park Brake Lever
M71463
A - Cruise Control Lever
Foot/Platform Controls
M71462
A - Differential Lock Pedal
B - Brake Pedal
C - Reverse Travel Pedal
D - Forward Travel Pedal
E - Mower Height Indicator
F - Mower Height Crank
MiscellaneousControls
Free Wheeling Lever
M71465
A - Free-Wheeling Lever
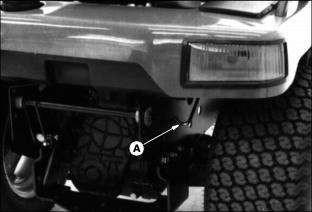
Air Restriction Indicator
M71510
A - Air Restriction Indicator (Optional)
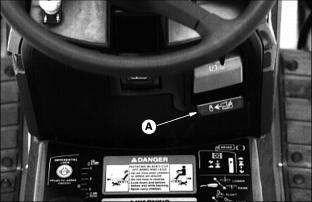
Adjusting Steering Wheel
NOTE: Steering wheel has four tilt positions.
M71475
1. Push in button (A) and push or pull wheel to a comfortable operating position.
2. Release button.
NOTE: Before operating, be sure steering wheel is locked in position.
Adjusting Seat (425)
Adjust Forward / Rearward
NOTE: This tractor is equipped with a fourteen position slide rail seat. Be sure seat is locked in position before operating.
M96042
1. Push lever (A) to the left.
2. Slide seat forward or backward to desired position.
3. Release lever.