BEFORE YOU UPLOAD YOUR ARTWORK A FEW QUICK CHECKS CAN HELP YOUR ORDER PRINT EXACTLY AS EXPECTED
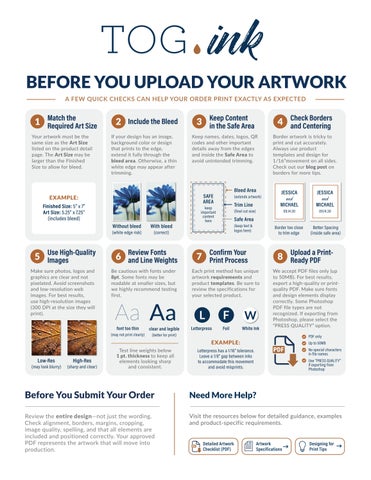
the 1 Match Required Art Size Your artwork must be the same size as the Art Size listed on the product detail page. The Art Size may be larger than the Finished Size to allow for bleed.
2 Include the Bleed If your design has an image, background color or design that prints to the edge, extend it fully through the bleed area. Otherwise, a thin white edge may appear after trimming.
Finished Size: 5” x 7” Art Size: 5.25” x 7.25” (includes bleed) Without bleed
(white edge risk)
Use High-Quality
Make sure photos, logos and graphics are clear and not pixelated. Avoid screenshots and low-resolution web images. For best results, use high-resolution images (300 DPI at the size they will print).
Borders 4 Check and Centering
Keep names, dates, logos, QR codes and other important details away from the edges and inside the Safe Area to avoid unintended trimming.
Border artwork is tricky to print and cut accurately. Always use product templates and design for 1/16”movement on all sides. Check out our blog post on borders for more tips.
Bleed Area
SAFE AREA
EXAMPLE:
5 Images
Content 3 Keep in the Safe Area
With bleed
Review Fonts
Be cautious with fonts under 8pt. Some fonts may be readable at smaller sizes, but we highly recommend testing first.
Aa Aa font too thin
(may not print clearly)
keep important content here
clear and legible
JESSICA
Trim Line
MICHAEL
MICHAEL
(final cut size)
09.14.30
09.14.30
Border too close to trim edge
Better Spacing (inside safe area)
and
(keep text & logos here)
Confirm Your
Upload a Print-
7 Print Process
8 Ready PDF
Each print method has unique artwork requirements and product templates. Be sure to review the specifications for your selected product.
L
F
W
Letterpress
Foil
White Ink
We accept PDF files only (up to 50MB). For best results, export a high-quality or printquality PDF. Make sure fonts and design elements display correctly. Some Photoshop PDF file types are not recognized. If exporting from Photoshop, please select the “PRESS QUALITY” option.
(better for print)
PDF only
EXAMPLE: Low-Res
(may look blurry)
High-Res
(sharp and clear)
Test line weights below 1 pt. thickness to keep all elements looking sharp and consistent.
and
Safe Area
(correct)
6 and Line Weights
JESSICA
(extends artwork)
Up to 50MB No special characters in file names
Letterpress has a 1/16” tolerance. Leave a 1/8” gap between inks to accommodate this movement and avoid misprints.
Use “PRESS QUALITY” if exporting from Photoshop
Before You Submit Your Order
Need More Help?
Review the entire design—not just the wording. Check alignment, borders, margins, cropping, image quality, spelling, and that all elements are included and positioned correctly. Your approved PDF represents the artwork that will move into production.
Visit the resources below for detailed guidance, examples and product-specific requirements. Detailed Artwork Checklist (PDF)
Artwork Specifications
Designing for Print Tips