
9 minute read
and a statement – with a DIY screen


Hip to besquare
Starting with a simple shape, we’ve thought outside the box to create a series of useful pieces
Abox is such a simple structure, but once you’ve nailed this basic shape, it can form the basis of countless projects around the home! We’ve turned boxes into three fantastic and functional objects: a neat little side table, box frames for a wall display, and a useful desk organiser to corral pens and other small items.
The clean lines of this side table suit any decor style
Box frames are an original way to display your stuff
Make working from home more organised!


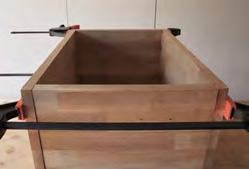
NO-DRILL SIDE TABLE This cute side table tucks in next to a bed or sofa and all you need is basic hand tools to build a designer piece – no drill required! We’ve created it to be a super-simple DIY project as it’s made from just one 1800mm x 405mm panel that can be cut in store, along with the pieces for the feet.

Three easy projects
1In store, have the panel cut to a and eye and ear protection) clamps punch square with pencil laminated timber panel (we 19mm Tasmanian oak• head nails x 17mm reinforcing brackets head screws with sanding block
the box by nailing through the top and base. Measure 20mm from the sides and 10mm from the edges to secure five evenly spaced nails. Tap the heads below the surface with a round-head centre nail punch. position the feet along the sides, 10mm from the edge and 30mm from the front. Apply some adhesive and secure with five nails into the base, at least 20mm from the ends to avoid splitting.
top, base and shelf, each 300mm wide; the remaining piece cut in half (ensure the sides are exactly equal) and the Tasmanian oak cut in half for two feet. Tip: The sides are slightly less than 450mm, allowing for the width of the blade. on the front of the box, use a combination square to measure 220mm up the sides (from the outside of the base). Position the combination square on the mark to make lines inside. Flip box to finish marking the lines from the back. with timber filler, leaving to dry. Sand the box all over with 180-grit abrasive paper to remove excess filler and pencil marks, sanding flat areas along the woodgrain and rounding over all the edges and corners slightly. 2Position the top and base between the sides, applying adhesive along the cut ends, clamping at the front and back. Wipe away excess adhesive with a damp cloth, leaving to dry. Tip: Ensure the best sides face

TOOLS & MATERIALS Safety equipment (mask Four 450mm quick-action Hammer Round head centre nail 300mm combination Phillips head screwdriver 1800mm x 405mm x 19mm used finger-jointed oak•) 700mm length of 42mm x Timber adhesive Cloths 30mm x 2mm bright bullet Four white 30mm x 30mm 8G x 13mm white button Timber filler 180-grit abrasive paper Furniture oil
PRO TIP
To DIY the cuts, use a circular saw with a straight edge, trimming the shelves and the sides if necessary to ensure they’re exactly the same width
3Remove the clamps to flip 4To mark out the shelf brackets, outwards, with the base facing up.
5On the inside, from the front and back, measure 100mm along the lines to position brackets, securing screws into the sides with a screwdriver. Position shelf, securing brackets underneath with screws. Tip: Create screw pilot holes by


6Turn the box upside down to 7Smooth over the nail heads tapping a nail through the brackets.
8Wipe over the box with a damp cloth to remove dust. Apply two coats of furniture oil, rubbing it into the timber with a cloth and leaving to dry after each. Tip: We used an easy trigger-pack oil then finished with a cloth.


Your DIY toolkit
4
1 SpecRite 1800mm x 405mm x 18mm finger jointed oak panel, $66, I/N: 8330202• . 2 Carinya 30mm x 30mm x 17mm x 1.8mm white round angle bracket, $4.59/pack of 12, I/N: 3962550. 3 Trojan 5mm nail punch, $8.45, I/N: 0014858. 4 Bondall ‘Monocel’ furniture oil trigger pack, $16.60/500ml, I/N: 1520428. Some products are not available at all Bunnings stores, but may be ordered.

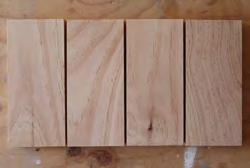
BOX FRAMES This is one of the simplest and most adaptable ways to make basic box frames – just ensure the four pieces are cut to exactly the same length. For our boxes, we cut four pieces 300mm long, 200mm and 150mm, but you can adjust the sizes to suit.
It should be noted that while gluing and nailing the joints keeps them secure, the frames are best kept under about 350mm square so they don’t become too heavy. Avoid using them to display heavy items – they’re best for stashing lighter bits and pieces.
TOOLS & MATERIALS Safety equipment (mask and eye and ear protection) Tape measure and pencil Mitre box with handsaw 150mm combination square Hammer 1.2m length of 64mm x 19mm DAR pine• (makes a 319mm-square frame) Timber adhesive Painter’s tape Cloth 30mm x 1.6mm bright bullet head nails 180-grit abrasive paper with sanding block Saw-tooth hangers with supplied nails
Your DIY toolkit
2
1
3
1On the pine, mark 300mm from the end and use a mitre box with handsaw to cut. Use this piece to mark and cut three more pieces, checking to make sure they’re the same length. grains and reassemble the frame. Wrap tape firmly around the middle, checking the joint angles with a combination square. Wipe away excess adhesive with a damp cloth and then set aside to cure. with a sanding block to remove any adhesive from inside and outside the frame, rounding over the edges and corners slightly for a professional finish. 2Dry-fit the frame by positioning a side flush against the base, the top flush against the side, the remaining side flush against the top and over the base. Tip: Work on a flat surface to keep the joints

3Apply adhesive along the end- straight and accurate.
4Working around the sides, hammer two nails into each joint, 10mm from the ends and sides, then remove the tape. Tip: Nailing too close to the sides


4
1 Zenith ‘SureHook’ 5/25kg brass plated 49 piece wallmate picture hanging starter kit, $23.54, I/N: 3930448. 2 Paslode 30mm x 1.6mm 100g bright steel bullet head nails, $3.98/pack of 190, I/N: 2360368. 3 Empire ‘True Blue’ 150mm combination square, $16.75, I/N: 5660527. 4 Claymark 1.2m x 64mm x 19mm standard grade dressed pine, $6.50, I/N: 8401490•. Some products are not available at all Bunnings stores, but may be ordered. 5Use 180-grit abrasive paper can split and damage the pine.
6On the back of the frame, measure along the top to find the centre. Position a saw- tooth hanger, tap in the supplied nails and hang on an installed screw to suit your wall type. Tip: To support larger frames, position D hooks either side.


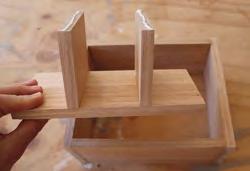
DESK ORGANISER Tasmanian oak is a lovely hardwood, so this simple project creates a useful object that’s also beautiful enough to be displayed on your desktop. Using 12mm-thick timber helps keep it simple to cut and secure without requiring power tools.

TOOLS & MATERIALS Safety equipment (mask and eye and ear protection) Tape measure and pencil Mitre box with handsaw 150mm combination square Hammer 2.4m length of 90mm x 12mm Tasmanian oak• Timber adhesive Painter’s tape Cloths 25mm x 1.25mm bright bullet head nails 180-grit abrasive paper with sanding block
adhesive along the end-grain of the short dividers. Position them on the long divider, 58mm from the ends, checking they’re straight with a combination square. Wipe away excess adhesive. Leave to dry. underside of the box, including along the dividers. Position the base pieces, then secure into the dividers and frame with nails. Wipe away any excess adhesive with a cloth and leave to cure. 1 Porta 90mm x 12mm x 2.4m Tasmanian oak DAR moulding, $43, Furniture oil 1Using a mitre box with handsaw, cut the Tasmanian oak into two 180mm-long ends, three 200mm lengths as the sides and centre divider, two 78mm-long dividers and two 224mm-long bases, checking the lengths of each

3To assemble the dividers, apply item are exactly the same.
4Apply adhesive to the end-grain of the divider assembly (the ends of the short and long pieces). Position it in the box, pushing against the frame and checking that it’s square. Wipe away excess

6Run some adhesive around the adhesive and leave to cure.
7Smooth all over with 180-grit abrasive paper to remove pencil marks, rounding over the edges and corners for a professional finish. Apply two coats of furniture oil with a cloth, setting aside to dry after each. ◆ 2To glue up the frame, apply adhesive along the end-grain of the sides and butt the ends against them. Wrap tape firmly around the middle, checking the joint angles with a combination square. Wipe away excess adhesive with a damp cloth and leave to dry.


5Tap two nails through each end, 20mm from the edges, to secure into the sides. Use a combination square to mark up the centre of the dividing pieces on the outside of the frame to

TOOL TIP
To use a hammer, grip the middle of the handle. With your other hand, hold the nail at the top and tap until it stands upright, then move your hand to hold the piece to finish driving in the nail
PRO TIP
When using a mitre box and handsaw, secure the box to your workbench with clamps or screws
secure with nails. I/N: 0081513• . 2 Craftright mitre box and saw set, $14.98, I/N: 5710099. 3 Uni-Pro cork sanding block, $3.74, I/N: 1670153. 4 Flexovit 280mm x 230mm 180 grit furniture sanding sheet, $0.75, I/N: 1210462.


