7 minute read
CREATIVE COOK ZONE


TIME TO BE INSPIRED BY A STUNNING, (MOSTLY) DIY KITCHEN MAKEOVER
Words HOLLY BYRNE Photography DENISE RIX Styling GRACE BUCKLEY
Before
†Available to order at the Special Orders Desk. ‘Before’ photograph courtesy of Harcourts.
Once an awkward, closed-in space, this kitchen is now light, bright and beautifully functional

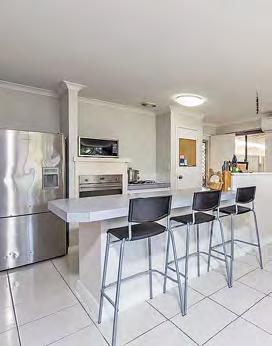
ABOVE Kaboodle Kitchen ‘Modern’ profile cabinetry in Egg White. Wall tiles, for similar try Johnson Tiles 450mm x 450mm matt ceramic tiles in Desert Sky, $31.80/carton of 6, I/N: 0078149†. Flooring, for similar try HanWood 1215mm x 195mm x 8mm laminate flooring in Aviento, $49.45/pack of 9 (2.15sqm), I/N: 8902175. All other products, stylist’s own. Some products are not available at all Bunnings stores, but may be ordered.
Dulux Mt Aspiring on the walls and British Paints Flat White on the ceiling, together with the glossy cabinetry and engineered stone benchtop, create an airy feel
When Chelsea and James purchased their beachside home, it was all about the location. “We bought this old house with the intent to pretty much gut it and redo it,” says Chelsea.
First on their to-do list was the kitchen, which lacked storage and was closed off from the rest of the living space. Chelsea had picked up skills watching her parents flip houses, but DIY was all new to James. “He had never even touched a screwdriver!” says Chelsea. Still, the pair pulled off the reno with help from some tradies and her electrician dad – and managed to stick to their budget.

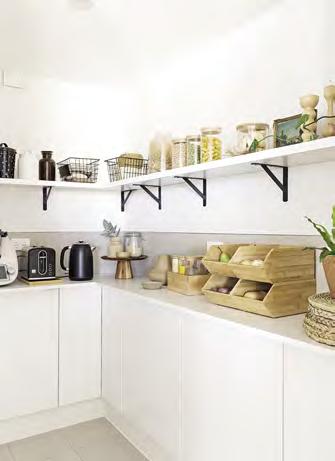
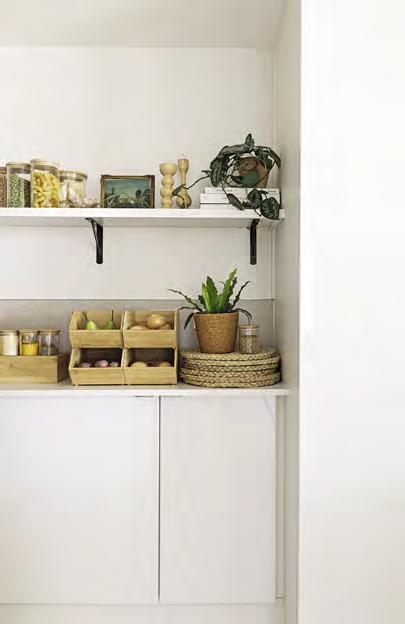
A reclaimed hallway provides much needed pantry storage
Chelsea, homeowner, @diy.dummies
LEFT Kaboodle Kitchen ‘Modern’ profile cabinetry in Egg White. Carinya ‘Studio’ 150mm x 150mm x 20mm brackets in Black, $5.90 each, I/N: 3961596. All other products, stylist’s own. Some products are not available at all Bunnings stores, but may be ordered.
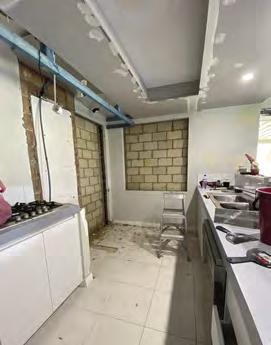

Paint colours may vary on application. Artwork Anya Brock. During
Mapping it out
To make sure their DIY workload was manageable, Chelsea and James broke up the reno into smaller tasks. “We tried to do it so that we could use parts of the kitchen for as long as possible to make it easier,” says Chelsea. The process took around
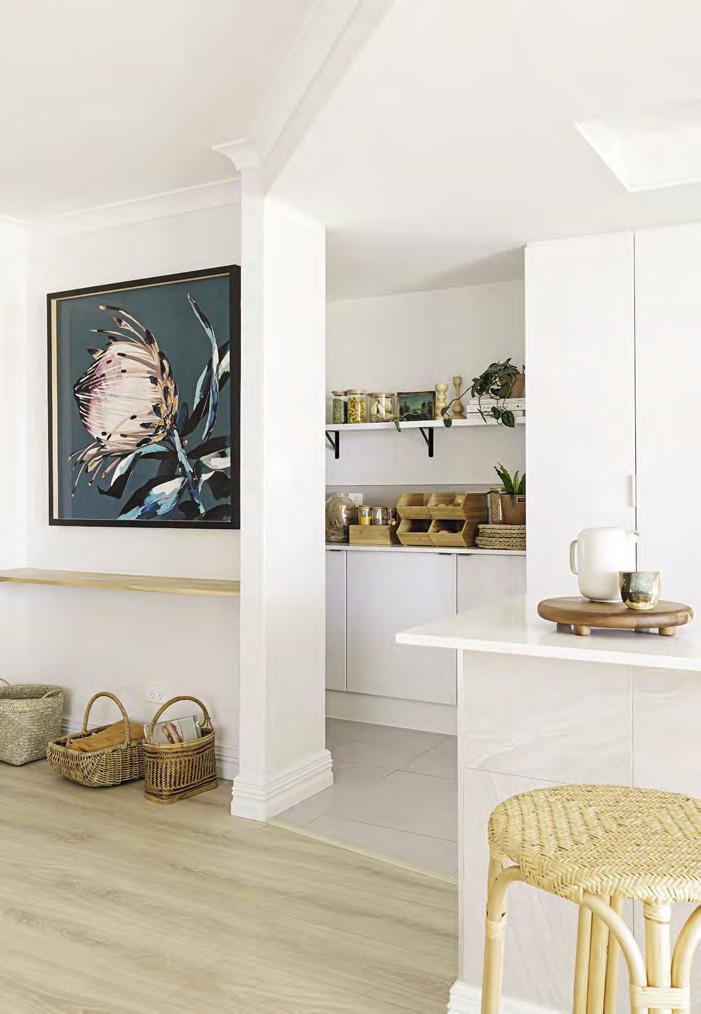
Architectural elements – such as the varied ceiling heights and cornices – create interest, define the cooking area and add symmetry to a previously unbalanced back wall
Strip lights
11 months, beginning with alterations to the floor plan. The couple blocked off a door to the carport and a side window to allow for a fridge recess.
“Then it seemed very closed in to have the island bench go all the way to the wall, so that’s when we decided to cut that off,” explains Chelsea. That next step delivered the stylish central island, and a more welcoming and open space. To fix the lack of storage, the couple turned a second walkway through to their front sitting room into a pantry.
Light the way
Chelsea and James wanted a way to delineate the cooking zone, which they have done by adding a drop ceiling. By raising a section between the island and the backbench and adding LED strip lights, they’ve also created the illusion of a skylight.
Above the island, they opted for simple downlights over pendants. “We put a large pendant over our dining table, just to the left of the kitchen – we didn’t want to have things hanging everywhere,” explains Chelsea.
Cupboard love
For the new cabinetry, Chelsea opted for Kaboodle Kitchen’s Modern profile design in Egg White. “We decided on the Kaboodle Kitchen range because we could put it all together ourselves, saving us on labour costs,” she says. Floor space in the new pantry was limited, so fitting it out required a little creativity. “Because we didn’t have much depth to play with, we actually used wall cupboards and just put them on the floor!”
ABOVE When storage is on display, limiting materials to just a few – such as timber and glass – keeps the look neat
Power moves
There’s a lot to love about the new kitchen the pair have created, but for Chelsea there’s a standout feature. “We put a power point on each end of the island bench with two power points and two USB sockets,” she says. “So, if you want to charge your phone, you can just plug it in on the end of the island, or if you want to use a sandwich toaster or a food processor that’s stored in the cupboard, it’s easy to find power.”
FLOOR PLAN
2200 900 800 1400 1200
1200 OVEN
WALK-IN PANTRY PANTRY CUPBOARD HOT PLATE ZONE FRIDGE 700
Tile style
Light, bright and neutral was the colour palette the couple had in mind, and between the glossy cabinetry and the pale tiles on the splashback, oven stack and island, they’ve nailed it. “We had finished the splashback area before we started the floor, so we went into Bunnings and took a couple of the samples to find a floor tile to match,” explains Chelsea, who chose a tile in a rectangle shape. “That was the nicest tile because it had some light colours, whites and light greys going through it and that would help tie in the floor tile and obviously the gloss whites.” They used the same tile along the pantry wall. “We wanted to keep it all matching but we didn’t want to have a full tile in the scullery, so we cut them in half.”
Keep in mind...
n Electrical and plumbing work must be carried out by licensed tradies.
ISLAND BENCH
3200 SINK
900 2700
Selleys ‘Sugar Soap’ wall surface cleaner, $4.92/1L, I/N: 0222766

Selleys ‘Spakfilla Rapid’ rigid filler, $13.50/180g, I/N: 1231864

Ready, set, paint!

Selleys ‘No More Gaps Multipurpose’ flexible gap filler, $8.49/150g, I/N: 0147102
Walls ready for a refresh? A pro-level job starts with a perfectly prepped surface
The secret to a quality paint job is in the prep. Okay, it’s not the most glamorous part of the task, but it’s one step you won’t want to skip. The work you put in beforehand will deliver you a finish to be proud of and, with help from Selleys, it’s as easy as 1, 2, 3.

1. GET CLEANING
Start by washing your walls. Selleys Sugar Soap cuts through grease and grime (if only all cleaning was so easy!). Put down a drop cloth to protect your precious floors and pull on some rubber gloves. Remove any nails or hooks from the wall, then use sandpaper to sand over any rough or flaky bits. Dilute some Sugar Soap in a bucket with water (as per packet instructions) and use a cloth to wash off any dirt, dust and scuff marks. Done!
2. TACKLE DINGS
Don’t let dents and nail holes ruin your paint job. With a ready-to-use filler like Selleys Spakfilla Rapid, covering over the cracks is an easy job for any DIYer. Simply apply a small amount of Spakfilla Rapid to the included scraper and draw it across the hole or dent. Skim over the area in both directions a few times to push out air bubbles, then firmly draw down the surface, leaving a small amount of overfill. Allow to dry, as per pack instructions, then lightly sand smooth and brush off the dust.
3. FILL THE GAPS
The last thing your beautifully painted walls need is a gappy border around every architrave, window or door frame.
Selleys No More Gaps Multipurpose
makes filling gaps so much easier, thanks to the easy-squeeze tube, and it’s great for getting into those awkward corners. Make sure you’re starting with a clean, dry surface – give it a wipe before you start. Cut the tip of the tube at a 45-degree angle and gently squeeze it into the gap. Use a wet finger to smooth over the top and clean up any excess with a damp cloth. Give it at least 20 minutes to dry before painting over it with water-based paint, or allow 24-48 hours if using ceiling or oil-based paints.
Now for the fun part: brushing colour on your beautifully prepped walls!

Made in the USA

BONUS
INSINKERATOR BRUSH’N’PUSH SINK TOOL IN BOX


