6 minute read
Bantam Rebirth


mary's Bantam was untouched between 1976 and 2021 – CRAIG CAREY-CLINCH and MAx JOWETT recommissioned it
Advertisement
Just a straightforward refurbishment I was told, when sent a photograph of a complete but tired looking 1965 BSA Bantam D7. Sadly, the photo did not resemble reality, which was several boxes of dismembered scrap. The restored Bantam’s debut at this year’s Overland Event was only a matter of months away, so Max and I had a job on our hands.
After Mary completed her trip, the bike went into storage for several decades, but in a damp shed. She had got on with her life and had disappeared from the motorcycling world’s view. More recently she tried to have the Bantam restored, and a business which shall remain anonymous agreed to do the job. Unfortunately, they brutally ripped the bike apart, creating enormous damage in the process, wrecking the fork legs and smashing the barrel. They did get the chassis painted, but these parts were carelessly stored, gathering scratches and scrapes. Quite a lot of other bits had gone missing.
Max and I quickly agreed that I would focus on the mechanics while he would preserve the bike’s unique identity in its tinware and the all-important stickers. This was a challenge as extensive corrosion had set in on the mudguards, the treatment of which would be likely to destroy the stickers. A creative solution was required.
A list of parts and work required quickly grew, but Mary took it all in her stride and authorised the work. Not everything could be returned to the bike's 1976 condition – the tank had rusted beyond recovery but an identical one was sourced at Kempton Autojumble. With a tired finish from years of use, and the correct colour, it was perfect for the bike. Another set of D7 forks from Kempton replaced the originals, which were beyond saving.
The original rims were rotted right through, so these were replaced with rims in ‘trade stainless’ which come in a slightly dull finish and look the part. New bearings were fitted, plus new chain and sprockets, while Dunlop sponsored the project by kindly donating new tyres in the correct tread pattern for the era. The basic rolling chassis came together quite well with new swinging arm bushes and headstock bearings – it was great to see the Bantam once again supporting its own weight on the workshop ramp.
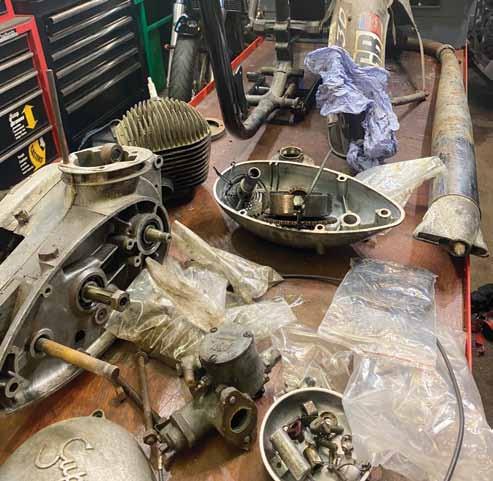
Top left: As arrived, a collection of parts, some damaged, some missing Top right: speaking at the Overland Festival
Right:
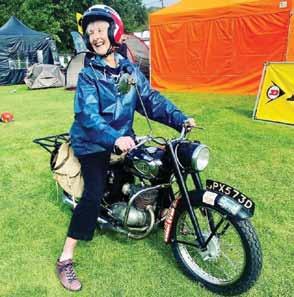
Reunited after 45 years, and the smile made it all worthwhile
Sourcing Parts
The trickier aspects of the job involved sourcing lost parts from various suppliers and private sales, plus machining new spacers and certain other parts. The online BSA Bantam Forum proved an invaluable source of advice and encouragement.
Meanwhile Max was bringing the mudguards and panels back to life, aiming at brightening up the corroded parts while cleaning and protecting the valuable stickers. Refitting the tinware was a major challenge, and at this point our suspicion that the frame was bent proved correct. It was a mild one, but had forced the rear subframe over to the right by about half an inch, though the chain and sprocket alignment remained unaffected. I was able to modify the chainguard to get some clearance between that and the rear tyre, without the mod being obvious to the eye.
The front mudguard was subtly bent out of shape in several ways, making it difficult to set up without it interfering with the front tyre. After a great deal of work, Max managed to get it straight.
The engine was a different matter as it had been badly damaged during a partial disassembly, so internally needed a full restoration. A local engineering firm was able to save the broken barrel by fitting a bespoke sleeve, which was married to a standard-size piston with a new rod and big-end. The gearbox was in pretty good shape given that it had been around the world, needing no real work.
Bearings were another matter. I always change engine bearings as a matter of course when restoring and on most Brit bike restorations, modern good quality imperial-sized bearings from reputable brands do the job just fine. These tend to be metric equivalents even though they are marked with imperial measures. But on the Bantam, machining seems to have been done in the factory to a higher standard of tolerance than on many bikes of the day. Modern equivalent bearings would only slip in if the engine cases were heated to a very high temperature, plus the mains would be a strong interference fit on the crankshaft. I’d be able to get the engine back together, but it would likely never come apart again. Proper-sized imperial bearings are still available from one or two places, but at a premium price.
Assessing the original bearings after they’d been thoroughly cleaned, we discovered that they spun up well when mounted in a lathe, with no worrying noises, and wear tolerances were well within specification. The Bantam had several major services during the world trip, and it seems that new bearings had likely been fitted not long before Mary’s final ride across the USA, so these perhaps had under 10,000 miles on them. Given the very low mileage that the Bantam is likely to cover going forward, we decided to reuse the originals. The clutch plates were similarly in good shape, so with new gaskets and seals, the motor was quickly back together.
The original exhaust was de-coked and cleaned and the carburettor, though worn, was refurbished with new parts.
The generator was another challenge. The original lighting and charging coils had packed up long before, having come loose and rubbed on the flywheel – hence Mary's resorting to regular battery charging while travelling the USA. The problem is that in ‘normal’ use, these Wipac coils never go wrong, so are now completely unavailable new. Thanks to the Bantam Forum, I was able to rewire a new set of coils from an earlier Bantam as a stop gap, though this type has a lower charging capacity. We have since been donated a correct set of old but working D7 coils by a member of the Forum.
Final Build
With new wiring and electrical components in place the Bantam had its final build up. We now had less than two weeks to go before the Overland Event, where Mary planned to ride the bike, and a nervous gathering took place in the workshop to witness me tickle the carb, close the choke, turn the ignition on and swing the kickstart. Second kick and the Bantam fired up for the first time in several decades!
The engine soon warmed up and ran evenly with no mechanical noise, while a test ride revealed that everything worked, with handling as it should be, despite the slight subframe bend. Brakes and suspension did their job as they should.
A fortnight later at Overland the whole project was vindicated by the joy on Mary’s face as she took her first ride on the Bantam since the end of her trip, 45 years earlier.
Max and I were able to recreate the bike to a finish that was as close as possible to how it ended the world ride. Not only that but it looks good, runs and rides well. If the Bantam was going to be pressed into regular use, it would need a new carburettor, but aside from that it’s in great shape and preserved for the future as a historically important motorcycle in the lexicon of round the world travel.
And Max’s creative solution for the painted parts? Well, if you see either Max or I at a motorcycle event next year, ask us about it then!
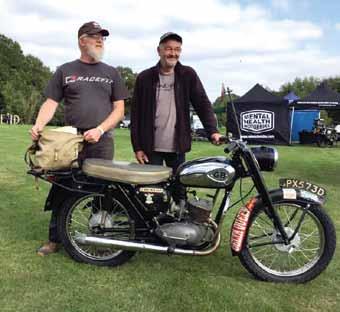
Max and Craig did the Bantam business