10 minute read
How to Register on Bitget Exchange(Bitget SignUp & KYC)

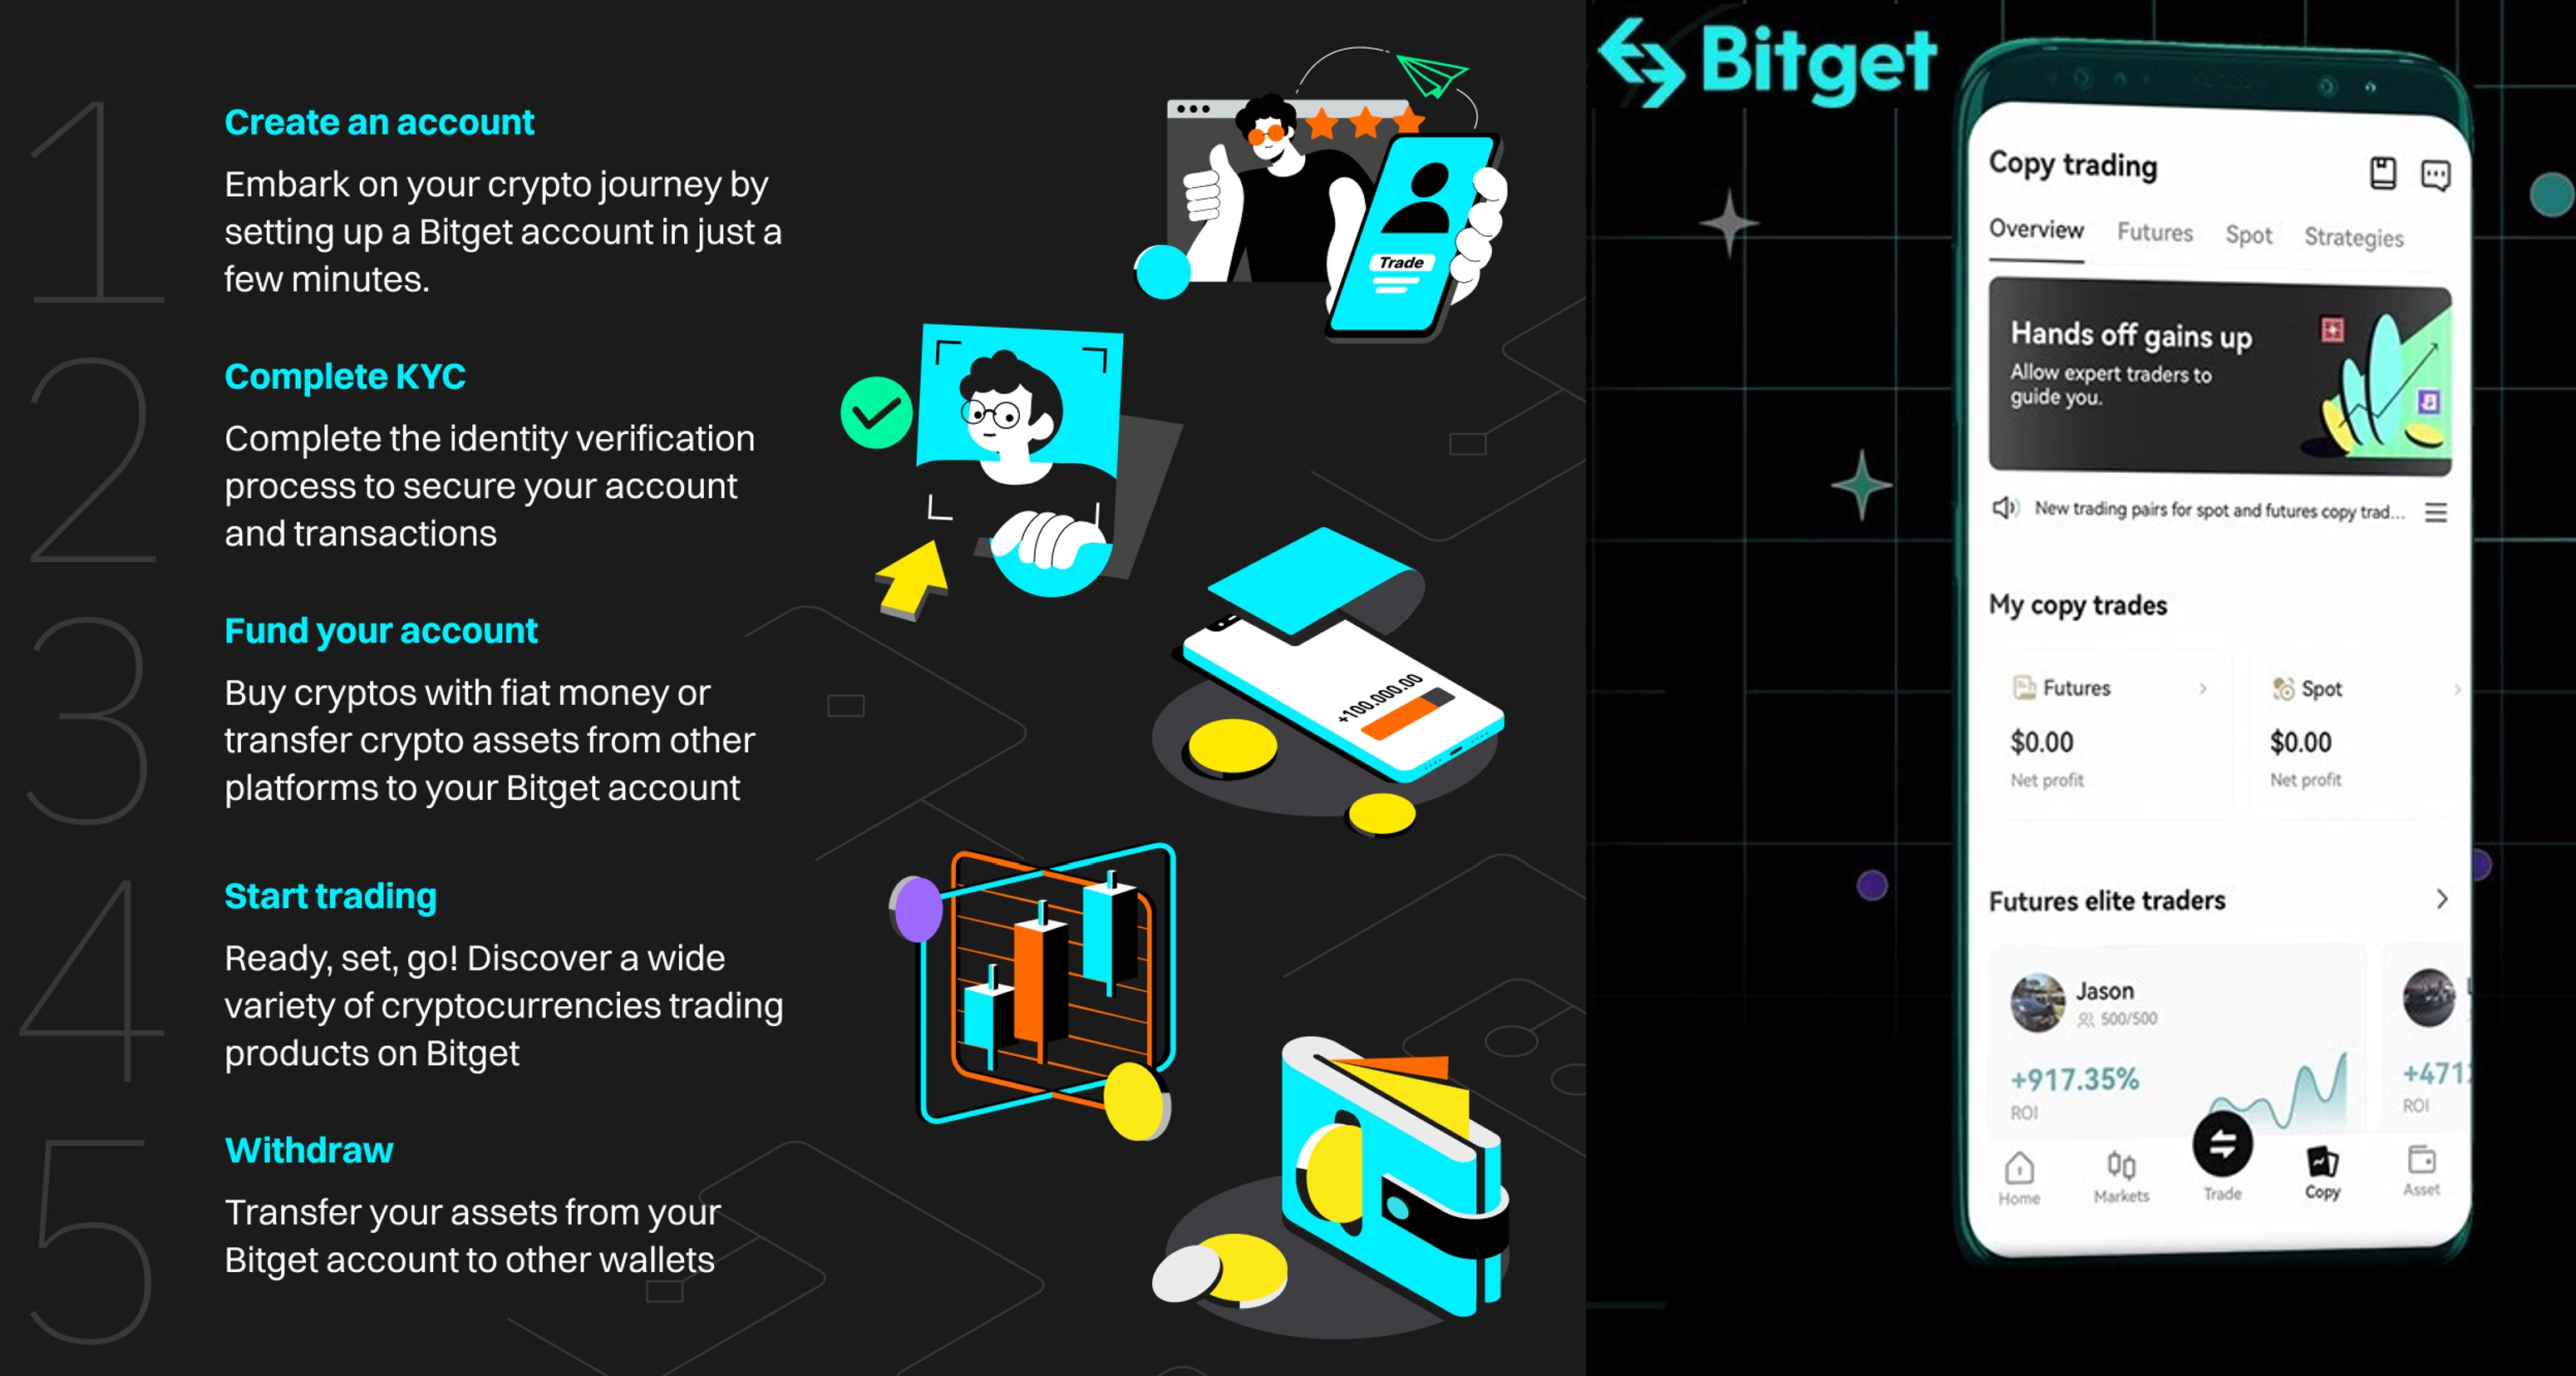
If you're looking to trade cryptocurrencies on Bitget, the first step is to sign up for a new account. Whether you're a seasoned trader or just getting started, Bitget’s new account registration process is simple and userfriendly.
In this guide, I’ll walk you through how to register on Bitget step by step. I’ll also share some tips on account security and where to find help if you run into any issues. Let’s dive in!

Why Choose Bitget?
Before jumping into the Bitget sign-up process, let me quickly highlight why Bitget is a great choice:
✅ User-Friendly Interface – Great for beginners and experienced traders alike.
✅ Advanced Trading Features – Futures, spot trading, and copy trading are all available.
✅ Robust Security – Offers two-factor authentication (2FA) and withdrawal whitelists.
✅ Low Fees – Competitive trading fees compared to other exchanges.
✅ Strong Support – If you ever need help, the Bitget support page has plenty of resources.
How to Register on Bitget Exchange - Step By Step
How to Sign Up for a Bitget Account - WEB

Here’s a simple step-by-step guide to completing your Bitget new account registration:
Step 1: Visit the Bitget Website
Step 1: Visit the Bitget Website

1. Go to the official Bitget website
2. Click the "Sign Up" button in the top right corner.
Step 2: Enter Your Information
You'll have two options:
Sign up with an email address
Sign up with a phone numbe
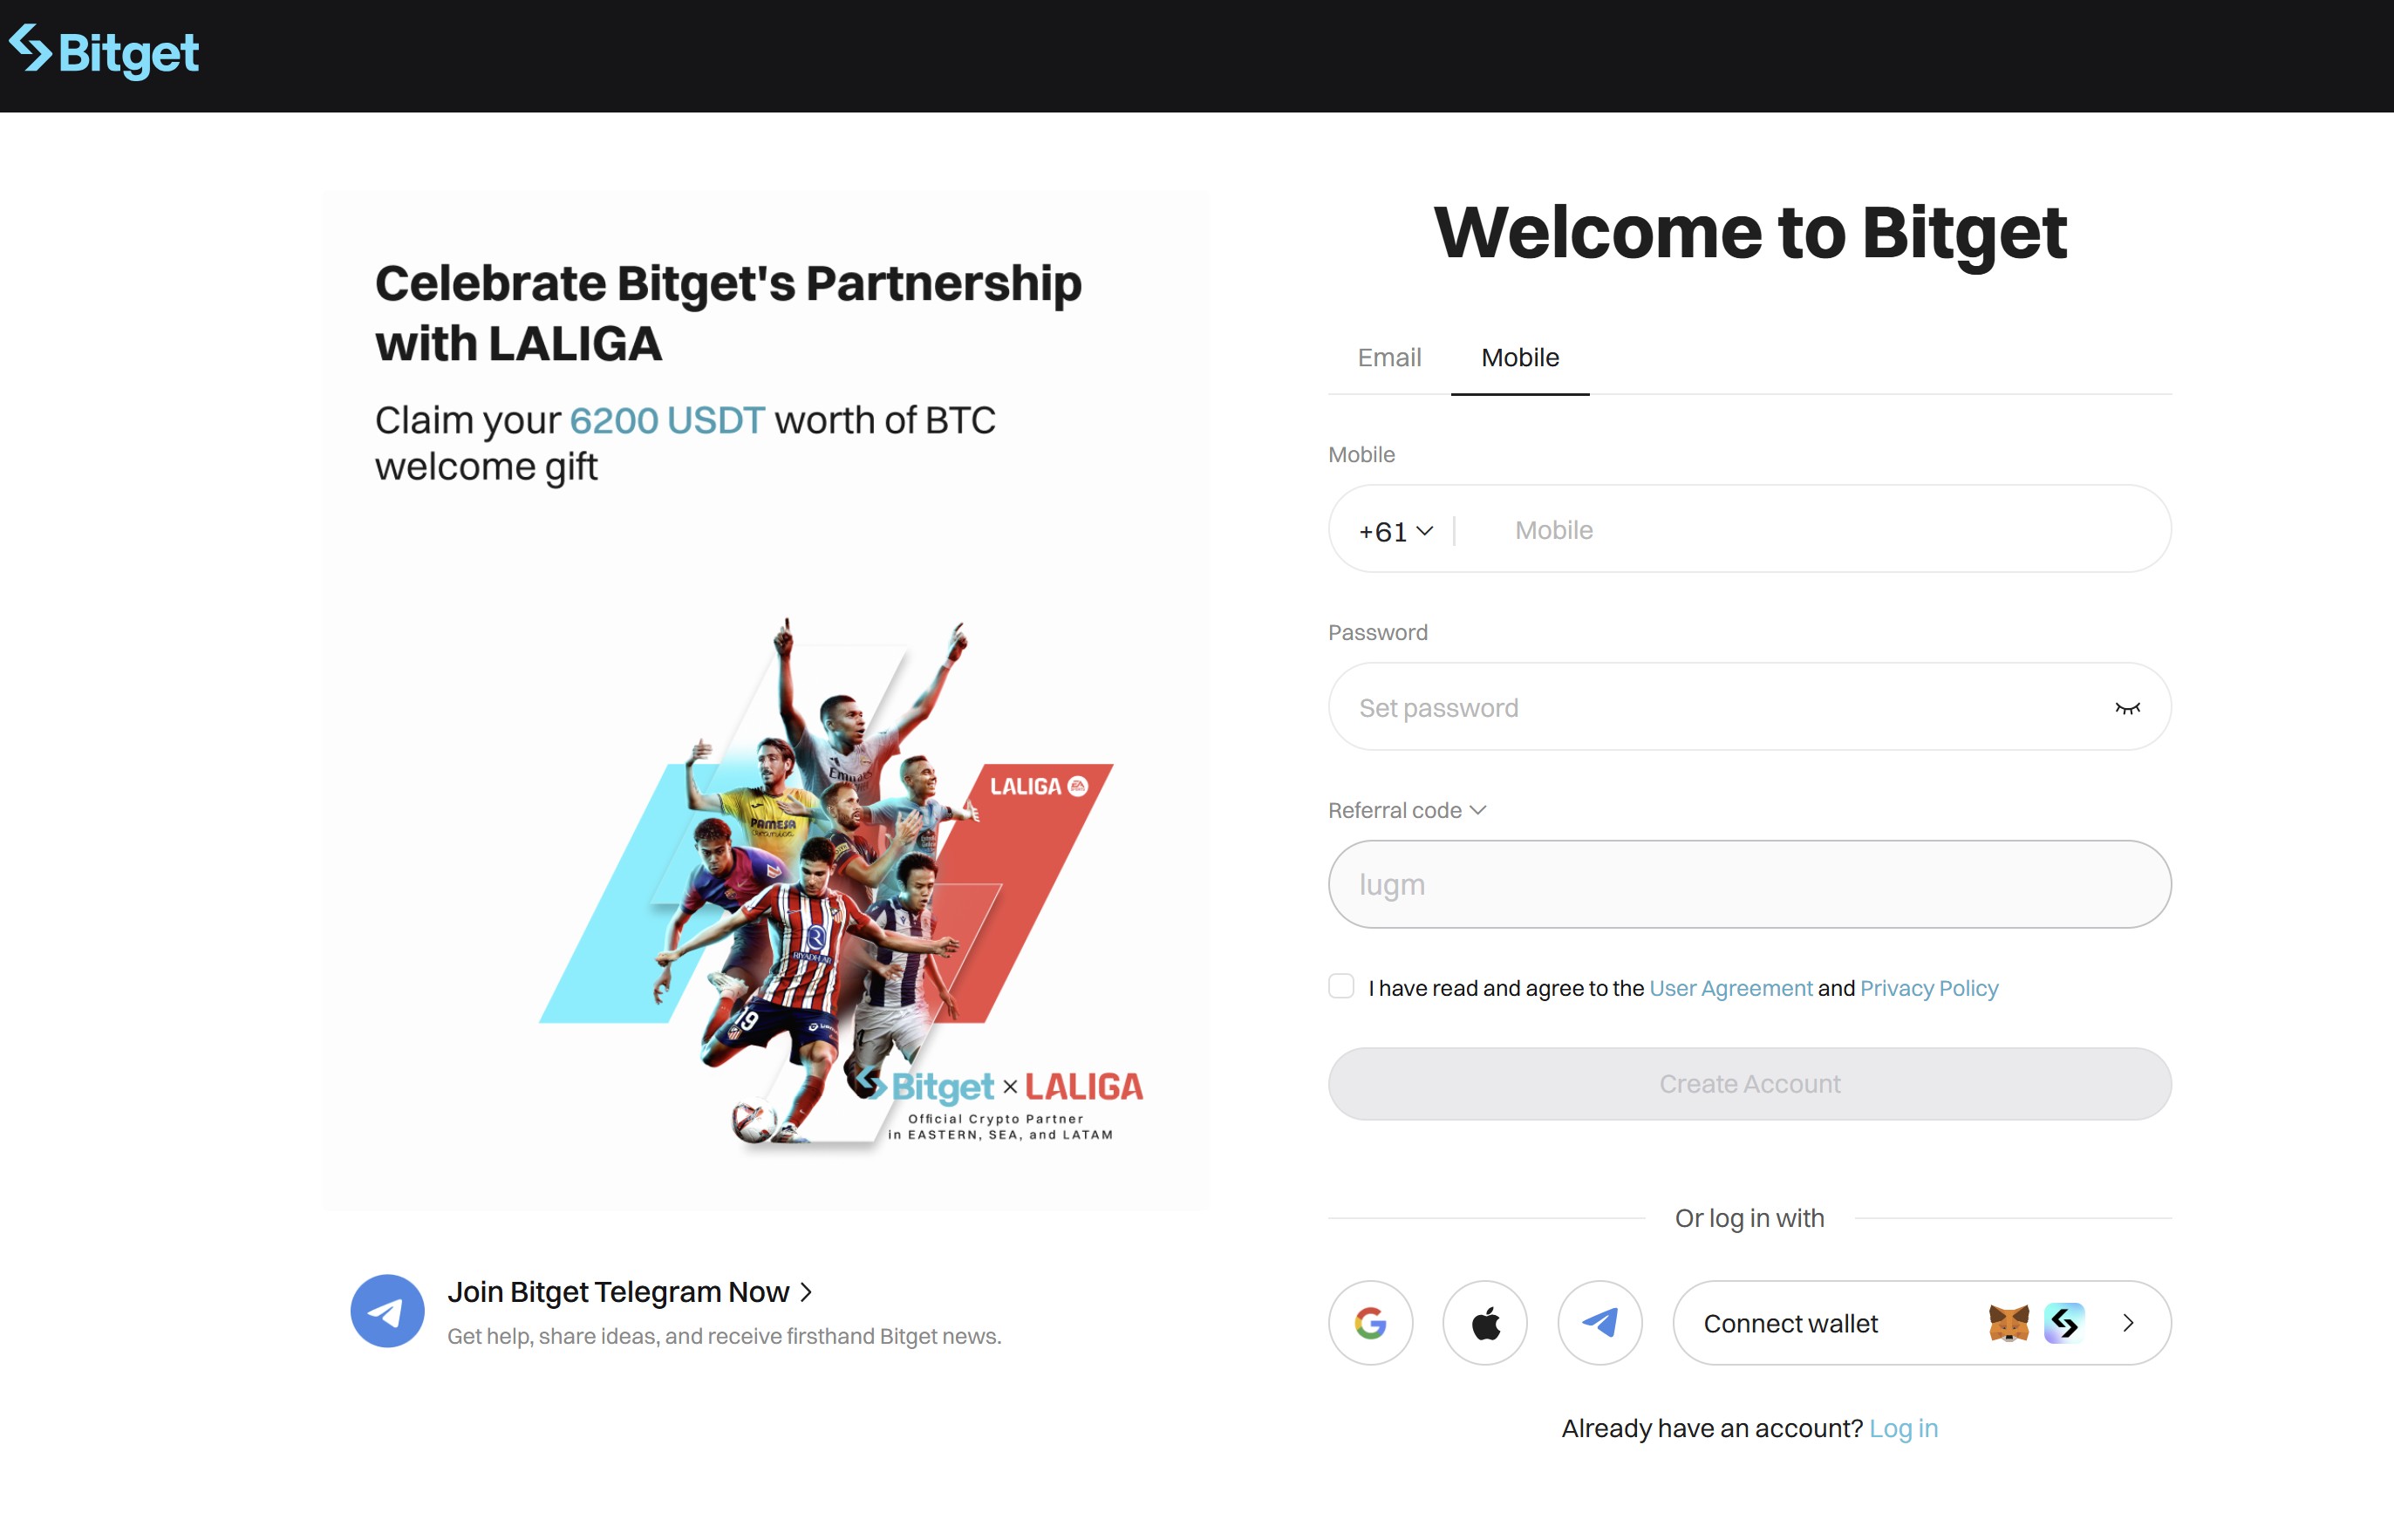
✅ For email sign-up: Enter your email address and create a strong password.
✅ For phone number sign-up: Choose your country code and enter your mobile number.
✅ Tip: Use a strong password with a mix of uppercase, lowercase, numbers, and symbols for better security.✅ For email sign-up: Enter your email address and create a strong password.
Step 3: Verify Your Email or Phone Number
Bitget will send a verification code to your email or phone.
Enter the code to confirm your registration.
Step 4: Enable Security Features (Highly Recommended)
To keep your account secure, I strongly suggest enabling Two-Factor Authentication (2FA):
1. Google Authenticator – Provides extra protection for logins and withdrawals.
2. SMS Authentication – Adds another layer of security.
How to Complete KYC (Know Your Customer) on Bitget
Although you can start trading without verification, completing KYC unlocks more features, such as higher withdrawal limits and fiat deposits.
1. Go to the "Verification" section in your account settings.
2. Upload your government-issued ID (passport, driver's license, or national ID).
3. Take a selfie for identity verification.
4. Wait for approval – This usually takes a few hours to a day.
👉 John Bitget Exchange Now > https://www.bitget.com/
Set Up Google Authenticator on Bitget (Website Version)
Setting up Google Authenticator on Bitget is simple and takes just a few minutes. Follow these steps to enable it on your account:
Step 1: Access Security Settings
Log in to your Bitget account on the official website.
Navigate to the Security Settings page.
Step 2: Select Google Authenticator
Locate the Google Authenticator option under the 2FA settings.
Click on [Configure] to begin setup.
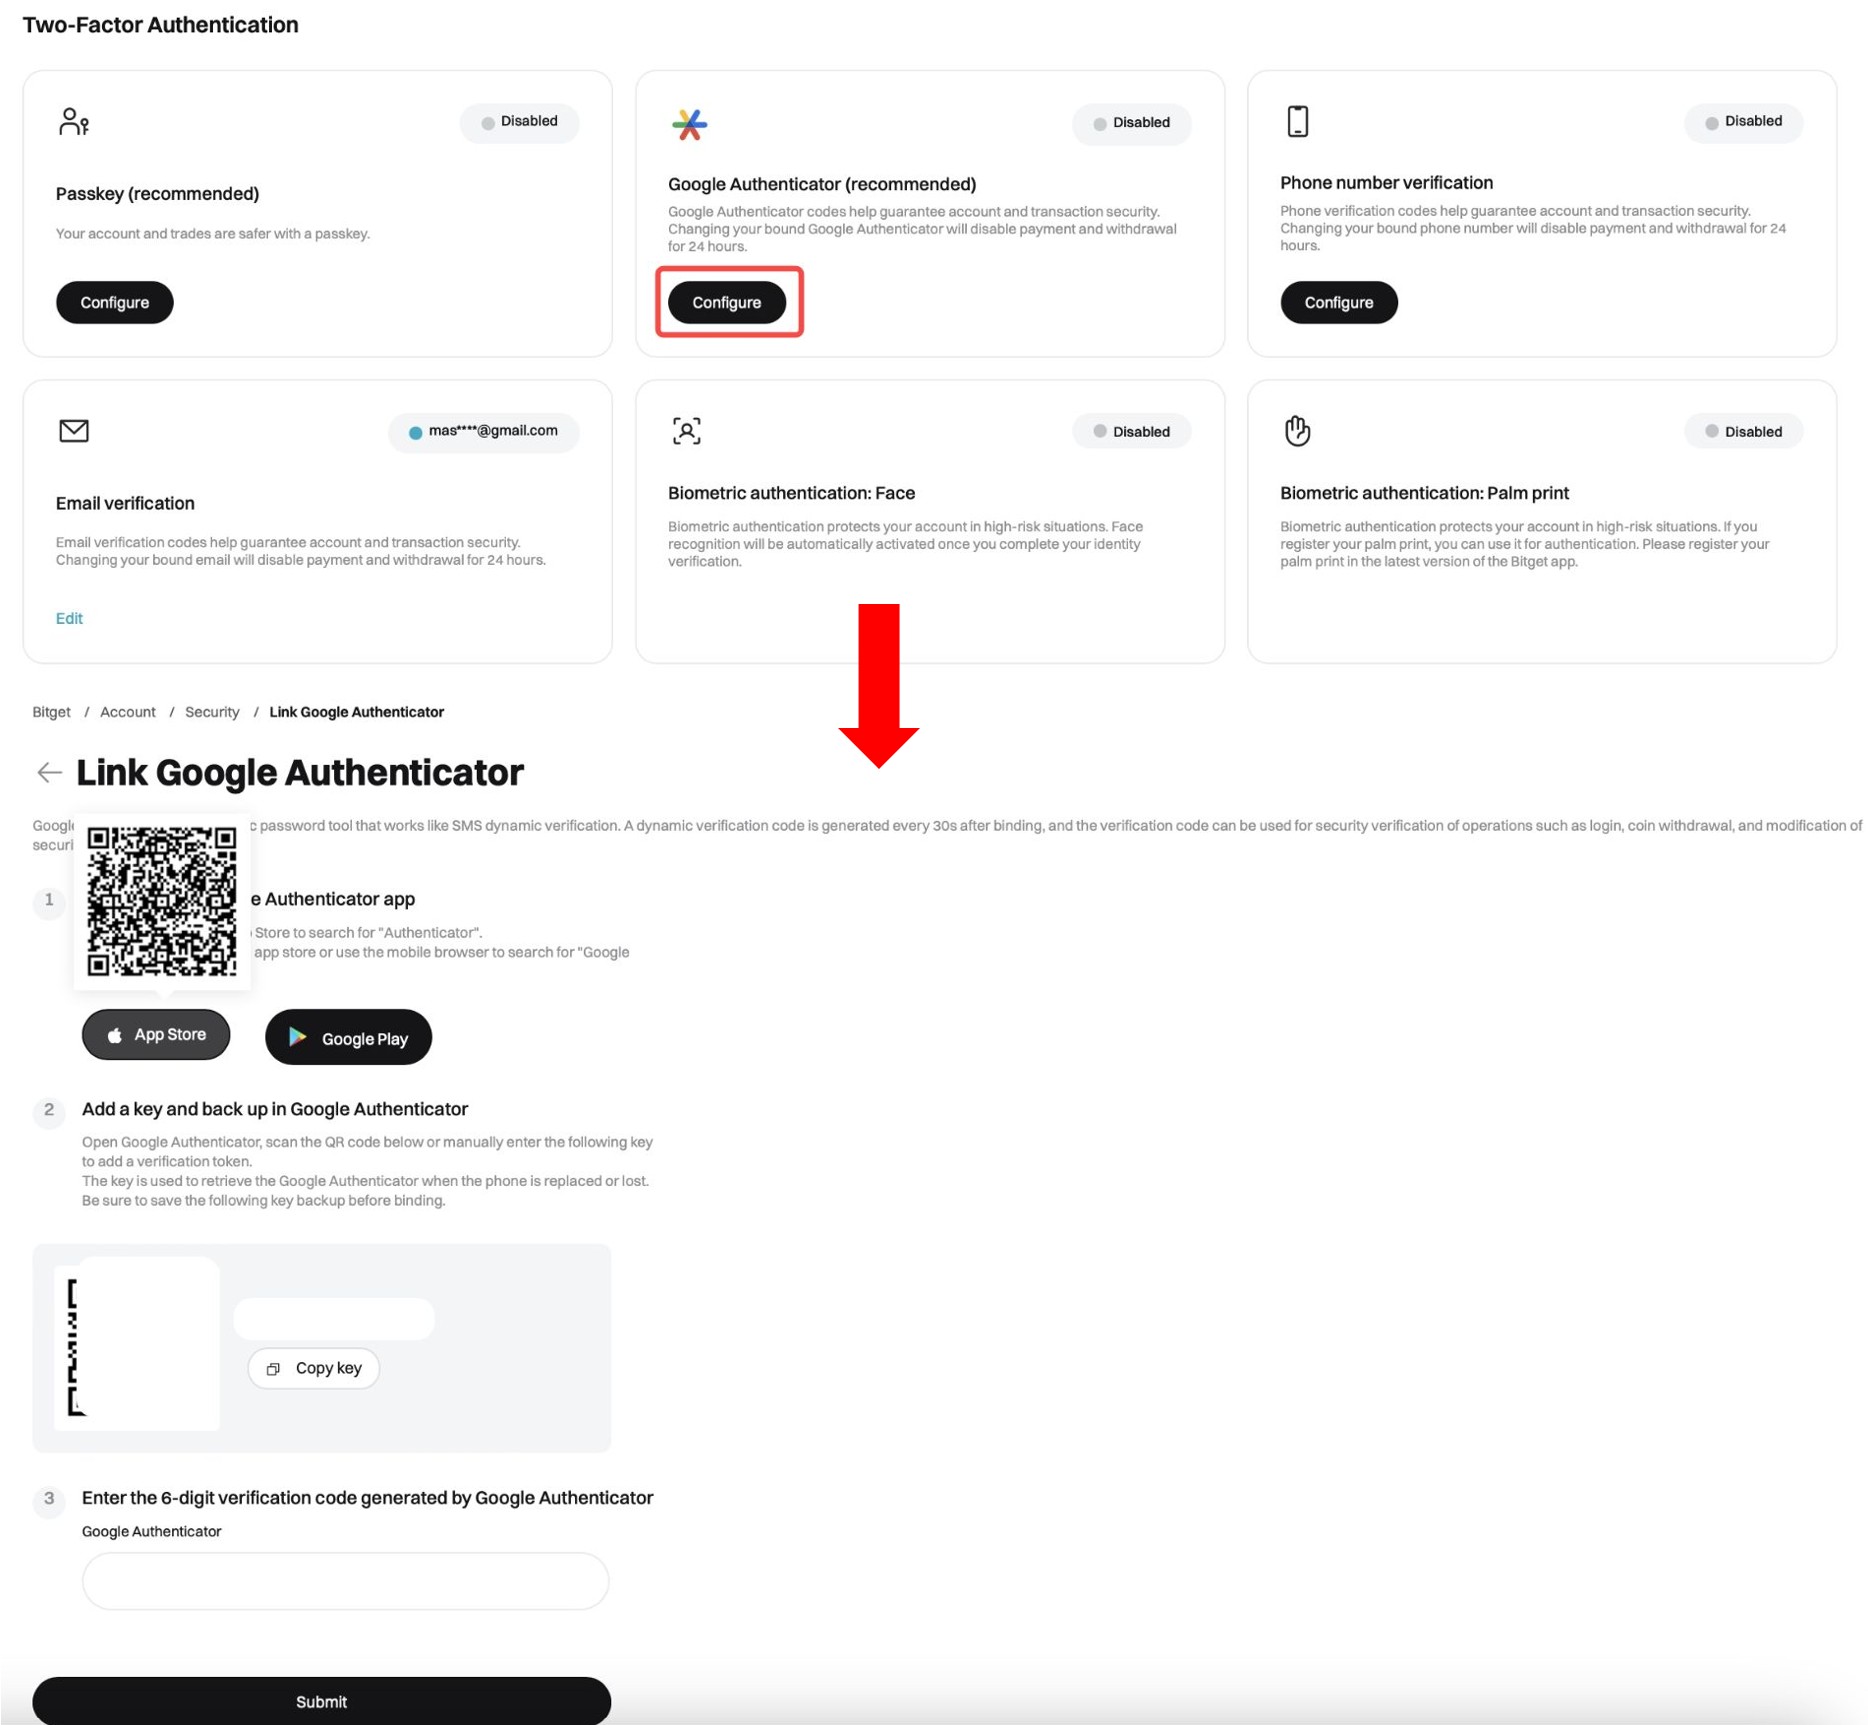
Step 3: Download Google Authenticator
If you haven’t installed Google Authenticator, download it from the App Store (iOS) or Google Play Store (Android).
Use the QR code provided by Bitget to install the app quickly.
Step 4: Link Bitget to Google Authenticator
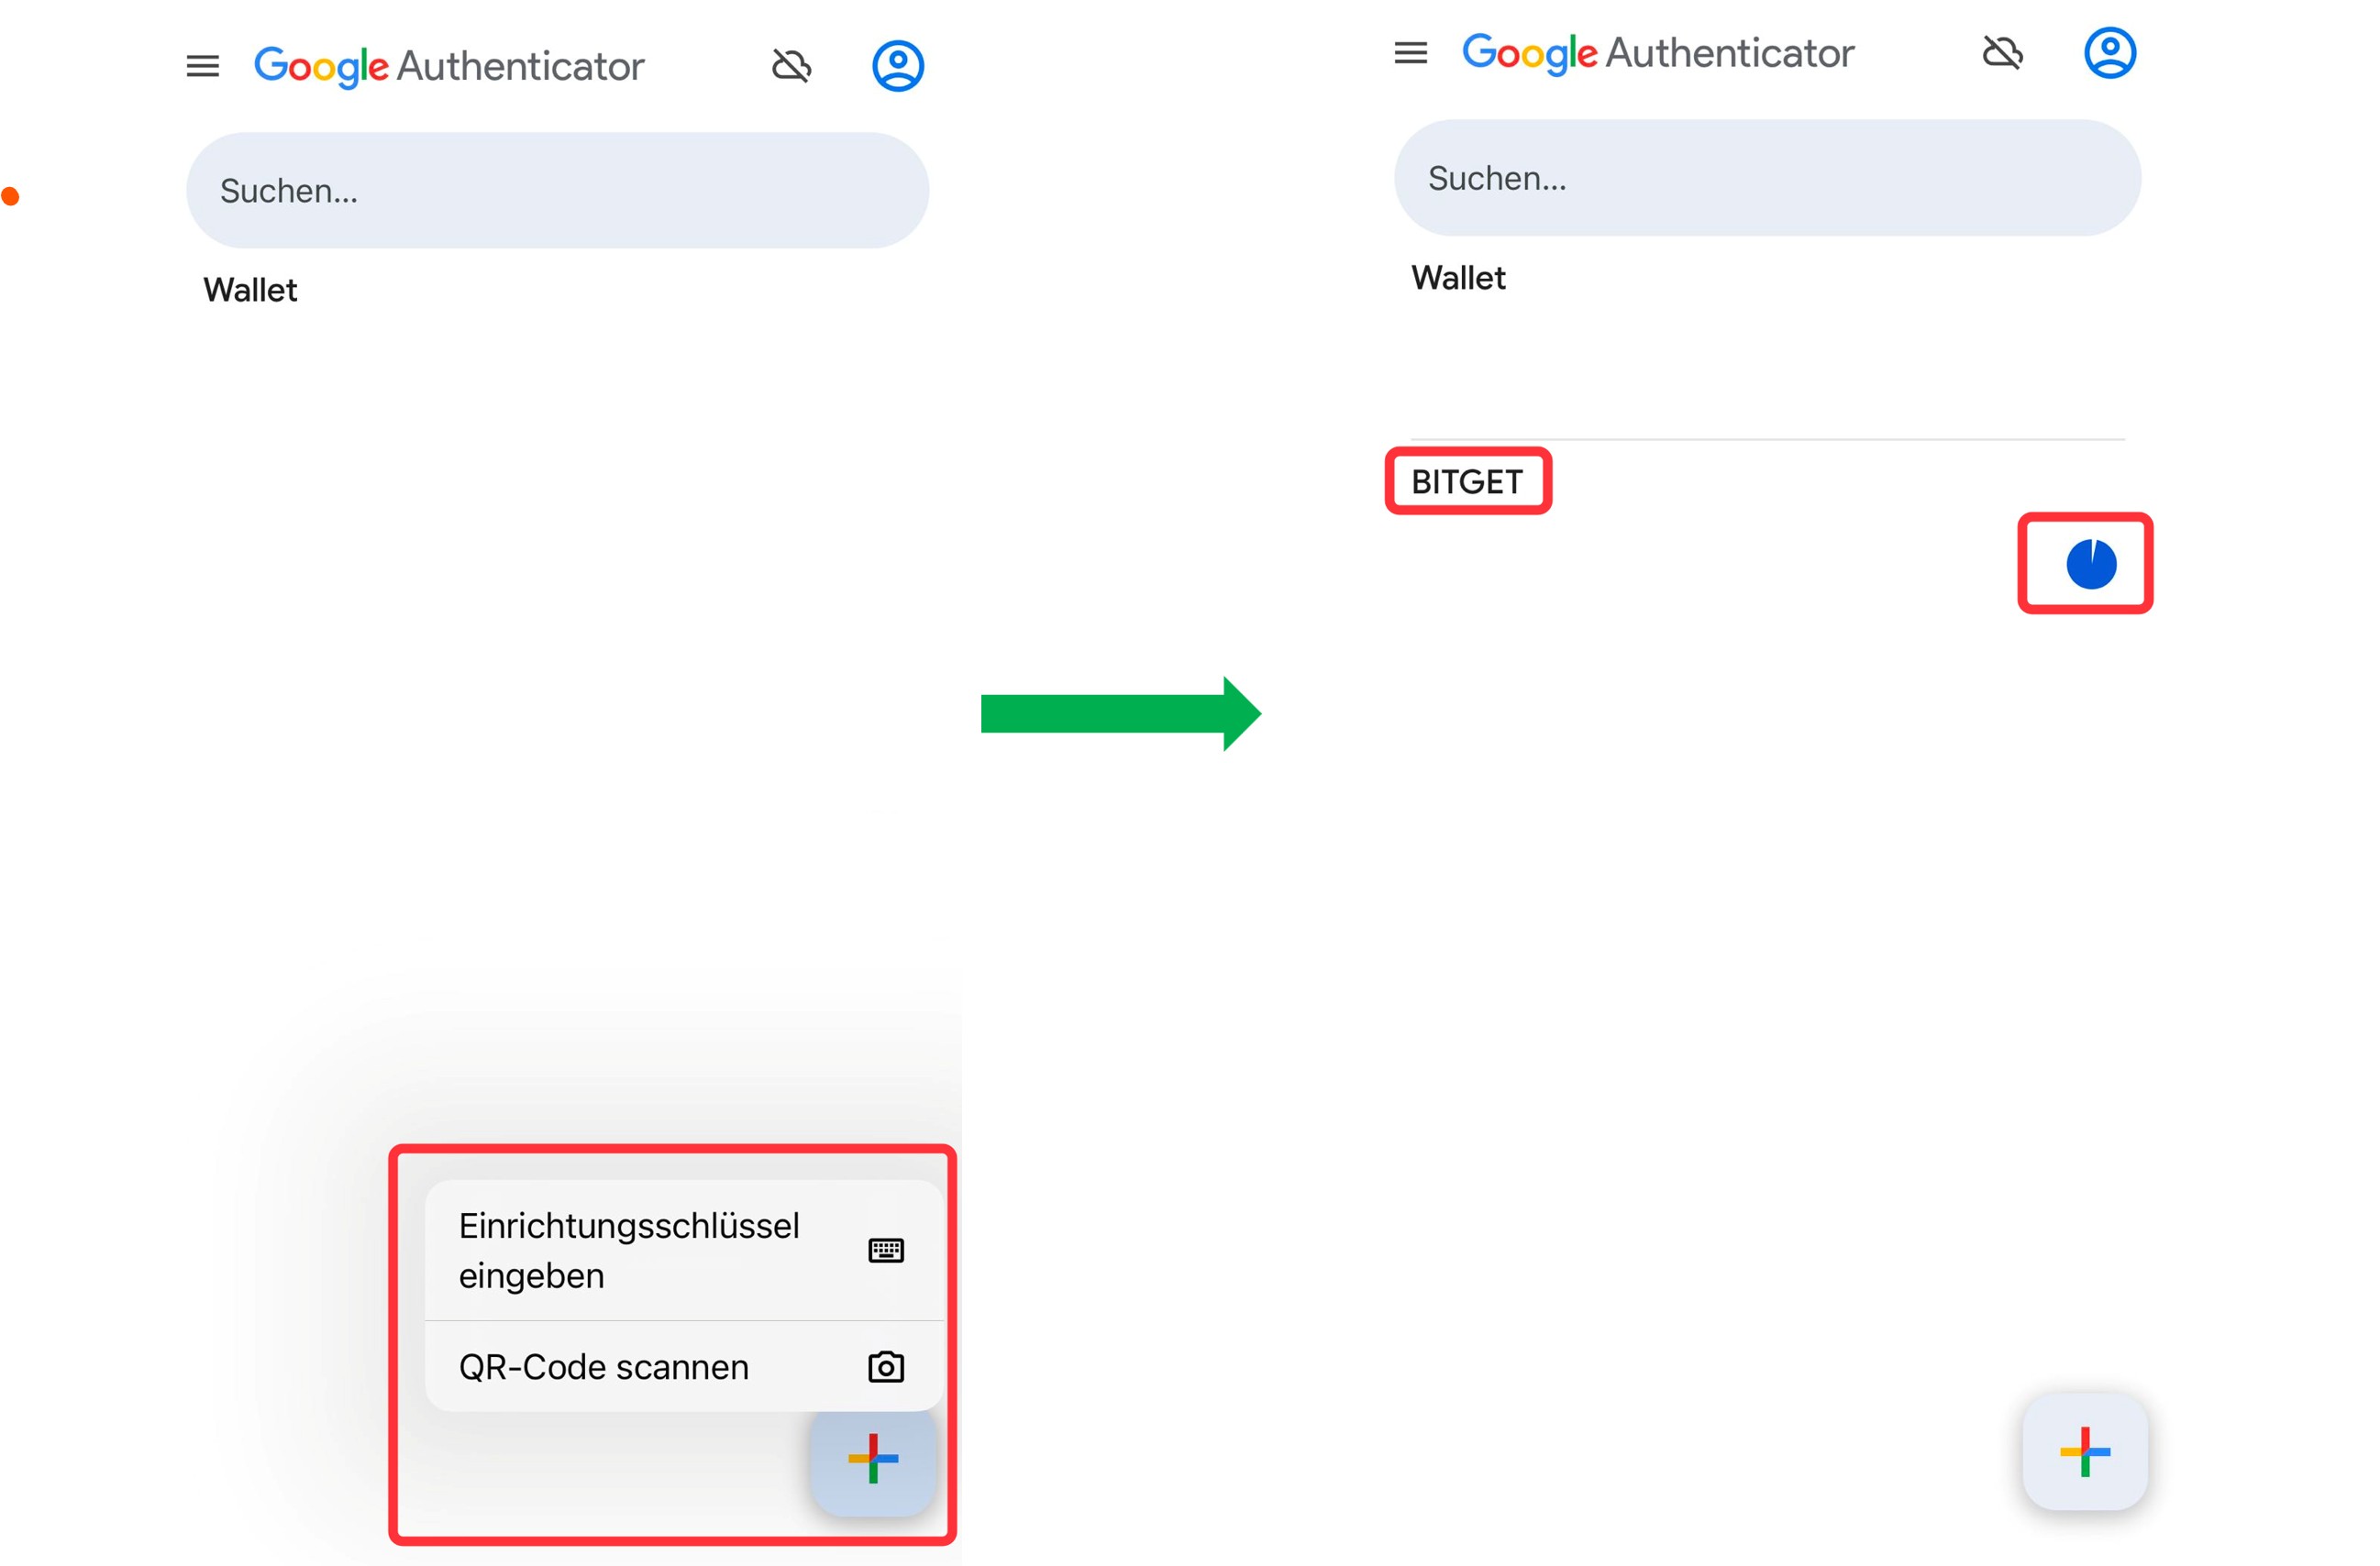
Open the Google Authenticator app.
If you're using the app for the first time, tap [Add the code] on the home screen.
If you already have accounts linked, tap the + icon in the bottom-right corner and choose either:
[Enter a setup key] (manual entry)
[Scan a QR code] (faster and recommended)
Step 5: Bind Bitget to Google Authenticator
Scan the QR code displayed on the Bitget website using the app.
Alternatively, copy the setup key from Bitget and enter it manually into Google Authenticator.
Once successfully linked, Bitget will appear on the app, showing:
Your account email
The binding date
A countdown timer indicating when the current OTP will expire
Step 6: Verify and Activate Google Authenticator
Go back to the Bitget website and enter the 6-digit code from Google Authenticator.
Check your email inbox for a verification code sent by Bitget.
Click [Send], enter the received code, and click [Confirm] to complete the setup.
Important: The email verification code is valid for 10 minutes only, so act quickly!
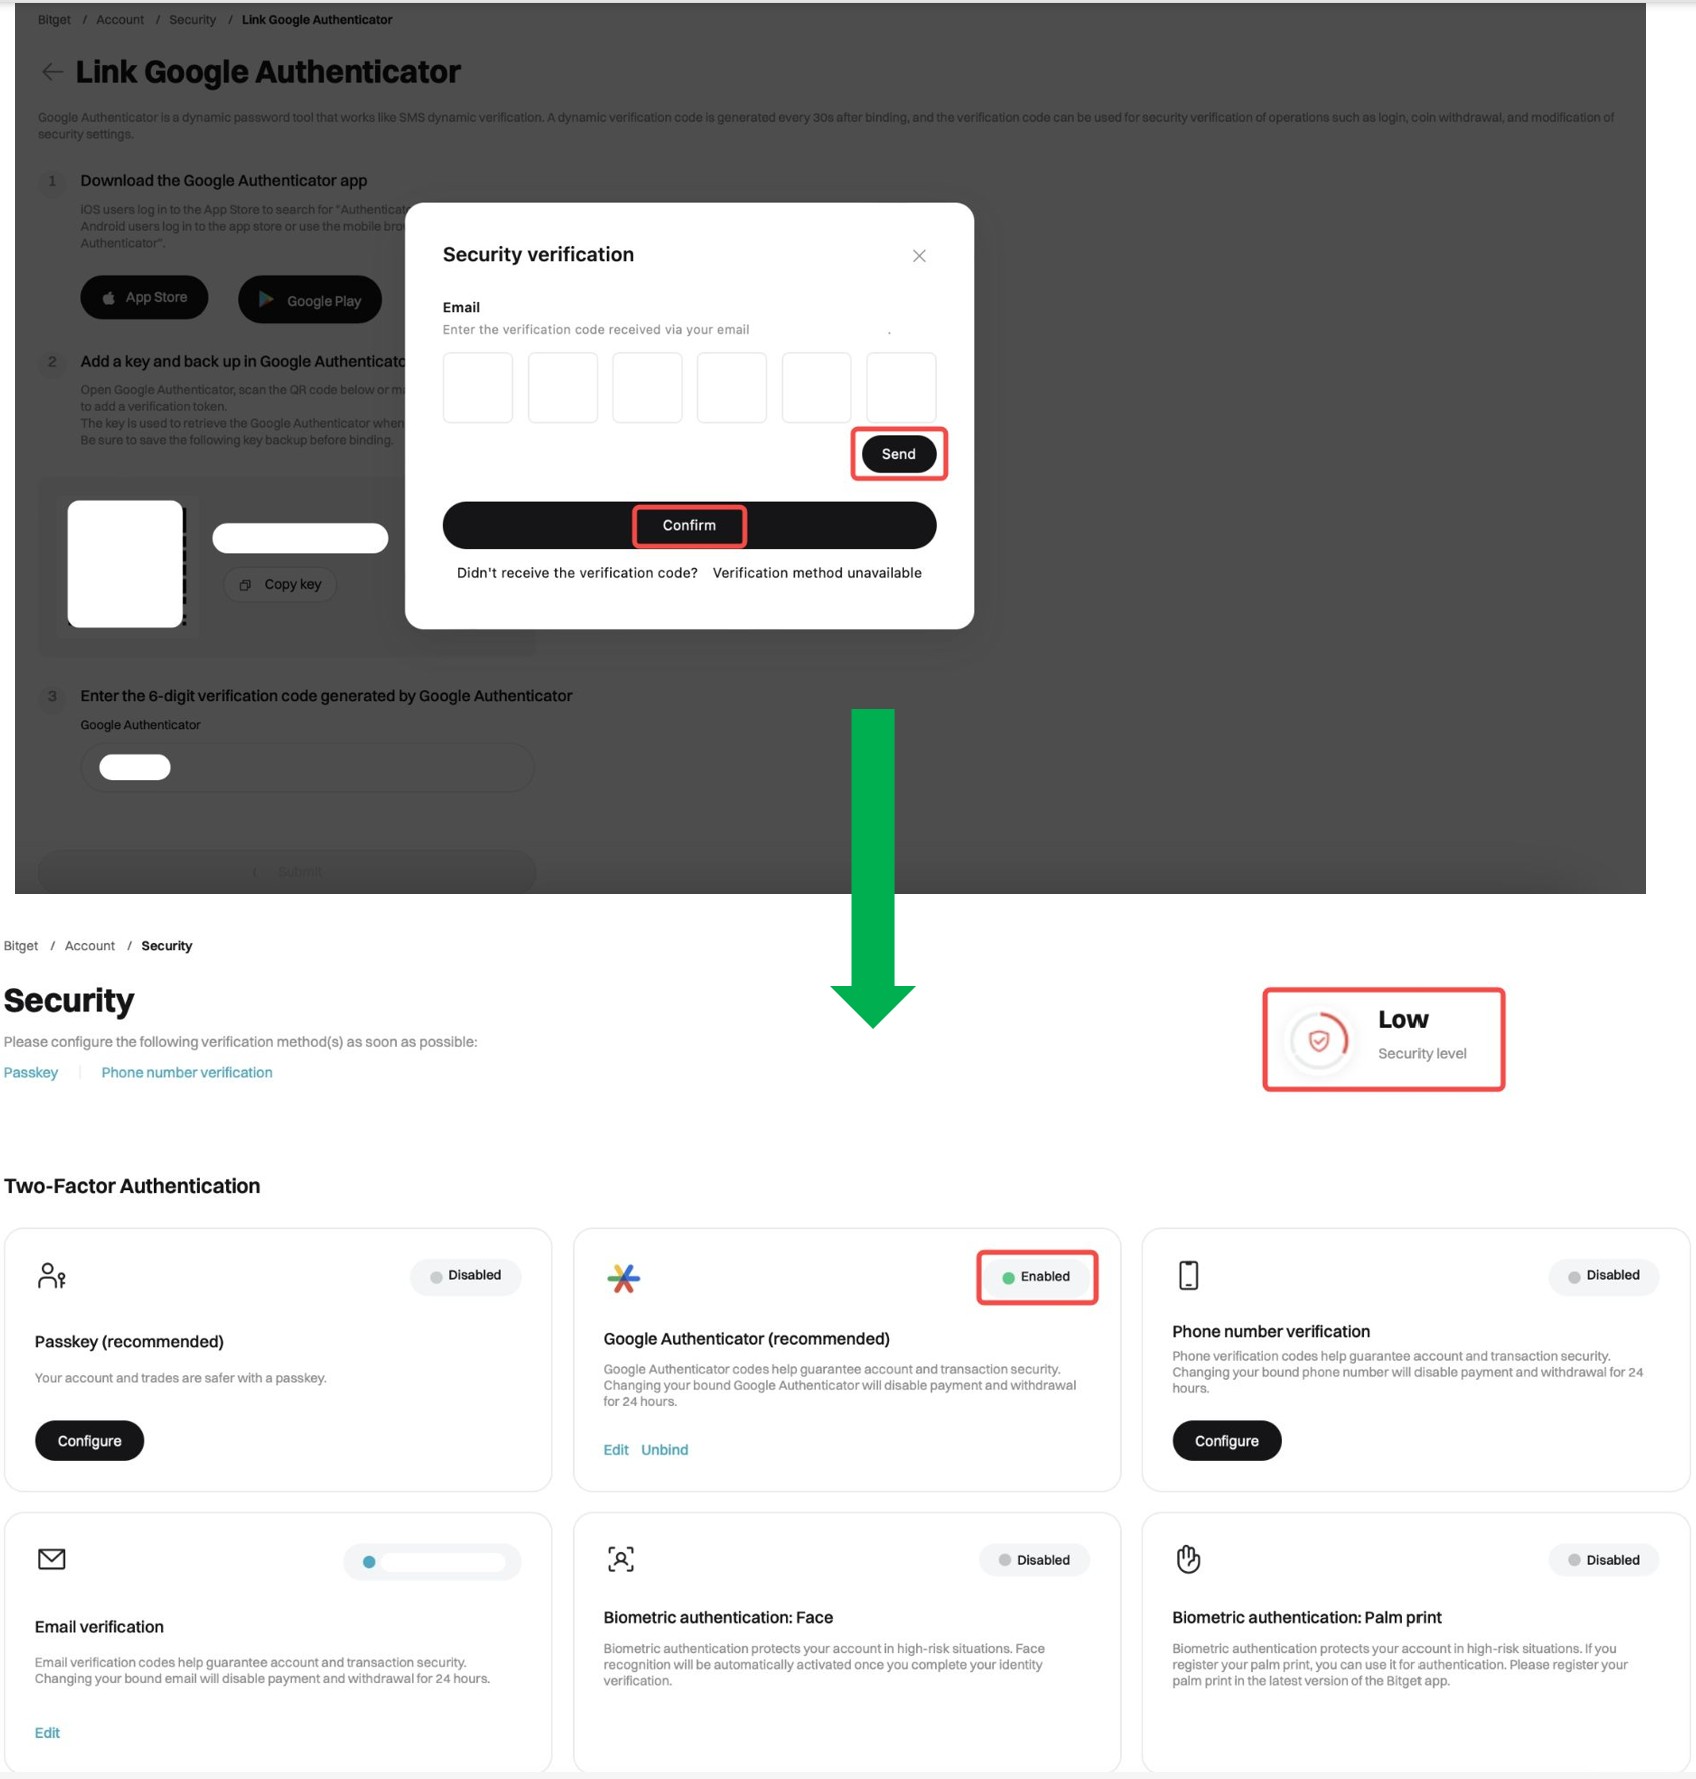
Step 7: Confirmation
Once done, you’ll see a confirmation message indicating that Google Authenticator has been successfully enabled.
Your account now has an extra layer of security, making it significantly harder for unauthorized access.
Complete KYC on Bitget: A Step-by-Step Guide
Know Your Customer (KYC) verification is required to unlock full access to Bitget’s features, including higher withdrawal limits, fiat deposits, and enhanced security. Here’s how to complete KYC smoothly:
Step 1: Access the KYC Verification Section
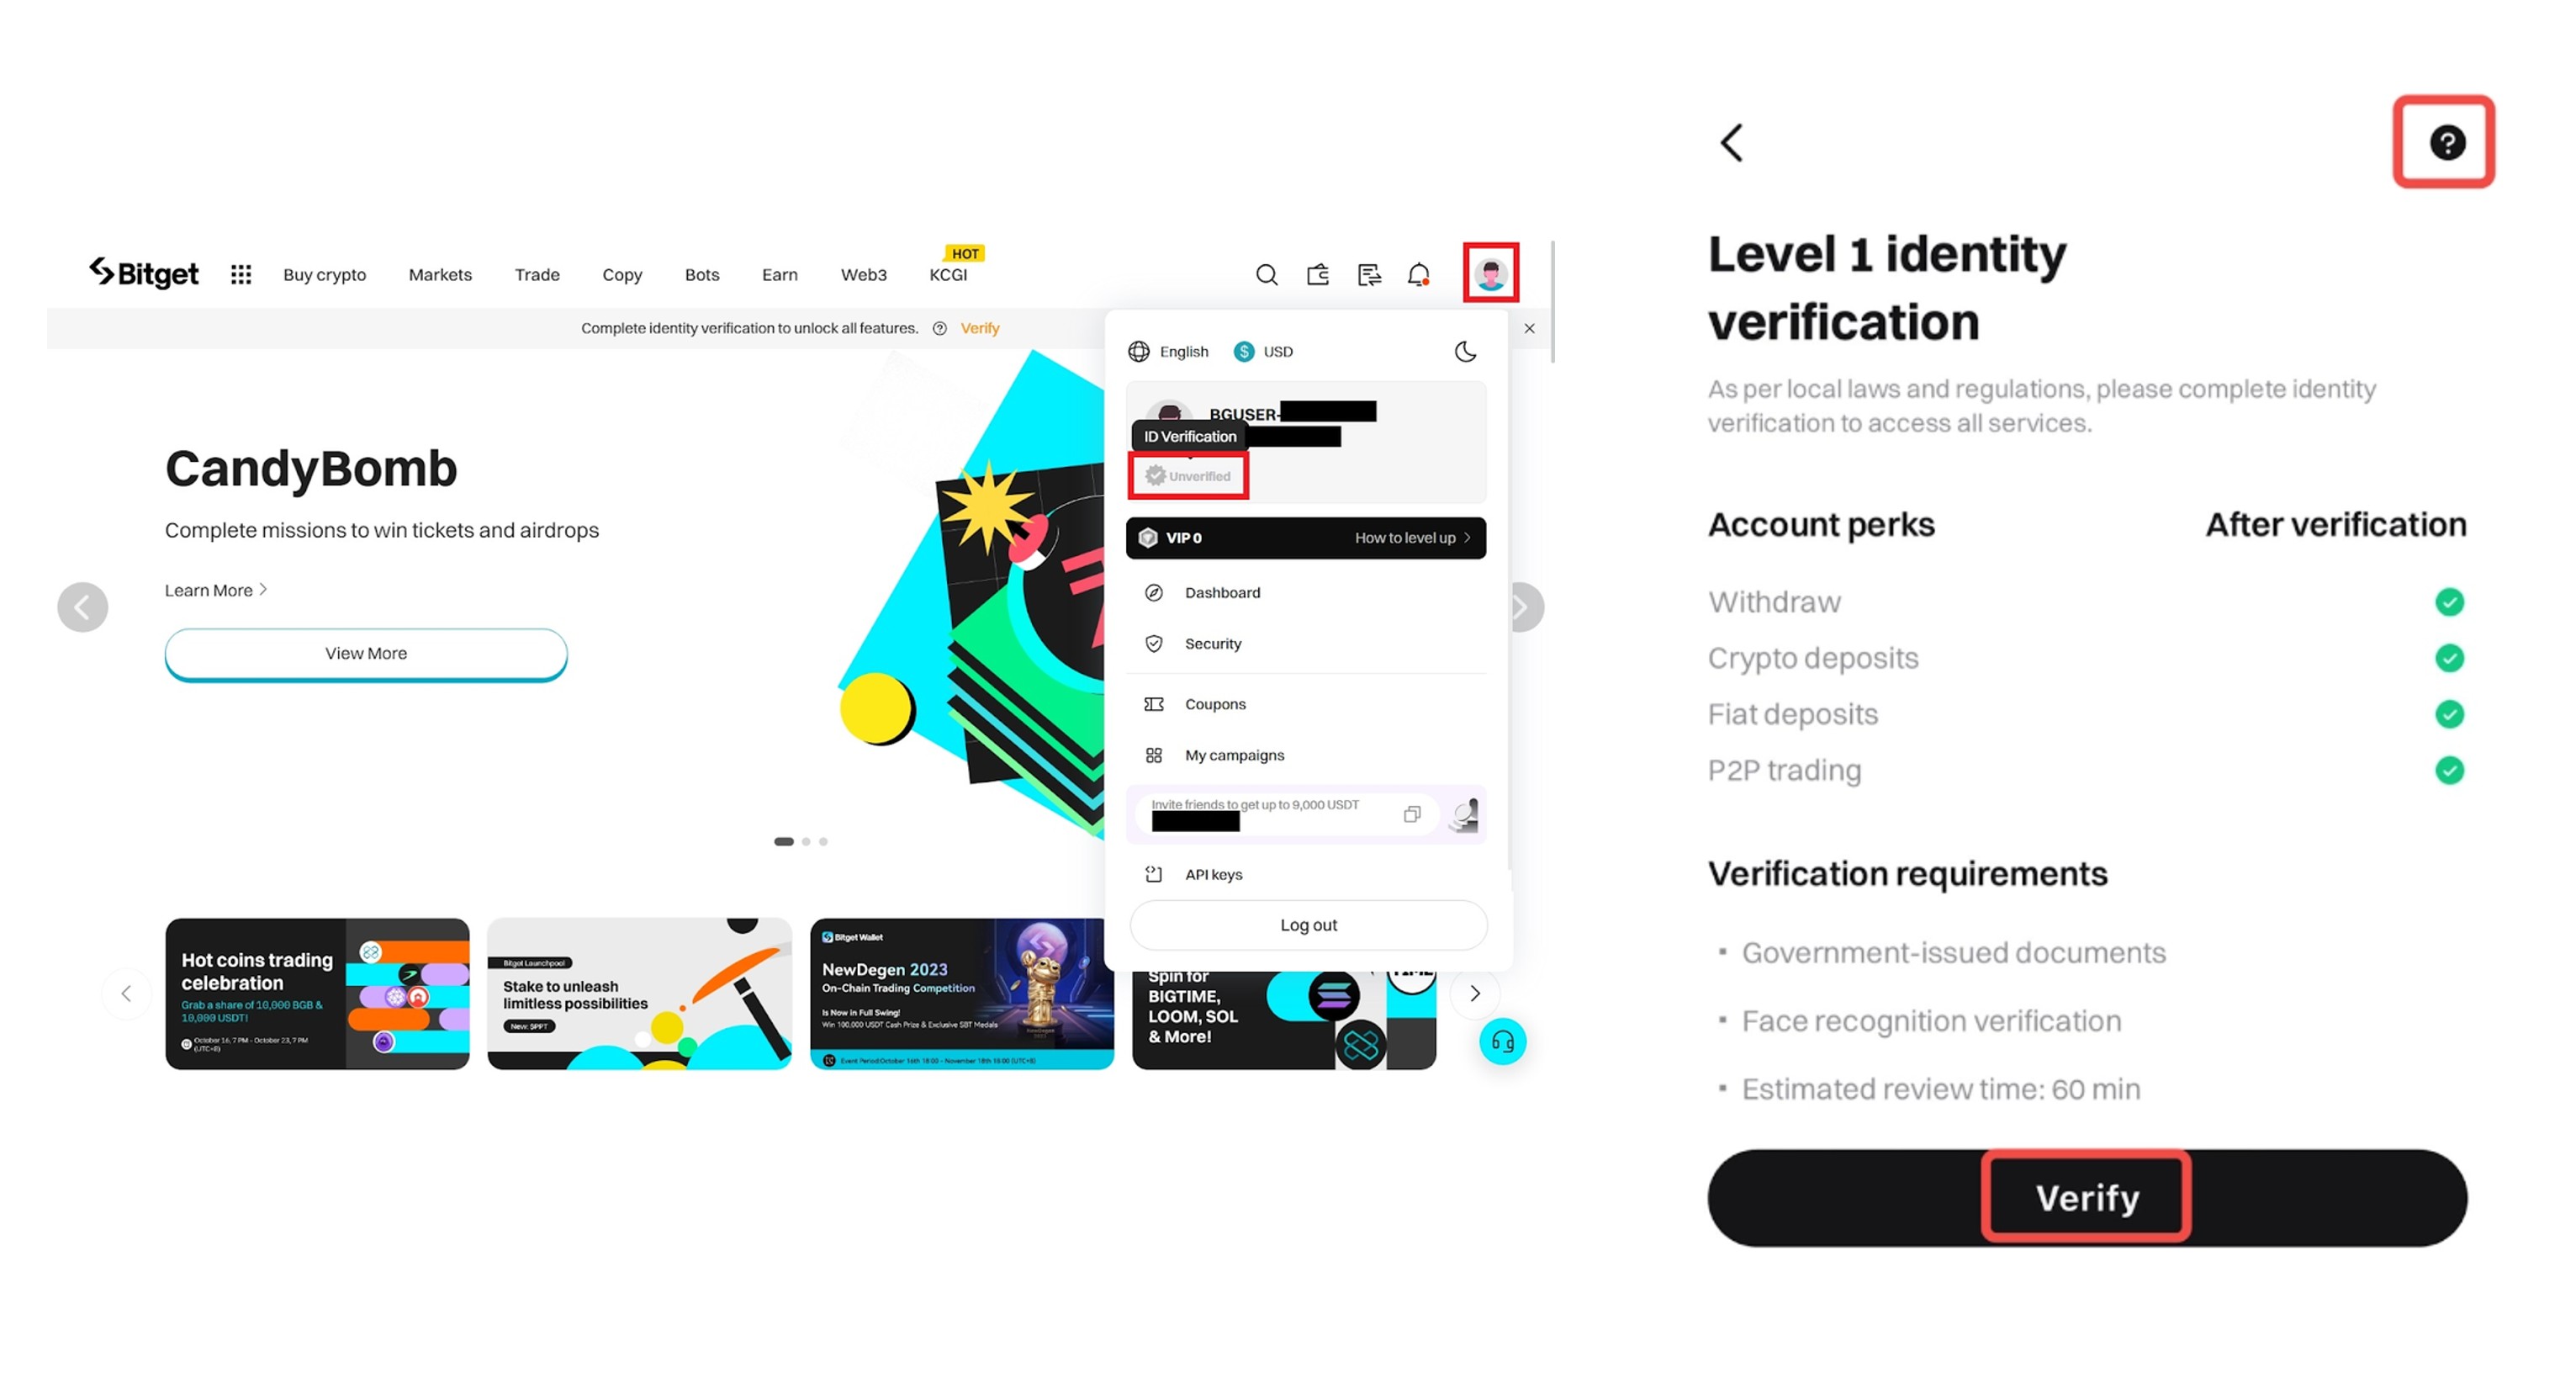
On the Bitget Website
Sign in to your Bitget account.
Hover over your profile icon in the top-right corner.
Click [Identity Verification].
Review the verification requirements, then click [Verify] to proceed.
On the Bitget App
Open the Bitget app.
Tap [Verify] on the main dashboard.
Step 2: Select Your Country and Document Type
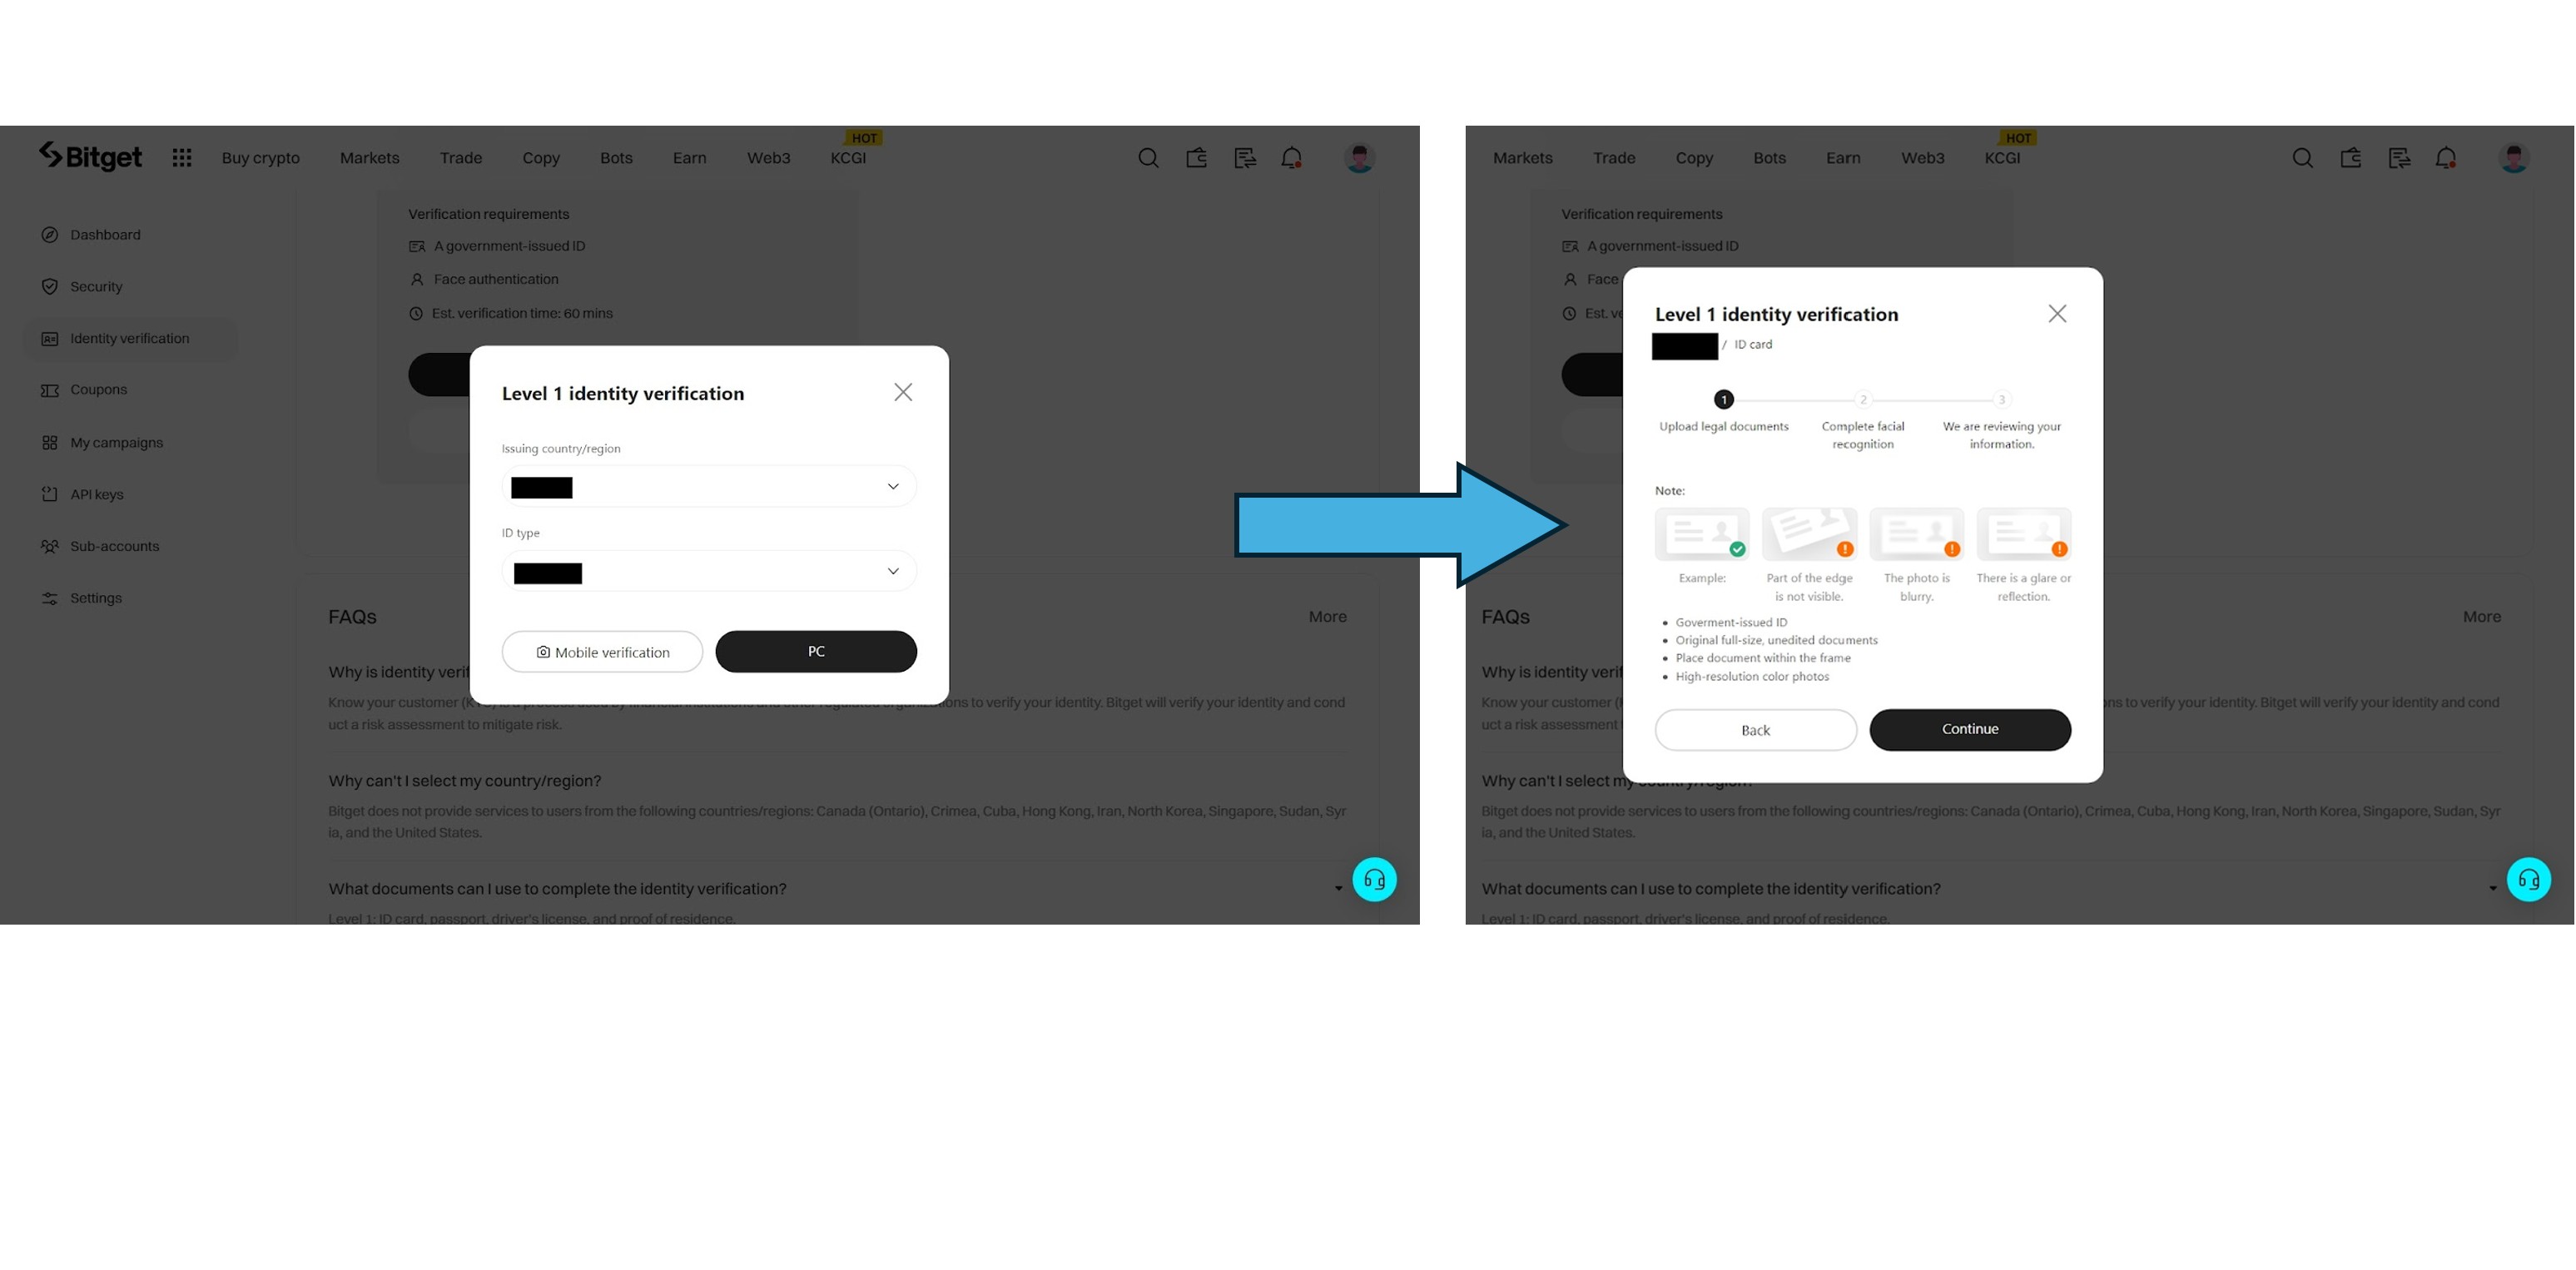

Choose your Country/Region of Residence and the Issuing Country/Region of your ID.
Select the ID type you’ll use for verification:
Passport
Driver’s License
National ID
Click [Continue] on the website or [Verify on Mobile Phone] (recommended).
📌 Important: Some countries only accept specific documents, so ensure you select the correct ID type.
Step 3: Upload Your Identity Documents
To complete KYC, you’ll need to provide three images for verification:
📌 1. Front View of Your ID
Make sure all details are clear and readable.
Ensure all four corners of the document are visible.
If using a passport, include the data page and adjacent page.
📌 2. Back View of Your ID (if required)
Some ID types require a back view for verification.
📌 3. Selfie for Face Verification
Take a clear selfie to match your ID photo.
Avoid wearing hats, glasses, face masks, or any accessories that obscure your face.
Ensure good lighting and hold the camera steady.
Troubleshooting: Common KYC Mistakes to Avoid
If your KYC submission is rejected, it may be due to one of the following errors:
❌ Cropped or incomplete ID images – Make sure all details are visible.❌ Blurry or low-quality scans – Use a high-resolution camera.❌ Reflections or glare on the ID – Adjust lighting to avoid glare.❌ Selfie issues – Eyes closed, face covered, or poor lighting.❌ Expired or invalid document – Ensure your ID is valid and up to date.
If your verification fails, Bitget will email you with specific reasons and instructions on how to correct the issue.
Step 4: Submit Your Verification
After uploading all required documents, click [Confirm].
Your KYC application will be processed within 1 hour (sometimes up to 4 hours during peak times).
Step 5: Review Process & Approval
Your status will change to [Reviewing] while Bitget’s team verifies your documents.
If approved, your account will be fully verified, and you’ll gain access to all trading features.
Step 6: What If Your KYC is Rejected?
In rare cases where your application is denied:
You will receive an email explaining the reason for rejection.
Follow the provided instructions and re-submit your documents.
Ensure all images are clear and information matches your Bitget account details.
☘️🚀🚀🚀Click Register on Bitget Exchange Here https://www.bitget.com/
Sign Up for a Bitget Account on the App
Follow these simple steps to register on Bitget using the mobile app:
Step 1: Download the Bitget App
1. Open the App Store (iOS) or Google Play Store (Android).
2. Search for "Bitget" and tap Install.
3. Once installed, open the app.
Step 2: Start the Registration Process
1. Tap "Sign Up" on the welcome screen.
2. Choose how you want to register:
o By email
o By phone number
Step 3: Enter Your Details
If registering with email, enter your email address and create a strong password.
If registering with phone number, select your country code and enter your phone number.
✅ Tip: Use a strong password with a mix of uppercase, lowercase, numbers, and symbols for better security.
What is Bitget?
Bitget is a global crypto exchange that offers spot trading, futures trading, and copy trading. Launched in 2018, it has quickly gained popularity, especially among futures traders. The platform is known for its low fees, advanced trading tools, and a strong focus on security.
If you're wondering, “Is this crypto exchange safe & legit?”, I’ll cover that in detail below!
Key Features of Bitget
Here’s what makes Bitget stand out:
✅ Futures Trading – Offers high leverage with advanced trading options.
✅ Spot Trading – A wide range of cryptocurrencies available for trading.
✅ Copy Trading – Follow expert traders and copy their trades automatically.
✅ Low Fees – Competitive trading fees compared to other exchanges.
✅ Security – Strong security measures, including 2FA and cold storage.
✅ User-Friendly Interface – Suitable for both beginners and professional traders.
Now, let’s break down the pros & cons of Bitget.
Pros & Cons of Bitget
✅ Pros
User-Friendly Interface – Easy to navigate, even for beginners.
Futures and Derivatives Trading – High leverage and multiple trading pairs.
Copy Trading – Unique feature that allows you to follow top traders.
Competitive Trading Fees – Lower than many other exchanges.
Strong Security – 2FA, cold storage, and withdrawal whitelists.
Active Support – A dedicated Bitget support page for quick assistance.
Cons
Limited Fiat Deposit Options – Buying crypto with fiat can be tricky.
Not Available in Some Countries – Regulatory restrictions apply.
Futures Trading Can Be Risky – High leverage means high risk for new traders.
👉🚀🚀🚀Open Account Bitget today & Claim your $6200 worth of BTC Welcome Gift
Is This Crypto Exchange Safe & Legit?
Security is one of my biggest concerns when using an exchange. So, is Bitget safe and legit?
The answer is YES! Bitget has a strong reputation for security and compliance. Here’s why:
✅ Regulatory Compliance – Bitget is registered in multiple jurisdictions and follows strict regulations.
✅ Cold Storage for Funds – A majority of user funds are kept in secure offline wallets.
✅ Two-Factor Authentication (2FA) – Extra protection for logins and withdrawals.
✅ KYC Verification – Helps prevent fraud and ensures account security.
While no exchange is 100% risk-free, Bitget takes strong security measures to protect its users.
Where to Find Help: Bitget Support Page
If you encounter any issues during Bitget sign-up, don’t worry! You can visit the Bitget support page to find:
✅ FAQs – Answers to common registration and trading questions.
✅ Live Chat – Get real-time assistance from the support team.
✅ Help Tickets – Submit a request if you need further assistance.
Conclusion
Signing up on Bitget is quick and easy! Just follow these steps, and you’ll be ready to start trading in no time. Remember to enable security features and complete KYC to make the most of your account.
If you ever need help, the Bitget support page is always available to assist you. Happy trading! ✅
Got any questions? Drop them in the comments, and I’ll be happy to help! 😍
