Oct-5-26
721 west 2nd Ave Spokane WA
When AI Art Goes BIG — and Why the Right Preparation Makes All the Difference
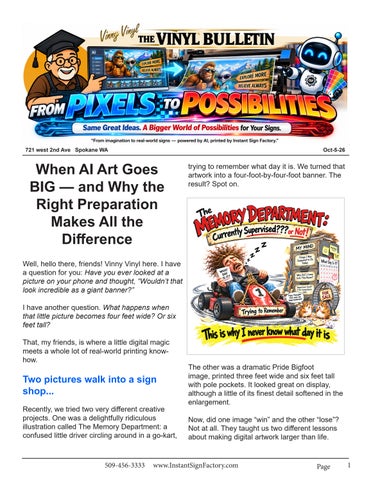
trying to remember what day it is. We turned that artwork into a four-foot-by-four-foot banner. The result? Spot on.
Well, hello there, friends! Vinny Vinyl here. I have a question for you: Have you ever looked at a picture on your phone and thought, “Wouldn’t that look incredible as a giant banner?” I have another question. What happens when that little picture becomes four feet wide? Or six feet tall? That, my friends, is where a little digital magic meets a whole lot of real-world printing knowhow.
Two pictures walk into a sign shop... Recently, we tried two very different creative projects. One was a delightfully ridiculous illustration called The Memory Department: a confused little driver circling around in a go-kart,
509-456-3333
The other was a dramatic Pride Bigfoot image, printed three feet wide and six feet tall with pole pockets. It looked great on display, although a little of its finest detail softened in the enlargement. Now, did one image “win” and the other “lose”? Not at all. They taught us two different lessons about making digital artwork larger than life.
www.InstantSignFactory.com
Page
1
can sometimes remain beautifully clear while a photorealistic image needs more careful preparation. “Can’t you just sharpen it?” Oh, if only there were a giant button labeled “MAKE EVERYTHING PERFECT!” Photoshop sharpening can make edges appear crisper. It helped our illustrated Memory Department artwork. But sharpening is not a magic detail factory. On realistic fur, faces, and delicate textures, too much sharpening can create halos and strange-looking patterns. The better plan is to begin with the strongest image possible, enlarge thoughtfully, and check a small sample at the size it will actually print. Five questions to ask before making your image BIG What am I making? A banner, wall graphic, decal, poster, and fine-art reproduction can
Why does one image enlarge better than another? Imagine drawing a bold cartoon with clean lines and strong colors. The important shapes are easy to recognize. Now imagine a realistic Bigfoot with thousands of tiny hairs, subtle lighting, shadows, and textures. That second image has much more intricate information to preserve. When you enlarge either picture, the computer must spread its existing pixels across a bigger surface. Some software can estimate new detail, but it cannot guarantee the missing information is genuine. That is why an illustration
2
Page
www.InstantSignFactory.com
509-456-3333
509-456-3333
www.InstantSignFactory.com
Page
3
Bigfoot image for a six-foot banner. Keep the face detailed, leave room at the top and bottom for pole pockets, and don’t put important wording close to the edges.” For a cartoon, you might say, “I want a playful illustration for a four-foot-square banner. Use bold colors, clear outlines, simple shapes, and room for the title. I’ll add the final text separately.” The more clearly you describe the job, the easier it is to evaluate whether the artwork is suitable. You may still need revisions. That’s normal!
have very different expectations. How big will it be? Tell your designer or AI assistant the actual finished width and height before the image is created. How close will people stand? A banner across a room can be judged differently from a framed art print viewed inches away. What details matter most? A character’s eyes, an artist’s brushwork, and a company logo may need special attention.
What about those mysterious DPI numbers? People often hear “300 DPI” and assume that makes any picture printable at any size. Not quite! A picture has a certain number of pixels. Stretch those pixels over more inches and the effective resolution goes down. Changing a resolution label without adding real detail doesn’t fix that. The right amount of detail depends on the product, the material, and how the finished piece will be viewed. That’s why the best question isn’t just “What’s the DPI?” It’s “Will this image look good at this size, for this purpose?” The tiny test that can save a giant disappointment Before committing to a huge print, print a small section at the actual final enlargement. Pick the most demanding part: perhaps a face, fine fur, lettering, or a delicate color gradient.
Look at that sample up close. Then step back to Where will it be finished? Pole pockets, hems, the distance where people will normally see the grommets, and trimming can cover important parts of an image unless space is planned ahead. finished sign. If the important details look good, you have much better evidence that the whole How do I talk to an AI image generator? project will work. Here’s Vinny’s secret: Ask like you’re explaining the job to a real designer. Don’t just say, “Make me a cool Bigfoot.” Say, “I need a tall, realistic
4
Page
And remember: a proof is an investment in confidence, not a sign that something went wrong.
www.InstantSignFactory.com
509-456-3333
509-456-3333
www.InstantSignFactory.com
Page
5
NOV 23
Could my own photos or artwork become a banner? Absolutely worth exploring! Phone photographs, drawings, original paintings, digital illustrations, and AI-assisted creations can all be candidates for large-format printing. But not every source file will support every size equally well. If you are bringing in someone else’s art, make sure you have the rights or permission needed to reproduce it. And if the artwork contains a business logo, brand color, or important wording, have those details checked carefully before printing. Vinny’s final word Folks, I love a big idea. And I especially love seeing that idea hanging on a wall, welcoming people into an event, or making someone stop and smile. The exciting thing about AI is that it can help people imagine artwork they might never have tried before. The important thing about a good sign shop is knowing how to turn that imagination into something real. So don’t be afraid to dream BIG. Just remember to plan BIG, prepare BIG, and proof BIG, too. Because when creativity meets the right production process, those little pixels can turn into some mighty big possibilities!
6
Page
www.InstantSignFactory.com
509-456-3333
WHY BIGFOOT AND THE MEMORY DEPARTMENT? Two Unusual Ideas. Two Very Different Printing Challenges. You might be wondering why we chose a larger-than-life Bigfoot celebrating Pride and a hilarious cartoon called The Memory Department to demonstrate AI artwork and large-format printing. The answer is simple: We wanted to have some fun while putting AI-generated artwork to the test! At Instant Sign Factory, we believe creativity shouldn’t be limited to ordinary subjects. Sometimes the most unusual ideas provide the best opportunities to experiment, learn, and discover what’s possible. For this project, we deliberately chose two dramatically different artistic styles. PRIDE BIGFOOT — THE PHOTOREALISTIC CHALLENGE Imagine a larger-than-life Bigfoot celebrating Pride!
509-456-3333
www.InstantSignFactory.com
Page
7
This colorful, imaginative design gave us an opportunity to explore the challenges of enlarging highly detailed AI-generated artwork.
THE MEMORY DEPARTMENT — THE ILLUSTRATED CHALLENGE
The original image included realistic fur, dimensional lighting, detailed textures, and vibrant colors.
Now imagine a department responsible for remembering everything, operated by a fellow who can’t even remember what day it is!
We enlarged the artwork into a 36 × 72-inch banner, complete with pole pockets.
That’s the idea behind The Memory Department.
The finished banner looked great, but we discovered that some of the finest details softened during enlargement.
Our fictional character drives a little gokart in circles while supposedly managing the brain’s filing system. It’s a humorous exaggeration of those everyday moments when our memories don’t cooperate.
That taught us an important lesson: photorealistic AI artwork requires careful preparation, particularly when printing at larger sizes. The Pride theme was simply part of the creative concept—a celebration of individuality, imagination, and self-expression.
We chose this design because its bold cartoon style, strong outlines, and exaggerated features provided an excellent contrast to Bigfoot’s realistic detail. The artwork was enlarged into a 4 × 4-foot banner, and the results were excellent. The illustrated shapes and carefully prepared edges maintained their appearance remarkably well at the larger size. WHAT DID WE LEARN? Both images began as imaginative ideas, but they presented very different production challenges. Bigfoot demonstrated how delicate photographic details can change during enlargement. The Memory Department showed how bold illustration and defined shapes can reproduce successfully at large sizes.
8
Page
www.InstantSignFactory.com
509-456-3333
Neither project was intended to represent a typical advertising design. We deliberately took two unusual ideas to the extreme to see what AI artwork could do when transformed into real, oversized prints. And that’s the exciting part! Whether your idea is funny, imaginative, artistic, personal, or completely unexpected, understanding how to prepare the artwork can make the difference between an image that looks good on a screen and one that looks great on a wall. Our philosophy at Instant Sign Factory is simple: Explore your imagination. Have fun creating. And when you’re ready to make it BIG, we’ll help you make it look good!
509-456-3333
www.InstantSignFactory.com
Page
9
AI Artwork to Large-Format Print Master production guide • Version 2 | October 2026 For artists, customers, designers, and production staff. This is the comprehensive reference guide— not the Vinny Vinyl Bulletin article. Adapt every recommendation to the actual printer, substrate, finishing process, and viewing distance.
1 | The universal job brief • Finished product and dimensions. State exact trim size, orientation, aspect ratio, material, and whether it will be a banner, decal, rigid sign, poster, or art reproduction. • Viewing conditions. Specify typical viewing distance, indoor/outdoor use, lighting, and whether close inspection matters. • Important content. Identify focal point, must-keep details, brand colors, logos, text, and a safe area for hems, grommets, pole pockets, or trimming. • Image requirements. Ask for the highest native resolution available and a clean composition that can be enlarged. Do not assume an AI tool can guarantee a particular DPI or exact pixel dimensions. • Delivery and approval. Request a clean master without mockup shadows, watermarks, or invented logos; confirm permission to use source/reference artwork and obtain customer proof approval. NEW — Define the artistic intent. State the message or emotion, focal subject, hierarchy, background simplicity, negative space, and any approved reference image. For series, explicitly define what must remain consistent. NEW — Decide the approval stages. First approve composition and content; then prepare the enlarged production file; finally approve a representative full-scale proof.
10
Page
www.InstantSignFactory.com
509-456-3333
2 | Three production tracks Track A | Illustrated, graphic, or cartoon AI artwork Best suited to: stylized characters, comic illustrations, bold-color graphics, playful posters, simplified backgrounds, and designs with strong silhouettes and edges. The Memory Department 4 × 4-foot banner is a successful production example. 1. Plan the composition. Specify final aspect ratio, subject, expression, camera framing, negative space, and simple visual hierarchy. Avoid putting essential objects against edges. 2. Request clean illustration. Ask for crisp boundaries, deliberate color blocks, controlled texture, legible silhouettes, and separation between subjects and background. 3. Keep lettering separate when possible. Generate artwork without critical small text; set exact wording in Photoshop, Illustrator, or another design application as editable type or vectors. AI image text can be unreliable. 4. Inspect the native output. Zoom to 100% and inspect fingers, faces, line work, gradients, repeating details, unintended artifacts, and odd lettering. 5. Resize deliberately. Work in Photoshop at final dimensions or a documented scale; use a suitable resampling method. Upscale only as much as needed, in a controlled sequence. 6. Sharpen gently at output size. A restrained Unsharp Mask or Smart Sharpen may help illustrated edges. Watch for white/dark halos, jagged lines, crunchy textures, and amplified noise. 7. Proof before production. Print a representative crop at 100% of final physical size. Review at arm’s length and the expected display distance. 8. Export and archive. Keep layered working file and approved master; export in a format supported by the shop’s RIP with fonts/text handled correctly and embedded color profile where appropriate. Copy-ready AI request: illustrated artwork Create an original [cartoon / graphic illustration] for a [product] printed at [width × height, units], [portrait/landscape], aspect ratio [ratio]. Main subject: [description]. Use strong, clean silhouettes, well-defined edges, deliberate color areas, and readable separation between foreground and background. Place the key subject inside a generous safe area; leave [location] open for wording that will be added later. Avoid tiny details, AI-generated lettering, logos, borders, watermarks, and important elements near finishing areas. Output at the highest native resolution supported. Do not claim the image is print-ready; I will inspect and prepare it in Photoshop.
509-456-3333
www.InstantSignFactory.com
Page
11
Track B | Photorealistic, cinematic, or detailed 3D AI artwork Best suited to: realistic characters, Bigfoot-style imagery, detailed fur, water, natural lighting, skin, fine textures, dimensional environments, and photographic exhibition banners. The 36 × 72-inch Pride Bigfoot banner was visually successful but showed some fine-detail loss at large size. 1. Design for physical size. State final aspect ratio, expected viewing distance, focal area, and finishing clearances before generation. Prioritize believable large forms and clear subject separation. 2. Request coherent natural detail. Ask for consistent fur strands, anatomically plausible features, physically believable reflections and lighting, and natural transitions rather than indiscriminate “ultra-sharp” texture. 3. Inspect for AI artifacts. Check eyes, teeth, hands, anatomy, hair/fur, reflections, background repetitions, inconsistent shadows, and texture that looks painted or melted. 4. Upscale before final sharpening. Try Photoshop Camera Raw Enhance/Super Resolution when compatible with the source and workflow, or a trusted image upscaler. Compare outputs; invented detail can look convincing but inaccurate. 5. Retouch selectively. Use masks to improve important focal details while avoiding aggressive sharpening on fur, foliage, bokeh, smoke, water, and softly lit backgrounds. 6. Check tonal transitions. Watch for banding in gradients, noise, blocked shadows, blown highlights, edge halos, oversaturated colors, and plastic-looking skin or fur. 7. Print a 100%-size crop. Choose a crop with face/eyes/fur and another with a smooth gradient if needed. Assess from realistic viewing distance, not only at 100% monitor zoom. 8. Approve the real print. Compare a proof to intended use. A slight loss of close-up microdetail may be acceptable on a six-foot banner but not on a close-view fine-art reproduction. Copy-ready AI request: photorealistic artwork Create an original photorealistic [scene/character] for a large-format [banner / print] at [width × height, units], aspect ratio [ratio], normally viewed from [distance]. Show [main subject and action] with coherent anatomy, natural lighting, realistic depth, believable materials, and carefully rendered facial/ foreground detail. Keep the composition clean and the subject distinct from the background. Preserve extra space for [pole pockets / hems / grommets / trimming] and leave [area] free for separately typeset wording. Avoid artificial over-sharpening, repeated textures, unnatural fur, invented logos, watermarks, and tiny essential details. Provide the highest native resolution supported; do not invent claims about DPI or print readiness.
12
Page
www.InstantSignFactory.com
509-456-3333
Track C | Fine-art, conservation, and reference-led series Best suited to: gallery reproductions, educational collections, botanical or wildlife portraits, museumstyle posters, and consistent multi-image series. Based on the approved When the Last One Is Gone / Sudan reference workflow. 1. State the artistic purpose. Define what the image communicates. For the conservation collection, a dignified living subject represents the species and white negative space represents its absence. 2. Fix composition before generating. Use a horizontal 4:3 canvas, place the subject left or right, and reserve approximately two-thirds of the canvas as uninterrupted pure-white negative space. Keep the subject anatomically complete and visually strong. 3. Control habitat and light. Keep environmental elements minimal, gently fading into white. Avoid heavy scenery, strong background shadows, frames, and decorative clutter. 4. Use an approved visual anchor. The Sudan northern white rhinoceros poster (2018) is the collection’s reference for relative subject scale, detail, lighting, whitespace, and text hierarchy. Supply the reference where the AI platform supports it. 5. Treat species information as research. Verify scientific name, physical appearance, last confirmed year, and ecological role from reliable references. Distinguish extinction from extinction in the wild and avoid unsupported ecological claims. 6. Keep typography restrained. Position the common name, italic scientific name, final confirmed year, and one ecological-role sentence beneath the subject—centered within the subject’s area, not the entire canvas. For reliable production, typeset final text separately. 7. Review before enlarging. Approve anatomy, subject scale, white-space balance, typography placement, and historical/scientific details before print preparation. 8. Prepare and proof the file. For the collection, the target is 48 × 36 inches (4:3), 14,400 × 10,800 pixels at 300 PPI, PNG, RGB working file, white background. These are target output specifications, not guaranteed native AI generation capabilities. Verify actual pixels, resampling, color profile, and a full-size proof. Copy-ready AI request: fine-art series Create an original, dignified, scientifically grounded portrait of [species] for a horizontal 48 × 36-inch fine-art print (4:3). Position the living subject on the [left/right], preserving approximately two-thirds of the canvas as pure white negative space. Render the subject with accurate anatomy, natural illumination, crisp but believable detail, and only minimal habitat fading softly into white. Do not crop important features or add borders. Follow the supplied approved Sudan artwork for relative scale, hierarchy, and restrained mood, if reference images are supported. Reserve space directly beneath
509-456-3333
www.InstantSignFactory.com
Page
13
the subject for separately typeset common name, scientific name, final confirmed year, and one verified ecological-role sentence. Generate the highest native resolution available. Present artwork for approval first; do not claim that requesting 14,400 × 10,800 pixels or 300 PPI guarantees those properties in the generated file.
3 | Working with ChatGPT, Gemini, Claude, Firefly, Copilot and other AI The production-brief method is broadly transferable. Actual image generation, reference-image handling, editing, export dimensions, and commercial-use terms vary by tool, model, plan, and version. Verify capabilities and license terms before use. Platform / category -Best use of this guide -Important qualification ChatGPT image tools -Draft and revise images with detailed briefs and references -Verify actual exported pixels and edits Google Gemini image tools -Generate/edit imagery; use supported references -Image options depend on model and account Adobe Firefly -Image creation and style/composition workflows -Controls vary by model; check commercial terms Microsoft Copilot image tools -Concept and image creation -Output and editing features vary by product Claude -Research planning, briefs, critique, prompt drafting -Not a native photorealistic image generator
14
Page
www.InstantSignFactory.com
509-456-3333
-FLUX and other image models -Generate with the same structured brief Reference/edit capabilities depend on model/interface Cross-platform method: (1) write the complete brief, (2) provide approved references when supported, (3) generate and inspect, (4) request one targeted change at a time, (5) export and verify pixels, (6) prepare separately in design software, (7) print a full-scale proof.
4 | Resolution and print-size planning Pixel dimensions = finished inches × target PPI. Effective PPI = actual pixels ÷ printed inches. A 300 DPI/PPI metadata tag alone does not add image information. Large signs often need less effective PPI than close-view artwork; use proofing and viewing distance to decide.
Finished size -Aspect ratio-
Pixels at 300 PPI (reference only) 8 × 10 in
4:5 2,400 × 3,000
18 × 24 in 3:4 5,400 × 7,200 24 × 36 in 2:3 7,200 × 10,800 36 × 48 in 3:4 10,800 × 14,400 48 × 36 in (horizontal) 4:3 14,400 × 10,800 48 × 96 in 1:2 14,400 × 28,800 Example: a 4,096-pixel-wide image at 48 inches wide provides approximately 85 effective PPI before resampling. This may be appropriate for some distance-viewed banners but may fall short for a closeview fine-art print.
5 | Production workflow and quality control How to ask ChatGPT or another AI for better results Give the whole brief, not just the subject. “Bigfoot with a flag” is a concept; a production brief also specifies 36 × 72 inches, portrait orientation, where pockets go, safe area, viewing distance, realism, and where text will be placed. Use reference images carefully. Supply approved character or brand references when the tool
509-456-3333
www.InstantSignFactory.com
Page
15
supports them; explain what must remain consistent. Verify usage rights and do not expect exact likeness or perfect text reproduction. Ask for one change at a time. If an image is close, request specific edits such as “more negative space above the head” rather than a vague complete redesign. Save approved versions. Ask for a preflight review. Prompt: “Review this image for enlargement risks: fine detail, edges, gradients, anatomy, typography, cropping, and finishing clearance. Tell me what to fix before print.” Do not confuse pixel count and DPI. Pixel dimensions describe the data available; PPI is pixels divided by physical print inches. A file tag of 300 DPI does not create additional detail. Production math and quality checks Effective PPI = image pixel dimension ÷ final print dimension in inches. Example: a 4096-pixel-wide file printed 48 inches wide gives about 85 PPI before resampling. That may work at distance on some banners, but it is not a universal pass/fail standard. A close-view art reproduction generally needs more real image detail than a banner seen across a room. Final dimensions and bleed. Set actual trim size, appropriate bleed, and separate finishing-safe zones. Pole-pocket allowance depends on pocket construction and shop finishing method; confirm it rather than assuming a fixed number. Color and output. Keep source profiles organized, soft-proof when practical, use calibrated displays when available, and let the RIP/printer/material ICC workflow determine final color conversion. RGB versus CMYK requirements depend on the specific workflow. File preparation. Keep an editable master; inspect at actual print size; verify fonts, transparencies, image links, and raster effects; follow the RIP’s accepted file format settings. Large-format proof. Print one or two critical sections at final scale; include the face/fur, text/edges, and gradients where relevant. Judge at intended viewing distance and under appropriate light. Record the job. Save original pixel dimensions, target size, effective PPI, upscaling tool/settings, sharpening settings, material, printer/RIP settings, viewing distance, and proof observations. These records turn experiments into a repeatable standard. Red flags: stop and revise before printing Text that is misspelled or baked into the image; faces or hands with AI distortions; a subject cropped by pockets or grommets; jagged illustrated edges; sharpening halos; unnatural photorealistic fur; muddy shadow detail; obvious gradient banding; an image that looks fine on screen but fails a 100%-scale crop; or customer-critical colors that have not been proofed. Two real-world lessons from ISF
16
Page
www.InstantSignFactory.com
509-456-3333
THE MEMORY DEPARTMENT — A 4 × 4-foot illustrated banner made from the approved artwork printed with excellent results. Defined graphic shapes and careful Photoshop sharpening helped preserve the intended look. PRIDE BIGFOOT — A 36 × 72-inch photorealistic-style banner with pole pockets looked good in production, although some fine detail softened. This suggests that realistic texture needs a more cautious upscale-and-proof workflow than bold illustration. The goal is not to promise perfection from every AI file. It is to build a dependable process for deciding which artwork is ready, what needs correction, and what quality is appropriate for the finished product.
6 | Final preflight checklist ☐ Job size, orientation, aspect ratio and intended viewing distance confirmed ☐ Composition, reference consistency, important details and safe areas approved ☐ Customer-supplied reference rights and final text/logo accuracy confirmed ☐ Actual pixel dimensions and effective PPI calculated (not inferred from metadata) ☐ Artifacts, anatomy, sharpness, halos, banding and gradients inspected ☐ Color profile, substrate, RIP settings and finishing allowances verified ☐ Full-size representative print crop reviewed and customer proof approved ☐ Original, edited master, output file and settings archived
7 | Universal copy-and-paste starting prompt Create original [illustrated / photorealistic / fine-art] artwork for [product] with final dimensions [width × height], [orientation], aspect ratio [ratio], and expected viewing distance [distance]. Main subject and message: [description]. Artistic style and lighting: [description]. Place the focal subject [location] and reserve [amount/location] of clean negative space for [text / absence / layout]. Keep essential content away from [trim / grommets / hems / pockets]. Use supplied approved references for [specific consistent elements], if supported. Avoid watermarks, invented logos, incorrect lettering, and distracting artifacts. Generate at the highest native resolution available. Show the artwork for approval first. Do not assume the exported file is print-ready; report actual pixel dimensions when available, and leave final text, resizing, color conversion, and proofing to the production workflow. Production principle: the AI prompt improves creative direction; verified pixels, retouching, typography, color management, and physical proofing determine print readiness.
509-456-3333
www.InstantSignFactory.com
Page
17