4 minute read
DIY Beach Crafts


by Kelly Oden
Seashells, driftwood, seaweed, and feathers are just a few of the eternal wonders of life on the beach. Whether you are here full time or visiting for some much-needed R&R, no doubt your long beach walks will give way to many
treasures. Often, these saltwater delights wind up in a box or a jar never to be seen again. Why not get crafty and create some lasting, one-of-akind art and décor with your unique specimens? The following projects are great for families, but kids may need adult supervision. Let’s get crafty!
Beach Specimen Shadow Box
MATERIALS
• Beach specimens such as shells, driftwood and seaweed from your morning and evening walks • Shadow box frame • Card stock • Embroidery thread and needle • Glue gun and hot glue
DIRECTIONS
1. Cut your card stock so that it fits snugly in your shadow box frame. If you’re using embroidery thread, flip the card stock over and add little dots or lines as a guide for where you’d like to place the thread. 2. Use a needle and thread to embroider your card stock in any pattern you’d like. 3. Arrange your specimen on your card stock. Play around with different placements until you find one that feels just right. Glue your arrangement in place using hot glue. Insert the card stock into the shadow box. 4. This clean arrangement looks great on a wall, shelf or mantle next to other natural objects.
Courtesy of blog.freepeople. com/2013/06/diy-beachspecimen-shadow-box/

Shell Candles
MATERIALS
• Medium to large scallop shaped shells • Glass container • Tea Lights • Microwave
DIRECTIONS
1. Wash and dry shells thoroughly. 2. Remove metal container and wick from tea light. Be sure to remove the metal wick base, but keep it attached to the wick. 3. Place the tea light in the glass container and microwave for two minutes. 4. Use a drop of melted wax to secure wick base and wick to the inside of the shell. 5. Carefully pour the melted wax into the shells. Place shells in the fridge for two hours. 6. Light and enjoy. Don’t forget to blow them out when finished!
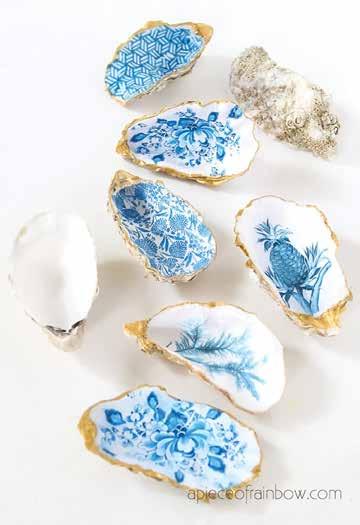
Decoupage Oyster Shell Trinket Dish
MATERIALS
• Large Oyster Shells – save them from your dinner or ask a local seafood market or restaurant for empty shells. If all else fails, they are available on Amazon. • Gloss Mod Podge (or any clear decoupage glue) and a soft brush • Printed napkins or regular copy paper to print your favorite designs (You can download free designs at the link below). • Gold acrylic paint to paint the edges • White acrylic paint to cover darker spots in shells
DIRECTIONS
1. Make sure your oyster shells are clean. If your shells have darker spots on the interior surface, give them a coat of white acrylic paint, especially if you are using thin napkins later. Let the paint dry before the next step. If you are using printed napkins, they are usually double layered. Peel off the back layer which does not have the designs. 2. Cut your piece of design on paper a bit larger than the oyster shell. 3. If you are using copy paper, brush the back side with Mod Podge to soften the paper a little. Skip this if you are using tissue or napkin. 4. Brush a coat of Mod Podge on the inside surface of an oyster shell. Starting from one spot on the inside shell surface, lay the paper or napkin on the spot and gently press the paper down little by little until it covers the entire surface. While the paper is still wet, carefully tear off the excess paper around the edges. 5. Brush a generous coat of Mod Podge over the entire decoupaged surface. This will create a water-resistant surface and make the trinket dish more durable. 6. Use the gold acrylic paint to dab along the edges of the shell.
Courtesy of apieceofrainbow.com/anthropologie-diy-oyster-shell-trinket-dish/
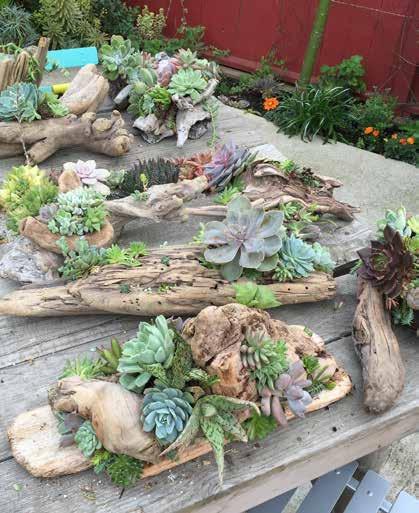

Driftwood Succulent Planter
MATERIALS
• Interesting piece of driftwood • Floral or craft glue • Moss • Assortment of small to medium succulents, depending on the size of your driftwood. • A small bit of soil (optional)
DIRECTIONS
1. The driftwood might have algae or insects on it, so be sure to rinse thoroughly. Lightly dry and place in oven at 250 degrees for two hours. 2. Check for burning every 20 minutes. Remove from oven and let cool. 3. If your driftwood has natural grooves or holes, you can use those for your succulents. If not, drill a few shallow holes in the driftwood where you would like the plants to go. 4. Dampen the moss and set aside. Prepare your succulents by gently removing lose dirt from the roots. 5. Use floral glue or craft glue to glue the moss into grooves or holes. If your grooves are deep enough, adding a little soil under the moss will help the plants develop stronger root systems. 6. Gently plant your succulents by rooting them into the moss. Slightly dampen the roots if necessary. If you are only using succulents, don’t water for two days. These driftwood planters look great as centerpieces, on patios and even hung on a wall.