IsoClear® B XT
Product code: FG00593
Product code: FG00593
IsoClear ® B XT is Astrea Bioseparations ’ caustic - stable resin for the capture & removal of anti - B isoagglutinins.
Isoagglutinins are antibodies (IgM and IgG isotypes) which recogni ze and bind to type A or B blood group antigens. The presence of isoagglutinin antibodies in plasma-derived products (particularly plasma for transfusion and IVIG) can give rise to serious side effects, such as hemolysis, depending upon the type of isoagglutinin present (A or B) and the blood type of the recipient. Historically, individuals of AB blood type has been used as ‘Universal Plasma’ donors as their plasma does not contain isoagglutinin antibodies. However, AB is the rarest blood group possessed by a very low percentage of the population. As a result, AB plasma is in great demand and only available in limited quantities. In addition, regulatory authorities are demanding safer IVIG products with low levels of isoagglutinins, to minimize the risk of agglutination and hemolysis in patients receiving IVIG treatments.
Astrea Bioseparations Ltd and its affiliates have developed two affinity chromatography adsorbents (IsoClear® A XT & IsoClear® B XT) comprising of immobilized trisaccharide blood group antigens (A & B). These antigens are chemically synthesized and covalently attached to PuraBead® 6HF base matrix allowing for caustic stability. IsoClear® XT resins are highly selective for the removal of isoagglutinin antibodies, enabling cost-effective and efficient reduction of isoagglutinin titer for plasma and plasma-derived products.

LIGAND: T risaccharide
FUNCTION: F or the c apture of anti - B i soagglutinins
RESIN APPEARENCE: White
MEAN PARTICLE SIZE (µm): 90 ± 10 µm
MATRIX:
6HF (Highly cross-linked 6% nearmonodisperse agarose)
PACKING SOLUTION: 0.1 M NaCl
OPERATIONAL FLOW RATES: Up to 600 cm/h
OPERATING PH: pH 4.0 to pH 7.0
OPERATING CONDUCTIVITY: 5–30 mS/cm
CHEMICAL STABILITY: All commonly used aqueous buffers and co-solvents
CLEANING/SANITIZATION: 0.5 M NaOH
STERILIZATION:
Autoclavable in 0.1 M NaCl solution at 121 °C for 30 minutes
STORAGE: 2–30 °C, 20% ethanol
IsoClear ® B X T resin is supplied in a preservative containing 20% ethano l . Before commencing the column pack, consult the relevant manufacturer’s instructions for the selected column hardware .
M ethod section 1 describes the packing of Astrea Bioseparation s ’ IsoClear ® B XT into axial 1 cm diameter column with a 1 .6 cm bed height .
Method section 2 describes packing into axial 1 cm and 1.6 cm diameter columns with a 10 cm bed height.
(Qualified in a 1 cm diameter column with a 1.6 cm bed height)
1. Allow all materials to equilibrate to the temperature at which the chromatography process is to be performed.
2. Determine the % slurry of the resin by agitating the resin in the bottle to form a complete slurry. Pour out ~15 mL into an appropriate measuring cylinder or 1 cm diameter column. Leave to settle for a minimum of 3 hours. Calculate the % slurry:
Slurry % calculation:
3. Calculate the volume of slurry you require. Compression factor (CF) of 1.19 (1.15–1.23) is recommended:
Column volume (CV) calculation:
Where ‘r’ is the radius of the column hardware in cm and ‘BH’ is the target bed height in cm.
Slurry volume (SV) calculation:
Where ‘CV’ is the column volume calculated above, ‘CF’ is the compression factor, and ‘slurry percentage’ is the slurry as calculated above.
4. Measure out the calculated volume of slurry required.
5. Assemble the column and remove air from the dead spaces by flushing the end piece and adaptor with storage solution then close the column outlet.
6. Carefully pour the resin slurry into the column in a single, continuous step. Pouring the slurry down the side of the column helps to prevent air becoming trapped within the resin bed. Use a packing reservoir if required.
7. Allow the resin to settle, leaving a dead volume of packing solution above the resin bed. If needed, add packing solution (0.1 M NaCl) to the top column up until full.
8. Attach the top adaptor to the workstation and flush with packing solution. Loosen the attachment of the top adaptor to the workstation to allow liquid to flow out and carefully add the top adaptor to the top of the column. Avoiding the introduction of air bubbles, adjust the adaptor to the top of the bed (Note: Bed will drop as you insert the adaptor), tighten the connection to the workstation, and tighten the adaptor into place.
9. Open the column outlet and apply a flow rate of 850 cm/h. To avoid bed compression on operation, ensure that the packing pressure is higher than the operational pressure at the process step with the highest pre-column pressure Aim for an operational flow rate/pressure of up to 75% of the column packing flow rate/pressure
10. After ≥8 CV, stop the flow and close the column outlet.
11. Mark a bed height of 1.6 cm on the column. Lower the top adaptor by loosening the top adaptor seal (the top adaptor must allow free flow from the workstation either by loosening the top adaptor connection or, if present, switching the top valve to waste) and drop the adaptor to the 1.6 cm bed height line.
Note: Once the flow is paused, the bed may relax and rise.
12. Re-tighten the top adaptor (if loosened) and attach back to the workstation (or switch valve back in-line). Open the bottom outlet and apply the packing flow to the column again for at least 8 CV. If a space is formed between the top of the bed and the adaptor mark where the bed compressed to, repeat the steps above dropping the adaptor to the marked position. If no space forms, the column is packed and ready to use.
(Qualified in 1 cm and 1.6 cm diameter columns with a 10 cm bed height)
1. Allow all materials to equilibrate to the temperature at which the chromatography process is to be performed.
2. Remove the storage solution by draining and washing at least 5 times with the packing solution (0.1 M NaCl).
3. Weigh out an excess amount of settled resin to pack the column. Create a 60% slurry by mixing the resin with an appropriate volume of packing solution:
4. It is recommended to verify the % slurry by resuspending the resin until fully homogeneous and pipetting an appropriate amount of resin slurry into a small measuring cylinder (25 mL or smaller) in triplicate, leaving it to settle for at least 1 hour.
5. Calculate the % slurry as follows:
Slurry % calculation:
6. Calculate the average of the three % slurry preparations from the measuring cylinders this should fall within 50–65% range. If it is outside of this range, it is recommended to reprepare the slurry.
7. The compression factor (CF) is defined as the bed height (BH) achieved after settling by gravity divided by the bed height achieved after packing under flow. The CF is used to calculate the required resin volume for a target bed height and subsequently the required slurry volume.
8. It is important to accurately determine the required slurry volume in order to achieve a good pack. The compression factor recommended when packing IsoClear® B XT to a 10 cm bed height in a 1–1.6 cm diameter column is 1.10 ± 0.03.
9. To calculate the amount of resin to add to the column, the column volume and slurry percentage are calculated as follows:
Column volume (CV) calculation: �������� = ���� × ����2 × ��������
Where ‘r’ is the radius of the column hardware in cm and ‘BH’ is the target bed height in cm.
Example (0.5 cm diameter, 10 cm BH column): �������� = ���� × 0 52 × 10 = 7 85 ��������
Slurry volume (SV) calculation:
10. Assemble the column and remove air from the dead spaces by flushing the end piece and adaptor with packing solution (0.1 M NaCl), then close the column outlet.
11. Carefully pour the resin slurry into the column in a single, continuous step. Pouring the slurry down the side of the column helps to prevent air becoming trapped within the resin bed. Use a packing reservoir if required.
12. Allow the resin to settle for at least 1 hour 15 mins ± 10 mins in the column, leaving a dead volume of packing solution above the resin bed. After settling, if needed, add 0.1 M NaCl to the top column up until full.
13. Attach the (open) top adaptor to the top of the column and adjust the adaptor to the top of the bed. Note: The bed might drop further as you add the top adaptor in. The adaptor should be dropped to wherever the bed drops to.
14. Tighten the adaptor and attach to the workstation, ensuring no air enters to the tubing.
15. Open the column outlet and apply a flow rate of 1100 cm/h for 5 CV. To avoid bed compression on operation, ensure that the packing pressure is higher than the operational pressure at the process step with the highest pre-column pressure. Aim for an operational flow rate/pressure of up to 75% of the column packing flow rate.
16. Once the resin has packed (after ≥5 CV), measure and mark the bed height under packing flow; close the column outlet and stop the liquid flow through the bed.
17. Lower the top adaptor by loosening the top adaptor seal (the top adaptor must allow free flow from the workstation either by loosening the top adaptor connection or, if present, switching the top valve to waste) and drop the adaptor to the bed.
Note: Once the flow is paused, the bed may relax and rise.
18. Re-tighten the top adaptor (if loosened) and attach back to the workstation (or switch valve back in-line). Open the bottom outlet and apply the packing flow to the column again for at least 5 CV.
19. If a space is formed between the top of the bed and the adaptor, repeat the steps above. If no space forms, the column is packed and ready to use.
1. Attach the column packed according to the ‘Column packing’ section above to a workstation primed with a mobile phase solution of equilibration buffer or 0.1 M NaCl.
2. Commence flow of mobile phase at 100 cm/h for at least 1 CV, ensuring that the column is equilibrated and a baseline obtained.
3. Inject 2% CV of a 1 M NaCl solution.
4. Continue flow until a conductivity peak is observed, and the trace has returned to baseline (≥1.5 CV).
Asymmetry determination
Determine the asymmetry (As) factor as follows: �������� = �������� ��������
Where ‘BC’ is the peak tail width at 10% peak height and ‘CA’ is the peak front width at 10% peak height.
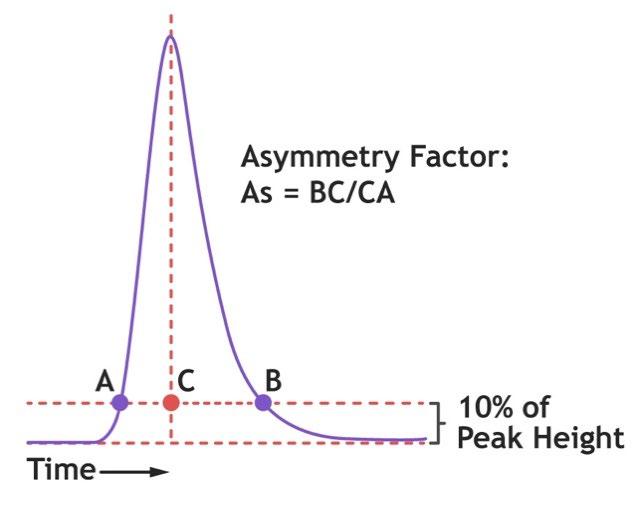
A typical acceptable range for asymmetry factor for packed IsoClear® XT is between 0.8 to 2.0, but the required range should be qualified to each process/application.
Asymmetry trouble shooting
As >2.0 (tailing) indicates that the column is underpacked. For asymmetry values significantly above 2.0, aim for a higher compression factor.
As <0.8 (fronting) indicates that the column is overpacked. For asymmetry values significantly below 0.8, target a lower compression factor.
Determine the HETP and N values as follows:
Theoretical plates (N) value is a measure of the peak broadening and can be used to determine the column efficiency. The higher the plates value, the less dispersion and the more efficient peaks and separation. The plates (N) value is calculated by:
Where ‘VR’ is the retention volume and ‘Wh’ is the peak width at half of the peak height.
HETP (H) is used to determine the column efficiency and corresponds to the distance between each plate. HETP is calculated by:
Where ‘L’ is the length of the column (bed height) and ‘N’ is the number of theoretical plates (as calculated above)
Plate count range required for the column should be verified for each process/application. The typical theoretical plates per meter count for an acceptable pack is ≥1800 N/m.
HETP trouble shooting
If the calculated plates/meter value is significantly below 1800 N/m, repack the column and repeat column efficiency testing.
The lower the HETP value (the higher the plate number), the more efficient the column is. When measured over time, the HETP can be used to monitor the column performance. If the HETP value increases, this indicates a reduction in the column performance and the column should be repacked
Note: The following recommendations are not prescriptive. A thorough investigation of these parameters at small-scale should be conducted to reveal the level of flexibility that can be tolerated with the chromatography resin, buffer, and protein combination selected. IsoClear ® A XT column kits are also available for screening experiments.
The following method is recommended (as a starting point) using a 1–2 mL column volume in a 0.5 or 1 cm diameter column. An initial flow rate to give a 1-minute residence time for the column chromatography steps should be used. Subsequent increases/decreases in the flow rate can be investigated to improve binding capacity or decrease processing times. An operational flow rate of up to 75% of the column packing flow rate can be used.
Filter all buffers and feedstock through an appropriate filter, prior to running the column.
Equilibrate the column with up to 10 CV of equilibration buffer. The equilibration buffer should match the pH and conductivity of the feedstock or an appropriate pH buffer for operating range pH 4.0–7.0 (sodium acetate/sodium phosphate) with the feedstock adjusted to match the buffer
Note: NaCl may interfere with binding of isoagglutinins, so its presence should be fully investigated. In the first instance, if NaCl is required, a maximum of 250 mM NaCl is recommended. If low clearance of isoagglutinins is observed, NaCl concentration should be reduced further.
Apply the clarified/filtered protein feedstock onto the equilibrated column. High titer feedstock up to 1/128 (isoagglutinin agglutination level) can be loaded. The recommended starting residence time is 1 minute but residence time can be increased to 5-minutes if backpressure at 1 minute is too high
Remove any non-bound material from the column with up to 10 CV of 50–500 mM NaCl added to the equilibration buffer, or until the UV trace returns to baseline.
It is recommended to strip the column prior to cleaning the column. This can be done with 1 M acetic acid.
If the isoagglutinins need to be eluted under milder conditions, 50 mM glycine pH 3 or equilibration buffer with 1 M NaCl can be used.
After each use, the resin should be regenerated with at least 2 CV of a high-salt buffer (1.0 M NaCl).
Effective cleaning is essential for maintaining IsoClear® XT resin performance, especially with plasma-derived feedstocks that contain lipids, nucleic acids, denatured proteins, and other fouling species. The recommendations below are based on chromatography cleaning guidelines and affinity-resin CIP best practices, adapted for IsoClear® XT. This maintains column efficiency, capacity, and separation performances.
5.1 General cleaning strategy
NaOH is the standard primary recommended cleaning and sanitizing agent for IsoClear® XT resins
Recommended CIP cycle:
• 5–10 CV of 0.5 M NaOH to give a >30-minute contact time
• Optional: combine NaOH with 0.5–1 M NaCl to enhance removal of tightly bound proteins and improve sanitization efficiency
• Rinse with ≥5 CV equilibration buffer until pH returns to baseline
IsoClear® XT has demonstrated stability under extended exposure to NaOH, supporting its use in robust cleaning operations, including those required for complex plasma feeds.
5.2 Specific cleaning recommendations by fouling type
The following cleaning processes outline recommended approaches for resins fouled by different classes of impurities.
Protein and aggregate fouling
• 1.0 M NaOH
• 5–10 CV, to give a 20- to 30-minute contact time
• Rinse with ≥5 CV equilibration buffer until pH returns to baseline
• Removes denatured proteins, fragments, aggregates, host-cell proteins, and nucleic acids
Lipid/lipoprotein/membrane fouling (common in plasma)
• 30–40% isopropanol (IPA) in water
• 5–10 CV, to give a 10– to 20-minute contact time
• 5–10 CV of 0.5 M NaOH to give a >30-minute contact time
• Rinse with ≥5 CV equilibration buffer until pH returns to baseline
Enhances disruption of hydrophobic fouling species; typically found in lipid-rich feeds. Follow with NaOH CIP process immediately afterwards.
Metal ion/precipitate fouling
• 50–100 mM citric acid
• 5–10 CV, to give a 10– to 20-minute contact time
• Rinse with ≥5 CV equilibration buffer until pH returns to baseline
• 5–10 CV of 0.5 M NaOH to give a >30-minute contact time
• Rinse with ≥5 CV equilibration buffer until pH returns to baseline Chelates metal contaminants that may accumulate when processing plasma intermediates
Stubborn organic or aggregated material
• 6 M guanidine-HCl or 8 M urea
• 3–5 CV, to give a short contact time of 5–10 minutes
For plasma-derived feedstocks, it is recommended to clean after every cycle due to high fouling potential. Because IsoClear® XT is NaOH-stable, a CIP-after-each-run strategy is appropriate and ensures consistent IgG recovery.
If the column is to be stored for future use, place the column into the storage solution (20% ethanol is recommended) and store at 2–30 °C.
This section provides guidance on optimizing performance of IsoClear® A and B XT resins for isoagglutinin removal while maintaining high IgG recovery.
In the first instance, it is recommended to perform a column run in line with the conditions stated above The results from this initial column run can guide how to optimize the column conditions.
Optimization should be performed at small scale before implementation in process-scale operations, as feedstock matrix, IgG concentration, and isoagglutinin titer can influence the required column volume, pH, conductivity, and residence time.
7.1 Critical parameters affecting performance
Loading pH
pH strongly influences isoagglutinin binding selectivity and IgG recovery.
Internal studies show IsoClear® XT achieves ≥2-titer reduction in isoagglutinins between pH 4–7, with pH 5 providing the optimal balance of IgG recovery and isoagglutinin clearance.
If isoagglutinin clearance is lower than required, screening the resin between pH 4–7 is recommended.
e.g., Adjust equilibration and load to pH 4.0, 5.5, and 7.0 and assess isoagglutinin breakthrough. Use the results from this to guide further investigation of the experimental space (if required).
If recovery of IgG is affected with the change of pH, this can be further optimi zed by conductivity adjustments (see ‘Conductivity’ section) and has been observed at the higher end of the recommended pH range.
IsoClear® XT resins give consistent isoagglutinin clearance across a conductivity range of 2–30 mS/cm, corresponding to ~0–250 mM NaCl in acetate buffers. Performance has been demonstrated to be stable in this range with ≥2-titer reduction in isoagglutinins.
If IgG recovery requires improvement at the selected pH conductivity can be optimized to deliver 98–99% IgG recovery.
Recommended actions:
Increase the conductivity by adding NaCl to the equilibration buffer and load up to 30 mS/cm (250 mM NaCl).
Alternatively, NaCl can also be added to the post-load wash buffer up to 500 mM NaCl to improve recovery
Residence time
Both 1-minute and 5-minute residence times (RT) have been demonstrated to achieve excellent IgG recovery. Longer residence time improves isoagglutinin capture, but 1-minute residence time can still achieve ≥2-titer reduction.
Recommended actions:
If isoagglutinin clearance is lower than required after pH adjustment i ncrease residence time. It is recommended to screen up to a 5-minute residence time.
If cycle time must be minimized screen as low as a 1 -minute RT but faster flow rates should be qualified for acceptable isoagglutinin clearance and the backpressure is within acceptable limits.
Recommended starting residence time:
1 minute, increasing if needed based on feedstock tit er
Load titer and feedstock variability
IsoClear® XT performs robustly with both low- and high-titer feedstocks, achieving 2-titer reduction in both cases when loading identical volumes.
Recommended actions:
If feedstock isoagglutinin titre is high (>1/128), depending on the robustness of the designed process it may be required to reduce load volume or increase residence time to attain the required clearance.
7.2 Example of general optimization workflow
1. Start with pH 5, matched conductivity, 1-minute residence time.
2. Run breakthrough curve on small column (1–2 mL).
3. Evaluate isoagglutinin reduction (titer) and IgG recovery.
4. If requirements not met, adjust parameters in this order:
• Screen alternative pH (4 or 7)
• Optimize residence time (investigate 2 to 5 minutes)
• Conductivity and PLW salt concentration optimi zation
• Reduce load volume
5. Re-verify performance through ≥3 cycles.
FG00593-00500 IsoClear ® B XT
FG00593-01000 IsoClear ® B XT
Astrea Bioseparations also supplies larger volumes of bulk resins for cGMP development and manufacturing-scale processes.
Astrea Bioseparations can also provide column packing services. For more information on this, or any other matters please do not hesitate to contact us at sales@astrea-bio.com