Preparing Your Property After a Disaster 2.
This guide is primarily focused on wildfire recovery, but many of the principles in this section can be applied across different types of disasters, from earthquakes to mudslides. One thing to keep in mind is that while you may want to immediately visit the site of your home or property after a disaster event, there can be many hazards from both physical (unstable structures and unsafe walking conditions) to environmental (toxic air and contaminated water) that you will want to avoid or be prepared to protect yourself from. Please be sure to check with your local Department of Public Health or officials to understand what potential hazards you may encounter and how to protect yourself, including using Personal Protective Equipment (PPE).
As you progress through the stages of cleanup and debris removal, you can and will likely be working concurrently on other activities, such as working with your insurance to determine your payout, establishing a budget for rebuilding, and thinking about what you want to rebuild and how. Architects are here to help even in this early stage; to help you understand all the concurrent activities you have going on and to inform how you think about the rebuilding process. Depending on how quickly you are able to and desire to move through these steps, you can quickly move from site clearance into design and construction with the help of your design team.
Site Cleanup and Clearance
Once a disaster event occurs, federal, state, and local agencies may mobilize to assist with cleanup and clearance, depending on the scale of the disaster and the emergency declarations in place. In some events, property owners may be responsible for coordinating their own cleanup. Even when government assistance is provided, it may not address all conditions on a site.
When government-led cleanup occurs, it may involve coordination among agencies such as:
The Army Corps of Engineers
California Environmental Protection Agency
California Department of Toxic Substances
The local governmental authority at the County or City level (typically)
The goal of these entities will be to remove as many environmental hazards as they can, and to remove and clear any debris or other materials from properties that are preventing recovery and rebuilding activities.
Phase 1: Hazardous Material Removal
This phase is focused on sorting through the materials that remain after an event and removing anything that could potentially cause harm to workers who will conduct future recovery and rebuilding efforts, from debris clearance to construction. These activities are coordinated at the state agency level, and will not require the participation from each property owner, but will instead be conducted independently for the safety of the public. Hazardous materials that are cleared in this phase include things like propane or fuel tanks, lithium batteries, household chemicals, and paint. You will not have to do anything for this activity to take place, and you will be notified once activities are complete. This process can take 2-6 months or more to complete depending on the scope and scale of work required.
Phase 2: Debris Clearance
This second phase can only move forward after Phase 1 is completed, and will be focused on clearing the other physical materials that are present on site to make way for future rebuilding. These activities are conducted by the U.S. Army Core of Engineers or (USACE) and coordinated through state and local agencies, and will require your input as property owner to move forward. Each property owner will be required to fill out a Right of Entry form which confirms your identity as the property owner and states your preferences for activities to be conducted on your site.
Property owners may also have the option to opt in to government-managed debris removal or opt out and hire a private contractor to complete cleanup. Government programs are often provided at no direct cost to the owner but may follow set procedures and timelines, while private cleanup allows owners to select their own contractor
and schedule but is typically paid for by the property owner. These options may vary depending on the scale of the disaster and the programs available in a particular recovery effort.
If you elect to opt in, you will be required to provide documentation about your ownership of the property and other information which may include:
Owner/applicant proof of identification
Property deed or information on ownership (Trust, LLC, etc.)
Insurance information
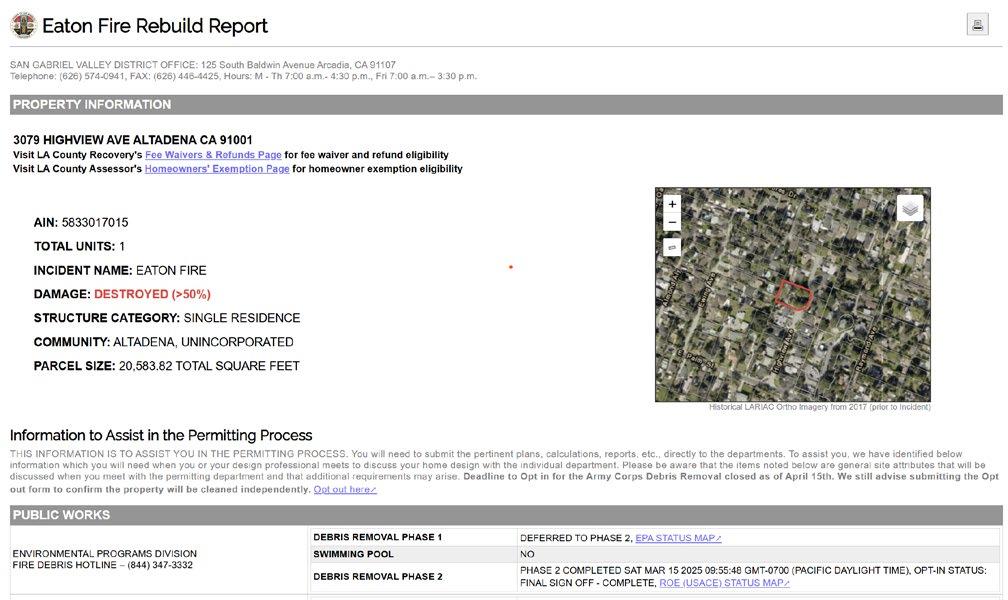
Property information including Assessor’s Parcel Number
Any existing structures, especially below ground
The primary decision that typically has to be made in filling out this form is whether you want to retain any remaining structures on your property, including foundations, retaining walls, or any other damaged structures. Not all jurisdictions will allow for this option, but if they do you will need to give direction on what the USACE will work to keep.
The AIA has consulted with the Structural Engineers Association of California (SEAOC), and our organization has determined that many shallow foundations and small retaining walls/elements are likely not worth preserving given that they have been damaged by heat, may be aged and designed before modern building codes, and will be difficult to preserve. SEAOC has published a memo on this topic [https://www.seaosc.org/News/13468805] which provides additional guidance. An internet keyword search may also be helpful.
Homeowners attempting to re-use foundations should consider the following:
a. Attempting to save foundations may require the homeowner to opt for private cleanup as discussed above or may need to act immediately to evaluate their existing foundations prior to USACE debris removal. To complete this approach a contractor will need to clear enough debris for review by the engineer. It can then be determined if the existing foundation can be used. If so, removal of debris without damaging the foundation will be necessary. If, however, the foundation is unusable then it should be removed.
b. The existing drawings should be available, and the concrete should test to an appropriate strength level. If no drawings are available, significant investigation and testing would be required to reuse the existing foundation.
c. A site review to verify the foundation matches the original drawings and testing to verify reinforcing spacing may be necessary. It may be difficult to examine the condition of foundations until after debris is removed.
d. While this is a nonstructural issue, the jurisdiction will also require that the underground utilities are certified as being acceptable.
e. In some cases, additional environmental testing such as soil testing for contaminants may be available through government programs, nonprofit organizations, universities, or private consultants if homeowners wish to pursue it. Soil may need to be removed and may affect foundations.
Timelines vary widely depending on disaster scale, environmental conditions, and agency capacity. In large wildfire events, debris removal and site clearance may take 6–18 months.
Site Information & Studies
Following a disaster, one of the first steps towards recovery includes gathering as much information about your home and property. This information can be used to support insurance claims, disaster assistance claims, and to rebuild if you choose to do so. The information that is compiled includes any existing documents that you might have on hand, records available at city, county or state agencies, and professionals you have worked with in the past. It will also include documentation that surveyors, engineers, and design professionals can assist in locating and developing.
1. Gathering Existing Information:
Gather existing data and documents that you may have or may request from outside companies or agencies. This includes:
Photographs and videos that show your property as it was before the disaster. Look for prints or digital copies that may have been stored on surviving computers or hard drives, cloud storage, or photo services you may have used in the past.
Locate receipts and purchasing correspondence for possessions that have been destroyed. In many cases, stores and vendors will retain receipts for some amount of time. You may be able to request and retrieve
copies of receipts for big-ticket purchases. These will support your insurance and disaster assistance claims.
If you own your property, you may have a copy of the property’s title report with the deed. If you have trouble locating it, you can visit your county’s records office. You may also request information describing your property from the original mortgage insurance holder.
In many disaster recovery efforts, community organizations may also offer Disaster Case Management services or coordinate Long Term Recovery Groups (LTRGs) to help residents navigate rebuilding decisions, connect with available resources, and understand their recovery options.
Permit history and records are filed at the local jurisdiction that oversees building construction permit review. This is typically your county or city. The permit records will include the size of the permitted building area on your property, a description of the number of rooms and restrooms, building height and number of stories, and plumbing and septic systems, among other information. Drawings of the property may also be found showing topographic information, site plans showing the building footprint, floor plans, etc. All of this information will be useful for validating insurance and disaster assistance claims, or for supporting claim disputes if they arise.
Locate any aerial or satellite images and maps. Services such as Google Earth and Google Maps have helped provide both historic and current satellite imagery through their free platforms.
Request a certified copy of your full insurance policies from your insurers. Typically, owners only have a copy of the insurance certificate and declarations sheet, a short document that summarizes the policy coverage amounts. However, more details of the coverage are included in the full certified policy that may add up to substantially more money than is indicated in the certificate and declarations sheets. Full policies are typically lengthy documents that are not provided unless requested by the policy holder in writing.
In many disaster recovery efforts, community organizations may also offer Disaster Case Management services or coordinate Long Term Recovery Groups (LTRGs) to help residents navigate rebuilding decisions, connect with available resources, and understand their recovery options.
2. Survey & Geotechnical
Once your property has been cleared of debris and hazardous materials, the next critical step in preparing for rebuilding is understanding the condition and characteristics of your site through professional surveys and geotechnical studies. These assessments provide the foundation for safe and resilient reconstruction, especially in areas affected by wildfires, landslides, or other natural disasters. Soil testing for toxicity following the debris removal may be required.
a. Site Survey
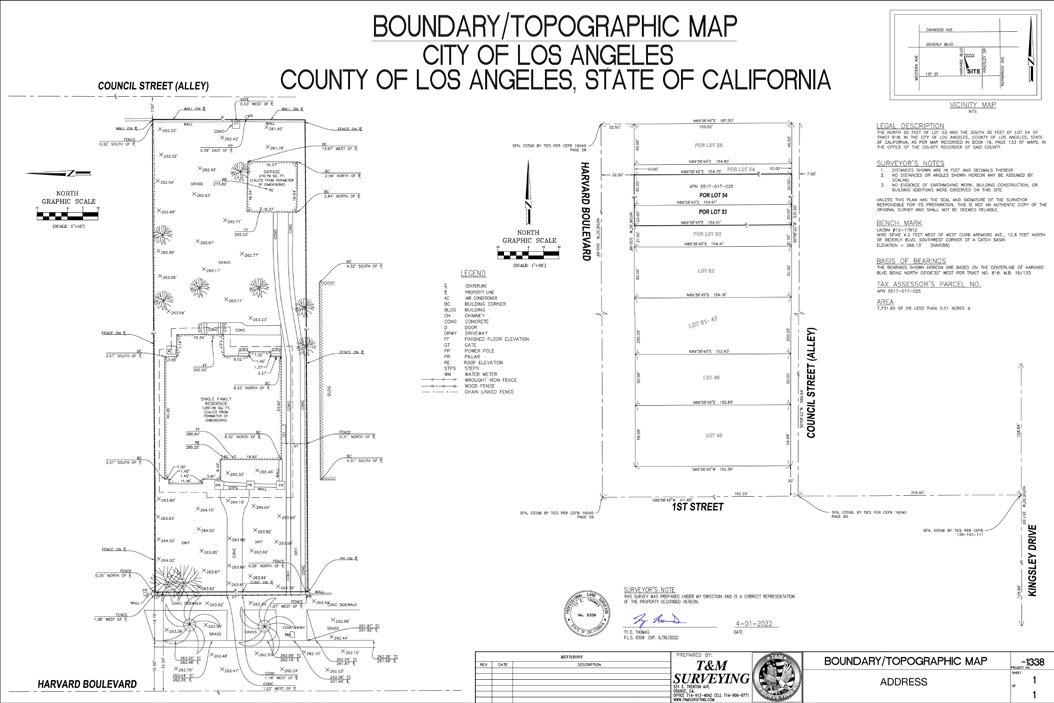
A licensed surveyor will map your property, including boundaries, slopes, and any remaining structures. This ensures that your rebuild will comply with local rules and align safely with the land, which is especially important
for hillside or sloped properties. Accurate surveys help your architects and engineers design a home that works with, rather than against, the natural features of your site.
b. Geotechnical Studies
Geotechnical engineers study the soil and underlying rock to determine if it can safely support your new home. In areas affected by fire, soil may have been weakened or altered, increasing risks like erosion or slope instability. Key elements of these studies include:
Soil testing for stability and strength
Assessment of slopes and potential landslides
Recommendations for foundations, retaining walls, and drainage
Why This Matters
These assessments guide decisions on foundation design, grading, drainage, and hazard mitigation. A surveyor would document any structures or foundations remaining on the property at the time of the survey if the determination by the structural engineer was a recommendation to preserve the foundations. Scheduling surveys and geotechnical work early, after debris removal, prevents delays and ensures your rebuild is safe, resilient, and code-compliant.
Doing this work earlier rather than later will help the design and construction schedules to move quickly and avoid work stoppage and delays.
Example of the LA County Fire Rebuild Report—some jurisdictions may have resources that collect a wide range of information for you about your property, or you may have to go to several different sources to find what you need.
Example of a survey document
Financing Options for Your Rebuild 3.
One of the most difficult aspects of rebuilding is navigating the pathway to financing, especially if you were underinsured or had no insurance. For many, it may not be financially feasible to rebuild, and they instead opt to sell their property and take the proceeds elsewhere.
Ultimately, you have to find the pathway that is right for you, and there are many avenues open to consider. One of the most challenging aspects of rebuilding is understanding current design and construction costs and how they align with your available budget.
This is where design and build professionals can help to provide guidance early on as you assess your options, especially as market conditions can be difficult to gauge when a large number of properties need to be rebuilt post-disaster.
1. Understanding Rebuild Costs
If you have never built a home or other property before, understanding costs and what goes into a rebuild can be confusing. When discussing your rebuild, design and construction terminology may not be consistent. Always ask for clarification. The terms will become familiar as you continue with the rebuilding effort.
A lot of people will talk in dollars per square foot ($/SF) because this is a shorthand way to discuss costs and is one way to compare rough order of magnitude figures. How this figure is constructed may vary depending on who you are talking to, however, we recommend that you discuss this with them, and work to include all of the following elements to get a full Construction Cost:
Hard Costs
Physical materials: This includes everything from structural elements and systems for air conditioning to finishes like flooring, cabinetry, and fixtures such as appliances.
Furnishings: This is something that is easily forgotten–make sure you have enough funds to furnish your property once it’s complete.
Soft Costs
Design fees: Whether you hire an architect, designer, contractor, or design-build team, there will be costs associated with planning and designing your home or property. This includes the labor involved in developing the design with you, preparing drawings, presentation materials, and documentation required for submission to the local authority having jurisdiction (AHJ) for permitting, coordinating with engineers or other specialists, and, in some cases, assisting during bidding and construction. The scope of these services, and how labor is organized, can vary depending on the project delivery approach, such as working with an architect-led team, a design-build contractor, or a prefabricated homes provider.
There may be soft costs to consider for structural engineering, civil engineering, and geotechnical engineering, and other consultants depending on the rebuild option, including interiors, landscape, mechanical, etc.
Your design professional can help explain what services are included and how they relate to the overall cost of your project.
Permitting Fees: There are typically permit fees associated with obtaining rebuild permits from your local authority, though some jurisdictions opt to waive these for rebuilds. Make sure to check with your design team and/or local AHJ to confirm.
Labor: Replace: this is the actual physical activity of building on your site, including everything from pouring concrete foundations to framing walls and roofs to installing plant material and sidewalks.
Overhead/Profit: General Contractors will charge a fee for coordinating the purchase of materials, the work of the subcontractors, and ultimate delivery of your project.
Other Costs to Consider
In addition to these costs, you will need to consider site development costs that may be associated with your property. Depending on the condition of your site once everything has been cleared, you may need the following services to prepare your property for design and construction:
Site survey: Establish your site boundary and existing grading conditions, if other than a flat site. Regrading is very common in lots after debris removal, especially with removal of foundations.
Geotechnical report: Typically required in hillside or high seismic zones to confirm the quality of soils for new foundations.
Additional utility costs: Depending on the condition of your existing sewer, septic, and water systems, you may be required to inspect or survey these. If your systems were very old, you may also need to rebuild or upgrade these connections, therefore it’s important that you understand their condition when assessing your property.
Contingency: It is common to include a contingency allowance in your budget to account for unforeseen conditions, design changes, or price changes that may arise during construction.
2. Understanding Insurance Payouts
If your property was insured, one of the first steps in rebuilding is understanding what your insurance policy will cover and how those funds will be paid out. Insurance settlements can be complex, and it may take time to determine the full extent of your benefits. Taking a few early steps can help you better understand your coverage and prepare for the rebuilding process. Steps to get started:
Request your full insurance policy. Many homeowners only have a summary or declarations page. Request the complete policy document from your insurer so you can understand the details of your coverage.
Review your coverage categories. Typical policies may include coverage for the dwelling, other structures, personal property, debris removal, and temporary housing or “loss of use.” Understanding these categories can help you anticipate how funds may be allocated.
Document losses and communications with your insurer. Keep detailed records of damage, communications, estimates, and payments related to your claim.
Consider professional assistance. Some homeowners choose to work with a public adjuster or other professionals who can help review policies and assist with the claims process.
Rebuilding after a disaster can involve complex insurance claims, contracts, and regulatory requirements. In some cases, homeowners may encounter legal issues during the recovery process and may wish to consult with an attorney experienced in wildfire or disaster-related claims.
3. Other Financing Options
As you begin to get resolution with your insurer (if you have one) and similarly understand rebuilding costs, you may see that there is a shortfall in your budget. While this can feel daunting, we want to provide you with information and resources about alternative pathways to finance your rebuild.
Make sure that you have taken advantage of all options that may be available to you for relief, including forbearance on any existing mortgages or financing you may have, as well as property tax forbearance, to ensure you aren’t paying unnecessarily while you are pursuing rebuilding.
A. Pursue Grant Funding and Low-Cost Loans
Many property owners, including homeowners and businesses, are not aware that a variety of grant and low-cost loan programs may be available to support rebuilding. Some programs are intended primarily for homeowners, while others are designed to assist businesses and commercial properties.
You can also look for opportunities with statewide funds such as the California Community Foundation [https://www.calfund.org/disaster/] and local entities.
You never know what you may find, and we also encourage you to reach out to local institutions that you may have been involved with, such as your church, schools, or employer who may be offering support.
B. Pursue Financing with a Lender
If insurance proceeds and other assistance do not fully cover rebuilding costs, you may consider working with a lender to secure financing that can help bridge the gap between available funds and the total cost of your rebuild.
C. Combining Multiple Financing
Streams
Many rebuild projects rely on a combination of funding sources, such as insurance payouts, grants, disaster assistance programs, and loans, which together may help cover different portions of the rebuilding process.
4. Cost Saving Strategies & Alternate Pathways
One of the biggest challenges faced during rebuilding is managing construction budgets, particularly when insurance coverage does not match current building costs. There are several strategies to help you navigate budget challenges and make informed decisions:
1. Build less square footage than you had previously. Rebuilding a home exactly as it was before a disaster may feel natural, but it can also significantly increase costs, timelines, and complexity. One practical strategy is to reduce the overall square footage (SF) of your new home. This will keep from additional tax assessments on your property as well.
2. Consider phasing over time–build what you can afford now, and design to add on later. Working with an architect or designer to phase your rebuild can make construction more financially manageable. Options might include starting with an accessory dwelling unit (ADU), completing essential rooms first, or planning additional spaces for future construction.
secure financing in stages, and maintain a place to live on your property during the rebuild process.
4. This statewide legislation allows for property owners to split their residential property to develop up to 4 units total, which can be leveraged by the owner or a developer partner. Visit QR code for the SBA Disaster Assistance page. Visit QR code for the SB-9 Legislation page.
D. Different funding sources may cover different portions of your rebuild. Insurance payouts, grants, and loans may each have specific requirements or limitations, so it is helpful to understand how these funds can be combined to support your project and to keep clear records of how each source is used.
3. Building an ADU to live in before your home rebuild can reduce your initial cost. In Los Angeles County, property owners are allowed to occupy an ADU before completing construction on the primary residence. This flexibility can help you manage costs,
Planning, Design, & Construction 4.
Rebuilding after a disaster is not only about replacing what was lost, but also about making thoughtful decisions that reflect your family’s needs, your property’s unique conditions, and future resilience against similar events. One of the most important decisions you will face in this stage is how to structure the rebuilding process and understand who will be part of your team, how responsibilities will be divided, and what delivery method will guide your project from planning through construction.
A. Documenting Your Needs and Priorities for Rebuilding
1. Begin with Reflection
Before diving into drawings or materials, take time to think about how you lived before the event—and how you’d like to live moving forward. Your architect can guide this process through questionnaires, interviews, and visual exercises. Documenting your priorities clearly will save time, reduce redesigns, and help every professional on your team make aligned decisions.
Ask yourself:
What spaces mattered most in your previous home?
What didn’t work or felt inefficient?
What do you want to improve — comfort, safety, energy use, or aesthetics?
How has your family’s lifestyle changed since then?
Write these down. Your answers form the foundation for your project program.
2. Define Your Project Goals
Establish clear, realistic goals early, both emotional and practical.
Examples of goals:
Safety and Resilience: A home that can better withstand future disasters and power outages.
Efficiency: Lower energy and water bills through sustainable systems.
Comfort: Better daylight, acoustics, and indoor air quality.
Community Connection: A design that feels welcoming and supports neighbors rebuilding nearby.
Speed and Budget: Balancing speed of completion with quality of materials.
Prioritize each goal as essential, important, or optional or needs, wants and must have’s. This helps when difficult trade-offs arise later in design or budgeting.
3. Inventory of What You Have and What You Need
Create a list of what needs to be rebuilt, replaced, or improved.
Physical Inventory:
Lot size, orientation, and remaining structures or foundations
Existing utilities (gas, electric, sewer/septic, water lines)
Trees, retaining walls, or features worth preserving
Insurance documentation, site surveys, or pre-fire plans (if available)
Lifestyle Inventory:
How many bedrooms, bathrooms, or special spaces do you need now?
Do you work from home or need flexible rooms?
Are accessibility or aging-in-place features important?
What outdoor uses matter most—gardening, gatherings, or quiet space?
4. Align on Budget and Timeline
Documenting your priorities also means being honest about resources and timing.
Work with your architect to develop a “rebuild roadmap” specific to your project—a phased outline of costs, approvals, and milestones. Include:
Total budget range (construction, design fees, permits, contingencies)
Insurance payout schedule and gaps to be covered by savings or loans
Timeline targets: design, permitting, construction start and finish
Flexibility points: what can wait for a later phase if funds run short
Having this plan in writing keeps expectations realistic and transparent.
5. Translate Priorities into a Written Program
A Project Program is a concise document (often created by your architect) that summarizes your needs and values. It becomes the reference point for all design decisions.
A good program includes:
Summary of goals and guiding principles
Room list with approximate sizes and adjacencies
Site considerations (views, privacy, solar access, setbacks)
Performance goals (energy, materials, durability)
Aesthetic direction (styles, materials, color palette)
Emotional intentions (e.g., “a calm retreat,” “a gathering place,” “a modernized memory of our old home”)
You can supplement it with photos, sketches, or inspiration boards—these help communicate what words alone can’t.
6. Capture Decisions as You Go
During the rebuild, you’ll make hundreds of decisions. Keep them organized in one shared file or binder.
Suggested structure:
Design decisions: floor plan versions, elevations, materials
Budget updates: estimates, approved change orders, allowances
Correspondence: meeting notes, emails, permit submissions
Receipts and warranties: for future insurance and maintenance
Photos: site progress and final documentation
This record helps with insurance audits, resale value, and any future remodels. It also provides a roadmap for others in your community who may face similar journeys later.
7. Revisit and Revise Needs evolve during rebuilding.
Revisit your priorities at key milestones—after schematic design, after pricing, and before construction—to ensure they still reflect your values and circumstances.
Documenting these shifts builds transparency between you, your architect, and your builder.
8. Why it Matters
A clear record of your needs and priorities does more than streamline design—it empowers you.
It ensures your new home reflects your goals, reduces misunderstandings with your team, and demonstrates to insurers and lenders that you’re rebuilding responsibly.
In communities where residents take this step together, shared documentation helps standardize resilient design practices, leading to faster approvals, better pricing, and improved collective safety.
B. Documenting Your Needs and Priorities for Rebuilding
Understanding the constraints on rebuilding clarifies:
a) what can be rebuilt
b) how much can be rebuilt
c) how long it may take to build.
State and local agencies often work to expedite their permitting processes after disaster and modify requirements to aid the rebuilding process. At the same time, they look at the causes of the disaster and attempt to enforce requirements that may mitigate a future event. In general, officials strive to alleviate burdens wherever possible and often continue to refine post-disaster recovery policies as they gather more information and feedback from the affected community. Together, existing requirements and disaster-related policies and adjustments make up a set of rules or constraints that will inform individual rebuilding efforts.
Like-for-Like Overall summary
If you choose to rebuild, many communities offer a like-for-like path that lets you replace what was legally there before based on your county’s assessors’ records, while meeting today’s codes for safety, energy, and resilience to natural hazards..
Your local jurisdiction’s Planning department or zoning office decides if your proposal matches what previously existed based on use, size, location, height, also what is allowable in the area per current regulation.. The Building department makes sure the new structure is built to current code.
Insurance often pays to replace your home with materials and features of “like kind and quality.” Upgrades required by new codes may need code-upgrade coverage.
Details vary by city, county, and insurer—use this information as a guide, then confirm locally with your local City/county/jurisdiction and insurance company as your policy will dictate rebuild.
1. What can “like-for-like” mean in practice?
A local Planning department may consider a rebuild “like-for-like” when most of the following match what was legally permitted before the fire (terminology varies by jurisdiction):
Same use (e.g., single-family home remains a single-family home).
Similar footprint/location on the lot (within setbacks and hazard zones). Check with your local planning department if your prefire structure was built within current development standards which may have changed since the original structure was built. Development standards include required setbacks from property lines, step backs, massing, height, location of raised decks and balconies. Most Like-for-Like rebuilds may be allowed to rebuild on the same footprint but will not be allowed to project into existing setbacks. Check with your local Planning department.
Comparable height, bulk, and massing. Some communities allow small increases; others require the same envelope.
Similar floor area/volume. Some allow modest increases and deviations as long as they are proposed within the existing development standards.
Same number of stories (e.g., 1-story back to 1-story).
Same number of dwelling units/bedrooms No added units unless separately approved. In some cases, accessory dwelling structure or units may be allowed to be built.
Similar counts of “plumbing fixtures” and
parking if those were regulated.
No new encroachments into setbacks, easements, or protected areas.
Meets current codes for structure, energy, fire, and wildland-urban interface (WUI).
Examples: After recent fires, Los Angeles County and Malibu created like-for-like programs that allow expedited review and, in some areas, up to ~10% increases in height/area/volume when other criteria are met. Your city or county may define this differently.
2. Planning & Zoning, Building & Safety, Fire, and Public Health: Who Decides What
The permit approval process typically requires review by multiple departments responsible for different aspects of construction. The different departments generally fall under the umbrellas of Planning & Zoning, Building & Safety, Fire, and Public Health. The departments that review your project are dependent on its specific requirements, location, and scope.
Planning & Zoning
Planning and Zoning is typically the first department review of a project. However, it may also occur concurrently with other department reviews, depending on the city or county. Planning & Zoning is largely focused on the overall size, height, and placement of buildings. Additionally, this department may review vehicular and pedestrian access to the project, the programmatic site components (i.e., garage, site walls, or pools), landscaping, or parking. These elements are reviewed with consideration of a project’s relationship to its immediate neighbors, the neighborhood zoning (i.e., residential, retail/ office, or manufacturing), neighborhood character, or environmental considerations such as noise.
• Check with your County (or City/town/ agency) assessor’s office to obtain legal title for your property and to obtain information on what was built, areas, number of rooms and bathroom, accessory structure etc.
• Your local jurisdiction may have a “Records” office and may keep records of permitted plans. Many jurisdictions have
online records freely available to the Community that provide property and structure information. Confirm the legal status of what was there (use, square footage, height, siting, bedrooms, fixtures, etc.).
• Determines what increases are allowed or if you must apply for added approvals. Look for any special constraints the property may be subject to for rebuilding — for example on a hillside or near a coastal bluff.
• Many jurisdictions offer expedited or special permit tracks for fire survivors.
Building (Construction Codes)
Building & Safety reviews a project to verify its compliance with building code requirements meant to ensure a building’s stability and safety. The typical areas of focus include the assembly of building materials, building structure, the configuration and location of rooms, spaces, and openings, and electrical, plumbing, and air conditioning systems. Considerations include confirmation that a building is structurally sound, weatherproof, and, in case of emergencies, can be exited safely and quickly. Additionally, Building & Safety will verify that a building’s design includes essential components such as restrooms and kitchens, and that they are sufficiently sized and organized to support their uses.
• Even if the layout is “like-for-like,” the new construction must meet today’s codes: structural, seismic, energy, electrical, mechanical, plumbing, fire-resistance, defensible space, ember-resistant vents, Class-A roofing, etc.
• Partial repairs (not a full rebuild) may be reviewed under the Existing Building Code rules; a full replacement is usually reviewed as new construction under the current Building Code.
• Many jurisdictions waive some or majority of the fees required for their review and approvals of the plans for issuing permits for rebuilding.
Fire
The Fire Department will review a project to confirm that it can be accessed by emergency vehicles when needed. Depending on the location and site, it will also review a project to ensure that it has appropriate fire mitigation systems, such as sprinklers, and that the landscape and planting for the project are appropriate in fire-prone areas. The extent of a Fire Department review is dependent on where a project is located, the existing street access to the project, access to water, and the size and configuration of the property and buildings.
Public Health
The Public Health department reviews projects that include systems that require periodic oversight and maintenance to ensure ongoing safety for the public. Examples include septic systems or commercial kitchens. Septic systems are common in residential rebuilds in rural areas where municipal sewer systems are unavailable or in suburban areas where municipal systems are impractical. In these cases, Public Health will review the design of the septic system to make sure it is sized to support the project. Once these systems are constructed, Public Health also verifies that the
system is maintained as needed to remain in good working condition.
3. Insurance Terms You May Hear. Check with your insurance company the terms for Rebuilding which can be specific to your Policy.
Replacement Cost Value (RCV): Pays what it takes to rebuild with like kind and quality up to your policy limits.
Extended/Guaranteed Replacement Cost: Some policies add a percentage above your stated limit and these terms may vary based on your specific policy.
Ordinance or Law (Code-Upgrade) Coverage: Pays for required upgrades so your rebuilt home meets current codes (often separate and limited).
Example: In California, state law requires that replacement-cost policies include at least 10% additional building code upgrade coverage as separate, additional coverage (Cal. Ins. Code §10103(c)).
4. What Usually Can Change Without Losing “Like-For-Like” (Always confirm locally before starting design with your Architect or design-build team.)
Resilient, safer, code-compliant materials (e.g., Class-A roof, tempered glazing, ember-resistant vents, ignition-resistant siding or façade systems).
Energy‑efficient systems (e.g., higher-performing insulation/windows, heat pump HVAC, heat-pump water heater).
Interior layout changes that do not increase area, height, stories, bedroom or bathroom
counts unless allowed by the local jurisdiction. Determine what changes are allowed by your insurance policy.
Non‑structural finishes and fixtures of similar quality.
5. What usually breaks “like-for-like” and triggers added approvals
Bigger changes: significant increases to square footage, height, stories, or bedroom/ unit count.
New or different use (e.g., adding a second dwelling unit or converting to mixed-use).
Relocating the building to a new area of the lot that conflicts with setbacks, slope limits, easements, height, or view protections.
Encroaching into setbacks or protected areas that weren’t previously legal.
Major grading or hillside work beyond what’s allowed administratively.
A simple step-by-step
1. Contact Planning/Zoning early; ask about like-for-like and any deadlines for preserving prior rights/nonconformities.
2. Confirm what was legal on your property (use, area, height, siting).
3. Request your insurer’s scope in writing: RCV, extended %, code-upgrade limits, Additional Living Expenses (ALE).
4. Debris removal & site safety (follow local program and testing).
5. Hire your design team (architect/engineer) and schedule a pre-design or pre-submittal meeting with the City/ County office .
6. Choose your path: like-for-like vs. like-for-like-plus (if allowed) vs. new approvals.
7. Submit Planning verification (if required) and Building permit drawings.
8. Coordinate inspections; keep insurer updated on code-required upgrades.
9. Rebuild to current code; document all decisions for your claim file.
Common Pitfalls (and Fixes) Other important things to know
Under-insurance: Your policy limit may be too low to rebuild today.
Fix: Ask for a current replacement cost estimate and review extended and code-upgrade limits.
Assuming old nonconformities carry over: Many places set deadlines to retain prior siting/height rights.
Fix: Contact Planning early and get dates in writing.
Confusing “repair in-kind” with “rebuild like-for-like”: Small, non-structural repairs are often “in-kind”; a full replacement is reviewed as a rebuild and must meet current code.
Fix: Ask the Building Official which code path applies.
Skipping documentation: Without proof of what existed, you may lose eligibility for the simplest path.
Fix: Gather records now; your city can help research.
Not budgeting for code upgrades: If your policy lacks Ordinance or Law coverage, required upgrades may be out-of-pocket.
Fix: Clarify coverage before you draw or finalize plans.
Deadlines & nonconforming rights: Many cities/counties only preserve prior setbacks/height rights if you apply within a set window (often 1–3 years).
Hazard-area overlays: If your site is in a Very High Fire Hazard Severity Zone (VHFHSZ in California), floodplain, hillside overlay, or coastal zone, expect extra requirements (defensible space, slope stability, fire sprinklers).
Debris clearance: Permits typically require hazardous debris removal and soil testing to be certified before rebuilding can start.
Temporary housing: ALE coverage is time-limited. Rebuilds often take longer than 24–36 months—plan for housing beyond insurance.
Financing gaps: Insurance may not cover 100% of today’s rebuild cost. Explore SBA loans, grants, or private financing.
Resilience upgrades: Code is the minimum. Voluntary upgrades (metal gutters, ignition-resistant fencing, exterior sprinklers etc) can reduce risk long-term.
Community resources: Many counties run Rebuild Permit Centers or disaster rebuild desks for fire survivors—ask if one exists.
This information is general. The exact definition of like-for-like—and what’s allowed without extra approvals—is set by your local Planning and Building departments and by your insurance policy. Start by talking to your city/county, then align your design and insurance claim with those local definitions.
C. Your Rebuilding Options –Approach and Team
Rebuilding will involve multiple parties, each with their own expertise and responsibilities. Begin with taking the time to understand your delivery options and the roles of each team member. Choosing the right team and the right approach for your individual needs will help you manage cost, schedule, and quality, while also reducing stress during what can otherwise be an overwhelming process.
Key roles in your rebuild team:
Property Owner (You)
Ultimately responsible for decision-making, financing, and approvals. You set the goals for cost, schedule, and design priorities.
Owner’s Representative (Optional) Represents the Owner in overseeing design, construction, budgeting, and scheduling. Ensures that project objectives are achieved and serves as a liaison between the owner and the project team.
Architect/Design Team
Guides you through the process of translating your needs and goals into a design that is code-compliant, resilient, and tailored to your property. Coordinates with engineers (structural, civil, mechanical, electrical) as needed. A licensed individual is required for complex homes, hillside properties, and multifamily residences (non-exempt). They are recommended for full-service
support and legal compliance for non-complex (exempt) homes.
Contractor/Builder
Responsible for executing construction per the construction documents. Depending on the delivery method, the contractor may be brought in early for input or later to bid and build. A Class B General Building Contractor license is required for new construction projects.
Engineers and Other Consultants
Structural engineers, geotechnical engineers, energy consultants, and landscape architects may be necessary depending on the complexity of your site and your goals for rebuilding.
Local Authorities
City or County Building Officials will review and approve plans, conduct inspections, and ensure compliance with safety and environmental codes.
Delivery Methods, Roles & Responsibilities
Rebuilding is not a one-size-fits-all process. There are several ways to organize the delivery of a building project. Each method defines the contractual relationship between the property owner, the architect/design team, and the builder/contractor.
The most common delivery methods for residential rebuilding include:
A. Design-Bid-Build (Traditional Method)
In this method, you work with an architect (or design professional) to create a full set of drawings and specifications. These documents are then sent to multiple contractors who provide competitive bids.
Roles and responsibilities:
• Owner: Oversees budget, approves design documents and construction changes, and makes decisions based on the architect’s recommendations.
• Architect/Designer: Prepares construction documents, ensures compliance with codes, acts as the owner’s representative during construction, and administers the construction contract (including reviewing submittals, observing construction, and certifying payments).
• Contractor: Executes construction according to the design/construction documents.
Advantages: Clear separation of roles, competitive pricing, strong checks and balances between architect and contractor.
Disadvantages: Longer timeline, less flexibility once construction begins, potential for conflicts between design and construction.
B. Design-Build
Here, one entity (a design-build firm) provides both design and construction services. You sign a single contract with this team, and the firm is responsible for both design and construction, and the owner’s approvals are typically at key milestones, not continuous micro-management.
Roles and responsibilities:
• Owner: Provides vision, priorities, and budget; approves design and materials.
• Design-Build Firm: Serves as both designer and builder; responsible for planning, permitting, and construction coordination.
Advantages: Streamlined communication, potentially faster timeline, single point of responsibility.
Disadvantages: Less opportunity to competitively bid construction costs, less independent oversight between designer and builder. Suggest engaging an Owner Representative to provide an independent, third party oversight to ensure Owner’s interests are represented.
C. Construction Manager at Risk (CMAR)
In this method, you hire a construction manager early in the design phase, who works alongside the architect to provide cost and constructability input. Once the design is complete, the CMAR commits to a guaranteed maximum price (GMP) and oversees construction.
Roles and responsibilities:
• Owner: Sets objectives, approves budget, and participates in key decisions.
• Construction Manager: Advises on design feasibility, manages contractors, and ensures construction meets agreed-upon specifications.
• Architect/Designer: Works closely with the CM to align design with budget and constructability.
Advantages: Early cost input, collaborative approach, potential for fewer surprises during construction.
Disadvantages: May be more expensive than competitive bid methods, requires a strong relationship of trust between owner, architect, and construction manager
Choosing the Right Approach for You
Every property owner will have different priorities. Some may prefer speed, others cost certainty, and others may place the highest value on quality and resilience. There is no single “right” method, but rather a range of options that you should evaluate with your design professional early in the planning process.
FF&E
1. Understanding FF&E
FF&E stands for Furniture, Fixtures, and Equipment—the movable and built-in items that make your house functional and livable once construction is complete.
It includes:
• Furniture: beds, sofas, tables, chairs, electronics
• Fixtures: lighting, plumbing fixtures, built-in cabinetry, window coverings
• Equipment: appliances, electronics, security systems, HVAC controls
FF&E represents a significant portion of the project budget and directly affects how your home feels and functions. Planning for it early helps avoid surprises, cost overruns, and mismatched finishes.
2. Begin Planning Early
FF&E decisions are often postponed until the end of construction—but that’s a mistake.
Your architect and interior designer should help you think about furnishings and equipment during schematic design, not after walls are built.
Early planning allows you to:
• Coordinate power, plumbing, and data connections for appliances, lighting, and smart systems.
• Size rooms appropriately for furniture layout and circulation.
• Plan storage and built-ins that reduce clutter and improve fire safety.
• Align finish selections for a cohesive look and consistent maintenance. Documenting FF&E selections early also helps your builder price the project more accurately.
3. Establish an FF&E Budget and Inventory
Create a dedicated FF&E budget separate from construction costs.
Even in an insurance-funded rebuild, allowances for furnishings may be limited—knowing your replacement costs helps you prioritize.
Your architect or designer can help you track these items in a FF&E schedule—a spreadsheet noting quantities, finishes, lead times, and vendors.
4. Procurement and Lead Times
FF&E procurement is often where delays occur— especially after natural disasters when demand spikes. Start early and confirm realistic lead times for each item.
You have two main procurement options:
A. Owner Procured FF&E
You or your designer purchase furniture and fixtures directly from vendors.
• Offers flexibility and cost control.
• Requires careful scheduling so deliveries align with site readiness.
• You are responsible for warranties and logistics.
• Some designers can obtain discounts with specific vendors to reduce your costs, make sure you understand if they are keeping any of this savings or passing along to you.
B. Contractor Procured FF&E
Your general contractor purchases and installs items as part of their contract.
• Simplifies coordination and installation.
• Typically includes markup for management and warranty coverage.
Either way, keep a procurement log listing order dates, tracking numbers, expected delivery, and installation timing.
5. Installation, Documentation and Warranties
Your contractor is responsible for correct coordination and installation of FF&E per your selections and specifications of your architect. Hold a punchlist walk for FF&E specifically, ensuring everything is installed correctly and in good condition before move-in.
FF&E comes with its own set of warranties, care guides, and serial numbers–if your contractor procures your FF&E, make sure to get this from them. Create a digital “Home Manual” to store:
• Product data sheets
• Finish care instructions
• Warranty expiration dates
• Vendor contact information
• Installation photos for reference
This documentation helps with insurance claims, maintenance, and future upgrades.
6. Safety and Resilience in FF&E Choices
Post-fire rebuilding is a chance to choose materials that perform better under stress and support long-term safety:
• Use fire-retardant fabrics and noncombustible materials for furniture and drapery, and review product information so you can make informed choices about fire safety and material health considerations.
• Select low-VOC finishes and adhesives to improve indoor air quality.
• Favor durable, repairable pieces instead of disposable furniture.
• Anchor heavy furniture to walls in seismic zones.
• For outdoor areas, use metal, stone, or composite furnishings resistant to embers and UV degradation.
These decisions not only enhance resilience but can also help maintain insurance compliance.
Design Considerations for Rebuilding
Rebuilding after a fire is complex — emotionally, technically, and financially. Work closely with your architect from the very beginning to guide design, permitting, and coordination with engineers, builders, and local agencies. A thoughtful architect will help you navigate codes, fire zone requirements, and resilient strategies specific to your site and budget.
Communities that rebuild with resilience and foresight—using ignition-resistant materials, defensible landscapes, and energy-independent systems—often find that they not only recover faster but also become more attractive to insurers, face fewer coverage challenges, and reduce long-term risk of loss in future disasters.
A. Start with Resilience in Mind
Rebuilding after a fire isn’t just about replacing what was lost — it’s an opportunity to build smarter, safer, and stronger. “Resilience” means designing a home and community that can better withstand future fires or disaster events and recover faster when disaster strikes.
There are a large number of resources available to provide guidance on materials and systems selections, approach to site planning and landscape design, and community resilience. You can find some of these with QR code links on the following pages.
California Building Code (CBC) Chapter 7A –Materials and Construction Methods for Exterior Wildfire Exposure
Ready, Set, Go! Program – LA County Fire Department
FEMA Home Builder’s Guide to Construction in Wildfire Zones
Insurance Institute for Business & Home Safety (IBHS) – Wildfire Prepared Home™ Program
AIA Disaster Assistance Handbook
USGBC CA: Wildfire Rebuilding Guide
Refer to Section 5 for links to these resources.
B. Looking Ahead: Designing for the Future
Beyond designing for disaster resilience and mitigation, it’s also worthwhile to take this opportunity to think about long-term flexibility and adaptability as well to allow for your property to change as your needs change over time.
Some of these ideas include:
• Use modular or flexible layouts to simplify future retrofits.
• Plan for microgrids, EV charging, and smart home systems.
• Select durable, maintainable materials for long life cycles.
• Consider landscape recovery with native, drought-tolerant species.
C. How to find Reputable Professionals
In building your team for your rebuild, you will want to choose professionals who are licensed, reputable, and have experience in delivering the type of project you are looking to build. In order to find licensed professionals in the State of California, you can check the two major licensing bodies for architects and general contractors:
California Architects Board: https://www.cab.ca.gov/cons/archs/lic_search. shtml
Contractor’s State Licensing Board: https://www.cslb.ca.gov/onlineservices/checklicenseII/checklicense.aspx
While it is not required to use a licensed architect for rebuilding, it is highly recommended as these professionals are required to maintain ongoing continuing education, bringing best practices and modern knowledge of design approaches as well as to comply with a strict standard of ethics. You may also be approached by general contractors who are not licensed, or may be licensed but do not have full bonding and insurance–make sure to check all three as this protects you from both financial and legal liabilities in your rebuild.
The California Architects Board also has a wonderful guide on how to hire an architect: https://www.cab.ca.gov/docs/publications/consumers_guide.pdf
D. How to Contract with Your Team
No matter who you decide to work with as part of your rebuild process, it is critically important that you have a contract in place with all parties, from your design professional or architect to your general contractor, any engineers, and landscape architects, etc. Having a contract in place ensures that all parties have aligned expectations on what will be delivered and for what cost and terms, and it helps to minimize the risk that you will be taken advantage of as a consumer.
The AIA has standard agreements that are industry-accepted by not only architects, but also clients, builders, and subconsultants. You can find these here, and we recommend reviewing them even if you do not use them as a reference for the content, quality, and reasonableness of contracts: https://aiacontracts.com/
Your architect, engineer, or contractor should be able to provide you with a contract, and you should review it thoroughly. If you don’t understand the contract or feel uncomfortable with it, you can submit a request through the Ask an Architect program to help you review and understand the contract, or you can also have a lawyer review it with you.
At minimum, your contract should outline the cost/fee for the contract period, the services and deliverables expected, the duration of the contract, and termination for both parties. You should have the right to terminate the contract if needed, in a manner that is fair and equitable to both parties.
Refer to Section 5 for links to these resources.
Typical Right of Entry Form issued by the ACOE page 10
https://file.lacounty.gov/SDSInter/lac/1176418_Opt InForm.pdf
SEAOC memo page 11
https://www.seaosc.org/News/13468805
Example of the Los Angeles County Fire Rebuild Report page 14
Example of a Survey Document page 15
SBA Disaster Assistance page page 20
https://www.sba.gov/funding-programs/disaster-assistance
SB-9 Legislation page pages 21 and 22
https://leginfo.legislature.ca.gov/faces/billNavClient.xhtml?bill_ id=202120220SB9
California Building Code (CBC) Chapter 7A – Materials and Construction Methods for Exterior Wildfire Exposure
https://www.hcd.ca.gov/building-standards/state-housing-law/wildland-urbaninterface/docs/2010-part-2-cbc-ch7a.pdf page 38
Ready, Set, Go! Program – LA County Fire Department
https://fire.lacounty.gov/rsg/ page 38
FEMA Home Builder’s Guide to Construction in Wildfire Zones Insurance Institute for Business & Home Safety (IBHS) – Wildfire Prepared Home™ Program
https://www.fema.gov/sites/default/files/documents/fema_building science_builders guide construction wildfire zones_p 737.pdf page 38
AIA Disaster Assistance Handbook
https://www.aia.org/resource-center/disaster-assistance-handbook
USGBC CA: Wildfire Rebuilding Guide
https://usgbc ca.org/california wildfire rebuilding guide/ page 38
AIAPF Webinar on “How to Engage with a Design Professional” hosted in partnership wtih LA County Recovers
https://recovery.lacounty.gov/events/how-to-engage-with-a-design-professional-virtual-workshop/ page 38
The AIAPF Homeowner’s Predesign Worksheet
https://aiapf.org/For-Homeowners page 39
California Architects Board: https://www.cab.ca.gov/cons/archs/lic_search.shtml page 39
Contractor’s State Licensing Board: https://www.cslb.ca.gov/onlineservices/checklicenseII/checklicense.aspx page 39
The California Architects Board also has a wonderful guide on how to hire an architect:
https://www.cab.ca.gov/docs/publications/consumers_guide.pdf page 39
Ask an Architect: AIA in California (form)
https://docs.google.com/forms/d/e/1FAIpQLSegVA7XjVJSK46nq4ioS2g5M1tN9vVPACANI9QtXUgCUTj_ig/viewform?usp=header page 39