5 minute read
The Completion Backwards Principle


BY JIM MATHIS
Ikeep reading about the “Reverse Sear” method for cooking steaks, chops and even roasts. The idea is simple; you start by cooking the protein at a low temperature to reach your desired doneness, then finish with a quick blast of high heat to sear the outside. It’s the opposite from what most of us do; start with a hot sear, then lower the cooking temp until the inside reaches the right temp. Being an old dog, I’m sometime slow to learn new
Advertisement
tricks, so I hadn’t jumped on the bandwagon.
I hadn’t until one dreary Sunday. On that day, the prospect of standing in the rain grilling a steak had little appeal, so I decided to give the reverse sear a shot. And like many of my adventures in the kitchen, I look to a few sources for reliable information; the always informative and entertaining Alton Brown and the wellresearched Cook’s Illustrated. Both had sage advice for the novice

LOCALLYOWNED NEW ARRIVALS DAILY LATEST STYLES & TRENDS

STAY UP-TO-DATE ON
EVENTS, NEW ARRIVALS & PROMOTIONS
APRICOT LANE SIOUX FALLS THE SHOPPES AT LAKE LORRAINE 2524 S. LORRAINE PLACE
trying his first reverse sear, and were similar in their approach, but I went with Alton’s method.
Mr. Brown suggested starting with a 14-ounce ribeye, but in my case, I had a 14 -ounce Prime New York Strip...close enough! Following his instructions, I seasoned the steak on both sides with a couple of teaspoons of salt, and left it to rest for several hours on a rack in the fridge. This does a couple of things for the steak;


it adds the needed salt, and it helps to draw some of the moisture out of the meat, not enough to dry it out, just enough that when it cooks, it won’t steam itself.
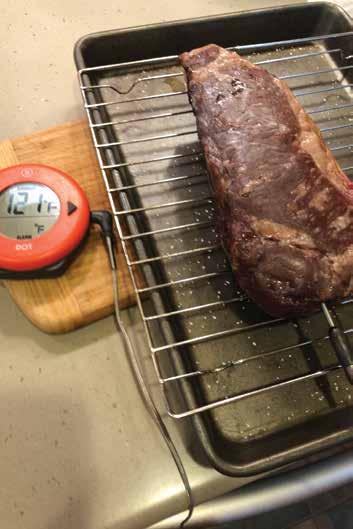
When it’s time to start cooking, insert a probe-style thermometer in the end of the steak so the tip is right in the middle of the meat, then set the alarm to 120 degrees. Pre-heat your oven to 200 degrees. Yes, just 200 degrees. You’re cooking this low and slow for now — the high heat will come later. Roast the steak until it reaches 120 degrees. It should take about an hour, depending on the thickness of the meat. When it hits 120 degrees, the inside

of the steak will be on the rare side of medium-rare. Let it rest for a good 10 minutes, leaving the probe in place so the juice doesn’t run out and you’ll see the temp continue to increase a few more degrees, right up to the perfect medium-rare.
In the meantime, heat up your favorite cast iron or carbon steel pan over high heat. You’re looking to get it up to about 600 degrees, so this could take all of the 10 minutes. If you’ve happen to have an infrared thermometer, this would be a perfect chance to show it off, if not, you can tell if the pan is hot enough when a drop of water in the pan evaporates in less than 5 seconds. When your pan is hot, rub each side of the steak with a teaspoon of good neutral oil, like peanut or canola.
Now here’s where I should tell you what Alton Brown did not tell me; when you start to sear the steak on the screaming hot pan, it will smoke like crazy! If you’ve got an industrial range hood, crank it up. If not, open windows and have your spouse prepared to unplug the smoke detectors! OK… you’ve been warned.
Now it’s time for that reverse sear you’ve heard so much about. Using a stopwatch or timer, sear each side on the 600 degree pan for just 45 seconds. Yep, just 45 seconds is all it takes to create a beautiful, crusty sear. It’s the Maillard reaction; that wonderful, flavorful chemical transformation when sugars and amino acids are transformed and turn brown and make things taste so darned good! In this case, those short stints at high-heat bring this reaction to your plate.
About that smoke… on my second attempt at the reverse sear, I took that part outside. I heated my cast iron griddle on the gas grill to 600 degrees and when I was ready to sear, I stepped outside for a couple of minutes and left that smoky mess on the patio. This will be my go-to method in the future; lesson learned!
Once you’ve seared the meat, let it rest another 5 minutes or so and you’re ready to slice and eat. I served the steak shown in the photos with the last of the local asparagus and some mushroom risotto. That is just about a perfect meal if you ask me.
After a couple of tries, what do I think of the reverse sear method? I’m glad you asked. I have mixed feelings. It takes more time and planning than just throwing a steak on the grill. The flavor was good, the seared crust was nearly perfect and it is certainly the most reliable way I’ve found to be able to control the doneness of a steak and achieve that perfect temperature across the whole steak. But, I had mixed results on the steaks I tried. One was perfectly juicy and tender, the other pretty tough. I think I just got a bad steak on the second one. I will try it again, and while I think I’ll stick to grilling on most sunny warm summer days, this could become my go-to method for cooking steaks in the winter. And I’m anxious to try this method with other cuts of meat. Stay tuned!
Do yourself a favor, eat something good today.
When Jim’s not searching for the perfect way to cook a steak, he runs ADwërks, an advertising and marketing communications agency in Downtown Sioux Falls.