5 minute read
Generate an App Installer file


<UpdateSettings> <AutomaticBackground /> </UpdateSettings>
Code Listing 59
Advertisement
With this configuration, Windows will check for updates in the background every eight hours, regardless of when the user has last launched the application.
An App Installer file is nothing more than an XML file, so you can manually create it following the guidelines included in the official documentation. You will be able to reference not only main MSIX packages, but also dependencies and modification packages. This way, the user will automatically install everything required by the application to run as expected.
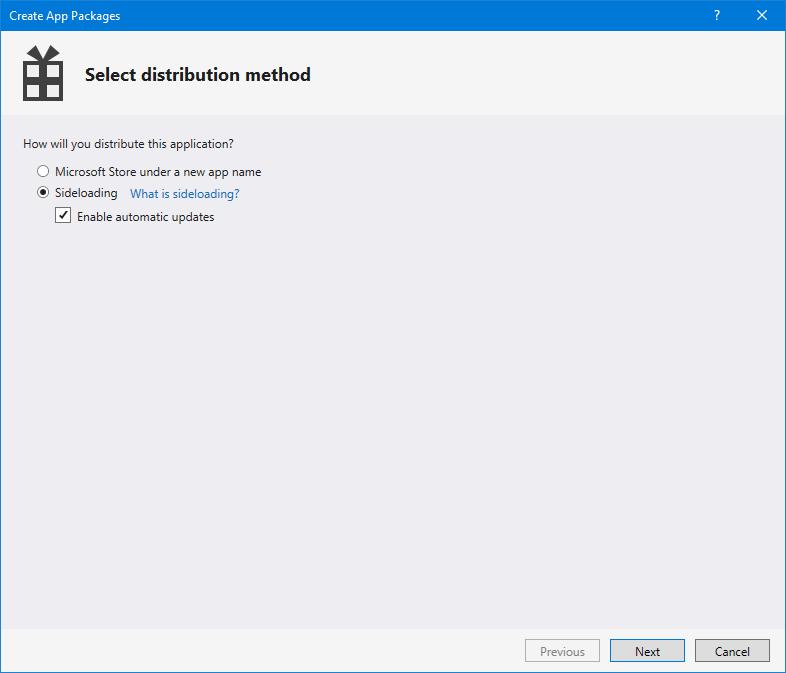
Visual Studio can help you by generating an App Installer file for you during the package creation wizard, which you can trigger by right-clicking the UWP or Windows Application Packaging Project and choosing Store > Create app packages. As the first question, you’re asked if you want to create a package for the Store or for sideloading. In the second scenario, you can select the check box called Enable automatic updates.
Figure 88: The option in Visual Studio to create a package for sideloading with automatic updates
Once you enable this option, you will have the opportunity to specify the URL where the package will be deployed (it can be a web URL or a file share path) update frequency.
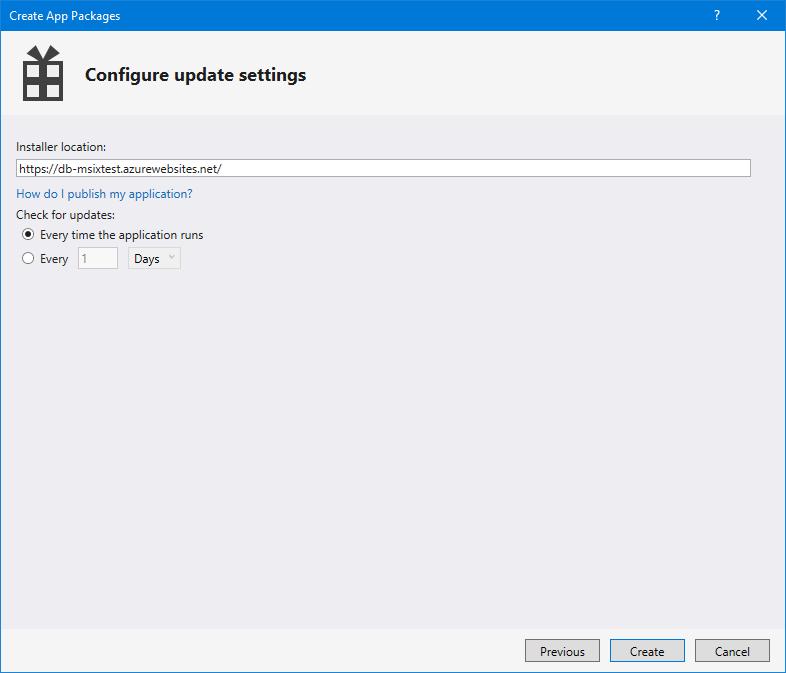
Figure 89: The option to configure automatic updates during the package creation wizard
At the end of the process, Visual Studio will generate, in addition to the folder with the package, a file with an .appinstaller extension and a default HTML page with a link to install it using the ms-appinstaller protocol.

Figure 90: Visual Studio when you create an MSIX package for sideloading with the automatic check for update feature enabled

Figure 91: The page generated by Visual Studio to install the MSIX package using the ms-appinstaller protocol
The wizard has a downside, however. You can specify only a few options, like the update frequency and the installer location. What if you want to enable one of the new features we have just explored, like the ability to show a prompt or to mark an update as critical? You would need to manually edit the generated App Installer file after the package creation has been completed. However, this approach has many downsides, especially if you’re planning to include an automation system (like a CI/CD pipeline, as we’re going to see in Chapter 8) in order to automatically deploy the generated package.
Starting from Visual Studio 2019 version 16.2, you have the opportunity to add an App Installer template to your project, which you can customize. The relevant information (like the installer URL and the package identity) will be replaced at runtime during the package creation. To add a template, right-click your Windows Application Packaging Project (or directly in the UWP one, if it’s a full UWP application) and choose Add > New item. You will find a template called App Installer.
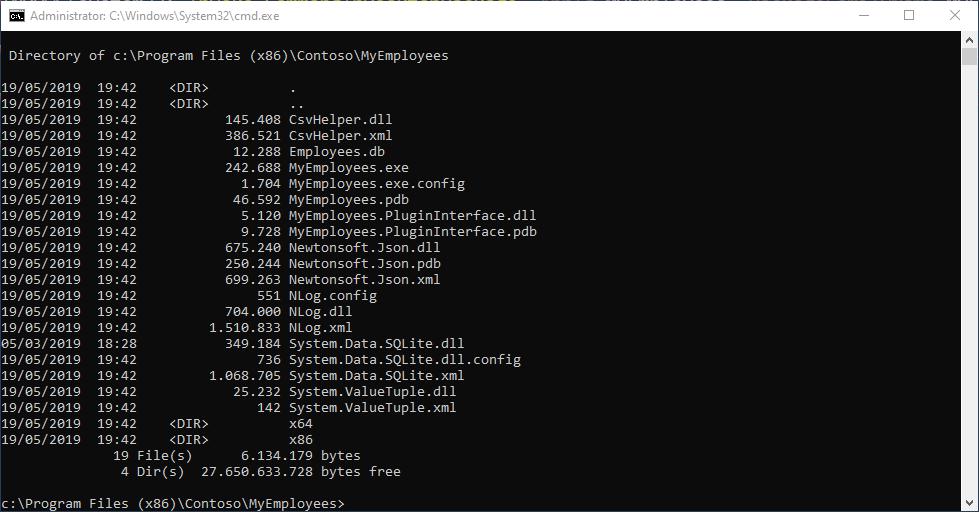
Your task will be to copy the contents of this folder to your website or file share path. Your users will just have to open the URL to see the webpage and trigger the installation of the application. The generated HTML page contains some useful information, like the app version, the publisher, and the logo based on the application’s assets.

Figure 92: The template to generate an App Installer file
The file will look like the following.
Code Listing 60
<?xml version= "1.0" encoding= "utf-8"?> <AppInstaller Uri= "{AppInstallerUri}" Version= "{Version}"
xmlns= "http://schemas.microsoft.com/appx/appinstaller/2018">
<MainBundle Name= "{Name}" Version= "{Version}" Publisher= "{Publisher}" Uri= "{MainPackageUri}"/>
<UpdateSettings> <OnLaunch HoursBetweenUpdateChecks= "0" /> </UpdateSettings>
</AppInstaller>

Figure 93: Visual Studio informs the user that an App Installer template is included inside the project
Another option is to leverage an open-source project created by Microsoft, called MSIX Toolkit, which includes many helpers to facilitate the work of IT pros and developers who are adopting MSIX. Among the tools, you will find one called AppInstaller File Builder, which provides a convenient user interface to generate an App Installer file.
As you can see, all the custom information is included with a placeholder, like {AppInstallerUri) or {Version}. These values will be replaced during the package generation, with the ones that are set in your manifest and that you have specified during the wizard. This way, you can customize the configuration (for example, by adding the ShowPrompt attribute to the OnLaunch item) and let Visual Studio automatically generate the correct App Installer file when you create a new MSIX package.
You will notice that the template is correctly recognized because, when you try to generate a new package, you will see the following notification in the wizard.

Figure 94: The AppInstaller File Builder tool
In the Main Package section, you can manually fill in all the information about the main application, or just click Get Package Info and choose the MSIX package you want to deploy from your hard disk. The tool will automatically retrieve all the relevant information from the manifest and fill the various fields.
In the second area, you can turn on the automatic check for updates feature. Based on the Min OS Version value you select from the drop-down list, you will see different options, since not all the features are supported by all the Windows 10 versions.
The Advanced section of the tool can be used to configure the various additional packages that are supported to be deployed together with the main one: optional packages, modification packages, related packages, and dependencies. All the various sections work in the same way: you can manually fill the various fields, or you can select the MSIX package and the tool will extract all the relevant information from the manifest.
Once you have completed the configuration, you can click Review to reach the final stage, where the tool will summarize all the options you have selected. Just click Generate to choose a folder on your computer where the App Installer file will be generated.